Artists know that first of all it is necessary to prepare an easel. It can be made by hand according to drawings with dimensions. If you do not prepare the workplace correctly, do not arrange the necessary accessories in a convenient angle, then it is difficult to work productively.
This happens because the artist will have to be distracted from work to get paints, brushes, paper. Organization of the workplace is of key importance.
Purpose and types of easels
An easel is needed to place the canvas on it, which is intended for painting. The lighting falling on the future painting is important for the choice of color.
Easels vary in type and have different tilts.
Types of canvas support:
- stretcher;
- floor or tabletop;
- machine;
- lyre;
- sketchbook or tablet;
- tripod.
Each type of canvas stand has its own purpose:
| Name of the easel | Who and what is it suitable for? |
| Stretcher or clapperboard |
|
| Lyra |
|
| Easel or studio easel |
|
| Tripod |
|
| Sketchbook |
|
| Desktop | They are used by children and teenagers, that is, those who have just begun to learn about painting. |
| Transformer |
|
Drawings with dimensions are the main attributes in making an easel with your own hands to get an easy and simple installation with reliable fixation.
Many parents make easels out of cardboard for their children. But this option is only suitable for a 5-year-old child.
If the future artist is over 7 years old and seriously intends to engage in this art, then a real easel is purchased. Otherwise, the child may lose the desire to create because he will not feel surrounded by the necessary accessories that a real artist uses.
Rules for choosing an easel design
A child should not develop a negative attitude towards this type of art from an early age due to an incorrectly chosen easel.
Therefore, it is recommended to pay attention to the following parameters:
- height;
- stability;
- secure fixation;
- flat board.
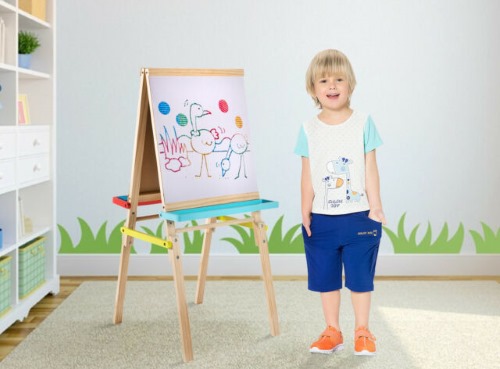
You should not buy a stand that is too small or, conversely, too high. Otherwise, it will be uncomfortable for the child to do his favorite thing with such an object. The main thing is that the little artist can work both sitting and standing.
The canvas stand should be well fixed. It should be made of environmentally friendly material, such as birch wood. Plastic easels break too often and quickly become unusable.
If there are more than two children in the family, it is better to make or buy a two-sided easel. You can make surfaces that differ from each other in color and execution. For example, make one board for drawing with chalk and a dark color, and the board on the other side for playing with magnets or drawing with markers.
For adult beginner artists, a tripod is a good choice. It is lightweight and easy to carry around in case you have to paint at a friend's house.
Professionals choose easels based on their needs and preferences for tools., which they use during work. Also, the choice of a professional depends on financial capabilities, love for one of the types of creativity, be it still life, landscape or portrait.
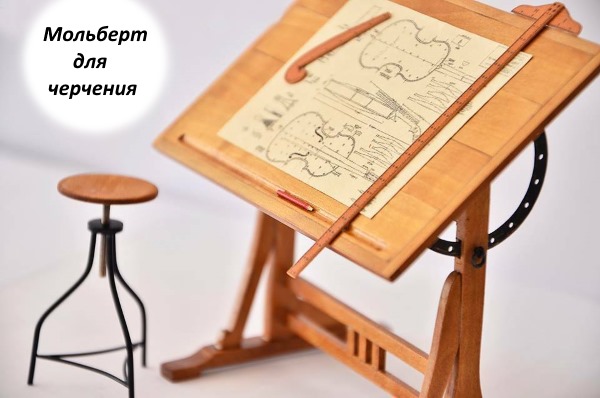
There is another category of people who use easels. These are draftsmen. They buy special studio stands for canvases, with clamps, special compartments for tools, and an angle of inclination. These are large easels for A3 sheets, on which the design engineer draws the necessary drawing.
Materials and tools for making an easel with your own hands
To make an easel with your own hands at home, you will need the following tools:
- self-tapping screws;
- anchors with nuts;
- saw;
- strap;
- sandpaper;
- drill or screwdriver;
- hammer;
- screwdriver;
- wooden beam;
- drawings according to which the canvas stand will be created.
Tabletop easel
When making a tabletop easel, it is important to consider the height of the artist and the size of the paper he will be using.
In order to make this type of easel with your own hands, you do not need to draw the drawings yourself. They will be presented below.
A person will need the following materials:
- screwdriver;
- wooden beam, preferably dry, wood - pine;
- slats;
- plywood sheet;
- piano canopy;
- wood saw;
- screws.
This stand can be converted into a children's drawing table in the future.
The easel made by hand (drawings with dimensions are shown in the picture) is made in stages:
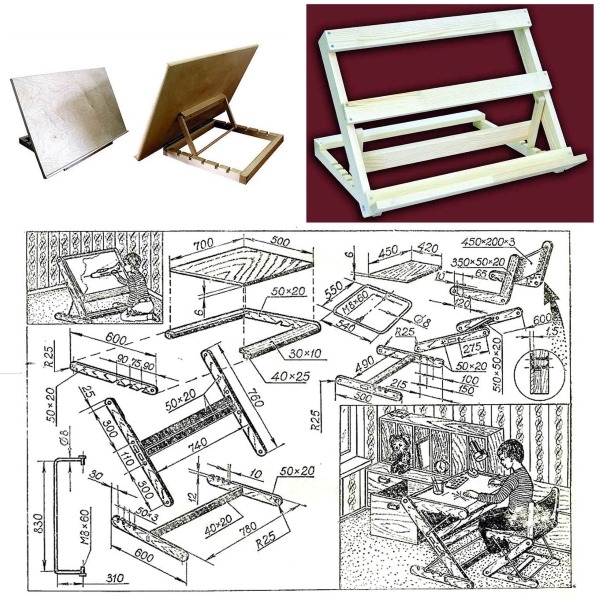
Manufacturing procedure:
- On two bars, make symmetrical cuts to tilt the plywood onto which the canvas will lie.
- Make a square from four bars. Place two bars where the notches are made parallel to each other and connect with screws.
- Prepare the plywood. Attach a beam to the center of the back of the sheet with screws, to which a support is attached with a bolt and nut. The user will be able to insert it into any of the cuts made in the stand so that the user can give the canvas any tilt.
- The plywood sheet is fastened to the square stand using a piano canopy.
Children's for drawing
When making a children's easel for drawing, you must not forget about a shelf for paints and brushes, so that the child does not have to constantly be distracted by searching for them. The tool and requirements for wood are the same. You can make an easel with your own hands (drawings with dimensions for children are shown in the figure) without having experience working with wood.
Manufacturing steps:
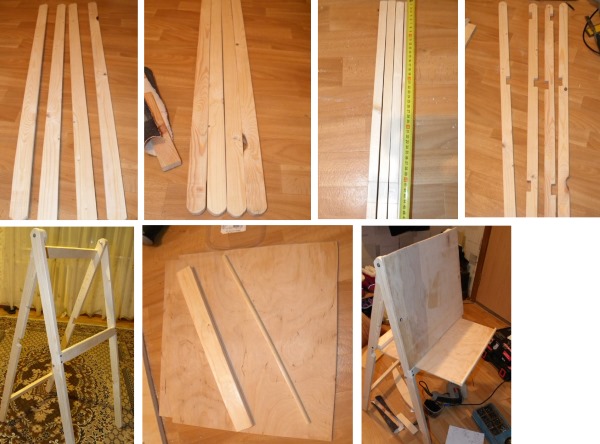
- Take four 1 m bars. Cut off the corners. Sand with sandpaper.
- Assemble them together and drill a hole 15 cm from the end of the beam on either side. Fasten with a long bolt for the time being.
- Measure 44 cm on 4 bars from the start to the center. Make cuts on all four bars.
- Turn them over, measure the distance for the rear crossbar on two bars. Make a cut in the center on the other two bars.
- Measure the distance on the support leg to the top mark of the upper crossbar 6 cm, and from the bottom of the support leg to the lower crossbar 13 cm. Make a cut.
- Assemble the back and front supports together and secure with M6 bolts. Make the holes on the bars slightly smaller in diameter. If the user gets other easel sizes, then when assembling, it is necessary to adjust to the size of the back support.
- Now all that's left is to make a shelf for paints and brushes and attach the base - a sheet of plywood on which the canvas will lie. Take a 40x40 cm sheet and screw it onto the beams. Make a small border from the glazing bead so that the brushes don't roll onto the floor.
- Take another sheet of plywood and attach it to the front support with screws. Cut off all excess and sand with sandpaper.
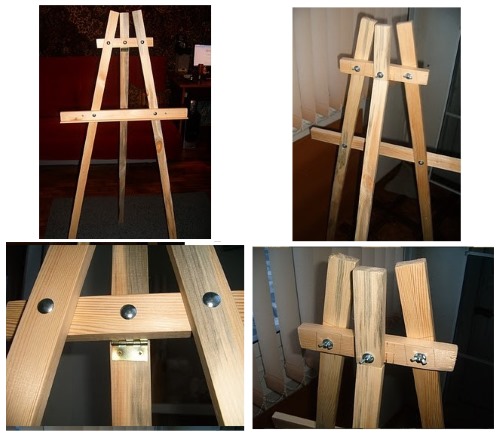
Tripod
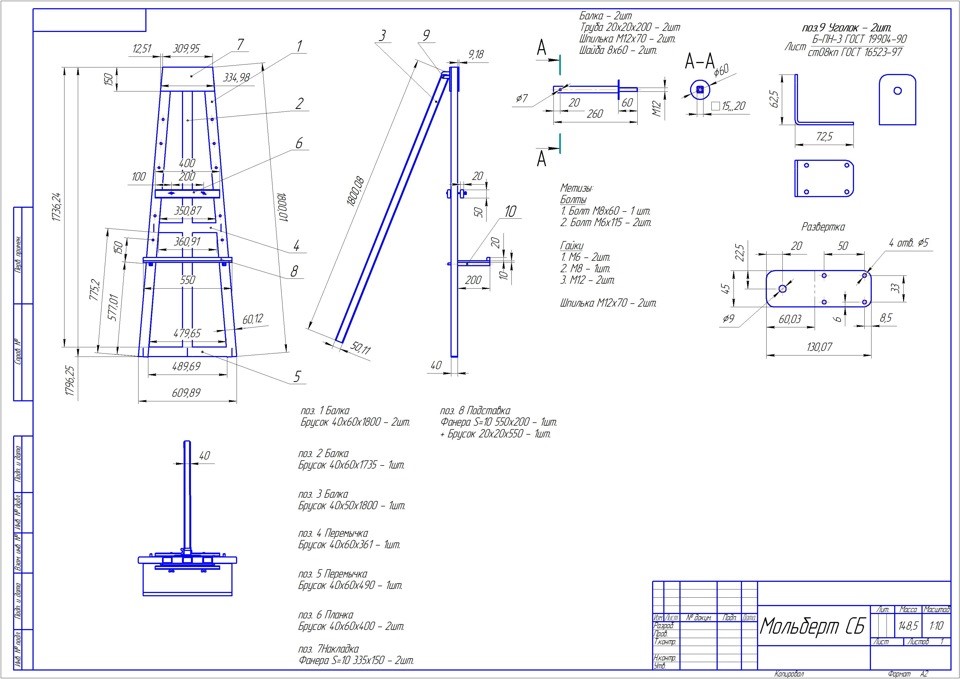
The easel is made with your own hands (drawings with dimensions are shown in the picture) and is made with future use in mind.
To make a tripod, you will need to complete the following steps one by one:
- Cut 3 bars of 140 cm each. The thickness should be 40x40 mm. For this type of easel, the bars cannot be extended, as the child will not be able to draw very large pictures. Therefore, it should be compact and neat.
- If the stand is made for adult artists, the length of the beam can be increased to 2 m, as far as the ceiling allows. It should be taken into account that in this case the tripod will not be portable.
- Cut 1 m of timber for the stand. For the support, take a timber 50x75 mm thick.
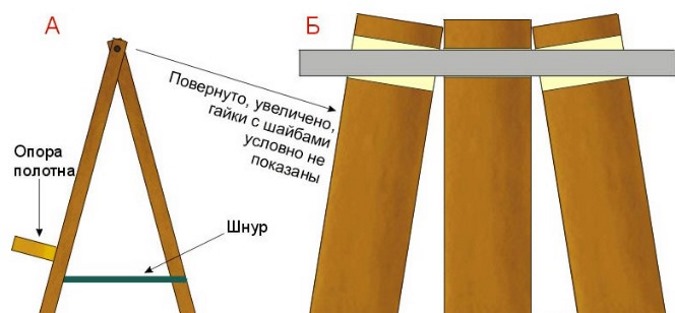
- The tripod is assembled and the support is attached as shown in the figure below.
- Drill a hole for the key in the rear leg according to its diameter. It is advisable to take an M6 bolt. And in the side legs, drill holes wider than the diameter.
- The back leg is made to fold back.
- Attach the back leg to the support with a cord. Place the center of the cord over the back leg and attach it to the screws on the sides of the support with loops.
- The base is made taking into account the maximum splay of the legs.
Firecracker
Another type of easel is a clapperboard. In execution it will be similar to a children's easel for drawing. And in appearance it resembles an old school board. This is a light and portable easel. When creating it, it is necessary to take into account all the dimensions so that the user can easily move it from one place to another.
Manufacturing steps:
- Cut 4 bars to the following dimensions: 1200x50x20 mm.
- Cut 4 more bars with different dimensions: 560x50x20 mm.
- Cut 2 bars with the following dimensions: 600x100x10 mm.
- Install the hinges on the supports, check that the corners meet evenly.
- Make countersinks in the bars where the screws are to be screwed in. Drill holes in the bars with a thin drill to avoid splitting the wood. Place the screws deep into the wood so that the heads are not visible.
- Place a sheet of plywood on the front support and attach it with screws.
- At the bottom, on an additional rail attached to the legs of the clapper, you can attach a shelf made of plywood for paints and brushes.
The easel made by hand (drawings with dimensions are shown in the picture) should be made strictly according to the dimensions. The drawing shows a more complex type of clapper.
Bilateral
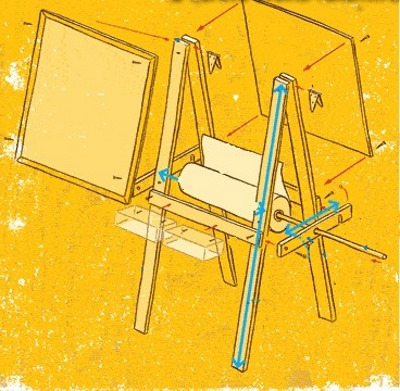
Double-sided easels are suitable for use in drawing classes. You will need a minimum of parts. It is easy and simple to make, even a child can take part in it.
Steps to create:
- Saw 4 beams of the same height, 2 beams 50 cm long, 2 pieces of 40 cm, make one round beam 60 cm long (a roll of paper is put on it) - these things will be needed to make a double-sided easel.
- Find the center of the long supports and attach 50 cm long crossbars to them using self-tapping screws.
- Drill holes in the side rails for the round piece of wood to hold the paper.
- Cut a notch in the wood for the screw with a jigsaw. Since the side beam is hooked onto the second stand. This is done for quick disassembly of the clapper and ease of storage.
- Attach these 2 beams with screws on one side and hang them on a self-tapping screw on the other.
- Insert the paper roll into the hole on the bars.
- Attach the plywood sheets on both sides with screws.
Folding
A folding easel is useful in drawing studios. It is easy to carry or hide in a closet. Such stands for an artist's canvas will accommodate no more than 70 cm of paper in height and about 40 cm in width.
 But this is quite sufficient for portraitists, as well as for those who do small works.
Manufacturing steps:
- You will need a beam - 40x20x170 mm, plywood 10 mm thick, M6 bolts with washers, fabric strap.
- It is created in the same way as a tripod. Measure and mark with a pencil the sections of 95, 105, 115, 125, 135, 145 cm on the bars and drill holes. Then connect them together.
- Cut the timber to 70 cm. Measure the timber 1 cm and 13 cm on both edges. Drill holes so that they can connect.
- Fasten the resulting part to the supporting legs.
- Attach one end of the strap to the support leg and the other end to the middle beam.
- Attach the sliding frame to the canvas support and to the leg.
Disassemblable
A collapsible easel is made from wood that is bolted together with wing nuts so that they can be easily unscrewed and screwed back together when needed.
To make it, a person must take the following steps:
- Prepare a 40x20x170 mm beam, a piano hinge, 6x50 mm bolts, wing nuts – 5 pieces.
- Make holes on two bars at a distance of 25, 35, 45, 55, 65 cm. They will be needed to attach the frame that will hold the canvas and determine its dimensions.
- Make holes in three bars at a distance of 25 cm from the top and attach a 40 cm bar to them. This bar should also be attached to the back leg with a piano hinge. This will make it collapsible in addition to being collapsible.
- The bolts on the back are tightened with wing nuts for ease of assembly and disassembly.
- The bottom bar is attached to one of the holes made at the bottom of the supports.
- Now the artist can place his canvas on the easel and begin to create.
This easel can be placed in the far corner of the room and covered with a cloth if there is no need to use it. Or put it on the mezzanine of the closet. The disassemblable parts and dimensions allow you to do whatever you want with it.
All the easels presented above, which can be made with your own hands according to drawings with dimensions, are extremely simple and universal. By adding certain components to them, you can get a modernized, portable or stationary easel. The main thing is not to be afraid to experiment.
Article formatting:Natalie Podolskaya
Video about making easels
Video instructions on how to make an easel (drawings with dimensions):
The most convenient is a tabletop easel, so the child can sit comfortably and draw for his own pleasure.
It would be easier to put a third strip in the middle, in which to drill holes. Due to the rectangular hole of the stroke, the strip play horizontally is eliminated. If necessary, you can additionally fix the strip with a wing nut to the vertical strip.