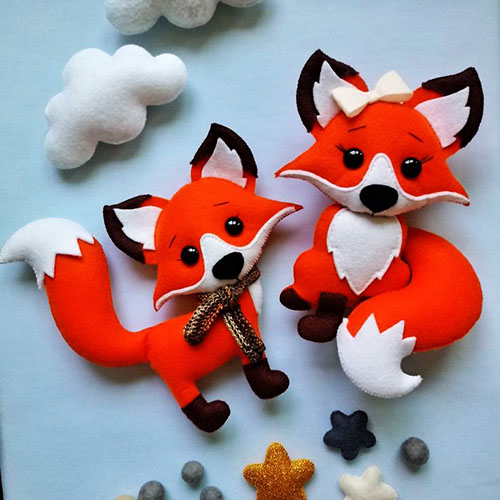
A figurine of a fox or its cunning face, made of felt, can decorate any object or interior, and also become an entertaining toyThe patterns presented in the article will help make the process of making the product simple and interesting.
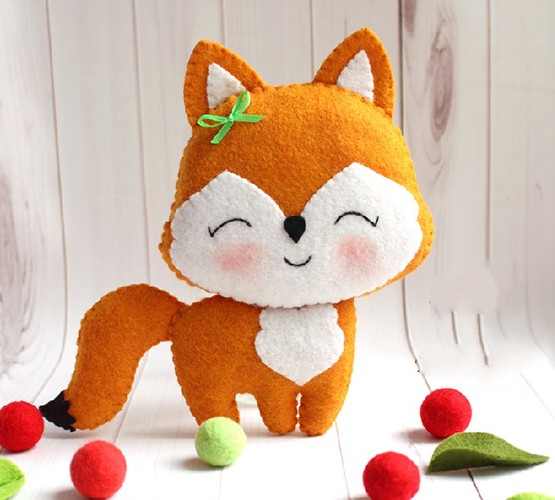
For example, you can make such a beautiful toy fox out of felt in a couple of hours.
Necessary tools and materials
A felt fox, the pattern of which is presented in various versions below, can be made if you have the following materials and tools.
| Material/tool | Purpose |
| Sheet/cut of felt | If the product requires stuffing, it is better to use soft felt. When stuffing is not required, hard felt is perfect. |
| Sample | It is necessary for cutting out the parts. If a picture is used instead of a template, it should be printed in 2-3 copies to ensure the integrity of each part. Because the parts are superimposed on each other in the picture. |
| Filler | Required for volumetric toys. The following types of materials can be used as filler:
|
| Sewing threads | For stitching and edging of details, you can choose not only sewing threads, but also knitting and embroidery threads. It is important to remember that the thickness of the needle eye depends on the thickness of the threads. The threads should be the same colors as the felt parts. |
| Needle | It should not be short or thin, but strong enough to pass freely through 2-3 layers of felt. |
| Hot glue gun | It is hot melt glue that can provide a high level of durability to products. However, if it is not available, any super glue with an instant effect will do. |
| Soft pencil or marker | They are necessary for transferring the outlines of the product parts onto felt. It is better to choose a marker for soft felt, a soft pencil for hard felt. On black felt, traces of a pencil and marker will not be visible, so when using it, it is best to use tailor's chalk. |
| Scissors | They should be of two types: large (for large parts, as well as for cutting a product with o2 layers of felt) and small (for small parts). It is best to take strong and sharp tailor's scissors. |
| Safety pins | They are necessary for fixing a pair of parts when sewing them together. The fixed parts will not be able to shift, which means they will be sewn evenly. |
| Decorative elements | Used to decorate the product. These can be:
|
Application
Even a primary school child can make a felt fox applique. You can use this picture to decorate a book cover, or you can frame it and hang it on the wall.
To create the applique, you need to prepare the following materials and tools:
- a sheet of blue or light green felt for the base;
- a sheet of orange felt (the size of the sheet depends on the intended size of the image);
- a small piece of white or beige felt (for the face, stomach, etc.);
- a small piece of black felt (for feet, nose, eyes);
- scissors;
- needle;
- threads;
- sample;
- hot melt glue;
- soft simple pencil.
Master class on making a felt applique of a fox:
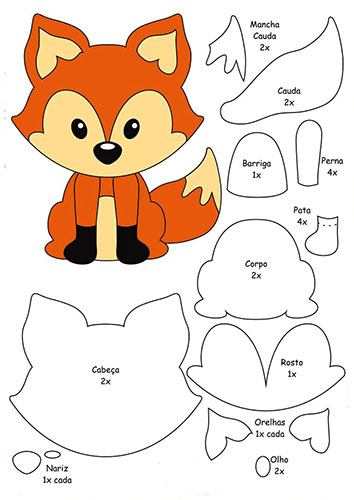
- First, you need to cut out (transfer the images of the parts onto felt using a pencil or marker and cut them out) the necessary parts. There should be 1 piece of each, except for the paired ones (ears, paws, eyes), since the fox will not be a separate figure, but an applique sewn onto the base. The following parts are needed:
- head (orange) – 1 pc.;
- face (white) – 1 pc.;
- middle of the ear (white) – 2 pcs.;
- eye (black) – 2 pcs.;
- nose (black) – 1 pc.;
- body (orange) – 1 pc.;
- front paw (orange) – 1 pc.;
- foot (black) – 2 pcs.;
- belly (white) – 1 pc.;
- tail (orange) – 1 pc.;
- tail tip (white) – 1 pc.
- Then you need to mark the location of the applique details on the base. To do this, you should lay out all the details to get an image of a fox, and then fix them on the base with safety pins.
- Now you can start sewing the parts, making sure that they do not "slide" and fit tightly to each other. First, sew the body, since the head slightly overlaps the body. The seam should be neat and decorative - "forward needle" or "backward needle". First, you need to put the tail under the body, fixing it with a seam.
- Next, you need to sew on the belly, followed by the front legs and feet, and then sew the rest of the tail to the base.
- Then the head and face are sewn on: both parts, placed on top of each other, must be simultaneously sewn at the bottom (in the chin area) to the top of the body.
- Next, the seam is completed around the entire circumference of the head and the centers of the ears are sewn on.
- After this, the animal’s face is sewn on and shaped: the eyes and nose are glued into place.
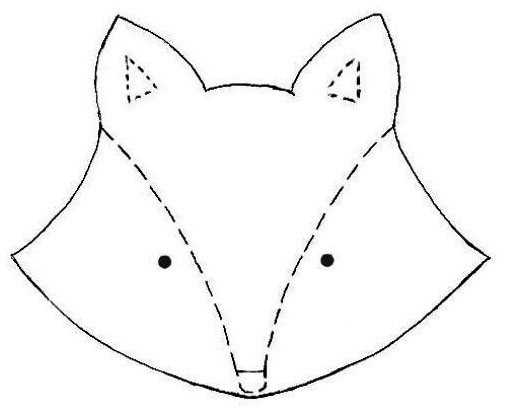
Fox face
A flat fox face made of felt will effectively decorate a bag, folder and other items. From a voluminous face you can make hair bands, keychains and the like. Patterns for both options are presented below. You can also take your own option - any fox pattern will do, from which you only need a head with a face.
To create a fox face, you need to prepare the following materials and tools:
- small pieces of orange and white felt;
- filler (for a voluminous muzzle);
- black beads for the eyes and nose (for a flat fox they can be embroidered);
- orange and black threads;
- needle;
- soft pencil;
- scissors.
Flat face
Master class on making a flat fox face from felt:
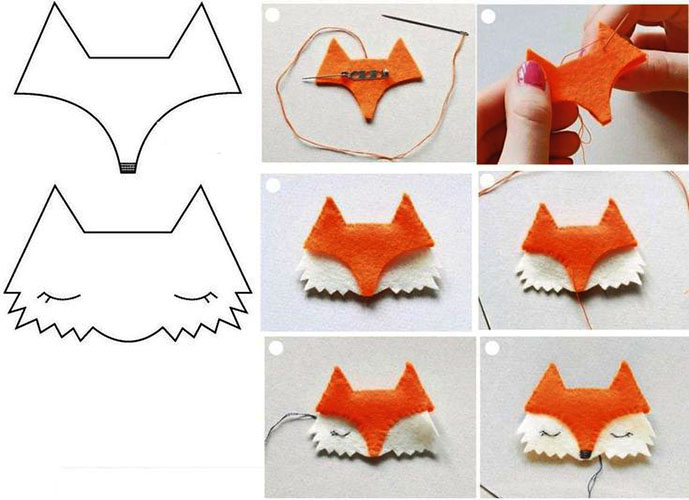
- First, you need to cut out (transfer the images of the parts onto felt using a pencil or marker and cut them out) the parts:
- upper part of the muzzle with nose (orange) – 2 pcs.;
- lower part of the muzzle with cheeks (white) – 1 pc.
- If you plan to decorate the fox's face with a brooch or a hairpin, you need to sew a fastening element to one of the orange parts. Then you should fold both orange parts together and sew in the area of the crown and ears.
- Now you need to place the white part with cheeks between the two orange ones. Since the ear area of this part is narrower than the same areas of the orange parts, it should "fit" into the stitched "pockets" of the ears.
- Next, the orange parts are stitched through to the end, and the eyes are embroidered on the white one.
- At the end you need to embroider the fox's nose.
Voluminous muzzle
Master class on making a voluminous fox face from felt:
- The first thing you need to do is cut out the pieces (transfer their images onto felt using a pencil or marker and cut them out):
- main part – one-piece muzzle (orange color) – 2 pcs.;
- cheek (white) – 2 pcs.;
- inner part of the ear (white) – 2 pcs.
- Next, you need to work on the face design. To do this, you need to sew the cheeks and inner parts of the ears to one of the main parts (the whole muzzle) with a decorative stitch, and also glue beads for the eyes and nose.
- Now you need to put both main parts together and stitch with a decorative stitch, remembering to leave an opening for stuffing. You can use a loop stitch through the edge or any decorative stitch.
- Once the fox's face is stuffed, you can carefully sew up the hole by continuing the seam.
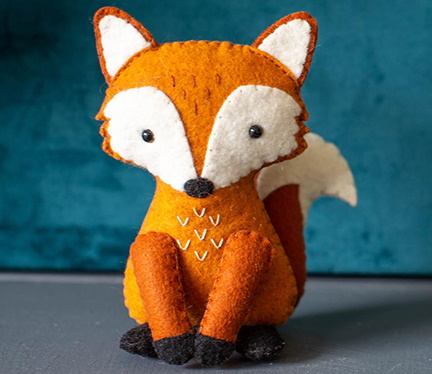
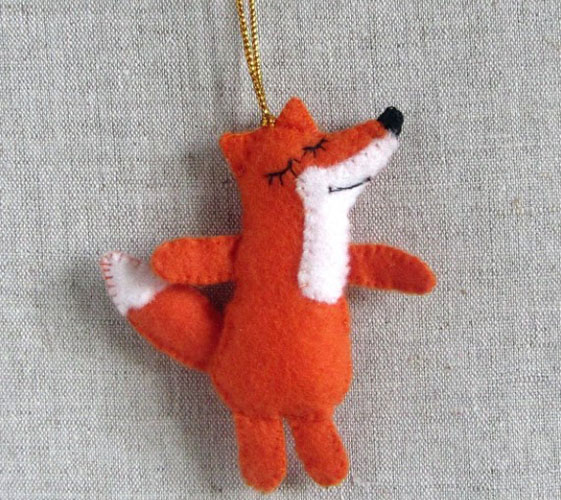
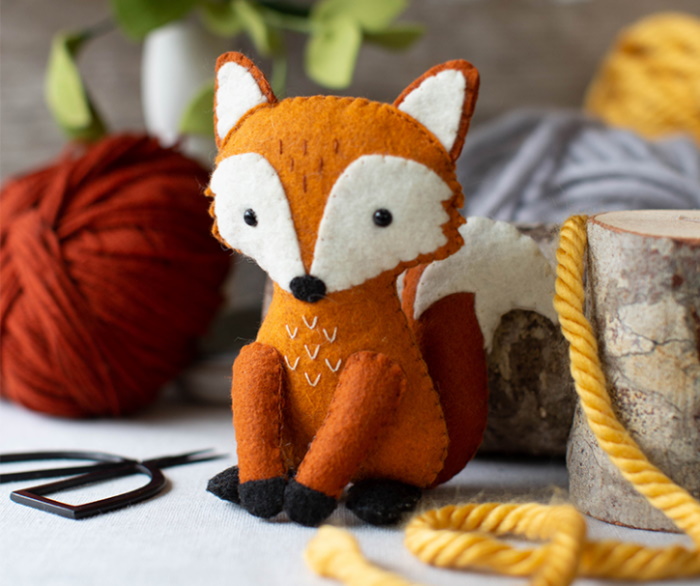
Toy
To create the toy you will need the following materials and tools:
- A5 sheet of orange felt – 2 pcs.;
- pieces of white felt;
- a small piece of black felt for the nose and tip of the tail;
- sample;
- soft pencil;
- scissors;
- threads in felt and pink colors;
- safety pins;
- filler;
- needle;
- blush (can be replaced with pink paint).
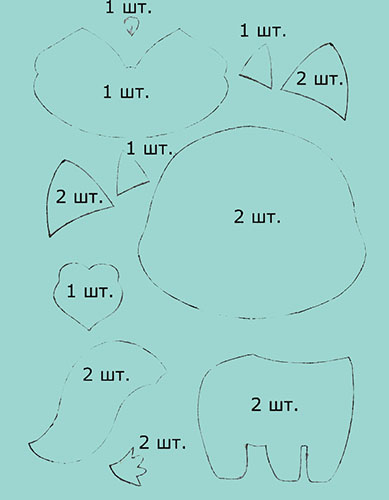
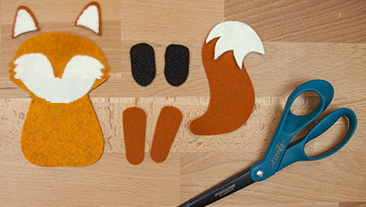
Master class on making a felt fox toy:
- First, you need to cut out the pieces (transfer their images onto felt using a pencil or marker and cut them out):
- head (orange) – 2 pcs.;
- face (white) – 1 pc.;
- nose (black) – 1 pc.;
- external ears (orange) – 4 pcs.;
- inner ears (white) – 2 pcs.;
- body (orange) – 2 pcs.;
- breast (white) – 1 pc.;
- tail (orange) – 2 pcs.;
- tail brushes (black) – 2 pcs.
- Next, the preparation of the elements for stuffing begins. First, work is done with the head. The face is attached to one of its parts and fixed with safety pins, after which it is sewn with a neat decorative stitch. The nose is glued in place, the eyes and smile are embroidered with pink threads.
- Now it's the ears' turn - their outer parts should be laid out in pairs, not forgetting to check the symmetry. The inner ear parts of white color are sewn to the upper part of each pair of outer ears.
- The ears will not be stuffed, so they need to be sewn in pairs, and then each ear pinned to the fox's head with safety pins. The edges of the ears should be under the top edge of the head so that a blind stitch is created when sewing them on.
- You can start stitching the head - attach the second orange piece (the back of the head) and stitch it with a loop stitch along the edge.
- When the needle reaches the ears, the seam should change slightly:
- it is necessary to insert the needle in front of the ear and pierce the front part of the head;
- make a stitch through the edge and pierce the ear, bringing the thread out over the edge of the back part of the head;
- make a stitch down, pierce the ear again, but bring the needle out not into the previous hole, but a little to the side to form a new stitch.
- In this way, the seam is made to the end of the ear. In the space between the ears, it is necessary to stitch with a regular loop stitch through the edge. When stitching the second ear, step 6 is repeated.
- When sewing the head parts, you must not forget to leave a hole for stuffing, through which you can place the required amount of padding polyester inside the toy. Then the hole must be sewn up, continuing the seam.
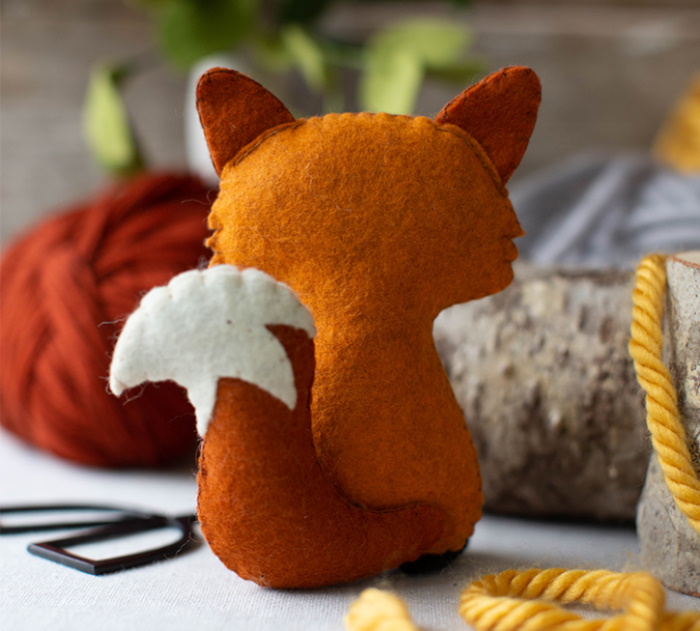
- A white chest should be sewn to the upper part of the body, and a black tassel should be sewn to the upper part of the tail.
- Next, the lower part of the tail is sewn to the upper part. It is important not to forget to leave a small opening for stuffing, which is then sewn up.
- Now you need to form the body - attach the lower part and stitch along the contour with a loop stitch through the edge. When the stitching reaches the location of the tail - it should be sewn to the body according to the principle described in point 6.
- The upper part of the body is not stitched, as it needs to be filled with padding polyester, after which the seam is completed.
- Next, you should attach the fox's head to the body so that the nose and mouth are located directly above the dimple on the white chest.
- The head and body are sewn together with a blind stitch, which should have 2 invisible lines - on both sides of the loop stitch.
- You can add a blush to your cheeks.
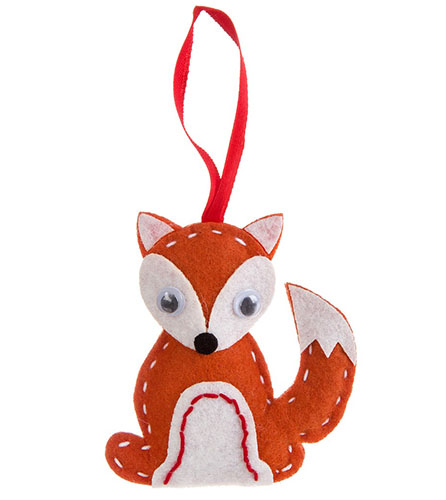
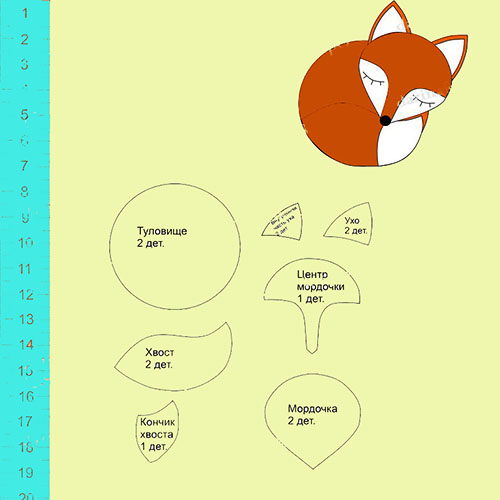
Christmas tree toy
A felt fox, the pattern of which is made according to the drawing below, will become an original decoration for a New Year tree.
To create a Christmas tree toy, you need to prepare the following materials and tools:
- ¼ sheet of A4 orange felt;
- pieces of white felt;
- a small piece of black felt for the nose;
- soft pencil;
- scissors;
- white and red threads;
- filler (optional);
- needle;
- "live" eyes;
- ribbon or tape.
Master class on making a Christmas tree toy in the form of a fox from felt:
- The first stage is cutting out the details (it is necessary to transfer their images onto felt using a pencil or marker and cut them out):
- head (orange) – 2 pcs.;
- cheeks (white) – 2 pcs.;
- nose (black) – 1 pc.;
- external ears (orange) – 2 pcs.;
- inner ears (white) – 2 pcs.;
- body with tail (orange) – 2 pcs.;
- belly (white) – 1 pc.;
- tail brush (white) – 1 pc.
- The second stage is the design of the head and muzzle:
- First, you need to glue the inner parts of the ears to the outer ones;
- Next, you need to sew both parts of the head together, having first inserted the ears and ribbon for the loop between them (if you plan to stuff it, you need to leave a hole, which is sewn up after filling it with padding polyester);
- glue cheeks, nose, eyes.
- The third stage is the design of the body:
- First, the stomach is sewn to one of the two body parts with red threads;
- a white tassel is glued to the tail;
- Both parts of the body are sewn together with white threads; if necessary, the product is stuffed.
- The fourth stage is assembling the product. The head is applied to the body with an overlap and sewn with a blind stitch (or glued).
Brooch
A fox brooch is a small decorative item that is quick and easy to create.
Flat fox
To create a flat fox brooch you will need the following materials and tools:

- a small piece of stiff orange felt;
- small pieces of white felt;
- a small piece of black felt for the nose;
- soft pencil;
- scissors;
- white, black and orange threads;
- needle;
- brooch fastening element.
Master class on making a fox brooch from felt:
- First, you need to cut out the pieces (transfer their images onto felt using a pencil or marker and cut them out):
- main part (the whole figure of the fox, orange color) – 1 pc.;
- body (orange) – 1 pc.;
- muzzle (orange) – 1 pc.;
- cheeks (white) – 2 pcs.;
- tail brush (white) – 1 pc.;
- nose (black) – 1 pc.
- Then you need to sew the body to the base with orange threads.
- Now you need to sew the cheeks and nose to the head, and also embroider the animal’s eyes.
- Next, the head is attached to the body and sewn on.
- At the end, the brooch fastening element is glued to the base.
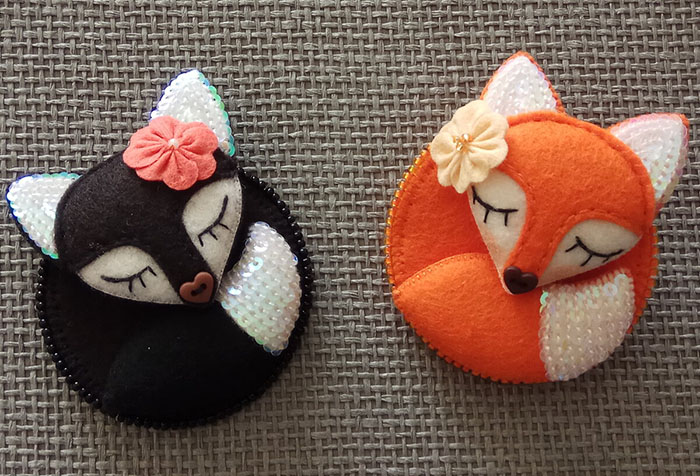
Volumetric fox
The felt fox, the pattern for which is presented for a brooch below, can be made voluminous if you place a small amount of filler inside the head and tail.
To create a brooch in the form of a three-dimensional fox, you will need the following materials and tools:
- a small piece of stiff orange felt;
- a small piece of soft orange felt;
- small pieces of white felt;
- a button (bead) for the nose;
- bow or flower;
- white sequins;
- soft pencil;
- scissors;
- black and orange threads;
- needle;
- safety pins;
- brooch fastening element;
- hot melt glue.
Master class on making a voluminous felt brooch:
- The first stage is cutting out the parts. You need to transfer their images to felt using a pencil or marker and cut them out. You should get the following set of parts:
- body (orange) – 2 pcs.;
- muzzle (white) – 2 pcs.;
- center of the muzzle (orange) – 1 pc.;
- ear (orange) – 2 pcs.;
- inner part of the ear (white) – 2 pcs.;
- tail (orange) – 2 pcs.;
- tail brush (white) – 1 pc.
- The second stage is assembling the base. Both round orange parts need to be folded together, secured with safety pins, and stitched with orange threads using a loop stitch over the edge.
- The third stage is the design of the tail:
- you should glue a white tassel to one of the tail parts;
- next you need to embroider the tail with sequins;
- then you need to sew both parts of the tail together with orange threads using a loop stitch over the edge;
- Closer to the tip, it is necessary to leave a hole for stuffing, after which it is sewn up.
- The fourth stage is the design of the head:
- the inner parts of the ears should be glued to the outer ones;
- then you need to embroider the inner parts with sequins;
- now you need to sew the center of the muzzle to one of the white parts of the head;
- Next, the nose is sewn on and the animal’s eyes are embroidered;
- now you can sew the decorated head piece to another white piece using a loop stitch over the edge, having first inserted the ears between them;
- leaving a small opening, you need to place a little stuffing inside the head, and then continue the stitching.
- The fifth stage is assembling the product. The head and tail are glued to the body, a flower (bow) is attached near one of the ears.
- The sixth stage is the final one: you need to glue the brooch mount to the back of the product.
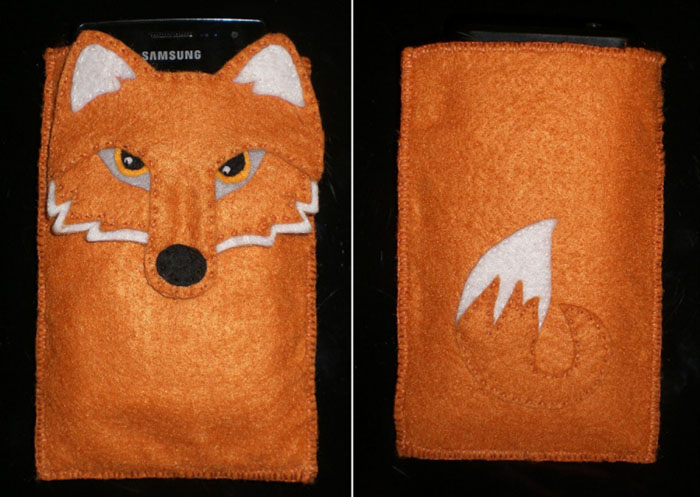
Case
To create a fox-shaped case, you need to prepare the following materials and tools:
- orange (brown) soft felt – 2 sheets of A5 format;
- a small piece of white felt;
- a small piece of black felt;
- a small piece of grey felt;
- soft pencil;
- scissors;
- orange threads;
- needle;
- safety pins;
- hot melt glue.
Master class on making a felt phone case in the shape of a fox:
- First, you need to cut out the parts: transfer their images to felt using a pencil or marker and cut them out. For the pattern, you can use the image of the finished product shown above. You should get the following set of parts:
- case base (according to the size of the phone, but taking into account the seam) – 2 pcs.;
- head – one piece (white) – 1 pc.;
- muzzle - middle part without ears and nose (orange) - 1 pc.;
- upper part of the muzzle with nose (orange) – 1 pc.;
- inner part of the ear (white) – 2 pcs.;
- eye (gray) – 2 pcs.;
- pupil (black) – 2 pcs.;
- nose (black) – 2 pcs.;
- tail – one piece (white) – 1 pc.;
- tail without tip (orange) – 1 pc.
- Next, take one of the base pieces and sew the white tail piece to its lower part, having first secured it with safety pins. The orange tail piece is sewn on top.
- Then the second part of the base is formed. First, it is necessary to attach the white solid part of the head to it, fixing it with safety pins.
- On top, you need to attach and fix the middle part - the muzzle, and then sew it to the base only in the cheek area.
- Now you need to mark the location of the eyes and glue them to the muzzle.
- The inner parts of the ears and nose are sewn into place to the upper part of the muzzle with the nose.
- Next, you need to attach the upper part of the muzzle with the nose to the fox’s head and secure it with safety pins, and sew all the parts with a decorative stitch, securing them to the base.
- At the end, both parts of the base of the cover are sewn together with a loop stitch across the edge.
The felt fox figurine can be used in various directions: from a soft toy to a simple applique for children's development in their free time. From the large number of presented patterns, you can choose the right one and create a beautiful product.
Another felt fox
Author: anna-master (Anastasia Kostylina)
Video about making a fox from felt
Master class on making a soft toy fox from felt: