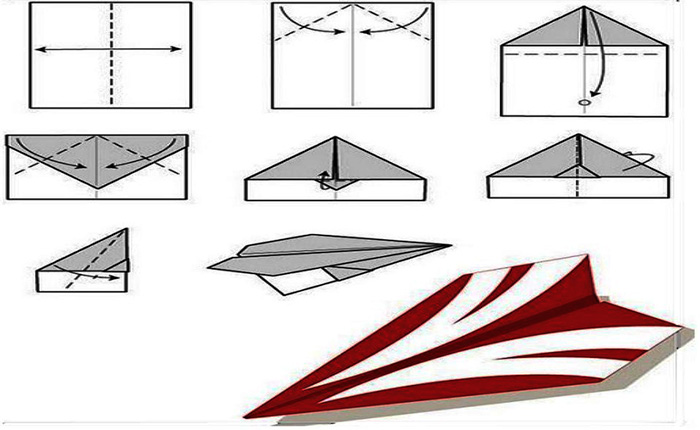
Paper fighter planes come in different shapes and sizes. Some models fly farther and higher than others. There are planes that can fly in circles and flip in the air. To learn how to make flying paper toys, you need to find out what tools are needed, and also look at several step-by-step master classes.
What you need to create a fighter jet out of paper
To do this type of origami you will need not only paper, but also additional tools.
In the table you can see their names and purposes:
| Ruler | Origami requires precision. Often you have to measure the width and length of some elements. |
| Pencil | It is needed for marking. Sometimes it is difficult to make a straight line from corner to corner of a figure "by eye". |
| Scissors | Some airplane models cannot be made without cuts. |
| Stationery knife | It is needed to cut sheets of paper evenly. |
Airplanes are not only made from A4 paper. Sometimes you need to cut off the excess to get a square or triangular base.
Simple airplane made of A4 paper
This is the easiest way to make a paper airplane. It will take less than 3 minutes to make.
Algorithm of actions:
- Place a sheet of paper vertically on the table.
- Fold it in half and iron the fold line well.
- Unfold the sheet.
- Fold the right corner so that the center fold line and the edge of the corner match exactly.
- Fold the left corner of the sheet in the same way.
- The folded corners should form 1 horizontal line. The workpiece should be folded along this line.
- Fold the paper in half again and iron the fold line well.
- Fold the corners in the same way as in points 4 and 5.
- There should be a small corner sticking out under the resulting horizontal line; it needs to be folded upward.
- Turn the workpiece over to the other side and fold it in half again.
- Bend the wing in half, but not straight, but at an angle. The beveled part should be placed on the straight fold line, where the small folded corner is.
- Turn the workpiece over and repeat these steps with the 2nd wing.
- Carefully iron all lines with your fingers to prevent the paper from unfolding.
The plane is ready to launch, all that remains is to spread its wings. The paper toy should be thrown forward, with a little effort. The plane should be held with 1 hand by the corner folded underneath.
Plane with a "beak"
This is an unusual model of a paper airplane that looks like a bird. Here the front corner has a curved shape in the form of a beak, and at the back there is a triangular tail sticking out, which provides good air flow, so this version with a "beak" flies further and higher than the classic model.
How to make such a plane:
- Place a sheet of A4 paper horizontally on the table.
- Fold it in half and iron the fold line well.
- Unfold the paper, fold the top and bottom corners so that their edges meet along the marked line.
- Fold the corners again, also aligning them in the center of the workpiece.
- Fold the resulting figure in half. The sharp end should extend beyond the opposite edge.
- Fold the corners again as in step #2.
- Turn the paper over to the other side.
- Fold the workpiece in half horizontally.
- Bend the nose of the future plane to the right and left so that the line is clearly visible.
- Now this corner needs to be turned inside out. This should be done carefully, the paper may tear.
- Fold the airplane wings in half horizontally, separately.
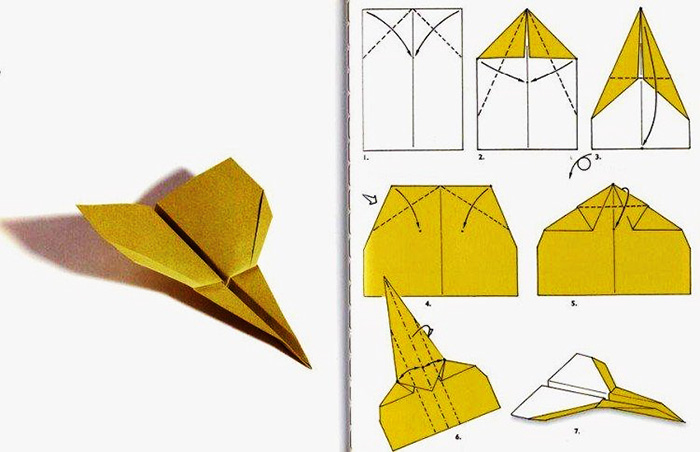
The plane must be held by the lower part with 1 hand. It is launched into flight by slightly pointing upwards.
Wide paper airplane
It is a rectangular-shaped aircraft that flies low but far.
It's very easy to make:
- Place a sheet of A4 paper vertically on the table.
- Fold in half and smooth the fold line.
- Unfold the paper and fold it in half again, but this time horizontally. Smooth the fold line only in the middle so that a short mark remains. Unfold the sheet.
- Fold the top part in half, up to the short mark, so that the edge connects with the marked line.
- Fold the top corners. Their even edges should match the horizontal line.
- Fold the top in half so that the top edge matches the horizontal line at the bottom.
- Turn the workpiece over to the other side.
- Mark the fold line along the top of the figure. Between the corners in the middle, draw a line and fold the paper along it, then unfold.
- Fold the workpiece in half vertically and mark the fold line on the sharp corner, bending it left and right.
- Along these lines, bend the corner inward.
- Unfold the top of the figure and fold the 2 parts. One of them should lie on the front side, and the other on the back side.
- Fold the wings of the plane in half, at a slight angle. The nose should protrude slightly forward.
This model needs to be thrown forward with a little effort. If all actions are performed correctly, the plane will fly straight.
Swallow plane
A beautiful model of a paper airplane that looks like a swallow.
How to do:
- Take a square sheet of paper measuring 21x21 cm.
- Fold it in half horizontally, unfold it, fold it vertically, unfold it and turn it over to the other side.
- Mark fold lines diagonally on 2 sides.
- Next, you need to fold the workpiece into a double triangle. Thanks to the marked lines, this will be easy. The sides of the square should be pulled to the center, and the paper will fold itself.
- Bend the corners of the top layer of the triangle so that their edges coincide with the marked vertical line in the center of the figure.
- Turn each corner inside out, folding it in half so that the central lines match the side lines.
- These corners need to be straightened and slightly shifted towards the center so that 2 additional lines are formed on them.
- Unfold the left corner, leave the right corner folded and hold it with your fingers. Fold the left corner so that its lower tip shifts slightly to the left.
- In the same way, unfold the right corner, and open and smooth the middle between the resulting “tails”.
- Bend the corners of the lower triangle so that their edges connect with the lines in the middle of the workpiece. Iron the fold lines well and unfold the corners.
- Bend them again along the marked lines.
- Fold the lower corners of each wing.
- Fold the corners in half twice.
- Bend the top corner of the workpiece down. Its tip should be adjacent to the horizontal edge of the middle of the figure.
- From the top of the resulting figure, step back about 1 cm and bend the tip upward.
- Spread the wings of the future airplane by pulling them in different directions.
- Turn the workpiece over to the other side and fold it in half.
- Fold the wings down.
This paper airplane model needs to be launched with a little effort, lifting the sharp tip upward.
Airplane with a reinforced nose
This aircraft is similar to the classic version, but has a more reliable design.
Algorithm of actions:
- Place a sheet of A4 paper horizontally on the table.
- Fold in half and iron the fold well. Straighten the paper.
- The top and bottom halves are also folded in half. Here the lines need to be ironed only to the middle.
- Straighten the paper, fold the upper and lower corners on the right. Their edges should meet in the center of the sheet and not go beyond the marked lines that were made in the previous step.
- Bend the sharp corner downwards.
- Turn the workpiece over to the other side and fold it horizontally.
- Bend each wing as in the classic version.
The reinforced nose protects the paper toy from damage when colliding with walls and the floor. After the impact, the plane will not be crumpled and will continue to fly without interference.
Airplane with "ears"
This type of plane has small front wings, called ears. They provide good air flow, so that the nose of the toy does not drop down during flight.
How to make such a plane:
- Place a sheet of paper vertically on the table.
- Fold it in half and iron the fold line well, then unfold the paper.
- Fold the top corners so that they meet in the center of the sheet.
- Turn the workpiece over to the other side and connect the corners in the center again.
- From the back side, use your fingers to lift the “ears” and straighten them out.
- Now a rhombus has formed on top of the workpiece. It needs to be folded in half horizontally.
- From the straight edge of the resulting figure, step back 1 cm down, and along this line, bend the corner upward.
- Fold the blank in half and bend each wing horizontally.
To launch such an airplane, you need to slightly lift its nose upward.
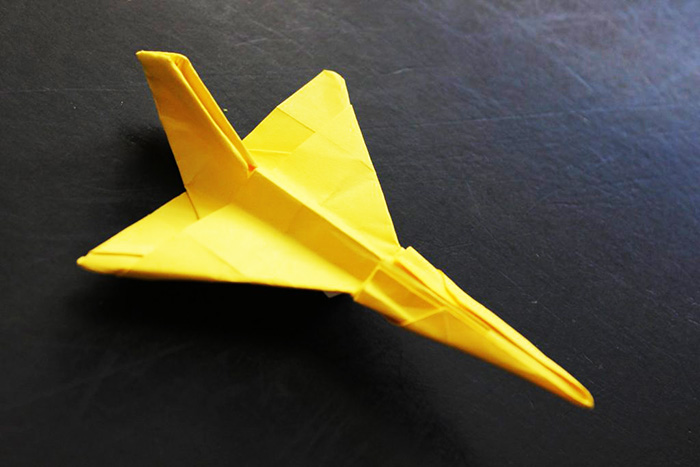
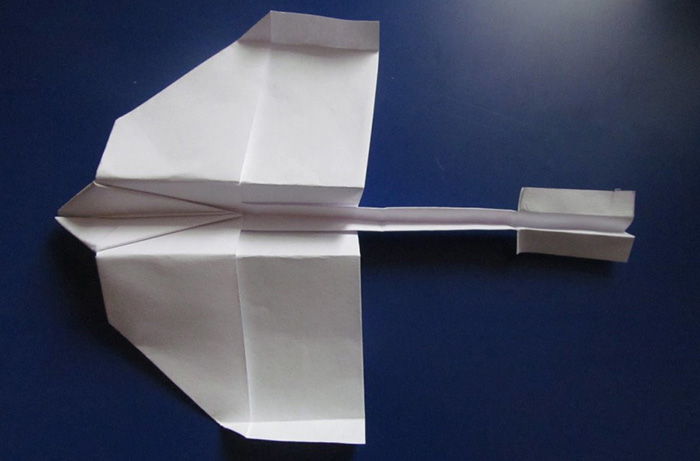
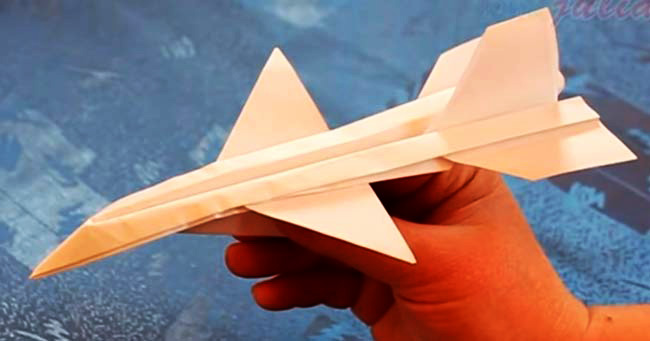
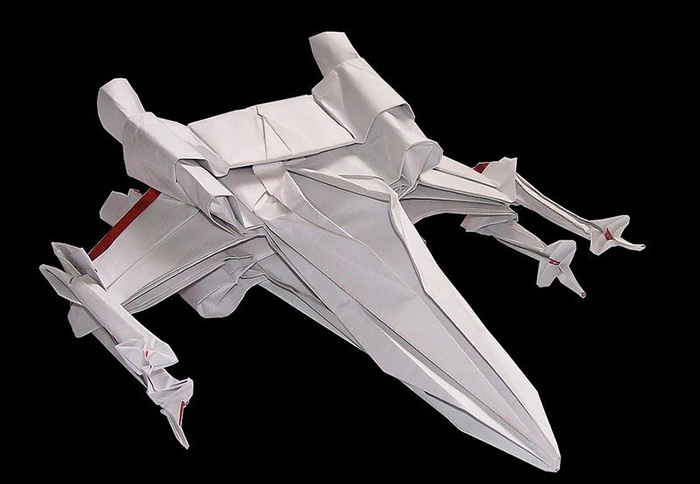
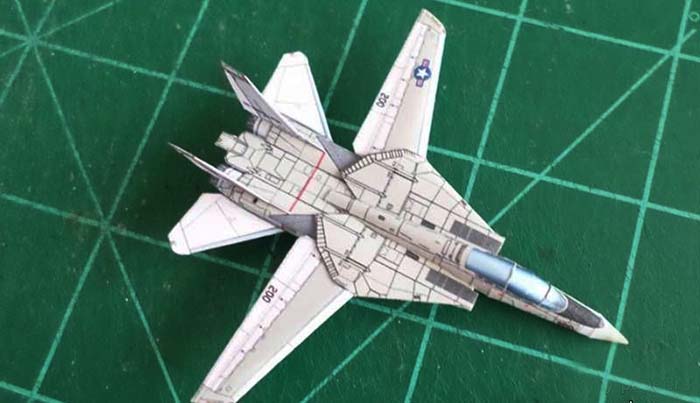
Fighter aircraft
You can make a paper fighter with your own hands not only from paper, but also from thin cardboard. The finished design will be stronger, but heavier.
How to make a paper fighter:
- Place the sheet horizontally on the table.
- Fold in half vertically, unfold and fold in half again, but horizontally.
- Fold the top corners, connecting their edges in the center, along the marked line.
- Unfold the corners and tuck them inside the folded sheet. You should get a double pentagon.
- Turn 1 layer of the figure from right to left and fold the corner of the bottom layer of paper to the center of the workpiece.
- Bend the corner at the bottom so that its edges coincide with the previous bend line.
- Turn the central part over to the left side. On the right side, repeat steps 5 and 6.
- Unfold the center piece and fold the right half at an angle so that its bottom edge meets the top edge of the bottom corner that remains folded over the bottom layer.
- Bend the upper part of the right side of the figure at an angle of 1 cm.
- Fold the fold formed in the middle to the right.
- Cover the resulting folds with the left side of the figure.
- Fold this part so that its edge coincides with the edge of the central fold.
- Repeat the steps from point No. 9.
- Make another similar fold and fold it down.
- Fold the workpiece in half horizontally.
- Unfold the bottom layer of the figure and straighten the central folds.
- Turn the workpiece over to the other side.
- Fold the left part of the top layer, and on top, on the bottom layer, fold the top corner in half. Repeat these steps with the right part of the bottom layer.
- Straighten the top layer of paper.
- Turn the workpiece over to the other side and fold the left part horizontally so that the lower corners become parallel to each other. Repeat these steps with the right part.
- Unfold the workpiece. Now the new fold lines should be clearly visible.
- Press the triangle formed at the bottom inward with your fingers.
- Fold each wing in half.
A paper fighter can fly about 15 m forward, and a cardboard figure
Airplane with curved wings
This model of the plane flies in a circle, soaring high into the air. The curved wings allow the figure to glide as long as possible.
How to make such a plane:
- Place a sheet of paper horizontally on the table and fold it in half vertically.
- Straighten the paper and fold the top corners so that their edges meet in the center of the sheet along the marked line.
- From the bottom of the resulting triangle, step back 2 cm upwards and draw a horizontal line. Fold the workpiece along this line.
- From the top edge of the figure, step back 1 cm and bend the sharp corner upward.
- Turn the workpiece over to the other side and fold it in half vertically.
- Fold the airplane wings in half, as in the classic version.
- Fold the edge of each wing up.
The plane must be launched straight, pointing its tip upward.
Space fighter
You can make a paper fighter in the form of a spaceship with your own hands in 3 minutes. It not only flies well, but also looks unusual.
How to fold a paper starship:
- Place a sheet of paper horizontally on the table.
- Using a ruler and pencil, make markings on top. You need to draw 5 parallel horizontal lines. The distance between them is about 1 cm.
- Fold the paper along the markings, moving towards the center of the sheet.
- Fold the workpiece in half vertically.
- Measure 4 cm from the left edge to the right and make a vertical cut with scissors.
- Bend the resulting corners to the right.
- Make cuts on each wing and fold them along the lines at the front and back. Fold the front part back and insert the parts into each other.
The width of the wings can be adjusted by inserting the parts deeper into each other. The wider the starship is, the further it will fly.
Crane plane
This type of plane flies low but far.
It's very easy to make:
- Place a sheet of paper horizontally on the table.
- Measure 4 cm from the bottom left corner and mark a point with a pencil.
- Pull the upper right corner to the mark and smooth the fold line.
- Also fold the upper left corner. The result should be a triangle.
- Fold the top corner so that its tip connects to the bottom side of the figure.
- From the top edge of the workpiece, step back 1 cm downwards, draw a horizontal line and bend the corner upwards.
- Turn the workpiece over to the other side and fold it in half vertically.
- Bend the wings of the plane in the same way as in the classic version.
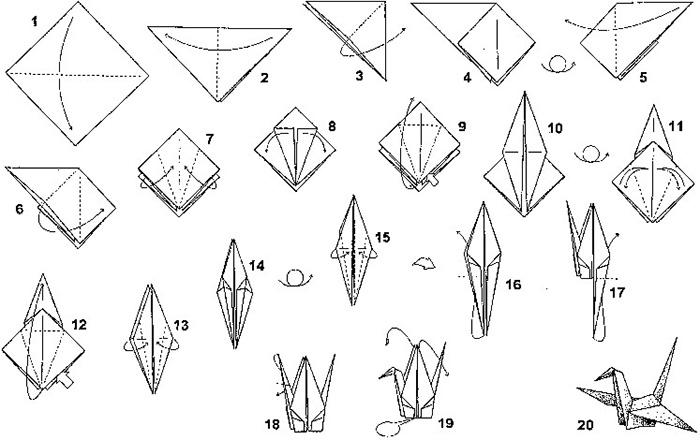
Widely spaced wings help the planes stay in the air flow longer.
Paper airplane "bat"
The paper fighter in the form of a bat flies in a circle. It maneuvers in the air flow, descending and rising, so the toy is interesting to watch.
How to make such a model:
- Place a sheet of paper measuring 21 x 21 cm on the table with one corner facing down.
- Fold the rhombus in half vertically and unfold.
- Then fold the workpiece in half horizontally. The sharp corner should be on top.
- Bend the sharp corner downwards so that it protrudes beyond the bottom edge of the figure.
- Turn the workpiece over to the other side. Bend both wings to the middle of the figure at a slight angle. The upper part should be narrower than the lower one.
- You should turn the paper over to the other side and fold the bottom corners up.
- Stretch the top pocket with your fingers and smooth it down.
This type of plane is launched smoothly, without any sudden movements. You need to hold it by the part that imitates the body of the bat.
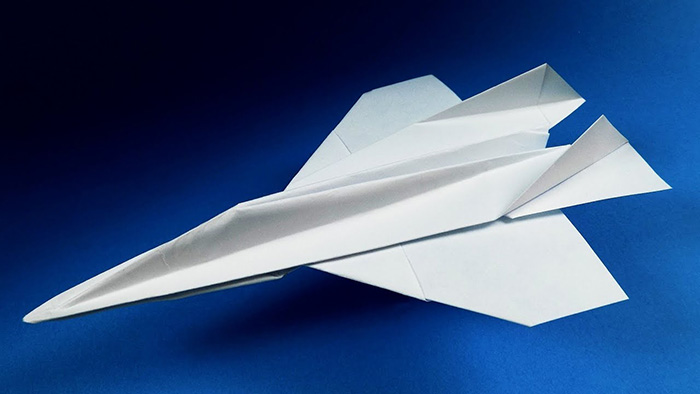
Strato Vulcan Airplane Model
This paper airplane model is capable of flying forward about 25 m.
How to make Strato Vulcan:
- Place a sheet of paper horizontally on the table. Fold it in half vertically.
- Fold the bottom right corner back.
- On the left are 2 layers of paper. Fold the corner of layer 1 to the right, and fold the corner of layer 2 back.
- Now there are 2 layers of paper on the right. These corners need to be folded in the same way, but to the left.
- Bend the wings of the plane in the same way as in the classic version.
- Step back 1 cm from the top of each wing. Draw horizontal lines and bend the corners upwards.
It is best to launch such a plane from a height. You can throw it from the window into the yard.
Paper airplane model Stingray
The flying ray is so called because it visually resembles the marine animal of the same name.
It's easy to make such an airplane:
- Place the sheet horizontally on the table and fold it in half.
- Unfold the paper and fold the left corners to the center.
- Fold the corners to the center again.
- In the center of the figure, make 1 accordion-shaped fold.
- Use a ruler to press lines from the tip of the acute angle to the upper end of the obtuse angle. Bend the angle. Also bend the corners on the other side.
- Fold the workpiece in half.
- Bend the wings of the plane in the same way as in the classic version.
The flying stingray must be launched with moderate force, pointing its nose upward.
Paper airplane model Cicada
Another original form of paper airplane, reminiscent of an insect called a cicada.
How to fold such a model:
- Fold a sheet of paper measuring 21 x 21 cm in half vertically, unfold and fold horizontally.
- Fold the top corners to the center.
- Fold the top corner down, iron the fold line and unfold.
- On the left, at the top, you have a small triangle. From its center to the lower right corner of the figure, draw a line and fold the paper in this place.
- Fold the left part of the figure to the right, iron the fold line with your fingers and unfold.
- Fold the bottom corners of the workpiece and turn them inside out.
- Bend the protruding corner back.
- Fold the wings of the plane so that they come closer to the center, but do not connect at this point. There should be a distance of 1 cm between the edges.
The cicada must be launched straight with a little effort.
Fighter-interceptor model
A paper fighter (you can make such a model in 2 minutes) of a military type flies high and fast.
How to fold such an airplane:
- Place the sheet of paper vertically.
- Measure 10 from the top, draw a horizontal line and fold. Unfold the paper.
- Fold the sheet in half vertically and unfold.
- Mark lines by folding the paper diagonally from the top corners.
- Pull the rectangle by the edges and fold the top part into a triangle. The rectangular part will stick out from the bottom.
- Lines have formed on the lower corners of the triangle. You need to pick up the corners with your fingers from below and bend them upward along these lines.
- Turn the workpiece over to the other side and fold the corners up and then to the left.
- Bend the resulting corner down. Repeat the steps on the other side.
- Fold the wings of the plane towards the center.
- Fold each wing in half.
The paper fighter-invader must be launched with a sharp forward movement.
Making paper airplanes is easy. Following step-by-step instructions, you can fold several different models of fighter jets and compete with friends. The winner is the one whose craft flies further or rises higher.
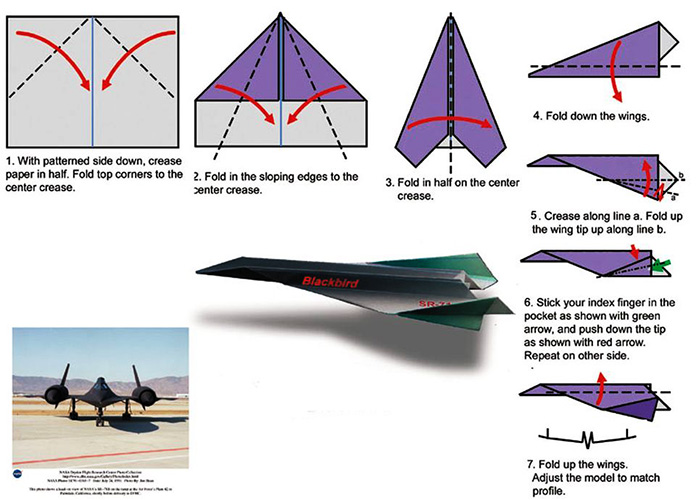
Video about paper fighter
Master class on making a MIG-29 fighter from paper: