A beautiful metric for a girl can be made in various techniques, this article tells how to make such a thing cross stitch.
The work will require a sufficient amount of time and effort, but will become a memorable gift for the baby, whether it is made by the mother, godmother or one of the friends or relatives. The product can be presented not only directly for the birth, but also for a birthday, New Year, including to an already grown-up girl.
What is metrics
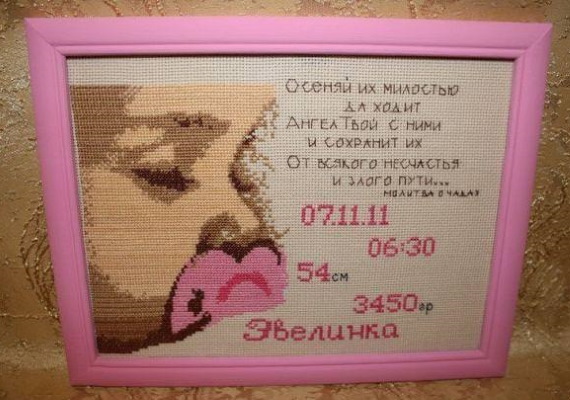
The metric is a commemorative picture, cross-stitched, supplemented with information about the birth of a girl.
Typically it includes the following information:
- baby's name;
- date and time of birth of the child;
- baby's height and weight at birth.
There are no clear rules for formatting metric data, for example, a name can be specified in several ways:
- full name – Anna;
- diminutive - Anechka, Anyuta;
- with the address - beloved daughter Anechka;
- officially - Pavlova Anna Sergeevna.
The first two options are the most common, but the choice always remains with the author of the metric.
How to make a metric with cross stitch
Procedure for performing work:
- Choose a suitable plot for the metric. Various options are presented below in the article.
- Select the necessary materials.
- Complete the embroidery of the main design.
- Add metric data to the embroidery.
- Wash and iron the work.
- Frame the finished work.
Each stage of the work is discussed below.
Necessary materials
For work you will need the following items:
- Base for embroidery.
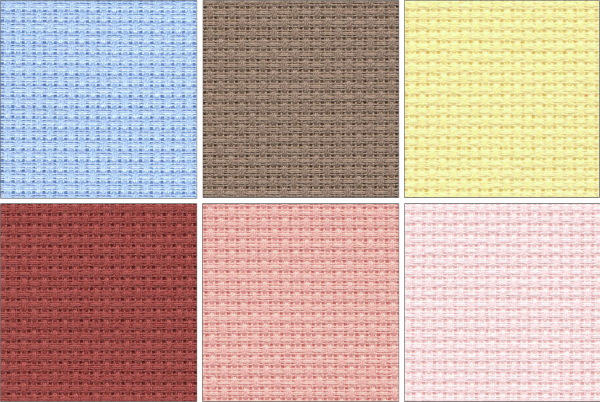
Aida canvas, a special cotton fabric, is ideal for cross stitching., the interlacing of the threads of which forms a clear grid of squares and holes, on which embroidery must be performed. Experienced craftswomen can choose a fabric of even weave with small weaves, but for beginners, Aida is recommended.
When choosing a canvas, it is important to pay attention to the count - the number of canvas threads (and, accordingly, cells for crosses) per 1 inch of fabric. The most common Aida counts are 14, 16 and 18. The larger the count, the finer the canvas.
The smaller the canvas, the more crosses you will get on the same area, but the crosses will be smaller in size. At the same time, the larger the canvas, the easier it is to embroider. Beginners are recommended to choose 14 and 16 count.
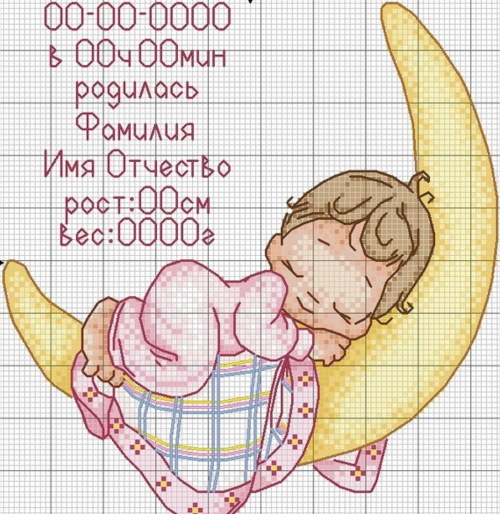
- Drawing diagram.
Metrics for girls (cross stitch is shown below) are made according to special patterns, where the pattern is made up of squares. Each square of the pattern is equal to one cross on the fabric.
For ease of embroidery, the patterns are divided into blocks of 10x10 cells or crosses, as in the picture below.
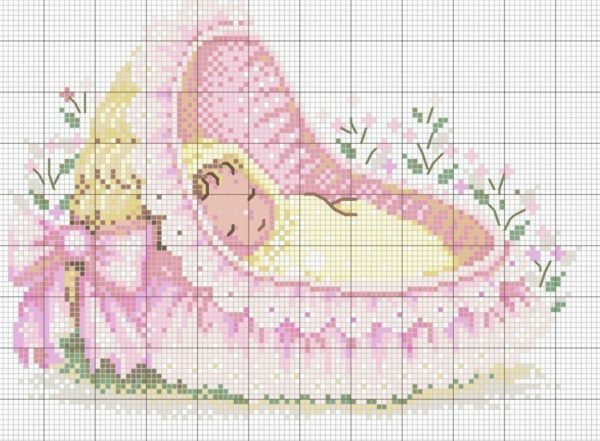
Different colors of crosses can be marked on the chart not only with different cell colors, but also with different symbols, for example, in black and white charts. The chart also usually includes a separate field with a list of the required thread colors and the name of their manufacturer.
- Mouline thread.
Mouline threads are the main threads for embroidery, usually sold in small skeins of 8-30 m in length, depending on the manufacturer. For the simplest designs containing several colors, you can select the threads yourself, but, as a rule, any embroidery pattern contains a so-called “key” - a list of the necessary thread colors with their factory number and manufacturer.
Each manufacturer has its own palette of floss colors. The same shade may be absent from another manufacturer's palette or have a different number. For example, white in the palette of French DMC threads has the number B5200, in the palette of Russian threads produced by PNK im. Kirov - 0101, in the palette of the Gamma trading house - 415, and so on.
If you cannot find the floss indicated in the manufacturer's key on sale, or the price is not suitable (for example, the price of French DMC threads is significantly higher than domestic ones), you can select floss from the palette of other manufacturers, using color conversion tables.
Also, in a number of schemes for the convenience of selecting materials, keys in palettes of several popular manufacturers are already given. High-quality schemes include data on thread consumption, but for small images, which usually decorate embroidered metrics, as a rule, it is enough to buy one skein of each color.
- Needle.
Cross stitch is done using blunt-tipped embroidery needles. You can buy such needles at any handicraft store; they are usually sold in sets of 4-8 pieces.
- Hoop.
They are necessary for the convenience of embroidery. The fabric in the hoop is straightened and stretched, like in a drum, which allows you to make even crosses. There are many options for embroidery hoops on sale now: wooden, plastic or metal.
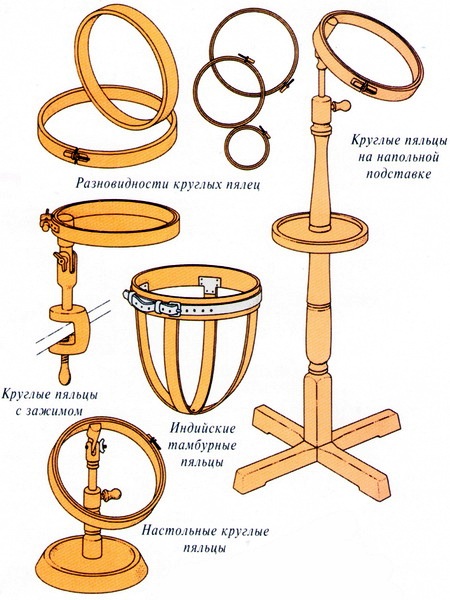
When choosing a hoop, you need to pay attention to the size: the smaller the hoop in diameter, the lighter it is in weight, and therefore easier to hold.. At the same time, small hoops will most likely not accommodate all the work and will have to be rearranged quite often, moving the fabric for new sections of embroidery.
For small works, it is recommended to choose a medium-sized hoop, about 15-18 cm in diameter. It is also necessary to take into account that the hoop is not larger than the selected piece of fabric, in which case it will be impossible to stretch the base properly.
- Scissors.
These are needed to trim the ends of the threads. Any small craft scissors or manicure scissors will do.
- Water-soluble marker or pen.
A special marker is used to mark the canvas into 10x10 crosses as indicated in the pattern. This will make the embroidery process easier. After finishing the work, the markings are usually washed off with water.

There are also markers on sale that disappear on their own after 24 hours. In any case, the marking is only intended to make the work process easier; it is not necessary to do it.
Before applying markings, it is recommended to test the marker on the edge of the fabric. If the markings are difficult to wash off and leave marks, it is better to abandon them so as not to ruin the work.
You cannot mark the base with a regular pen or pencil - such markings will ruin the work, because they will be visible on unsewn areas of the canvas and can also show through light crosses.
Metrics for a girl (cross stitch can be done using ready-made embroidery kits) in the set contains a diagram, a base, threads for a key and a needle. It is necessary to additionally purchase a hoop and scissors, as well as select a font for metric data (an example is presented below) and embroider them on a free area of the base.
Cross stitch of the main design
It is recommended to start embroidery from the center, so the work will be ideally placed on the fabric.
To do this, you need to find and mark the center of the fabric cut, as well as the center on the diagram (on some diagrams, the center is usually marked with arrows). The skein of floss contains 6 threads. Unless otherwise specified in the diagram, cross stitch is done with 2 threads. You need to cut the floss thread to the desired length (no more than 40 cm), separate 1 thread from 6, fold it in half and insert it into the needle.
Securing the thread at the beginning of work
Knots are not used in cross stitch.
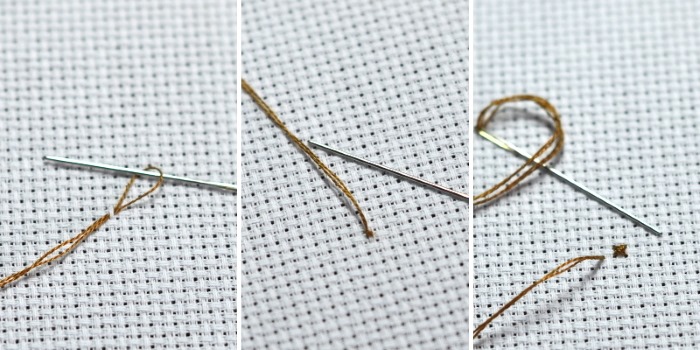
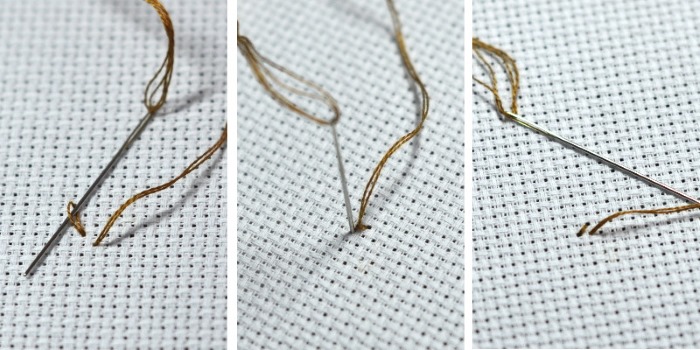
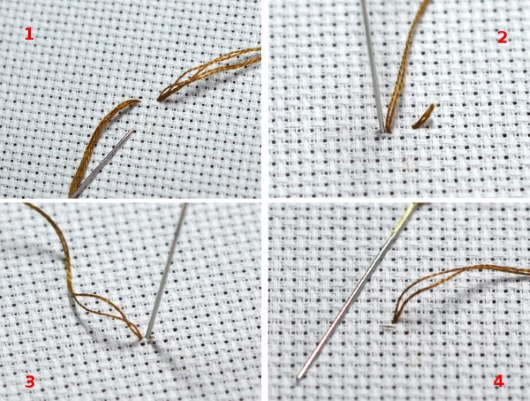
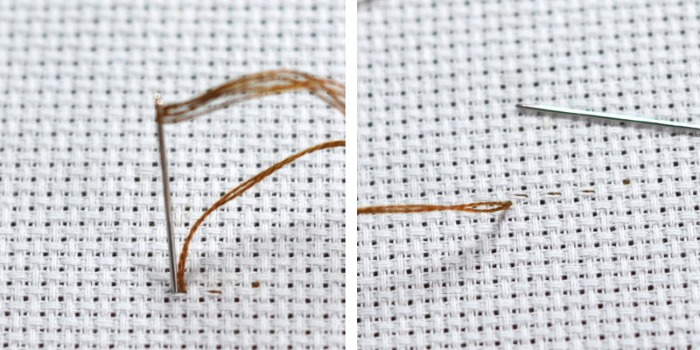
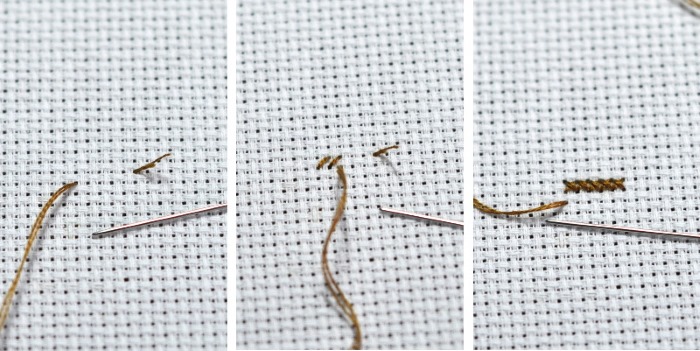
To secure the thread, bring the needle from the wrong side to the right side, step back 1 thread of the base (you will get a microscopic stitch), bring the needle to the wrong side and thread it through the ring formed by the bend of the thread. Then bring the thread back through the first hole and tighten. The fastening is ready.
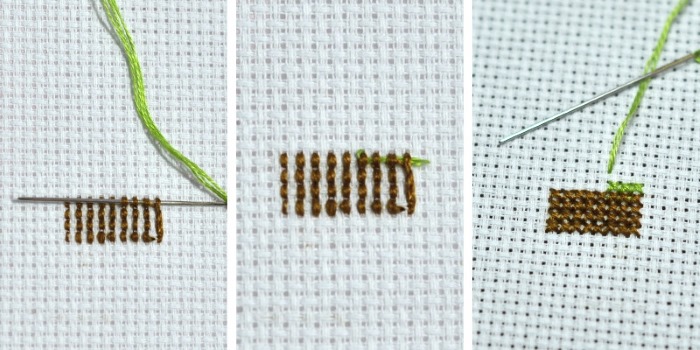
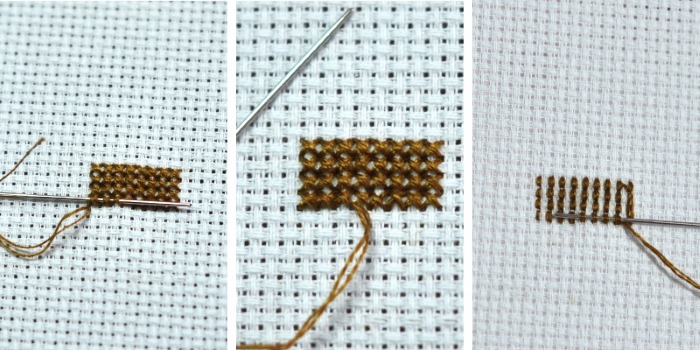
Making crosses
The cross stitch consists of 2 diagonal stitches and is done in 2 stages. First, you need to make a stitch from the lower left corner of the cell to the upper right, then from the lower right to the upper left. In this way, single crosses of one color are made.
As a rule, several crosses of the same color are located next to each other. It is convenient to first make all the lower stitches, and then close the crosses with the upper stitches in the reverse order. It is desirable that the stitches on the back side are not located chaotically, but are arranged in vertical lines - this will add neatness to the back side of the work.
It does not matter which way you start the cross, from left to right or from right to left. But it is necessary that all the upper stitches are tilted in one direction, so the work will look neat.
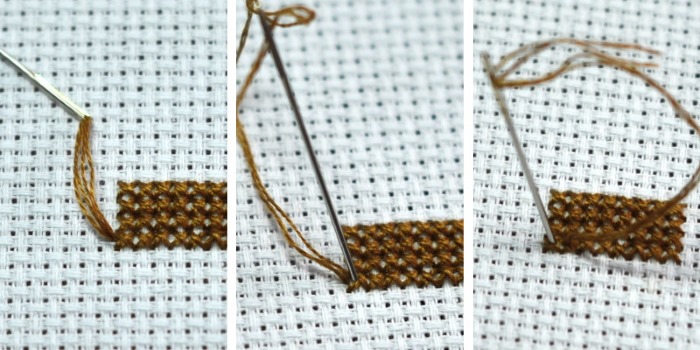
Securing the thread at the end of the work
After completing all the crosses of the desired color, you need to secure the thread. To do this, turn the work over to the wrong side and pull the needle with the thread under 3-4 vertical stitches on the wrong side. Cut off the end of the thread.
Experienced needlewomen also secure the threads on the front side, pulling them under the crosses. This method allows you to achieve a perfect back side. But if the back side is closed (for example, when framing the embroidery), this method is not necessary.
All crosses must be completed in the above manner. It is recommended to embroider groups of crosses close to each other sequentially, not to jump more than 4-5 crosses to avoid mistakes and unraveling.
Blends
In more complex multi-color patterns, blends are often found - crosses embroidered with 2 threads of different colors. To make them, you need to cut 1 thread of floss of the required colors of the same size, thread the threads into the needle without folding, and make the first fastening using the method of the last one - pulling the needle under several stitches on the back side.
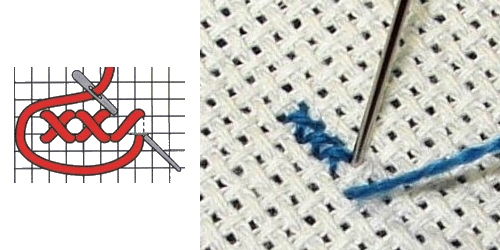
Backstitch or edging stitch
A number of patterns provide for backstitching or edging stitching in addition to crosses. They are usually used to design contours, folds of clothing and similar elements. Backstitching allows you to make the image clearer and gives the work a finished look.
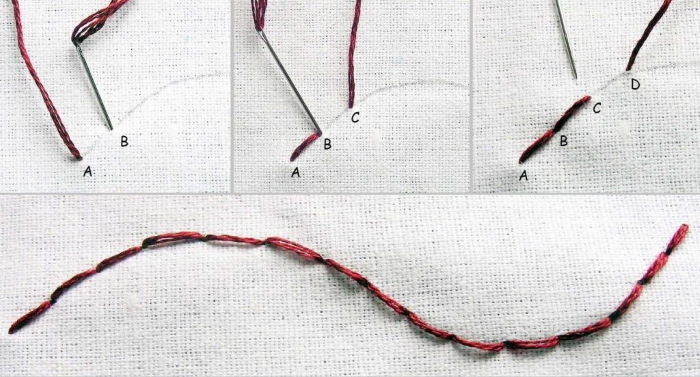
Unless otherwise specified in the pattern, backstitch is sewn in one thread. It is done with a back or forward stitch with a needle in small stitches. It is advisable not to make straight stitches longer than 4-5 crosses to avoid sagging of the thread. In order for the edging line to be continuous, it is necessary to make adjacent stitches exactly at one point, without gaps.
Additional stitches
In complex patterns, other types of stitches are also found, for example, half cross or French knots (abbreviated "frouzels").
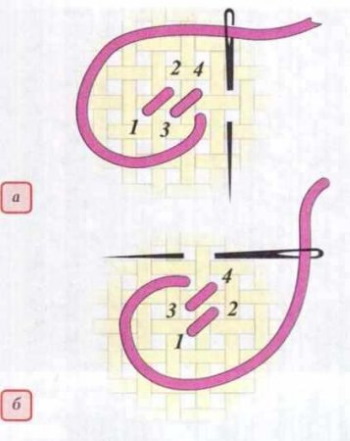
A half cross is half of a regular cross., respectively, is performed as one diagonal stitch, without closing the top stitch. Half cross is usually used when embroidering backgrounds or shadows, it gives volume to the work.
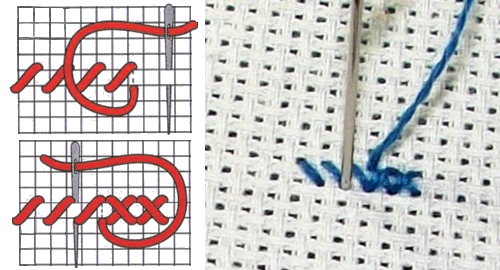
Fruzelki are small knots on the front side of the work., usually focus on the eyes or pupils, can depict snowflakes, stamens in flowers, holes in buttons and other design elements for which a regular cross stitch is too big. Fruzelki are embroidered in 1 thread, like backstitch (unless otherwise provided by the pattern and instructions).
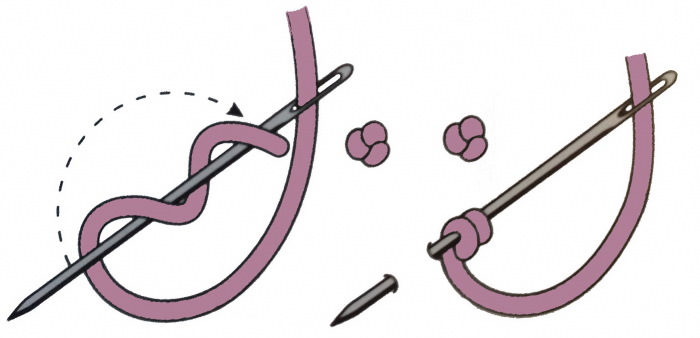
Technique of execution:
- Bring the needle to the front side.
- Make 2 windings (throw 2 loops of thread onto the needle).
- Insert the needle into the canvas as close to the first point as possible (as when securing at the beginning of the work).
- Holding the thread in the place of winding (so that the loops do not straighten out), carefully bring the needle with the thread to the wrong side and tighten. On the front side you should get a small neat knot.
Embroidery of metric data
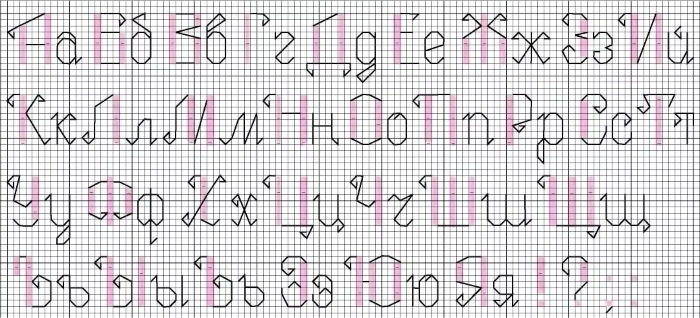
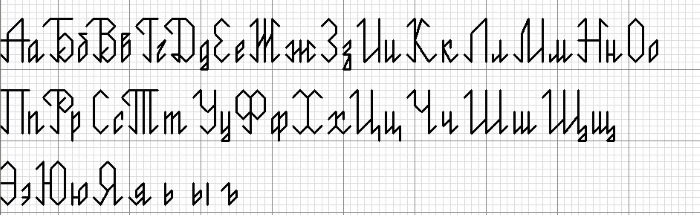
Metrics for girls (cross stitch can be done with a back stitch) have several varieties. In the first case, the letters and inscription will be more voluminous and will take up more space on the fabric, in the second case, the inscription will be more elegant and the main emphasis will remain on the picture of the metrics. Below are font options for both crosses and backstitch.
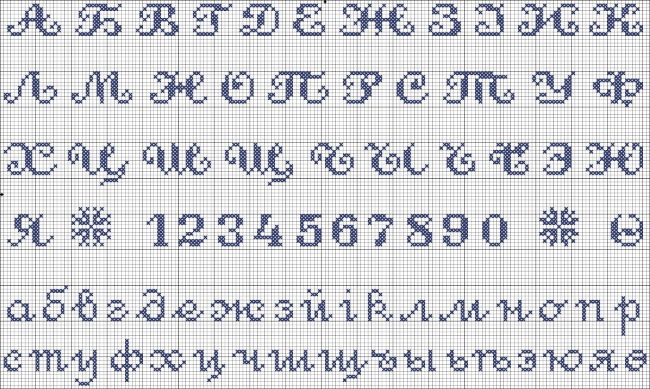
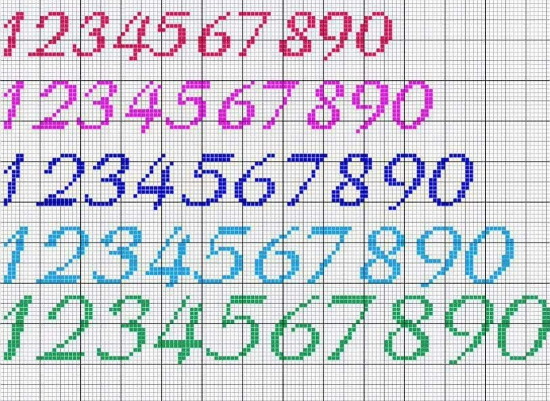

Cross stitch metric data must be embroidered in 2 threads, just like the main crosses of the work.With a backstitch, the letters and numbers are embroidered in 1 or 2 threads - depending on the desired size of the inscriptions and the thickness of the stitches. Before you start embroidering, you need to make a plan of the inscription. It is most convenient to make a plan on a sheet of squared paper.
It is necessary to choose the desired alphabet and type of writing of numbers and transfer the necessary letters to paper. One cell is equal to one cross (square of fabric). This will allow you to preliminarily estimate how the inscription will look, how much space it will take up, what size to make the indents and in which part of the fabric it is best to place it.

Having selected the best option, you can begin embroidering the metric data onto the fabric.
Wet-heat treatment of embroidery
After all the embroidery details are ready, it is necessary to remove the embroidery from the hoop and carry out wet-heat treatment - WHT. This will rid the fabric of dirt and dust (after all, it most likely took more than one day to work), and will also allow you to completely smooth out the fabric, removing possible creases left by the hoop.
Washing:
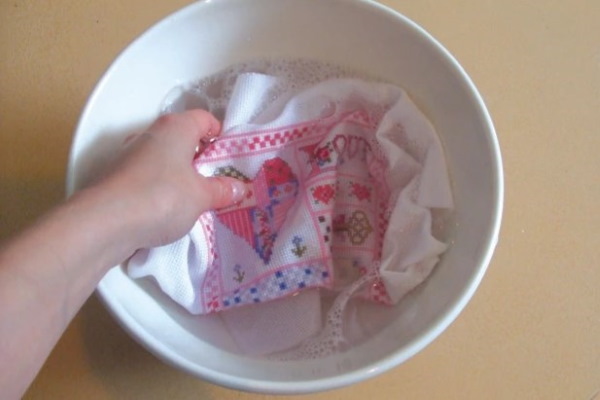
- To wash the embroidery, dissolve a small amount of the product in warm water at about 30 degrees (bright threads may fade in hot water). You can use liquid laundry detergent for delicate and woolen fabrics, or simple liquid soap without dyes to avoid staining the fabric.
- Place the fabric with embroidery in water for 3-5 minutes, rinse, you can gently rub the fabric in dirty areas, if any. Then rinse the fabric thoroughly.
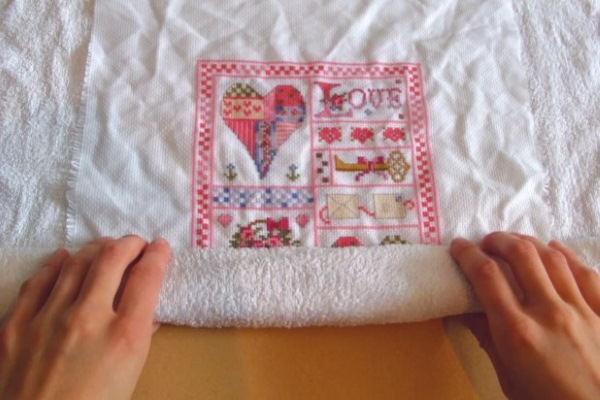
- There is no need to wring out the embroidery! To dry, spread out a terry towel, smooth out the embroidery on it and carefully roll it into a tight roll. Let the towel absorb excess water for 10 minutes.
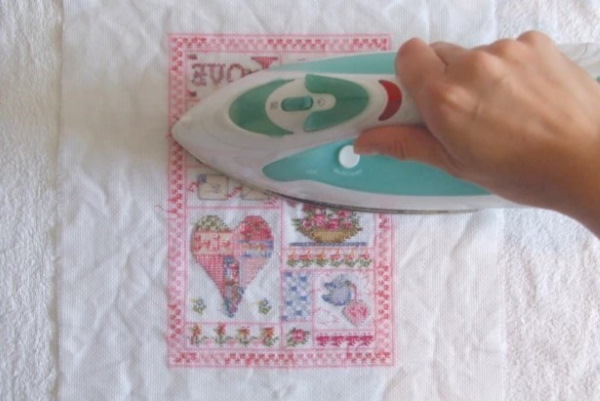
- Iron the damp embroidery from the reverse side until it is completely dry, this usually takes a few minutes. This method helps to remove traces of the hoop and achieve ideal smoothness of the fabric.
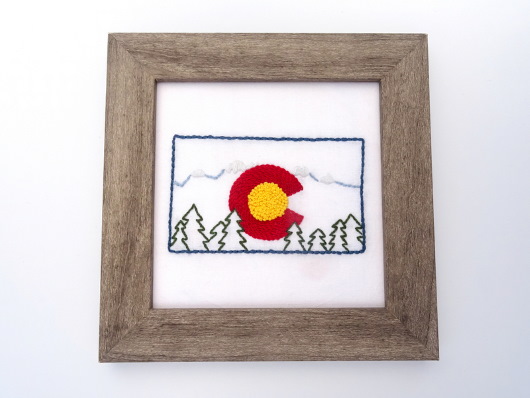
Design of the finished work
Metrics for a girl (cross-stitch is usually framed) has several design options. You can frame the work yourself or contact a framing workshop.
To complete the registration yourself you will need:
- frame of suitable size;
- glue;
- strong thread, needle;
- stapler;
- paper clips or clamps.
To frame the finished work, you need to select a frame of the appropriate size and color. As a rule, finished metrics have incomplete stitching, so it is not difficult to select a frame by size.
It is recommended to leave a few cm of the background open to give the work airiness. If the frame is too large for the metric, you can supplement it with a passe-partout, cutting it out of cardboard of the desired color and size.
Frames are usually sold complete with glass – it will protect the embroidery from dust and dirt. But having glass in a child’s room can be unsafe, so works for children’s rooms are often framed without glass. Dust can be removed from the work later with a hairdryer.
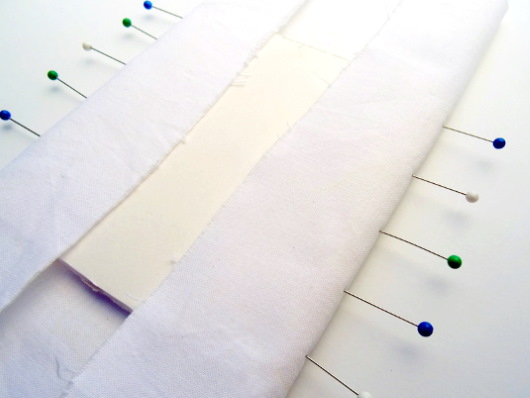
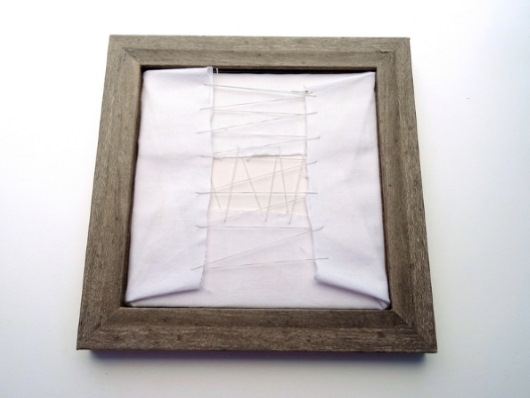
To ensure that the finished work looks neat, it is necessary to carefully stretch the embroidery.
To do this, apply the fabric to the cardboard that will cover the embroidery from behind and carefully stretch it, securing the work with paper clips or clamps. You can secure the work with a stapler, fastening the ends of the cardboard and fabric along the entire perimeter of the embroidery.
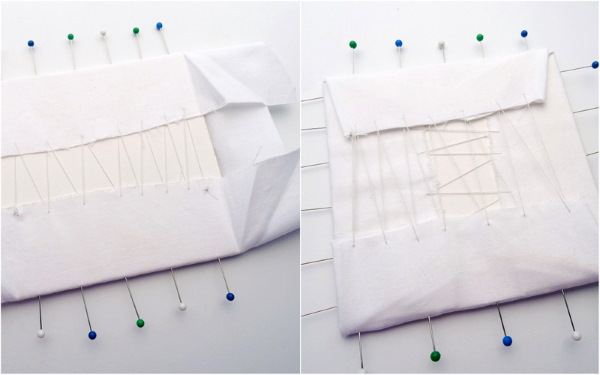
The second option is to pull the fabric together using a thread and needle, sewing together the opposite folds of fabric with diagonal stitches, like the lacing of a corset.
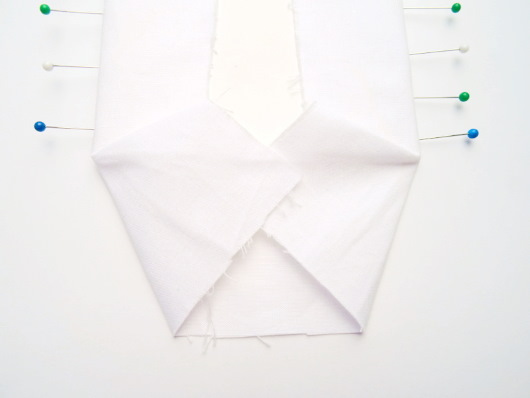
If the fabric is too big, you can trim the folded edges. To strengthen and make it neat, you can glue the indents with transparent glue. Cover the back of the work with a sheet of cardboard or paper and insert it into a frame.
Embroidered metric design options
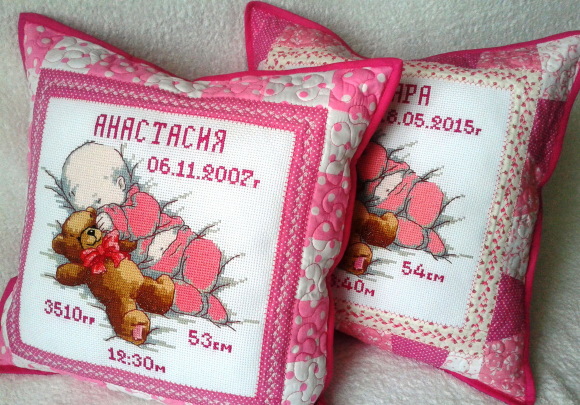
The embroidered metric can be made into applied products for girls:
- decorative pillow;
- photo album (for example, for the first year);
- basket, box for storing toys;
- backpack or children's handbag;
- item of clothing: bodysuit, dress, etc.
It is necessary to keep in mind that such a metric will be less durable (for example, the child will grow out of the clothes quite quickly) and will require the author to have skills in other types of creativity, for example, in sewing. It will also be necessary to select materials. Therefore, the best option remains to frame the embroidered metric.
Metric options for a girl
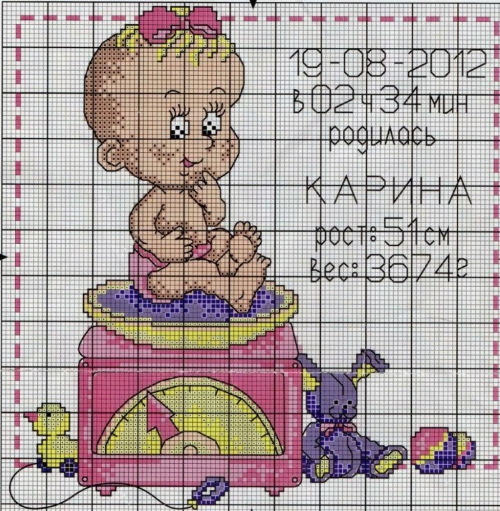
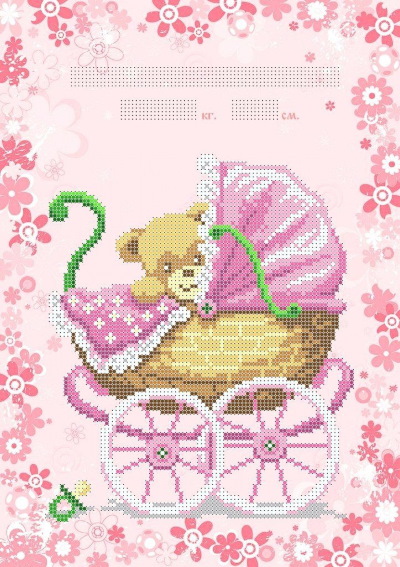
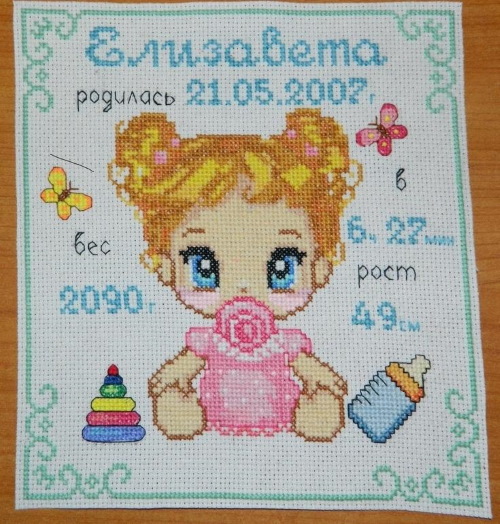
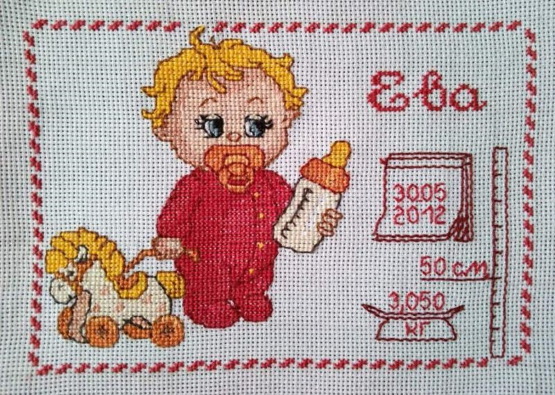
There are many options for metrics for girls and the choice of the picture depends on the author's preferences or, for example, the age and character of the girl. As a gift directly for the birth or in the first year, images of babies, strollers, children with pacifiers are suitable.
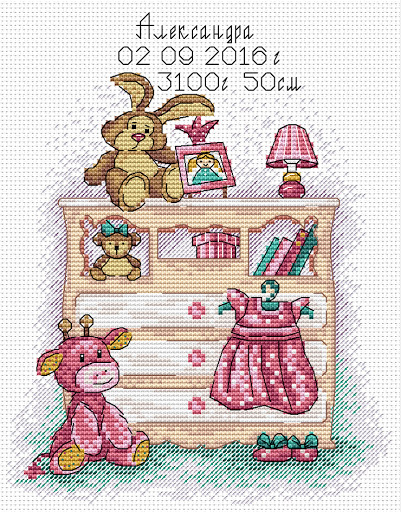
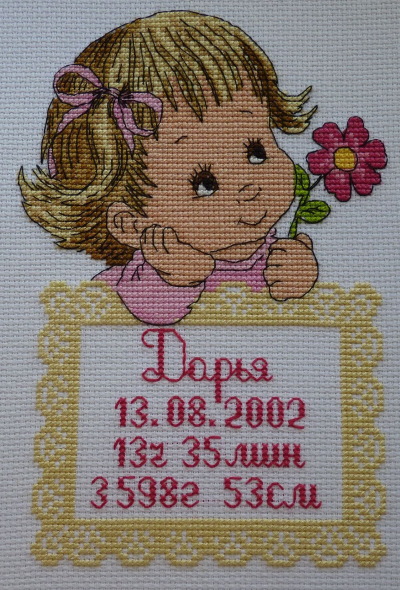
For older girls, you can choose an image of a girl with toys, flowers, making the image look like a child, for example, by changing the hair color. You can supplement the metric with images of the girl's favorite cartoon characters and fairy tales.
Images of animals and toys are often used in metrics: bears, bunnies, kittens, pyramids, dolls. Images of little fairies and angels are popular for girls.
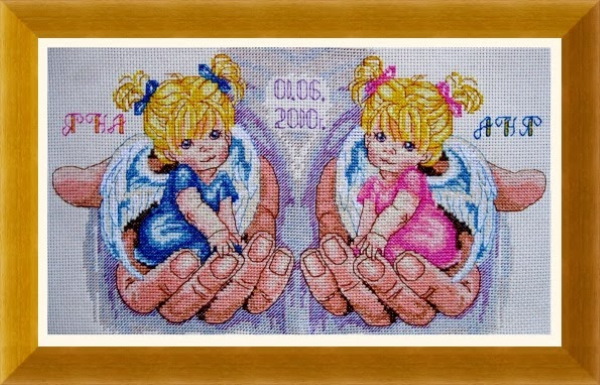
For twins, you can use ready-made patterns with 2 babies, or embroider identical figures next to each other, replacing, for example, some of the flowers from pink to lilac. The general metric for twins (or sisters of different ages) can be replaced with 2 separate ones. Paired images similar in plot, size, color scheme, and framed in the same frames will look great.
A colorful cross-stitched birth certificate can be supplemented with almost any image suitable for girls. Below are a number of patterns that can be used to make your own unique embroidered birth certificate for a girl.
Portrait of a baby
Video about embroidery of metrics
Metrics for a girl - cross stitch: