When a child draws, he develops sensory abilities, fine motor skills, as well as spatial thinking, fantasy and imagination. Small drawings for copying will help to form artistic taste.
Drawing tools
By mastering drawing, children begin their acquaintance with the genres of painting. The main goal of the classes is to develop artistic and creative activity, teach children to express their impressions and emotions by means of brushes, paints and other materials and tools. Small drawings of copying for their image on paper will require the preparation of everything necessary.
Pencils
With the help of pencils you can:
- make initial sketches;
- create contours;
- color the pictures.
This is one of the easiest ways for kids to color.
Pencils have the following advantages over other tools:
- economy;
- compactness;
- versatility;
- convenience.
They can be taken anywhere and used anywhere for their intended purpose. They are great for spontaneous sketching on the street.
Pencils always have the letters "H" or "B" on them, indicating hardness or softness, respectively. Hard pencils are used for technical drawings. The trace they leave is pale and weakly expressive.
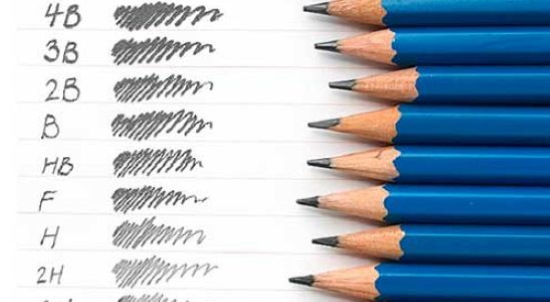
For drawing, it is best to use soft pencils. The higher the number next to the letter "B", the softer the lead will be, and as softness increases, the line becomes darker and easier to smudge. For starters, you can choose a pencil marked "2B".
If pencils of different hardness are used for one work, then you should try to make sure that black is the predominant color. It is not recommended to use many halftones. Among all the varieties of pencils, the type with a wide, chisel-like lead deserves special attention, thanks to which a thick mark remains on the sheet.
Knife
To keep the pencil in working condition, it needs to be sharpened. To do this, try to remove the wooden frame so that a sufficiently long end remains. This way, it will stay sharp longer, and you won’t have to sharpen it again any time soon. It is best to use a sharp knife for sharpening.
When sharpening the pencil lead, you need to try to keep the wooden frame far enough away from it. Otherwise, the wood will scratch the paper and ruin the drawing.
Eraser
To correct any errors that may arise during the drawing process, you will need an eraser. To effectively remove pencil marks, use only a soft eraser.
Handles
Drawing or copying small pictures can be done with pens or a combination of them with pencils. There are a huge number of brands of drawing pens for every taste. For example, the company Faber-Castell offers a wide selection.
These could be:
| Option | Description |
| Fountain pens | The main elements of these writing instruments are a holder and a removable nib. They are dipped in ink or other coloring liquid. It is better to give preference to steel flexible nibs, the tip of which is split. By changing the pressure, you can draw lines of varying expressiveness. However, the problem is that many colored inks intended for drawing are made from artificial components. The synthetic pigments present in their composition quickly lose their color: they stop performing their main function. Therefore, when choosing, preference should be given to stable water-soluble inks with a traditional composition. |
| Feathers made from reed and bamboo | These products are not very flexible, but they can be used to draw at different angles, which will produce a large number of different lines and short strokes. |
| Technical pens | They are easy to use. You can carry them with you. These tools are a tube-point. They are convenient for creating lines of a certain thickness. However, you need to show a good imagination to make such lines interesting.
Pens that can be refilled after they run out of ink allow you to save money. But if you decide to give preference to such pens, you will need to choose those that will not cause serious problems when cleaning. Some pens come with several different heads, which can be changed depending on the width of the line you need at the moment. |
| Ballpoint pens | They can also be used for sketching. It is important to ensure that they do not leave blots on the paper. The line they draw must be of high quality: without so-called "slips". |
Album
There are a huge number of different types of drawing albums on sale, among which there is sure to be one that will suit your child.
Watercolor paper
The paints can be applied to any watercolor paper: both rough and smooth satin material.
Watercolor
This paint is a universal drawing tool. With this paint you can achieve a large number of positive results.
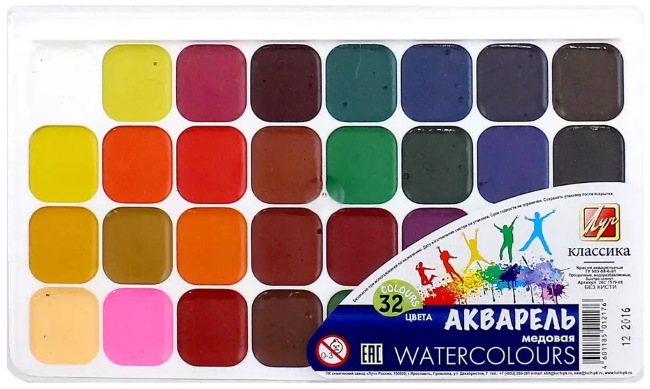
Most often, watercolors are sold in dry form.
Acrylic
This is another type of paint that is often used in children's work. They can be used to color anything.
Oil paint
It has become widespread, like other types of paints. There is a huge variety to choose from: from the usual to the one that dissolves well in water.
Oil paints differ from water-based paints in that they take longer to dry. However, to use them effectively, you need to have certain skills. They are not very suitable for little ones who are just beginning to learn drawing.
Water based paints
Paints and inks intended for drawing are made mainly on a water basis. They can be easily diluted, making the color less intense.
Watercolor can be bright and muted. It creates a soft effect, especially if the canvas is soft and thick paper sheets. As a rule, liquid paints are used when working on heavy grades of paper. In this case, a palette for mixing colors is required.
It would also be a good idea to prepare a horizontal surface on which to place a container of water. It is water-based paints that are recommended for beginners.
Gouache
A paint that is characterized by its density and matte finish. But this is only one of the varieties of water-based paints. When choosing, preference should be given to gouache, which is placed in tubes. There is also gouache in bottles, the purpose of which is to create posters. The simplest gouache is produced in tiles.
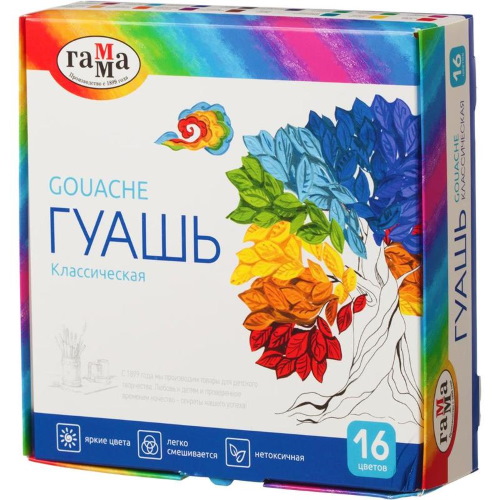
However, in any case, the great advantage of this paint is that it has a high covering power. An artist can use it to hide an unsuccessfully drawn fragment. The main thing is to apply the top layer carefully, trying not to touch the lower layers.
Brushes
Paints themselves will be useless if you don’t find brushes for them. Choosing this tool is not the easiest, because to create certain effects, you need a certain brush. You can try several different shapes to understand which one will best suit your child and the pictures he or she is drawing.
Round brushes with a pointed end and long hair help to apply wide or thin strokes. If the brush has short hair, it will be easier to use in work, especially when it is necessary to paint small details.
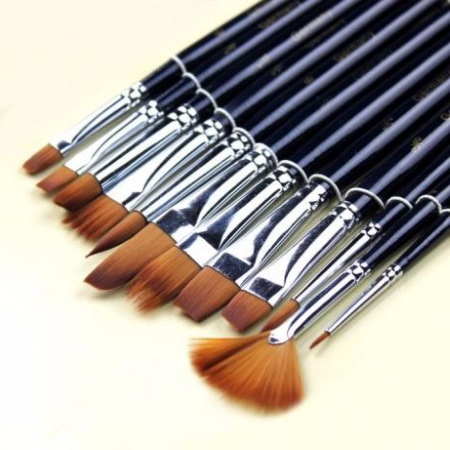
As for the material from which brushes are made, kolinsky is considered the best. Such tools are not cheap, but they are strong and durable, and they give excellent results. If you do not want to spend money on an expensive brush, you can buy squirrel and synthetic tools. The quality of the drawings created with their help will also be good.
To start with, you can limit yourself to buying a nylon brush. If they are wide enough, they can easily be used to paint details and fill in. You can also buy an oriental alternative to expensive brushes – sable tools.
Master classes
Small drawings for copying can be done in stages.
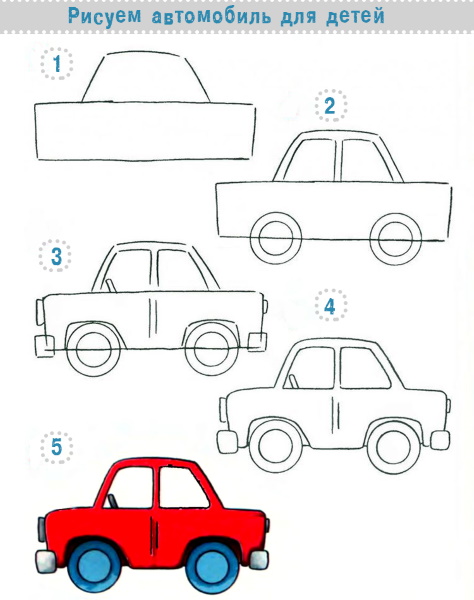
Machine
With a young male artist you can draw a simple car.
To do this you will need:
- paper;
- eraser;
- pencils, including the obligatory red color. The car body will be made with them.
The work is carried out in the following stages:
- Draw the roof. To do this, draw an arc line at the top of the album sheet. From its left end, a short horizontal segment extends to the left.
- Draw 3 more short horizontal segments at the bottom of the sheet. The one that will be located between the other 2 should be slightly longer.
- Connect all lines into a common outline. At the same time, draw arc lines between the 2 lower segments, which will become the wheel arches. The right end of the arc drawn in stage 1 is connected to the right end of the short lower segment. Between these 2 points, draw an arc line, which will become the hood.
- Draw the wheels. Above them, draw a horizontal line that will mark the lower edge of the glass.
- Detail the drawing. To do this, draw the door handles, as well as the glass, the front headlight (in this case, only one is visible) and the wheel rims (another 1 small circle inside the wheels).
- Add 2 horizontal stripes under the door handles, and then paint the finished car red. The stripes, headlights and glass can be left white. The wheel rims are red, and the tires should be black. You can simply paint them over with a simple pencil.
Airplane
Small drawings for copying can be on a transport theme. For example, using only a pencil, you can draw an excellent passenger plane.
The work on its creation takes place in the following stages:
- Draw a line that will mark the roof of the plane. It runs almost horizontally, but at the same time smoothly and slightly inclined. Its left part is rounded and goes down a few centimeters.
- Add the tail of the plane. It is located on the right and is a sharp angle, the top of which is directed upwards. But at the same time, the lines should be smooth.
- From the left end of the resulting line, draw a horizontal line. It should go towards the right end of the common line, but not reach it by several centimeters.
- In the resulting gap at the bottom, depict a wing. It, like the tail, is an acute angle, but only with its apex directed towards the lower right corner of the paper sheet.
- Draw a short line that connects the right side of the wing to the tail of the plane.
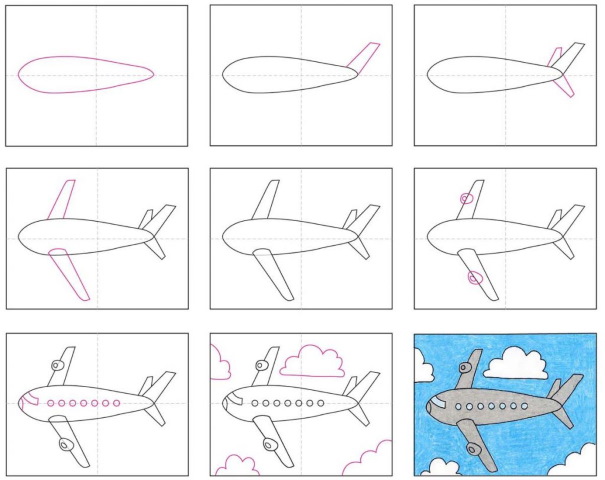
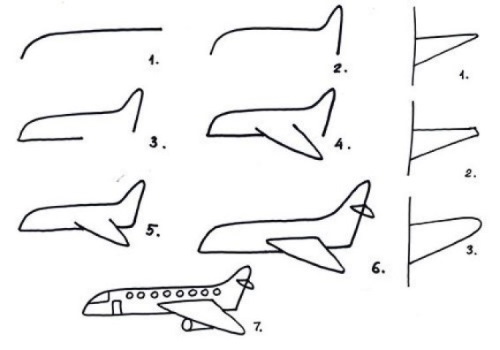
- The angle that represents the wing is turned into a triangle. To do this, it is enough to connect the 2 lines that form it. Also, add another small triangle to the tail section.
- Add the missing elements. In particular, there is a strip of round windows running along the entire plane. You just need to draw several small circles in a horizontal row at the top.
- Draw the cockpit glass in the front of the plane. It's just a right angle under the curved line. A little lower and to the right is the door. It's a small rectangle, stretched vertically.
- Draw a circle under the wing. It should be connected with a straight line to the wing itself.
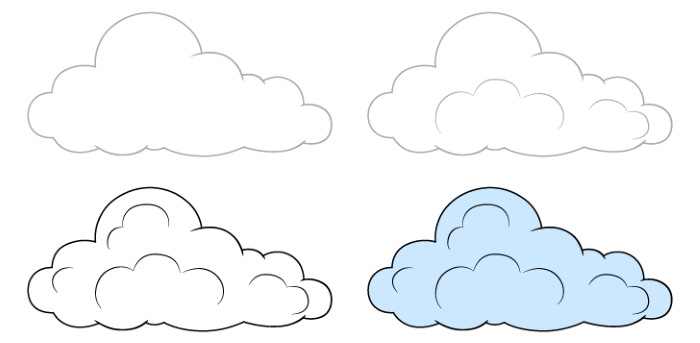
Cloud
Kids will love this cute cloud with eyes that doesn't raindrops but hearts and stars.
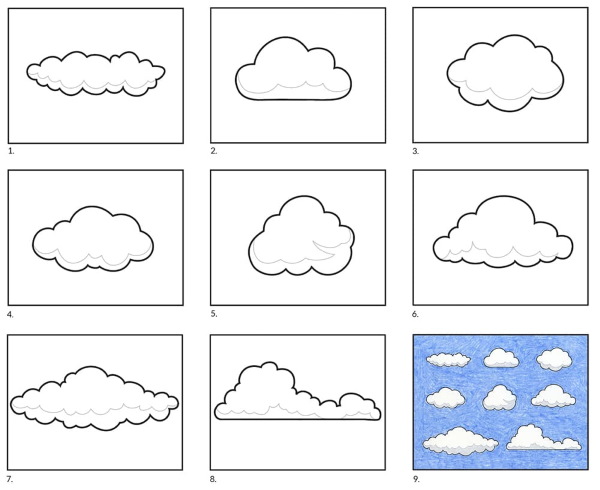
This drawing is performed as follows:
- Draw a cloud that consists of many arced lines.
- Draw eyes inside the cloud. There are only 2 of them – each of them is an arc. Draw several strokes under these arcs – eyelashes.
- Below, under the eyes, place the mouth, which is also drawn as an arc line. The result will look like a cloud smiling. On the edges of this smile - 1 pink circle.
- Draw a lot of small hearts and stars in a chaotic order under the cloud itself. The result will be a heart-star rain.
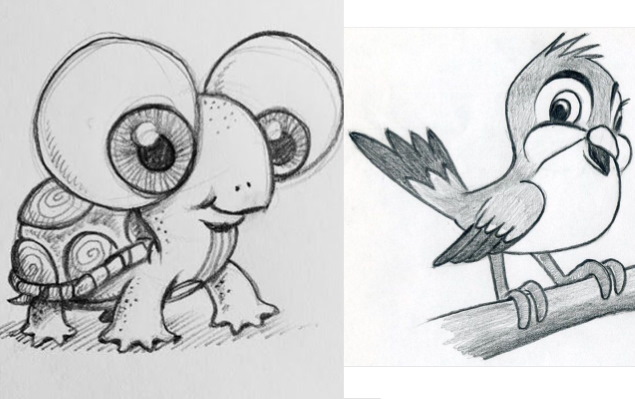
Turtle
Small drawings for copying can be presented by various animals, including exotic ones. The child may be happy if you offer him to draw a turtle.
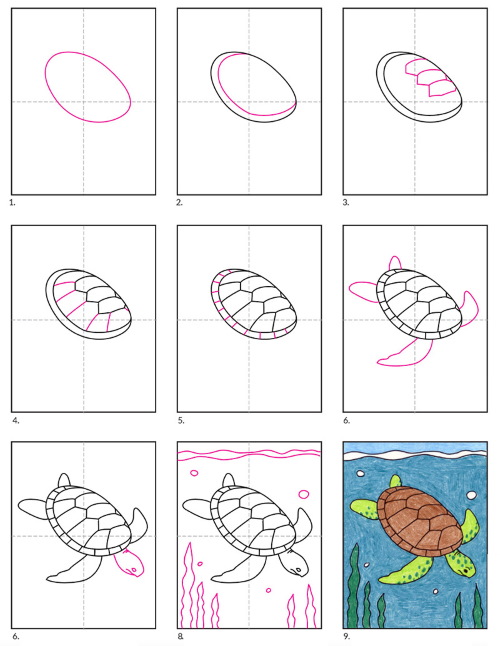
The work will take place in the following stages:
- Draw a large oval. Its height should be greater than its width: it should be slightly elongated vertically.
- Remove the lower part of the oval with an eraser. To the left of it, draw the head of a turtle. It is half a circle and half a square. In fact, it is a square, but only with smooth lines and rounded upper corners.
- Draw the legs. They are located in the place of the lower part of the circle removed in the previous step. For now, only 2 paws are drawn - on the left and on the right (respectively, the front and back).
- Draw the eye in the form of a circle, and the mouth in the form of a short line starting from the lower left corner of the head.
- At the back, under the shell, add a short tail in the shape of a small triangle.
- Finish drawing the turtle's right paws. It is important to remember that they are covered by the left paws and are only partially visible.
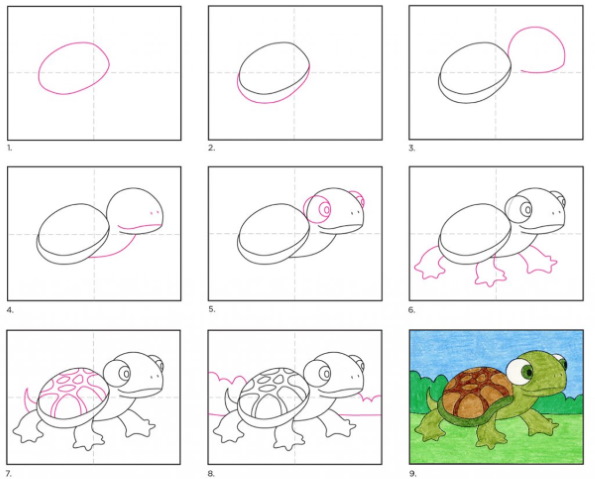
- Decorate the shell. You can simply draw a lot of rectangles all over its surface, but their corners should be rounded.
- Color the finished drawing. The legs, head and tail of the turtle can be made light green, the rectangles on the shell can be yellow, the spaces between these rectangles can be dark green, and the turtle's eye can be blue.
Poppies
In this case, you can use finger painting techniques to create a painting of blooming poppies.
The work will take place in the following stages:
- Draw some stems using a brush and green paint.
- Dip your finger in red paint and leave prints. Several red prints should form a circle, and the middle of this circle should be left unpainted. Each print is 1 poppy petal. You can make each flower have 4 such petals. But there can be more, then such poppies will become double.
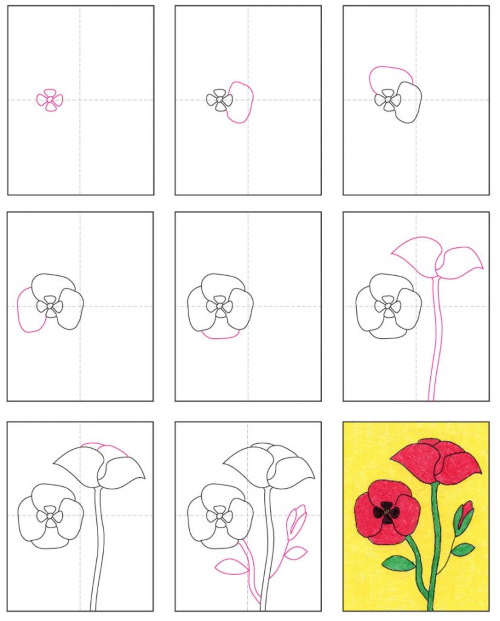
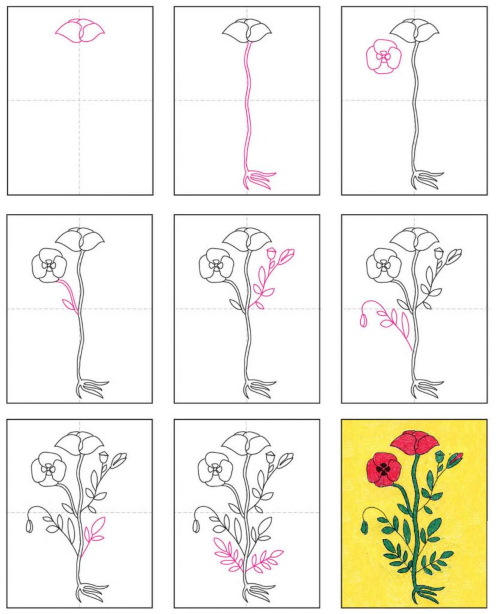
- Dip your finger in black paint and make 1 print in the center of each flower between the red petals.
- Using a thin brush, draw stamens from the center of the flower.
- After the paint has dried, use a cotton swab to make green prints in the very center of the cores. Hold the swab strictly vertically.
- To complete the picture, add leaves. This can be done with a brush.
To successfully copy small drawings, a child needs precise ideas about the objects that he will try to depict on a sheet of paper. During the work, he masters the methods of drawing and learns to subordinate the movements of his own hand in accordance with the task.
Video about drawing
Small drawings for copying: