Cats are popular pets with long hair, whiskers and a fluffy tail. One of their distinguishing marks is 4-5-fingered paws, which can be depicted using a simple pencil on thick paper.
What you need for drawing
Adults and children can draw a cat's paw schematically by cells, using a simple notebook sheet or full-length on paper, schematically depicting the pet itself.

Tools used in drawing:
| Name of the item | How to choose it correctly |
| Album sheet | Pencil sketches are recommended to be made on thick paper - on Whatman paper or on an A4 album sheet. For small children who are just getting acquainted with the basics of drawing, you can take a notebook sheet in a box and try to depict a kitten's paw schematically. |
| Simple pencils | For the work you will need pencils of different degrees of hardness - HB, B and 2B. The sketch of the drawing is done with HB pencils (medium softness), and soft pencils with B or 2B lead are used to highlight the contours and create color accents. |
| Erasers | Professional artists use two erasers: a regular one (which erases pencil marks along with a layer of paper) and a kneaded eraser, which helps to correct and lighten the drawing. |
| Colored pencils | Classic (graphite) or watercolour pencils are sold in sets of 6 to 24 colours and are used to colour the drawing. Experts recommend using coloured pencils from Faber-Castell, Berlingo and Multi-Pulti when drawing. |
Experts advise drawing on a hard surface (for example, on a table) with good natural or artificial lighting.
Master classes
A cat's paw is a drawing that even a novice artist can easily create using pencils and a sheet of paper.
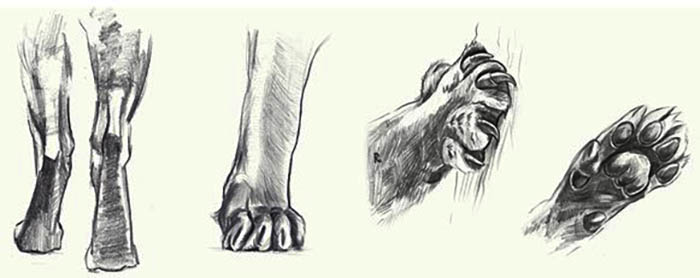
Before you start drawing, professional artists advise get acquainted with the anatomical structure of cat paws, and also study the basics of drawing, which consist of the following:
- To create it, you need to use simple geometric shapes - triangles, ovals, circles, applied with thin lines without the obligatory observance of clarity and evenness of edges. Despite this, you need to draw on the cells only with clear, even lines, without shifting to the sides.
- All parts of the drawing must have strict proportions, close to real ones, allowing the sketch to be made as similar to the original as possible.
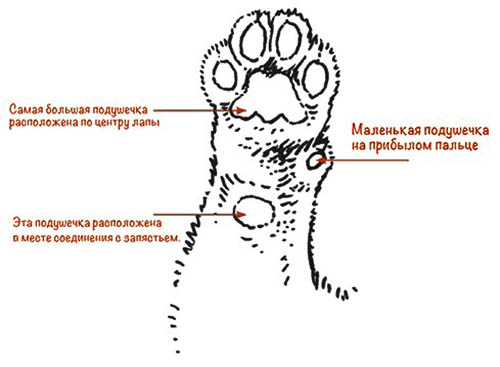
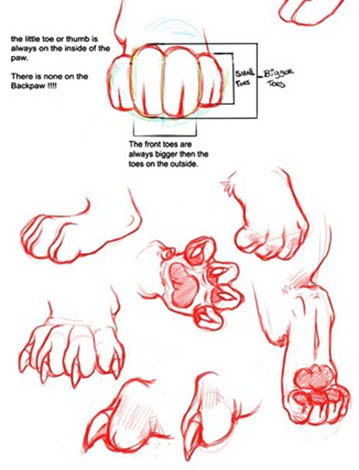
The anatomical structure of cats is also of particular importance, since domestic pets use only the tips of their toes when walking, and the rest of their paws are needed to support movement and jump, while their front and back paws are slightly different from each other. They have 4 active toes.
On the hind legs there is a rudiment of the fifth finger, which has the shape of a small tubercle, and on the front legs there is a small, rounded process.
The claws are attached to the last phalanx of the finger, and when retracted, bring it closer to the adjacent bone. Their structure and size differ depending on the type of finger. The metatarsal bones of cats end in heads, which allows them not only to bend, but also to spread their fingers.
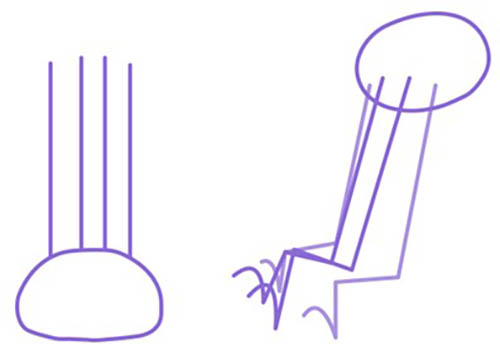
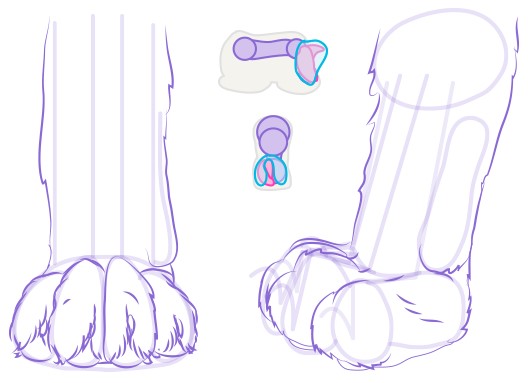
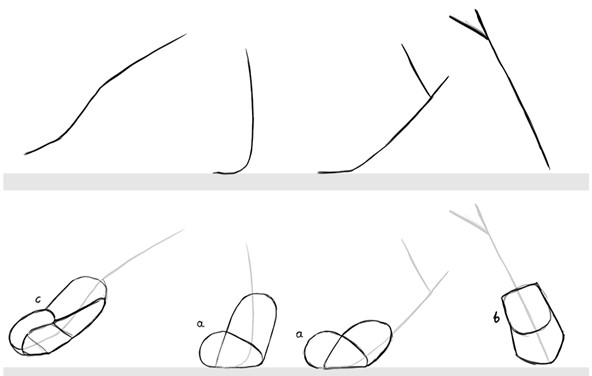
Having familiarized yourself with the anatomical features, you can try to depict the cat's paws, for which:
- For the front view, you need to draw 4 lines coming out of an oval with one flat side.
- For the side view, you should also draw 4 lines starting in an oval and ending in steps inclined towards the middle.
- At the next stage, on the paw shown from the front, you need to make 4 ovals of different sizes within the main large oval, depicting the fingers. For the "side view" drawing, you also need to draw ovals-fingers so that they cover the last corner, and then connect them to the upper part with a line.
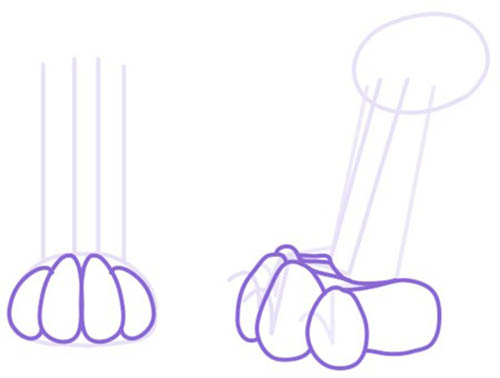
- The animal's 5th finger, which is in its embryonic state, should be schematically depicted with a wavy line in the drawings.

- Using strokes and short lines, draw the fur on the paws, not forgetting the area between the claws.
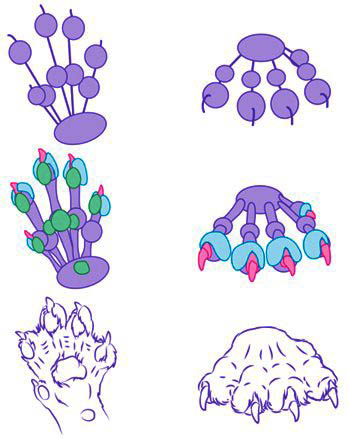
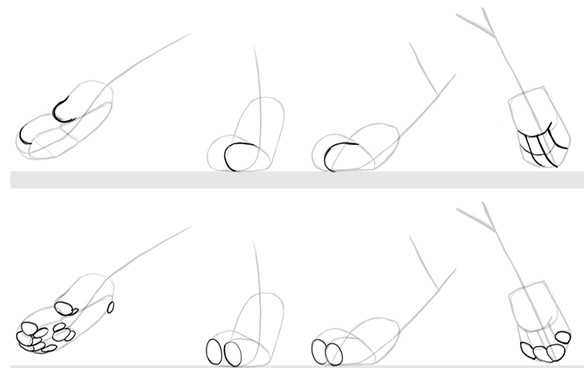
Likewise, based on the anatomical structure, you can also depict a cat's paw with extended claws, for this you will need:
- Draw a schematic oval on a sheet of paper with 5 lines of different lengths coming out of it - 3 long ones for the front fingers and 2 short ones for the side fingers. On each of them you need to place 2 circles - for the phalanges of the fingers, while the last, 5th circle, should slightly overlap the 4th long line.
- The circles of the phalanges-fingers are completed with short lines - a schematic representation of claws.
- Using wavy lines and geometric shapes, finish the cat's fingers and pads in the drawing, add volume to the phalanges and claws, and complement them with the thin nail coating inherent to all cats, located on both sides.
- Using strokes and broken lines, apply fur to the paws, highlight the outline of the drawing and erase all auxiliary details.
While drawing, you can also use various diagrams showing the rules for the step-by-step depiction of cat paws in different positions.
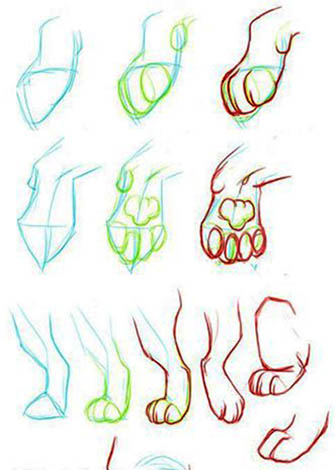
They must be repeated strictly according to the instructions:
Kitten with outstretched paws
You can depict cat paws together with your pet, for which:
- On a sheet of paper, you need to schematically draw a drawing of an animal with paws extended upward using pencil strokes.
- Using ovals and broken lines, draw the features of the cat's face and paws, not forgetting about the pad of the 5th finger.
- Draw claws and pupils in the eyes on the drawing.
- Use hatching to depict the fur, and then use a soft pencil to highlight the outlines of the drawing and erase all auxiliary details.
Volumetric cat paw
Cat's paw - a 3D drawing is achieved by applying shading, which adds additional volume to the image.
When performing it, you need to:
- Using a medium-soft pencil (HB), outline the silhouette of a paw in the form of a trapezoid on a sheet of paper, so that the distance between its sides is the same. Connect the upper points of the trapezoid with an arc and mark the place where the cat's fingers and pads will be located.
- Draw 4 spread fingers in the shape of ovals - 2 large ones in the center and 2 small ones on the sides, and then use an eraser to remove the auxiliary lines.
- Use a pencil to outline the outline of the drawing and draw pointed claws in the shape of pyramids on the upper part of the fingers.
- Remove all auxiliary lines of the drawing with an eraser and draw the central pad on the palm, which is shaped like a triangle with a wavy base.
- Apply small oval pads to each of the cat's toes.
- After the main parts of the drawing are completed, you can begin creating the shading, for which you should carefully apply horizontal and vertical strokes to the entire surface of the drawing with an HB pencil, without going beyond the contours of the paw.
- Using protruding lines of different lengths and widths, depict the fur in the drawing, paying special attention to the areas between the toes.
- Using a soft pencil B, draw the ovals of the fingertips, leaving a small light area on them, which can then be lightened with an eraser, and shade the rest of the paw, also leaving small light dots on the upper parts of the fingers.
- Correct the outline of the drawing with pencil strokes, making it smoother, and then darken the claws with a 2B pencil, making them a dark color that stands out from the main drawing.
- Using a soft pencil, apply shadow to the drawing, shading the pads of the fingers with a darker tone first, and then the fur on the palm, in the center of the paw and between the fingers, thereby adding volume to the drawing.
- On the central pad of the paw, apply dark spots of any shape at the bottom and top so that they do not intersect with each other, and leave a light gap between them.
- Use shading to add detail to the wrist of the paw and slightly darken the left side of the drawing.
- Using an eraser, lighten the fur in the center of the toes and correct it again with shading, darkening the central pad and the area between the toes.
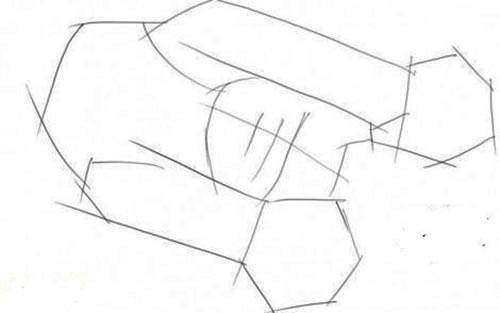
Another version of the image of a three-dimensional drawing begins with dividing the working plane with horizontal and vertical lines, for which:
- In the center of the sheet you need to draw a circle and divide it into 4 parts with perpendicular lines;
- Place an oval in each one so that the two central ones extend slightly beyond the horizontal line.
- From the top of the oval down both sides, extend the line to form the wrist, then draw oval pads on the sides of the circle and place one in the center.
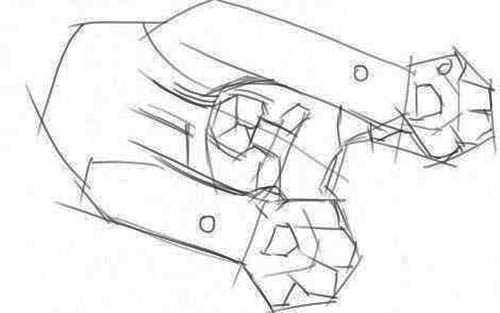
- In the central part of each of the large oval fingers, add small oval pads so that one of their edges has a straight side.
- Using an eraser, remove all auxiliary elements from the drawing, outline its contours and paint the pads of the fingers on the paw with a dark color.
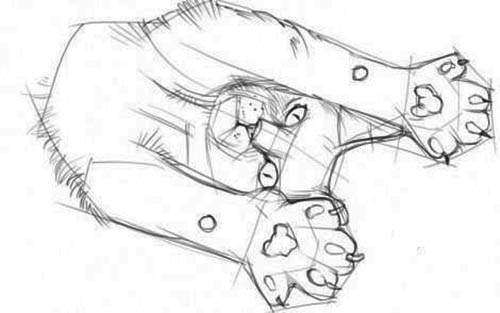
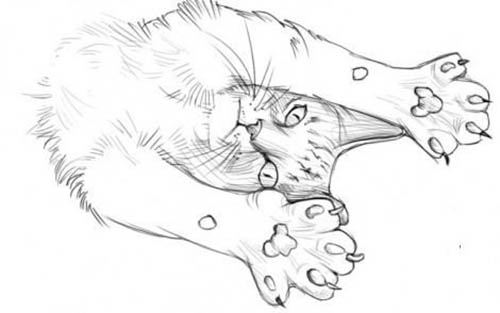
- Using shading, begin creating the fur, using multiple short lines that extend beyond the outline of the drawing.
- Use an eraser to highlight the areas near the fingertips, and use a soft lead pencil B to shade the right side of the wrist and the left side of the central fingertip.
Cat paws in motion
Cat's paw - a drawing made in motion, should reflect a smooth, one-sided presentation of the animal's paws - an amble, allowing it to move smoothly in a strictly straight line.
To create it you need:
- Use lines to depict the position of the cat's paws when walking on a sheet of paper, and then use ovals to schematically give them shape.
- Using circles, add toes to each paw, and then using small ovals, draw soft pads on the paws.
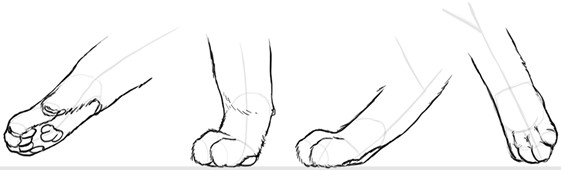
- Use smooth lines to outline the drawing and add short strokes to depict the animal's fur.
By the cells
Cat's paw - a drawing on cells can be done on a regular notebook sheet with even, clear lines with mandatory color filling of all elements. This style is also called "pixel" and can be done with a simple pencil or marker.
Drawing here follows a pattern in which a certain number of cells must be set aside diagonally, vertically and horizontally from the edge of an already drawn figure and immediately shaded (sketched).
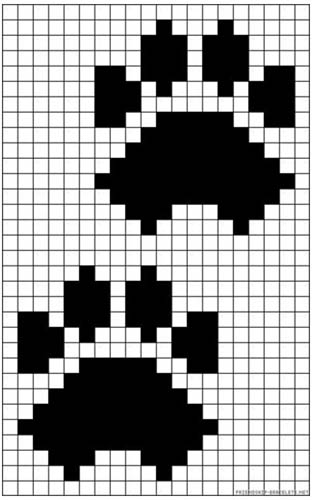
The cat's paw diagram begins with shading on the left side of the drawing of 3 horizontal cells, from which on both sides, sequentially, strictly from the edge of the last figure, you need to set aside:
- 3 cells down diagonally;
- 2 cells diagonally up;
- 4 cells up on both sides;
- 1 square diagonally;
- 2 cells horizontally;
- 1 cell up diagonally;
- 2 cells up horizontally;
- 3 cells diagonally;
- 3 cells horizontally;
- 5 cells in the center up on both sides;
- 1, 1, and 2 cells in the center up diagonally;
- moving from the last 3 cells deposited - 3, then 4 cells up on both sides;
- 1 cell diagonally on both sides and 1 in the center;
- From the middle of the pad, mark off 3 cells horizontally, 4 up on the left and right, 1 twice diagonally on both sides and 2 cells up to form the claw.
Traces
Cat's paw is a pencil drawing made in the form of animal tracks imprinted during movement on any soft surface (for example, on the ground), requires for its creation:
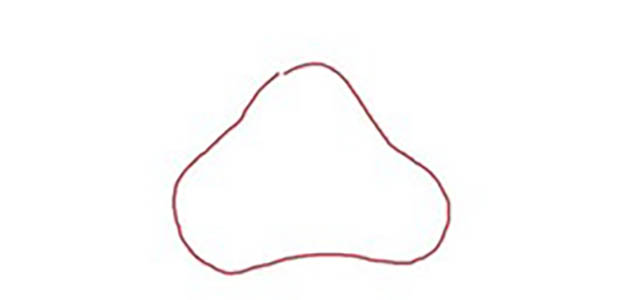
- Draw a triangular shape with rounded edges on a piece of paper with a pencil to represent the sole of the pet.
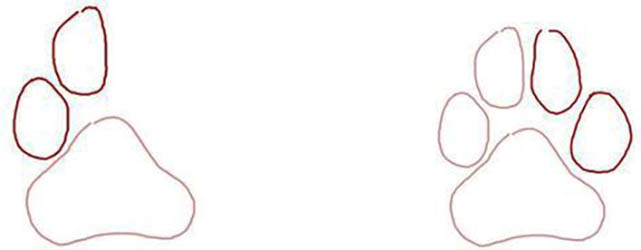
- At a distance from it (in the center and on the sides) place four ovals of different volumes - depicting the cat's fingers. To simplify the drawing for small children, you can draw circles instead of ovals. In this case, they can use a compass when working or trace along the contour of any round object attached to the paper.
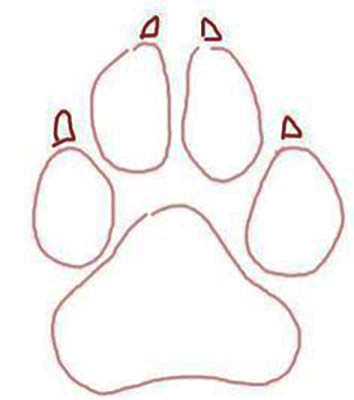
- Draw claws above the top of the fingers using small triangles.
- Trace the resulting trace along the outline with a soft pencil and, if desired, paint over it with dark paint.
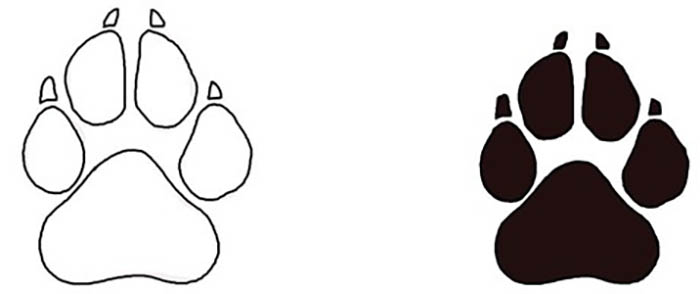

- Using pencil hatching - a grid instead of paint, you can achieve additional volume and add realism to the drawing. It is recommended to use pencils with soft leads B and 2B for hatching. The central part should be highlighted with an eraser (kneaded eraser).
If desired, such a drawing can be improved and supplemented:
- a trail of cat footprints;
- the silhouette of an animal or its muzzle located next to it;
- traces of scratches.
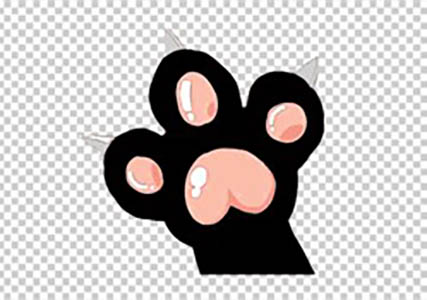
Cartoon paw
Cat's paw - a drawing reminiscent of scenes from a children's cartoon, allows you to show your imagination and depict one or several colorful animals reaching for a treat.
To create it you need:
- Draw a small triangle with rounded corners on a piece of paper or replace it with a figure that resembles an “inverted heart”.
- Next to it, draw several ovals or circles for the fingers. Their number can be from 3 to 5-6.
- Using triangles at the top of the circles (ovals), make the claws, and then draw the animal's hand.
- Use a soft-lead pencil to outline the outline of the drawing, then color it in with paints or colored pencils.
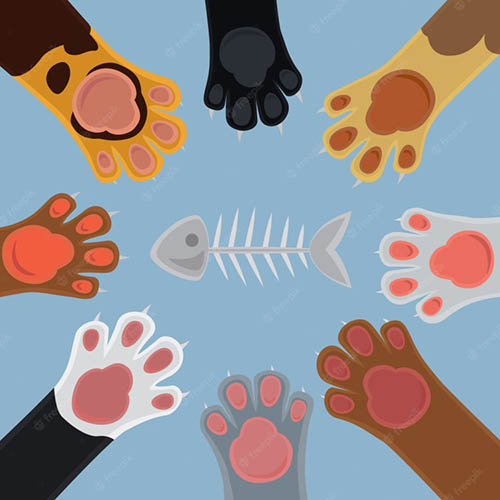
When creating a drawing with several cartoon cats at the same time, you will need:
- On a sheet of paper, draw a three-dimensional circle on which, at a distance from each other, draw 8 elongated ovals (they can be replaced with triangles with rounded corners or inverted hearts).
- Next to each of them, make 4 small ovals of different sizes to depict the pads of the fingers and draw the outlines of each paw with lines.
- Draw triangles – claws – on the upper part of the ovals for the fingers, then outline the outline of the drawing with a soft pencil and erase the auxiliary details with an eraser.
- In the center of the main circle (in the middle of the sheet), using triangles, one horizontal line and 5-6 short vertical lines coming out of it, draw the skeleton of a fish, behind which, according to the plot, the cats are reaching.
- Use paints or colored pencils to color the cat's paws and fish skeleton; you can complement the drawing with a contrasting background.
A cat's paw is a beautiful and fairly easy-to-do drawing consisting of simple geometric shapes. Performed in strict accordance with the animal's anatomy, it can be made according to a pattern, with strict adherence to the sequence of cells to be painted.
This can be done with simple pencils of varying degrees of hardness on a sheet of paper, with the drawing of wool fibers and the imposition of light shadows, allowing you to add volume to the sketch and maximum similarity to the original or in cartoon form, which will give the child and adult the opportunity to practice the basics of artistic skill.
Video about drawing