Crocheted bib or knitted, will become a warm accessory that the boy’s mother will easily put on him when going for a walk.
The advantage of a bib over a scarf
The peculiarity of grown-up children is their mobility. Therefore, all things should perform their functions, while allowing the child to move freely. This is one of the advantages of a bib over a scarf.
In addition to being comfortable to wear, the bib has a number of positive qualities, which are listed in the table:
| Pros | Cons |
| High cost of purchased models made from thermal fabrics. |
Choosing Crochet Hooks
For knitting, select hooks according to the thickness of the yarn.
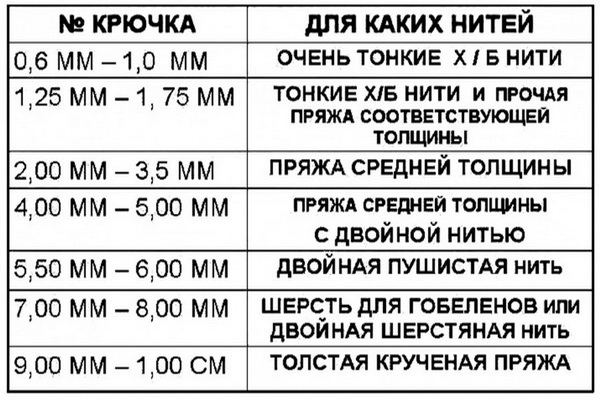
Often, such information is indicated on the label of the knitting threads. If the yarn is unlabeled, but it is of medium thickness, then you can take a standard hook No. 2.8, No. 3 or No. 3.5. You can select a hook by trying to knit a small fragment and assess the knitting density: if the hook is small, then the knitting will be tight, if on the contrary, the knitted fragment will be too loose.
Beginners who have no knitting experience are advised to ask the seller for advice on suitable knitting tools when purchasing yarn. Crochet hooks come in different types and are made from different materials.
For experienced needlewomen, any convenient tool made of metal, plastic or wood will do. Beginner knitters will find it convenient to start with a metal hook equipped with a finger holder.
Yarn requirements
When knitting children's things, special attention should be paid to the choice of yarn. Children's skin is delicate, and some babies are prone to allergies. The choice of material depends on these features.
Basic requirements for yarn for knitting a collar:
- Softness. The yarn should be pleasant to the touch and not distract the child. Many manufacturers produce special lines of yarn with the prefix "baby", the composition of which is specially developed taking into account the characteristics of children's skin. This yarn can have a natural or mixed composition.
- Hypoallergenic. Knitting threads should have a stable color and not contain fibers that cause allergies in the child. Before buying, it is recommended to familiarize yourself with the composition of the material, as well as check the dye for durability.
A simple way to determine the durability of a dye directly in the store is with a regular damp cloth. You need to pull the thread through the compressed cloth. Low-quality yarn will leave a colored mark on the fabric.
- Wear resistance. An important quality is maintaining the quality of the item when worn. For children's items, you can buy mixed threads consisting of natural and synthetic fibers. Synthetics allow the item to retain its shape and not roll. And natural components retain the warmth and breathability of the product.
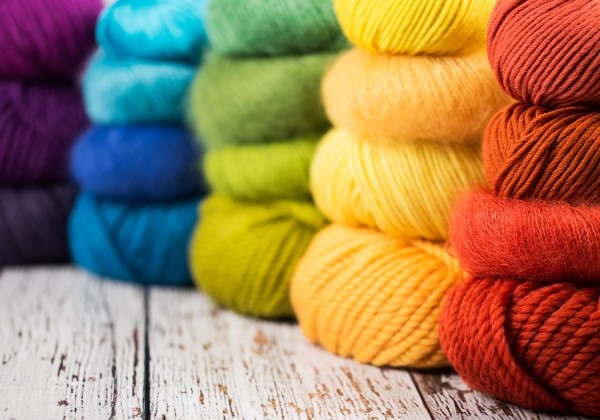
The choice of yarn color depends on the mother's wishes. For babies, you can choose any bright colors that match the color of the outerwear.
Choosing a comfortable style
Knowing the child's character, it is easy to guess which model will suit him best. There are 2 main types: with a solid collar and with a clasp. The first type will fit tightly around the neck, but it needs to be pulled over the head like a turtleneck, which many children don't like. The second type is comfortable to put on, but the fastener may get in the way when wearing, especially if it's at the back.
Some people will like a high collar that can be pulled up to the chin, while others will prefer a model with a low stand. The choice of a bib also depends on the season. In winter, models made of warm materials are relevant, possibly with a lining and a double collar. And for the off-season, a bib made of thin yarn is comfortable.
Taking measurements
A crochet collar for a boy is very easy to crochet.
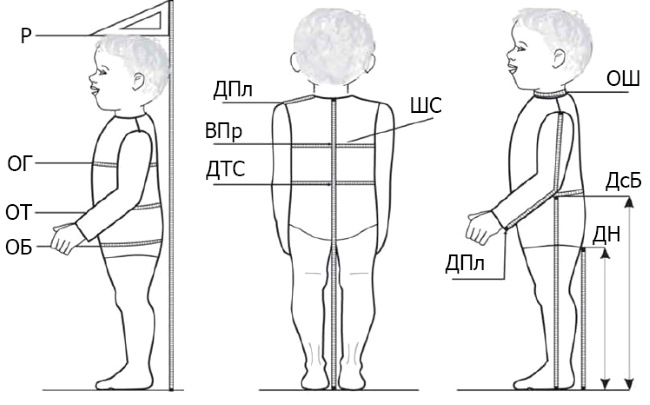
To knit you will need to know the basic measurements:
- Neck circumference. This size is measured where the neck and shoulder meet.
- Collar height. This is an individual size that can be adjusted as you knit, trying the product on your child.
- Shoulder length. This measurement is needed to determine the length of the bib.
- Shoulder circumference (or shirtfront width). If you plan to have the bib cover your shoulders, you need to measure your body volume, measuring just below the angle of the shoulder, including your arms, chest and back.
Sequence of knitting a simple collar for a boy. Master class for beginners
A crochet or knitted collar for a boy is knitted using a raglan pattern, when the entire product has no seams.
There are 2 types of execution:
- Start knitting from the collar.
- Knitting from the collar and then finishing the neckline.
To get started, you need to take a few preparatory steps: take measurements, knit a sample and calculate the number of loops.
Sample and calculation of loops
It is possible that following the instructions from the magazine, the item turns out to be smaller or larger in size. To avoid unraveling and re-tying, take into account the thickness of the knitting needles and yarn, it is recommended to make a sample and calculate the required number of loops. In this case, the item will correspond to the child's size.
To count loops, do the following:
- Knit a sample measuring 10 x 10 cm from the chosen yarn.
- Count the number of loops in 1 cm.
- Multiply the resulting number of loops by the length of the piece you plan to knit, and you will get the number of loops to cast on.
Neck
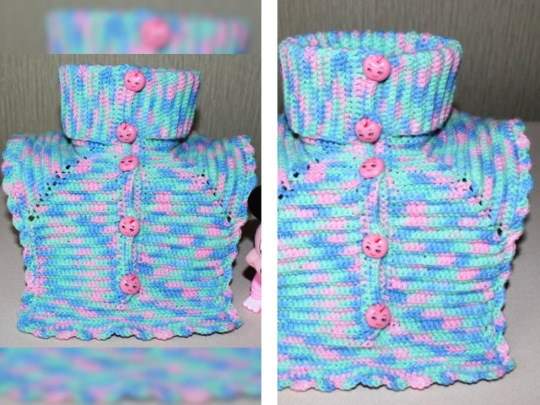
Next, in the step-by-step diagram, the model of the collar with fasteners is considered. This is the simplest thing for beginner craftswomen. When knitting the neck, you need to take into account that the collar is not too tight or too wide. When casting on loops, be guided by specific sizes and calculations of loops from the sample.
The positive aspect of knitting a collar with a fastener is that, if necessary, you can knit an additional strip for buttons. Such finishing will not spoil the appearance of the product and will eliminate the need for re-tying.
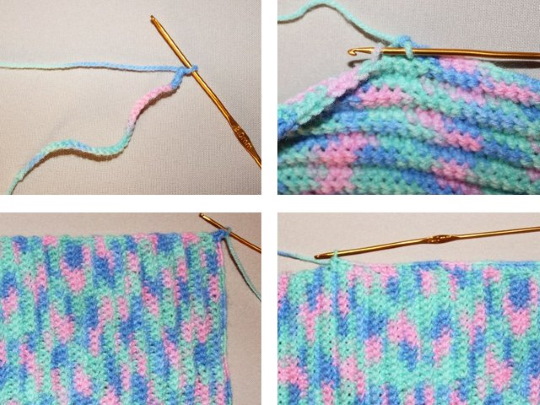
Knitting the neck (for a 2 year old):
- Knit a chain of 35 air loops, and add 1 lifting loop. This will be the height of the collar with a fold.
- Knit a row of single crochet stitches through the back wall of the loops.
- Knit about 60 rows. The length of the piece should be equal to the circumference of the baby's neck.
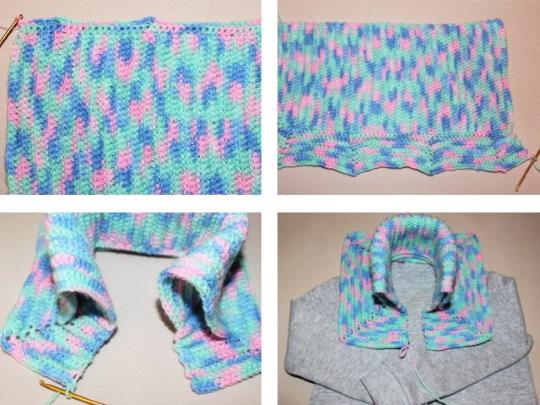
- Tie one transverse side with single crochets and move on to knitting the shoulder piece and cape using the raglan pattern.
Mantle or cape
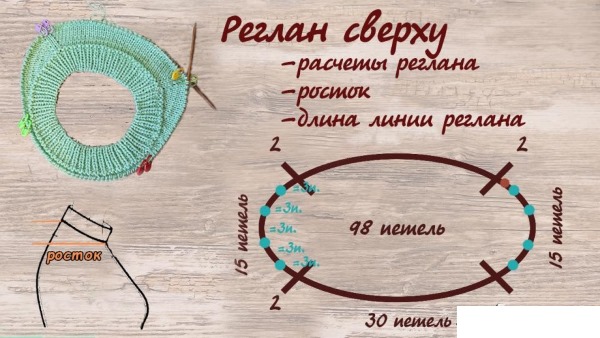
To proceed to the next stage of knitting, you need to divide all the loops of the lower edge of the collar into loops for the front, back and sleeves.
You can do it like this:
- Divide the total number of loops (60 pcs.) by 4. You will get 15 loops for each piece.
- Move 3 front loops to the back (18 back loops).
- Divide the front piece into 2 shelves (6 loops each).
Knitting pattern:
- Knit the first half of the front with single crochets. From the last loop of the front, knit 2 single crochets and make a chain of 3 air loops.
- In 1 loop of the sleeve, knit 2 single crochet stitches. Knit all loops of the sleeve. In the last loop of the sleeve, knit 2 single crochet stitches and make a chain of 3 loops.
- From 1 back loop, knit 2 single crochet stitches. Knit all back loops. From the last loop, knit 2 single crochet stitches and 3 air loops.
- From 1 loop of the 2nd sleeve, knit 2 single crochet stitches and knit all the loops of the sleeve. From the last loop of the sleeve, knit 2 single crochet stitches.
- From 1 loop of the 2nd shelf, knit 2 single crochets and 3 air loops. Knit all the loops of the shelf.
- Repeat the sequence until you get the desired size (approximately 16 rows). The length of the shoulder is equal to the shoulder length measurement.
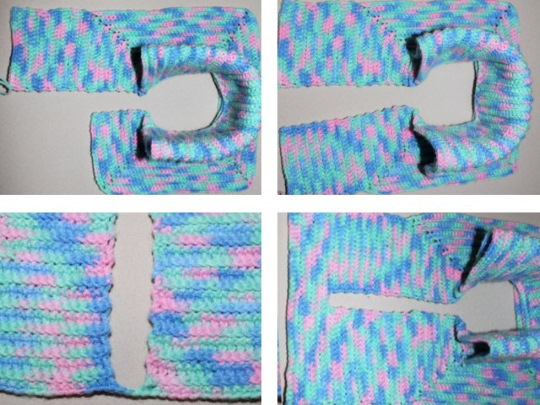
- Knit each shelf, extending it by 15 rows of single crochet stitches. Join the shelves together at the bottom by knitting the bottom edge with single crochet stitches and making a chain of 3 air loops between the pieces.
- On the left shelf, knit a button placket of 4 rows of single crochet stitches. Join the edge of the collar, folded in half, together with the first row of the placket.
- Make the right strip as follows: knit 1 row with single crochet stitches. Knit the 2nd row with single crochet stitches alternating with arches of air loops (taking into account the size of the buttons and the distance between them). 3rd row – single crochet stitches.
- Tie the edges of the bib with a decorative border (fans or crab stitch).
- Sew buttons onto the left strip.

In some models, a cape is knitted. This is the part of the collar that goes down below the shoulder and covers the upper part of the arm. The size of the cape should not be less than the measurement of the shoulder girth. This part is knitted by continuing the shoulder with single crochets, but without adding additional loops.
Ideas, patterns and descriptions of crocheted bibs for boys
A bib is a universal winter accessory that will suit both girls and boys. An original crocheted item will not get lost in kindergarten, and the baby will be able to put it on without outside help. Below are ideas, patterns and master classes for bib collars for children. As well as tips and options for decorating knitted items.
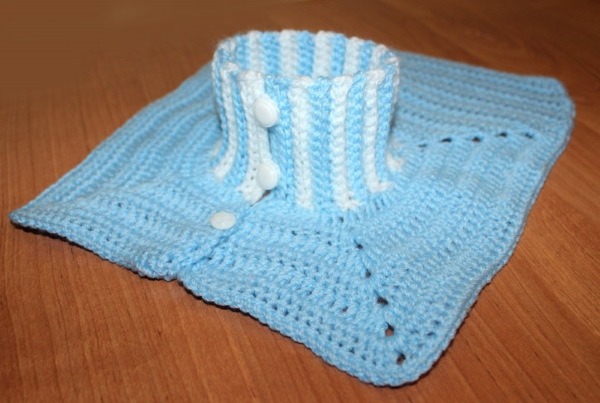
Collar-bib
A convenient option for a collar that looks like a turtleneck collar with a cape. The collar stand should be elastic enough for the child's head to pass through freely, but the collar should not be too wide and fit well around the neck.
When choosing yarn for this model, it is recommended to pay attention to threads with elastic fibers. In this case, the product will stretch well and the child will not feel uncomfortable putting the bib over his head.
Classic knitting pattern for a collar-bib:
- Knit a chain of air loops that is equal to the neck circumference. In this case, you need to take into account the circumference of the child's head so that the collar is not tight.
- Knit with relief front and back columns according to the 2 by 2 pattern, closing the rows into a ring. In each new row, knit 2 air loops for lifting.
- Knit the number of rows required to achieve the desired collar height.
- Proceed to knitting the cape. The expanding part can be knitted according to the raglan pattern, or you can evenly add additional double crochets in a circle.
Knit the cape according to the pattern, alternating the indicated sequence in each row:
- 1 row – 4 lifting loops, in each loop 2 columns with 2 yarns.
- 2nd row - 4 lifting loops, in 1 loop 1 column with 2 yarns, in the next 2 loops 2 columns with 2 yarns.
- 3rd row - 4 lifting loops, in 2 loops 1 column with 2 yarns, in 2 loops 2 columns with 2 yarns.
- 4th row - 4 lifting loops, in 3 loops 1 column with 2 yarns, in 2 loops 2 columns with 2 yarns.
- Following the pattern, knit the required number of rows.
- Tie the edge with a decorative border.
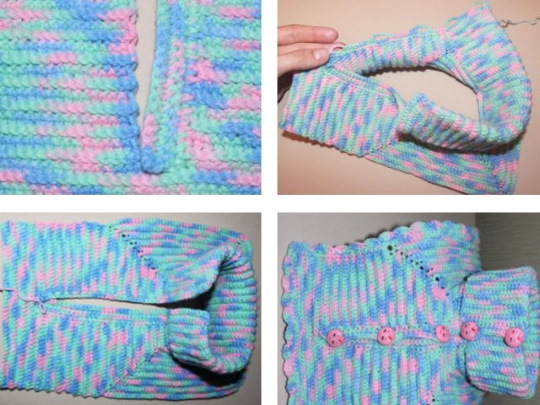
Button-down style
The classic style of a boy's bib, the master class of which is given above in the article, can be modified.
For example, add the following elements:
- Make a Velcro fastener at the back of the collar;
- Lengthen the front and back of the collar by knitting the required number of rows.
- Use yarns of different textures for knitting (fluffy, bouclé, bulky yarn).
- Decorate the product with knitted elements, fabric appliqués or decorative embellishments (beads, buttons, sewn-on animal figures).
- Use different knitting patterns (dense or openwork).
- Add a hat or hood to the bib.
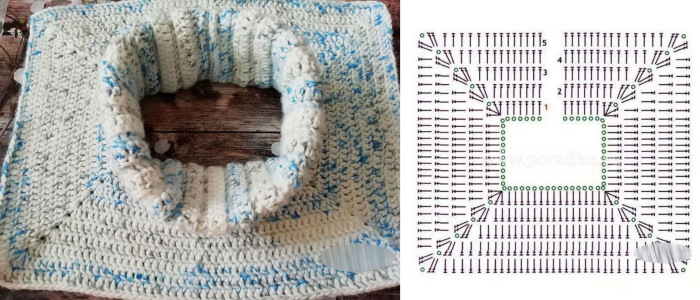
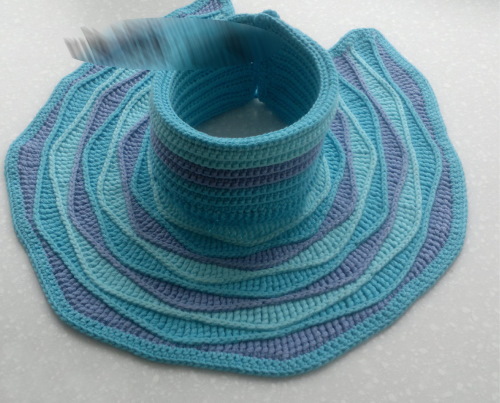
Round shape
The order of knitting a round collar depends on whether it will be made with a fastener or knitted in a circle. Knitting a collar is no different from the previous models. In knitting an elastic collar with a crochet hook, the technique of an elastic band from relief front and back columns is used. You can vary the pattern scheme using a 1 by 1 or 2 by 2 scheme.

The collar (or cape) is knitted according to the classic pattern, when columns are added evenly in each row. The pattern for knitting rows of a round cape is discussed in detail in the section on knitting a collar-collar. To decorate the model, you can use a combination of different colors of yarn, decorate the collar with stripes or a stylish brand emblem.
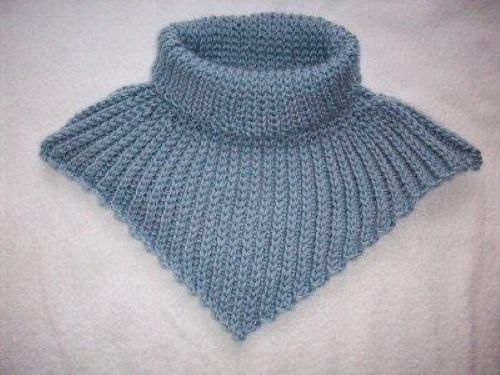
Rectangular shape
A crocheted collar for a boy that covers the shoulders will go with any clothes. For cold weather, it is better to make it from semi-woolen yarn. This simple cut model in any discreet color will suit older children. For knitting, you will need semi-woolen yarn of medium thickness and a hook No. 2.8 or No. 3.
The order of knitting a collar for a boy of 7 years:
- Take basic measurements (neck circumference and shoulder length).
- Knit a sample and count the required number of loops.
- For a 7 year old boy, cast on a chain of VP 15 cm long (37 loops) for the neck.
- Knit 1 row with SC.
- Row 2: knit SC behind the back loop of the previous row.
- Row 3: knit SC behind the front wall of the loops of the previous row.
- Repeat the sequence from the 2nd row and knit the collar elastic band 85 rows long. In each row make 1 lifting loop.
- Sew the neckline using slip stitches.
- Along the bottom edge of the resulting round collar, start knitting a collar using the raglan pattern.
- 1 row knit SC. Divide the resulting 86 loops as follows: 4 loops for raglan, between them 16 loops for shoulders and 25 loops for front and back.
- Knit the required number of rows with double crochet stitches, knitting 2 double crochet stitches in each row in the loops before and after the corner loops of the raglan. Make 3 lifting loops in each row. Knit the raglan loops with double crochet stitches.
- Decorate the edge with a decorative border.
Raglan style
Raglan style (or seamless knitting) is suitable for knitting models for babies. At the same time, knitting on bibs for older children looks beautiful.
Crochet pattern for a simple raglan:
- Knit a collar of the desired size. You can knit in a circle or with a clasp.
- Count the number of loops along the bottom edge and divide them into 4 equal parts. From the shoulder loops, leave the first and last loop for the raglan.
- Knit a cape of the desired length using double crochet stitches according to the pattern: start each row with 3 lifting loops, in each raglan loop knit a sequence of 2 columns, 1 air loop and 2 columns.
- The edge of the bib on the front and back can be lengthened to the desired length, if desired, by knitting the required number of rows in the front and back.
Variants of the bib models:
- A combination of bright turquoise with the inclusion of a wide dark grey stripe on the shoulder.
- A one-piece plum-coloured cape with a low stand-up collar and button fastening.
- A grey-steel coloured bib made of fleecy yarn reminiscent of rabbit fur with white trim.
- Round cape with openwork collar and buttons for babies.
Model with bright stripes
The crochet collar for a boy is knitted according to the classic pattern. The model with bright stripes can be fastened with bright buttons or have a round shape. When choosing bright yarn, there is no need to decorate the model with additional decor.
When knitting, you can follow the following tips:
- Choose a harmonious or contrasting combination of colors (optimally no more than 3 colors).
- Knit stripes of different widths. Alternating thin and wide stripes looks beautiful.
- You can only make the cape striped by decorating the collar in one color.
- Knit colored stripes with yarn of different textures.
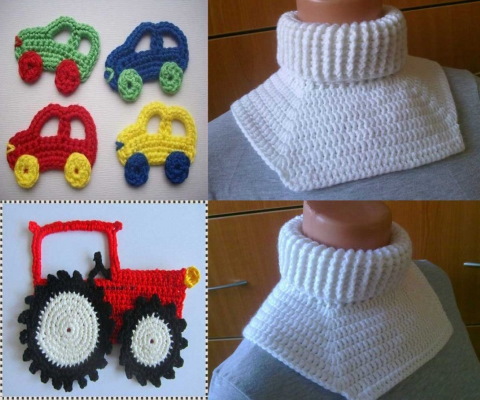
Model with a car
To create a collar decorated with an applique, you need to knit a single-color model and decorate it with a patch:
- sew the finished applique in the form of a car onto the front part of the cape using a needle and thread;
- crochet the car parts and decorate the collar with them.
Crochet pattern for a car:
-
- For knitting, take smooth synthetic threads of bright colors and a suitable hook.
- Knit a chain of 21 air loops.
- Make 1 lifting loop and knit with double crochets for 6 rows.
- Make 6 double crochet stitches and a chain of 9 air loops. Connect to the previous row in the 6th and 7th loops with two columns with 4 yarns. Knit a chain of 9 loops and connect to the penultimate loop of the previous row with a single crochet stitch. These will be the windows of the machine. Knit the last loop with a double crochet stitch.
- Knit with double crochets: in chains - 9 columns, between columns with 4 yarns - 2 columns.
- Tie the outline of the machine with single crochet stitches, knitting 4 stitches in the corners.
- Knit the wheels: knit 12 double crochet stitches into the central ring and tie with black yarn (2 single crochet stitches into each loop of the previous row).
- Sew the wheels to the body of the car.
Openwork for baby
The openwork knitting model is suitable for babies. It requires very little yarn. If the model is decorative, you can choose semi-synthetic threads or natural ones made of cotton, viscose or linen. To knit the model, you will need to take measurements, count the required number of loops. The collar can be made short and decorated with a decorative border.
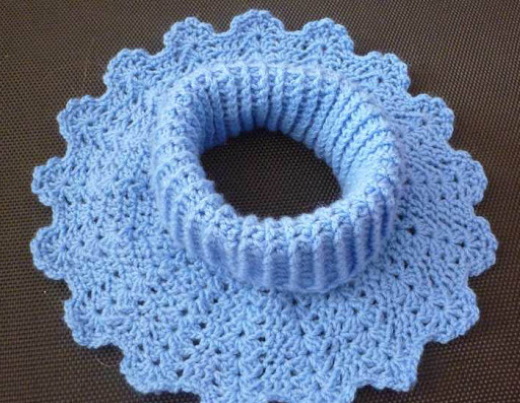
To make a cape, use a simple pattern, knitted according to the diagram:
- Knit a collar of the desired height and knit 1 row of the cape with single crochets.
- In every 2nd loop of the previous row, knit the following sequence: double crochet, chain stitch, double crochet. This creates a “check mark” pattern.
- In each “tick” knit the following sequence: 2 double crochets, chain stitch, 2 double crochets.
- Repeat the pattern of the previous row, but instead of 1 air loop, make 2 pieces.
- In the arch of 2 loops knit: 3 double crochets, 1 air loop, 3 double crochets.
- In the next row, repeat the pattern, but instead of 1 air loop, make 2 pieces.
- In an arch of 2 loops, knit 8 double crochets.
- Close knitting.
Knitting a collar for babies with your own hands allows you to create the most comfortable thing. For boys, thick things crocheted in subdued colors are suitable, for girls - openwork or fluffy models with bright decor.
Video about knitting a collar
Crochet bib for a boy: