A collection of small toys (characters from a fairy tale or cartoon) that can be put on your fingers - finger theater. It is used to develop fine motor skills of the hands, and also helps develop the child's speech. Such a craft is easy and quick to make with your own hands from felt using a pattern.
Preparation of materials
Before starting work, you need to collect a “box of useful things”, it will include all the necessary tools and materials that you can’t do without, namely:
- multi-colored soft felt, 1–2 mm thick (country of manufacture does not matter);
- a simple pencil and pen (professionals prefer self-disappearing fabric markers, in this case colored and white);
- 2-3 chalks with thin edges (since the details will be small);
- 2 types of sharp scissors (with blunt and sharp ends for easy cutting of patterns);
- pins or needles (the thinner the better);
- glue (optionally, Moment Crystal, regular super glue is not suitable, as it soaks into the felt and leaves marks), or a glue gun (if you have one);
- hole punch (for cutting out small circles);
- ready-made eyes for fairy tale characters (they are sold in craft stores) or beads;
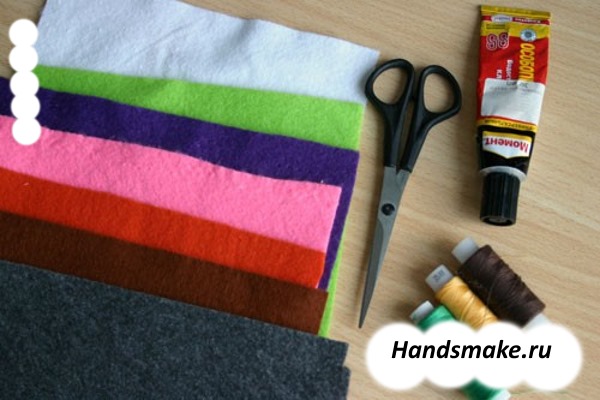
- multi-colored cotton threads for hand and machine sewing;
- multi-colored satin ribbons, 5 mm thick;
- thick cardboard measuring 20 cm by 30 cm (can be larger), you will need 2 sheets;
- synthetic padding for stuffing the house (sold in "Fabrics" stores).
Felt and working with it requires knowledge of the characteristics of this type of fabric., which will greatly simplify the process of sewing finger theater with your own hands and creating a pattern, namely:
- There are many types of felt (for creating small details it is more convenient to work with soft synthetic felt 1 mm thick);
- You can buy felt fabric in craft stores or online (both in sheets and by the meter). The fairy tale characters will require many different colors, so it is better to buy plain felt in sheets;
- felt does not crumble or fray when cut, which means you don’t have to process the edges of the product;
- it is wear-resistant (however, with intensive use, pilling may form on some types of fabric);
- felt toys are very light due to the porous structure of the material;
- the fabric is very flexible and does not break when bent (hard felt may fold when bent, so it is used for working with large parts).
How to make patterns
Before you start making patterns, it is useful to get acquainted with the types of finger theaters, which will help determine the direction of work.
Classification of finger theatres:
- A collection of toys that fit onto children's fingers, hiding them inside the doll.
- A set of characters with 2 round holes in the lower part of the body, into which the child's index and middle fingers are inserted, creating movable legs for the hero of a fairy tale or cartoon.
The first option is more practical and durable, these are the patterns that will be offered in this article. However, if desired, any pattern can be slightly adjusted by adding holes and sewing toys using the second method. You can make a finger theater from felt yourself, find ready-made patterns in handicraft books or on the Internet.
To make a pattern yourself, you need:
- determine which characters need to be “brought to life” and find out what they look like;
- draw characters of the required size on paper and all the details separately (arms, legs, cheeks, ears) or print a ready-made template from the computer screen. As a rule, toy patterns consist of the main part and the front parts;
- cut out the details;
- pin to felt fabric and cut out according to the pattern without leaving any indentations;
- if the characters are planned to be double-sided, then the number of pattern pieces will double (the main thing here is sequence and not to get confused, first cut out one character and assemble the pieces together, then proceed to the next one). For beginners, it is easier to start with one-sided dolls.
Scene
For the convenience of storing dolls, the stage can be made flat in the form of a book spread or three-dimensional from hard felt. This way you get a ready-made decoration and an envelope for storing toys.
Steps to create a flat scene in the form of a book spread:
- Take 4 pieces of felt measuring 20 cm by 30 cm (or more), 2 of which are green (this will be the inside of the stage) and 2 more pieces of any other color for the cover.
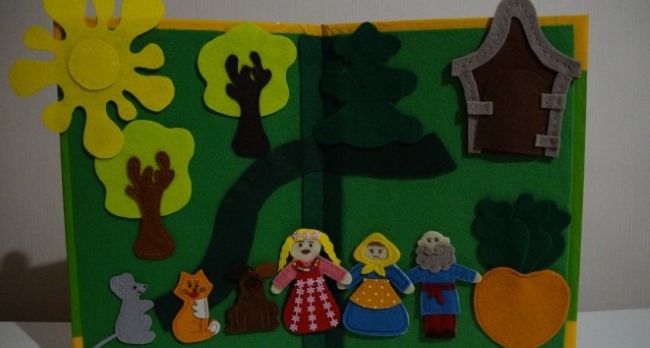
- Make flat one-sided patterns of trees, a house, the sun, clouds (they will act as permanent decorations for the intended fairy tale (for example, in the "bun" it makes sense to sew a house, a path, several trees, grass and the sun).
Here is an example of the scenery for the fairy tale "By the Pike's Command":
- Sew decorations to green pieces of felt.
- Sew 2 sheets together along the inner edge (like a book binding).
- Sew the cover to the finished inner part of the stage and finish the edges (decorate with braid).
This is how it should look like:
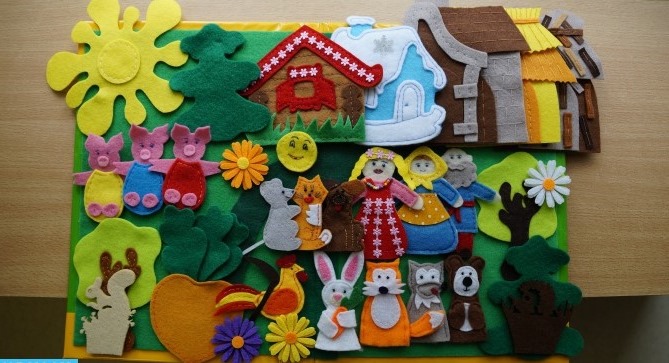
The advantage of a flat stage-turn is its versatility for several fairy tales at the same time with similar scenery (only the characters change).
And if you don't sew the scenery on, but put it on Velcro, then there are even more options. Examples of such fairy tales: "Kolobok", "The Three Little Pigs", "By the Pike's Command", "The Turnip", "The Thirtieth Kingdom", "Geese-Swans". An example of such a theater from one scene and heroes of three fairy tales is given below.
Stages of creating a three-dimensional scene from hard felt:
- Collect materials: 3 large sheets of hard felt, 30*30 cm (or 30*20 cm) in size and 3 mm thick (it is possible to use thinner felt, but for strength and stability it will need to be sewn to the cardboard).
- Draw a pattern on paper of the desired shape of the scene (front part and two sides), transfer it to the fabric, trace it with a marker and cut out with a stationery knife or scissors.
- Decorate the main stage facade with lace curtains or fabric.
- Connect the three parts of the scene together with seams.
This is what the final result should look like.
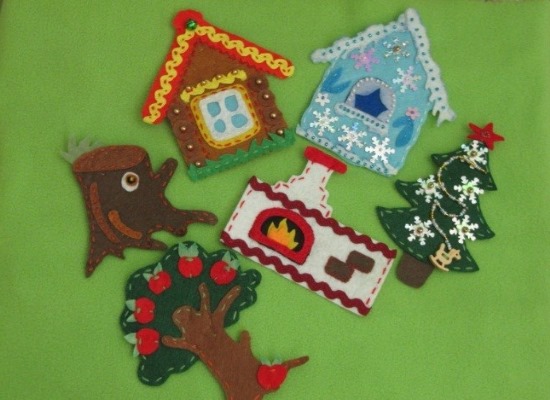
House for finger theater
If you plan to sew a finger theater for a fairy tale, the action of which mainly takes place in a house (for example, "The Teremok", "The Three Bears", "The Wolf and the Seven Little Goats", "Masha and the Bear", "Ryaba the Hen", "Zayushkina Izbushka"), then it makes sense to make a stage in the form of a book-house.
As in this photo:

And if you want to make the task more difficult, you should try making a three-dimensional house out of felt. Like in this picture:
How to sew a three-dimensional house - step-by-step description (reference photo above):
- Prepare materials (felt of 4 colors (light brown for the house, gray for the roof, orange for the balconies and green for the large base), tape of 2 types for curtains).
- Make a paper pattern of all parts of the house (according to the table):
| House detail | Pattern | How many felt pieces will you need? |
| Walls of the house | 1 square with all sides 20 cm long | 6 |
| Windows | 1 square window with sides 5 cm long | 2 |
| Balconies and door | 1 rectangle 3*10 cm | 3 |
| Front and rear roof sections | 1 equilateral triangle with edges 25 cm long | 2 |
| Roof base | 1 rectangle 20*25 cm | 1 |
| Roof covering | 1 rectangle 50 cm by 20 cm | 1 |
- Cut out all the details of the house according to the pattern.
- First, you need to sew windows, a door and a balcony onto the square walls of the house.
- Sew curtains onto the windows from braid, decorate the balcony with lace.
When sewing on the balcony, form a pocket so that later you can put a finger toy in it.
- Sew the walls of the house from 6 parts and fill it with padding polyester.
- Sew the balcony to the front part of the roof and decorate it.
- Similarly, sew a roof from 2 triangles, a base and a roof. Stuff it with padding polyester as well.
- Sew the roof to the base of the house.
- For greater stability, it is recommended to sew the house to the base (which is made from 2 large identical sheets of green felt, between which cardboard is inserted and everything is sewn along the edges).
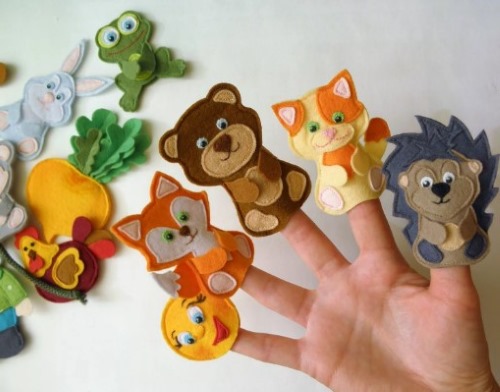
Fairy tale Teremok
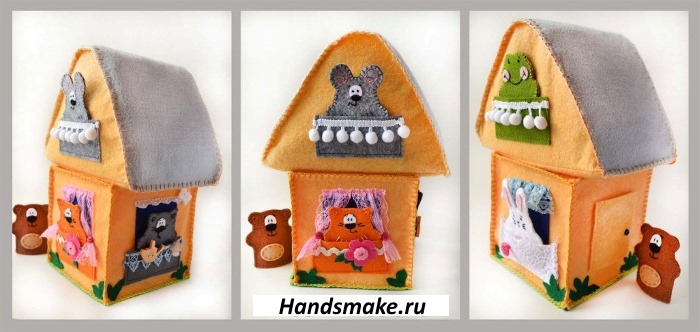
A DIY felt finger theater (patterns included) for the fairy tale "Teremok" consists of a tall house and characters (hare, mouse, wolf, bear, fox, frog).
https://www.youtube.com/watch?v=7pObZmJk4qE
To create toys you will need the following materials:
- colored soft felt (2 shades of green, 2 types of brown, 3 shades of gray, orange, white);
- lace trim for the house;
- ready-made eyes and glue or beads (buttons).
Step-by-step instructions on how to make a felt fairy tale "Teremok"
It is better to start by creating animals, and then make a tower (this will make it easier to determine the required size of the house).
Hare
To create a hare, you need:
- transfer the pattern template below onto paper;
- cut out all parts of the paper pattern;
- transfer them to felt, secure with pins and cut out the parts (from grey felt cut out 2 parts of the body, 4 parts of the ear (without the middle of the ear) and all the paws, and from white fabric cut out 2 middles of the ears, 2 large ovals of the eyes and the inner parts of the lower paws (with a hole punch). From an orange piece of fabric cut out 2 parts of the carrot and 1 green part of the tops).
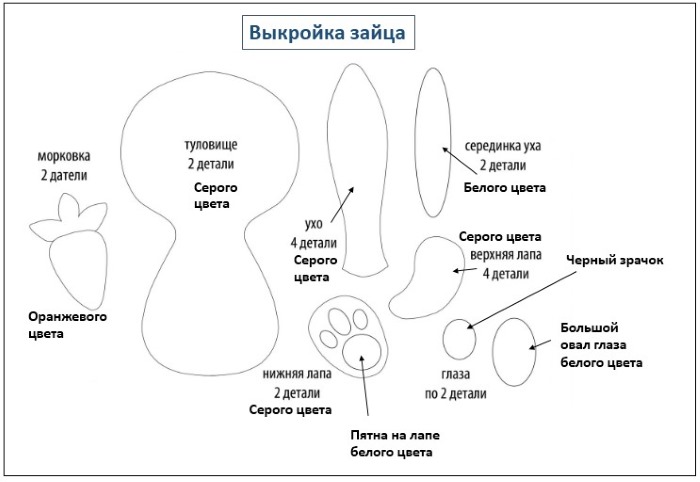
Assembling the hare:
- Ears (sew the white part of the ear onto the grey one, then sew the 2 parts of the grey ears together so that the white middle is on the outside. Repeat the same with the second ear. Fill the ears with padding polyester and sew up the edges).
- Upper paws (sew 2 upper paw pieces, stuff with synthetic padding).
- Lower paws (glue white spots to the sole, repeat with the second paw).
- Carrot (sew 2 parts of the vegetable, inserting the tops).
- Eyes (first glue white ovals to the head, then black pupils on top, embroider eyelashes with black thread).
- Muzzle (sew on a nose from a pink button or beads, embroider whiskers and a smile).
- Body (fold 2 parts of the body and sew, inserting paws and ears sequentially, leaving a hole for the finger at the bottom). Sew a carrot to the finished toy
Mouse
To make a mouse you will need:
- grey and white felt;
- gray ribbon;
- 2 black and 1 pink beads;
- cut out a pattern from paper using a template;
- transfer it to felt and make 2 grey body parts, 2 white inner ear parts and use a hole punch to make 2 black circles.
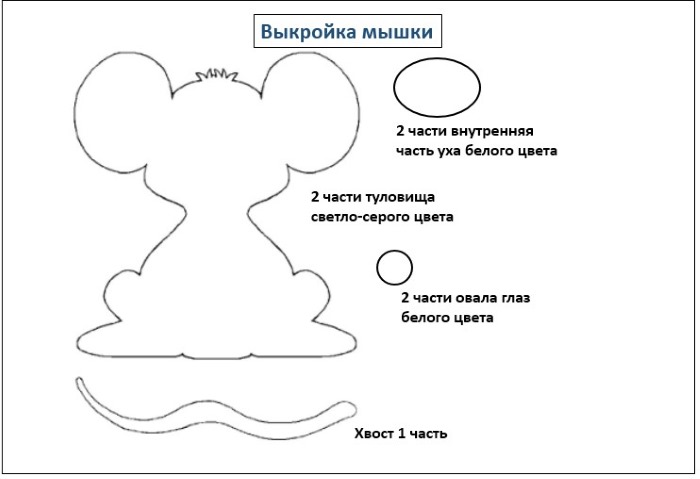
Sewing the mouse:
- Muzzle (sew 2 white oval eyes onto the front part, sew black beads for pupils on top, make eyelashes, a mustache and a smile, a nose from a button).
- Ears (glue the white parts of the ears).
- Sew the parts of the mouse's body, leaving a hole at the bottom for the finger, and sew on the tail at the end.
Wolf
To create a wolf you need:
- grey and white felt;
- 2 eyes and 1 black bead;
- cut out a paper pattern and fix it to the felt with pins;
- trace with a marker and cut out the parts from grey fabric (2 body parts, 2 heads, 2 tails, 4 paws) and from white felt (2 corners for the ears, 1 oval for the belly).
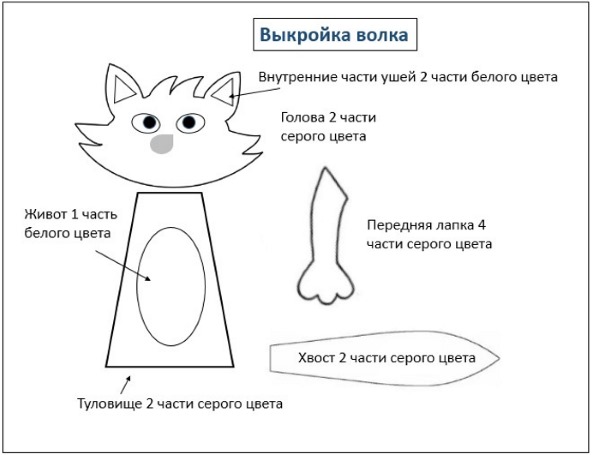
Wolf assembly:
- Muzzle (sew the corners of the ears onto one part of the head, glue on the eyes, sew a bead onto the nose, make a mouth).
- Head (sew 2 head pieces).
- Tail (sew 2 parts of the tail and fill with a little padding).
- Body (sew a white oval onto the belly, attach a tail to the back, connect the 2 parts of the body and sew, inserting the front paws and leaving a hole at the bottom for the finger).
Bear
To make a bear you need:
- brown sheet felt in 2 shades;
- eyes, dark bead;
- make a pattern using the template and distribute it over the felt;
- trace the contours, cut out the bear parts (2 body parts from darker brown fabric, 1 belly and 2 paws from lighter felt).
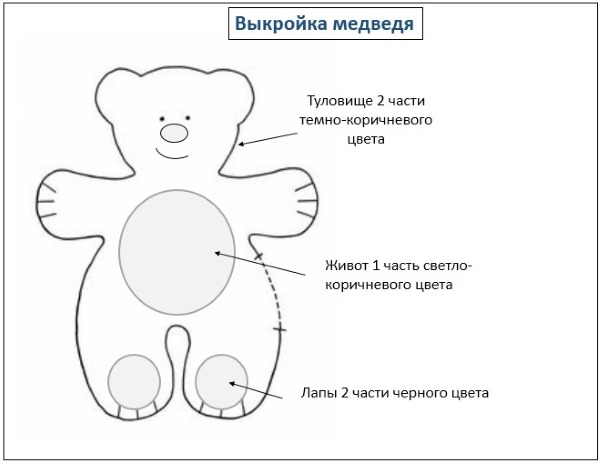
Assembling the bear:
- Sew the belly and paws onto the front part of the body.
- Glue the eyes onto the face and sew on a bead instead of a nose, embroider a smile and claws on the paws.
- Sew the body parts together, leaving an opening at the bottom (between the legs).
- If desired, stuff the head with synthetic padding and secure it with a few stitches on the neck (close the seams on the neck with a bow).
Fox
Algorithm of actions to make a fox:
- prepare orange and red felt;
- eyes and a button;
- make a pattern on paper using a template;
- apply paper details to the fabric, secure and outline with pencil or chalk;
- Cut out 2 body parts and 4 paws from orange felt, as well as 2 whisker halves and a tail part from red paper.
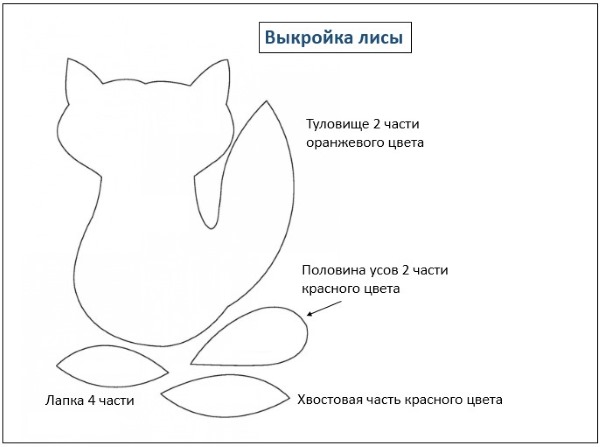
Fastening the fox:
- Muzzle (sew on whiskers, a button on the nose, glue on eyes and embroider a smile).
- Paws (sew the paws from 2 parts each, fill them a little with synthetic padding).
- Tail (sew a red insert onto the tail).
- Connect the body parts, gradually sewing the edges with your hands, inserting the paws and leaving a lower opening for the baby's finger.
Frog
To sew a fairy frog, you need:
- take 2 shades of green felt fabric and a piece of white:
- 2 black beads or buttons;
- make a pattern on paper using the template below, transfer it to the fabric, and secure it;
- cut out 2 parts of the main part of the frog and 2 front legs from a dark green piece, and the belly from a light green piece, and 2 circles for the eyes from white felt (they can be replaced with ready-made eyes).
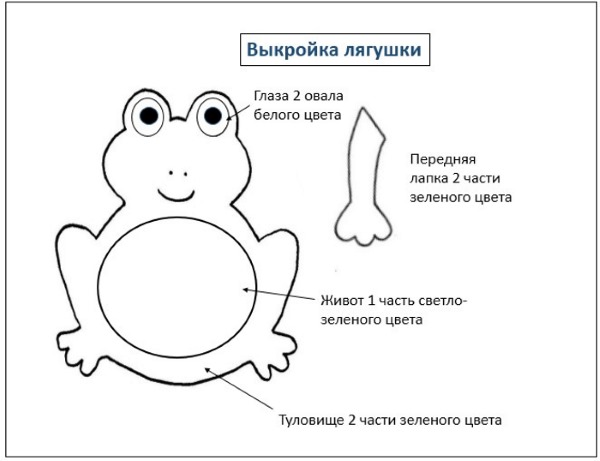
Assembling the finger frog:
- Sew or glue the eyes, belly and 2 front paws onto the front part.
- Embroider a smile and nostrils.
- Fasten the main parts of the frog and stitch along the outline without sewing the bottom.
Teremok
To create a little tower, use the technique of sewing a house described above as a basis, but increase its height (making it multi-story and with 6 balconies for the fairy tale heroes. You can sew either a flat little tower or a three-dimensional one) at the discretion of the master.

Here is an example of a finished little house.
Ryaba the Hen
Finger theater for the embodiment of the theatrical fairy tale "Ryaba the Hen" includes: a village hut (from the inside), a grandmother, a grandfather, a chicken, a mouse and an egg.
To create characters, you should stock up on consumables:
- colored soft felt (gray, yellow, beige, red, brown, blue, orange, pink);
- lace trim for curtains in the hut;
- ready-made eyes and glue or beads (buttons).
Step-by-step algorithm for sewing the fairy-tale theater "Ryaba the Hen"
It would be better to start with sewing the fairy tale characters and finish with the hut.
Golden egg
To make a golden egg, you need to cut out 2 oval parts from yellow felt and sew them together, filling them with padding polyester.
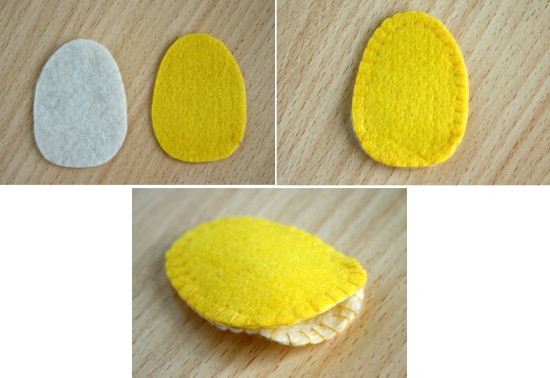
There is no finger hole left in this toy.
Mouse
The process of making a mouse is described in detail in the fairy tale "Teremok".
Ryaba the Hen
To sew the chicken you will need:
- felt in orange, red, beige colors;
- 2 beads for eyes
- make a paper pattern using a template;
- attach the pattern pieces to felt, trace with a marker and cut out.
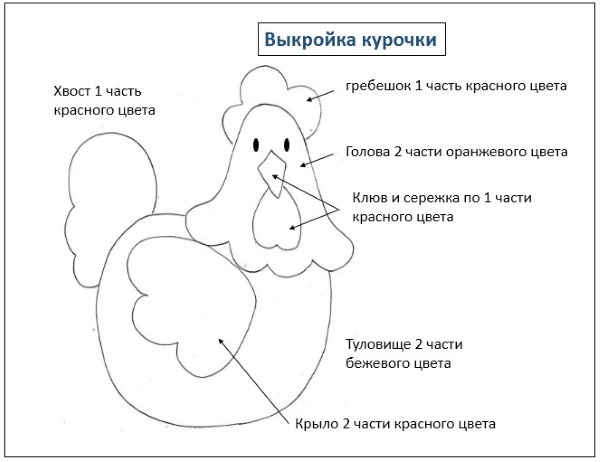
Assembling the Ryaba chicken:
- Sew a beak, earring, and beaded eyes onto the front of the head.
- Connect the 2 parts of the head and sew only the side parts and the top, inserting the comb and filler inside the head (synthetic padding).
- Sew the wings to each part of the body.
- Connect the 2 body parts and sew, starting from the side. Insert the tail. Leave a hole at the bottom for the finger.
- Sew on the head.
Grandfather
To make a grandfather:
- prepare felt in blue, light blue, flesh-colored, and gray colors;
- eyes or beads;
- make a paper pattern in parts using a template;
- transfer the details onto felt and cut out all the pattern components.
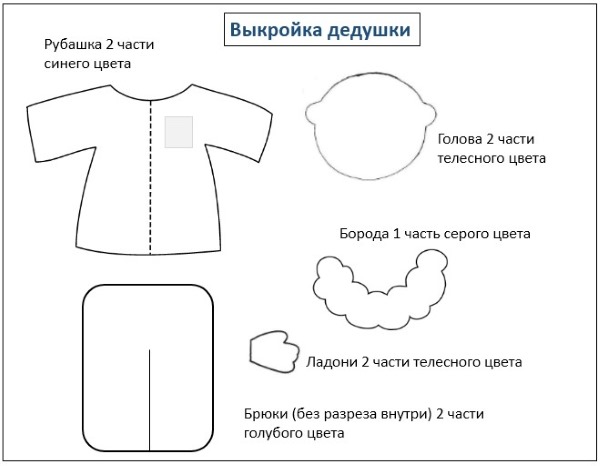
Assembling a toy grandfather:
- Head (sew eyes and beard to the face, embroider a nose and smile).
- Sew 2 parts of the head together.
- Shirt (sew palms to each sleeve).
- Trousers (embroider a seam on the trousers to visually separate the legs, but do not cut). Sew 2 pieces of trousers together so that there is a hole for the finger at the bottom.
- Sew the trousers to the shirt at the waist.
- Sew 2 parts of the shirt and sew the head to it.
- To decorate grandfather's clothes, you can sew on beads or buttons.
Grandmother
Stages of sewing a toy:
- select colored felt (brown, nude, red, pink and white);
- prepare eyes or beads, ribbon;
- cut out the Grandma paper pattern using the template;
- transfer it onto felt fabric and trace it with a pencil;
- cut out all the details.
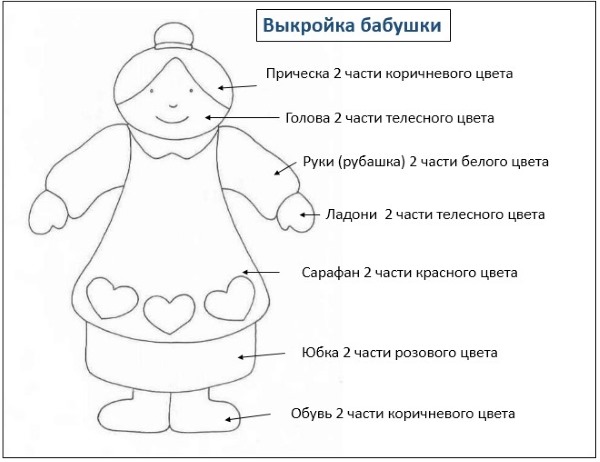
Assembly:
- Head (sew hair to face, embroider nose, smile and glue eyes), sew 2 head parts.
- Sew the palms to the shirt sleeves to form the arms.
- Sew 2 boots to the front of the skirt.
- Sew the front part of the skirt to the front part of the sundress.
- Sew the back parts of the skirt and sundress.
- Connect all the parts together and sew along the side seams, inserting the arms.
- Leave a toe hole in the skirt slit (boots should remain in front).
- Embroider a grandmother's sarafan according to the master's wishes.
Hut
To sew a beautiful hut as a decoration for the fairy tale "Ryaba the Hen", you will need:
- 2 large pieces of light brown felt measuring 30*30 cm, black (2 strips 30 cm long) and brown (for windows and doors);
- enlarge the pattern to the required dimensions and transfer it to felt in pieces;
- cut out parts of the hut.
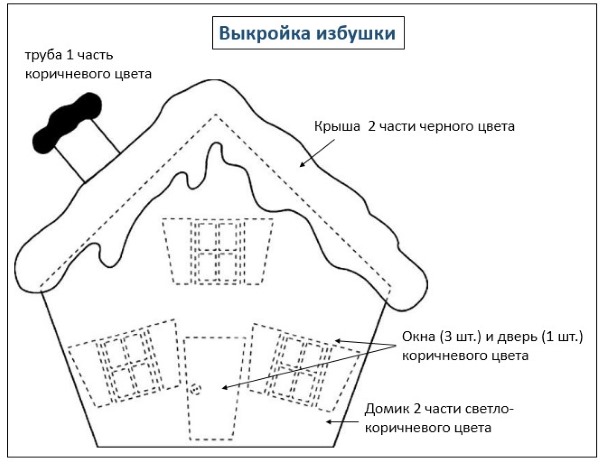
Assembling the hut:
- Sew windows and a door, a roof and a chimney to the front of the house.
- Attach the roof to the back of the house.
- Sew both parts, leave a pocket on any part of the house to put toys in for storage.
- If desired, you can attach some green fabric grass to the bottom of the hut or sew on a green strip of braid.
Masha and the Bear
DIY felt finger theater (patterns included) includes several funny characters (a girl named Masha, a bear, a pig, a rabbit, a she-bear, and 2 wolves).
Since the action of the cartoon takes place in the bear's hut and in the garden, it would be interesting to create a scene in the form of a book-spread (as described at the beginning of the article), making the hut on one page, and on the second - decorations in the form of a garden with trees and vegetables, as well as an ambulance of wolves.
Examples of decorations (they can be movable or Velcro):
- Ambulance of two wolves from the cartoon (pattern);

- Trees, vegetables in beds, fence.
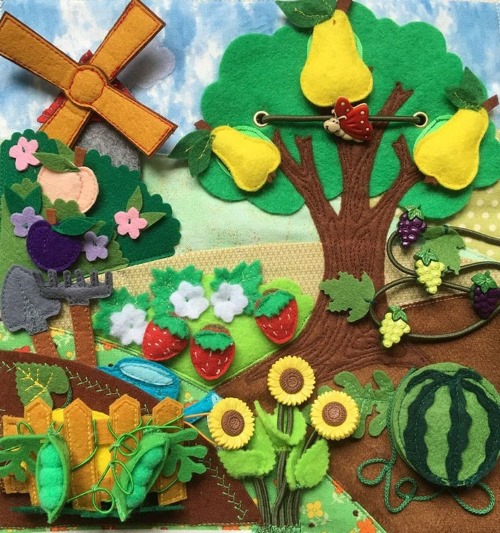
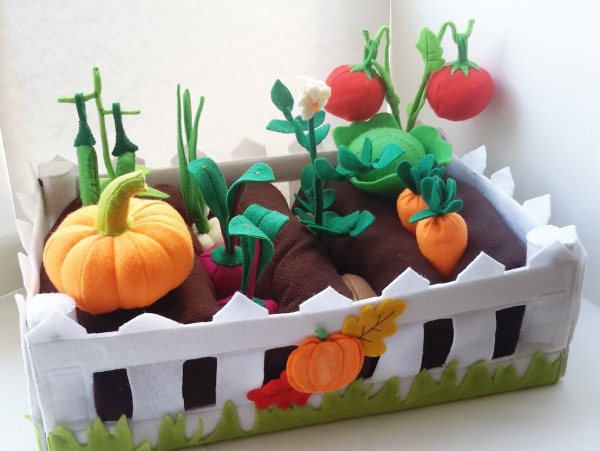
It will be very interesting for children to play if instead of a stage you sew a three-dimensional vegetable garden and a house (which move and create more opportunities for imagination), as in this photo.
Step-by-step description of sewing heroes
You can start by sewing the fairy tale characters, or with the decorations or stage.
Masha
To sew the fairy tale heroine, Masha, you will need:
- felt in pink, flesh-colored, light yellow colors;
- eyes and beads, pink ribbons;
- prepare a pattern from a template on paper;
- transfer to felt, trace and cut out all the details.
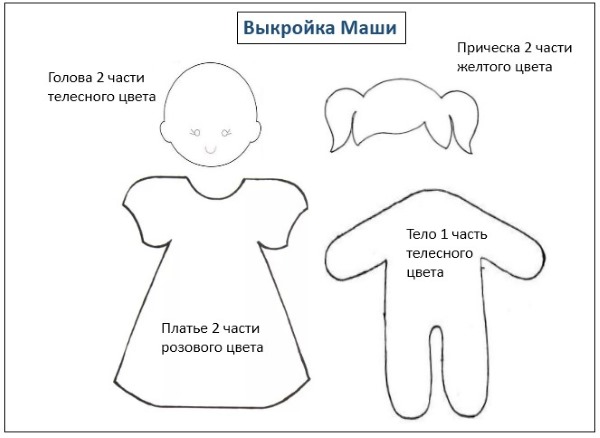
Masha's assembly:
- Sew the hairdo onto the front part, glue on the eyes, and embroider a smile.
- Sew the 2nd hair piece to the second part of the head and sew the head, stuffing it with synthetic padding.
- Place 2 dresses on the body so that the body remains inside. Secure with pins and sew, leaving a hole in the hem of the dress for a finger.
- Sew the head and dress.
- Tie ribbons to the waist of the dress and to the hair.
Bear
How to sew a bear is described in detail in the fairy tale "Teremok".
She-bear
The bear's girlfriend is sewn in the same way as the bear, only with the addition of a 2-part dress (yellow with decoration at the discretion of the master), which is sewn on top of the finished base.
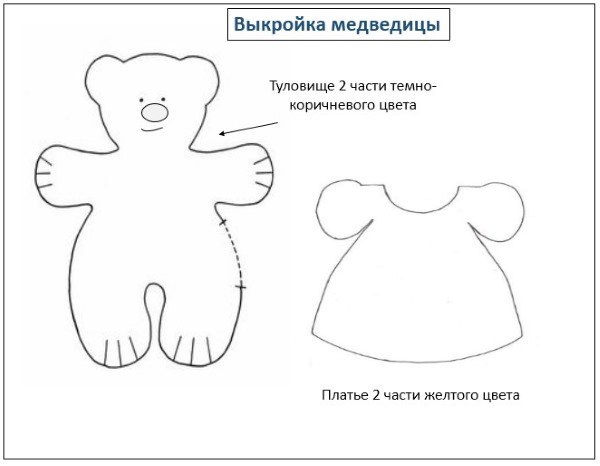
Pattern included.
Pig
To sew a funny pig from the cartoon you will need:
- Pink felt in 2 shades (the patch should be darker);
- Transfer the paper pattern onto the fabric, cut out 2 parts of the pig and 1 part of the snout.
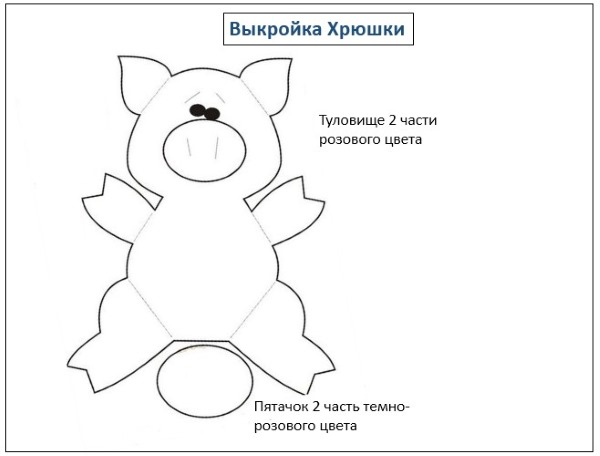
Connecting the pig parts:
- Sew on the snout, embroider the nostrils and glue on the eyes.
- Place the two body parts together and sew, leaving an opening between the legs.
The Rabbit and the Wolves
How to sew a hare and a wolf is described in the fairy tale "Teremok". The second wolf can be made a little darker or lighter in color.
House of the Bear
To make a bear's dwelling, you can use as a basis the hut described in the fairy tale "Ryaba the Hen", or the recommendations for sewing a stage or a house at the beginning of the article.
Turnip
The beloved children's fairy tale "Turnip" is represented by the following characters: grandmother, grandfather, granddaughter, cat, dog, mouse. The action takes place in the garden near the hut. Accordingly, a flat composition in the form of a book-spread with a hut, trees and a large turnip will be ideal as a scene (how to make such a scene can be seen at the beginning of the article).
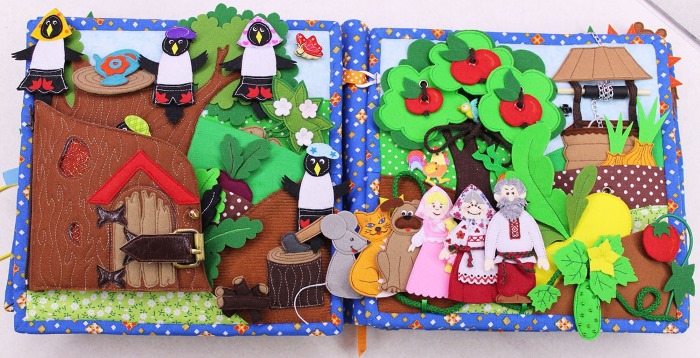
Example scene above.
Step-by-step description of sewing the characters of the fairy tale "Turnip"
An important aspect before starting work will be the step-by-step production of characters in order to maintain their sizes (animals should be correspondingly slightly smaller in size than people).
Grandmother and Grandfather, Granddaughter
The sewing algorithm for Grandma and Grandpa is described in detail in the fairy tale "Ryaba the Hen". To sew a granddaughter, you should use the description of the creation of Masha from the cartoon "Masha and the Bear".
Cat
To sew a cat for the fairy tale "Turnip", you will need:
- 2 pieces of grey felt;
- eyes or 2 black and 1 pink beads;
- using a template, prepare a paper pattern and transfer it onto felt;
- cut out 2 pieces.
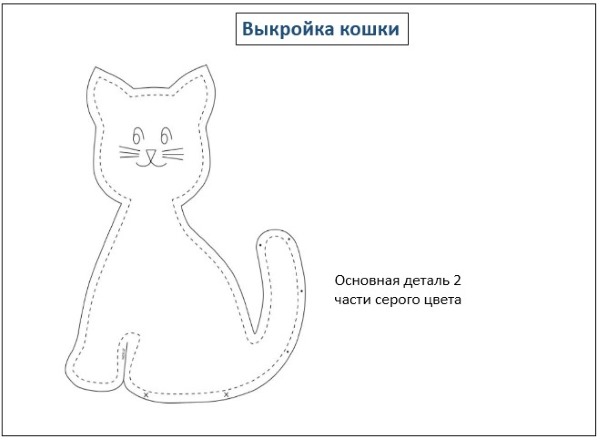
Assembling the cat:
- Glue the eyes onto the face, sew on the nose, embroider the whiskers and smile.
- Connect and sew the 2 main parts, leaving a hole at the bottom for the finger.
- You can decorate it with a bow on your neck.
Dog
To create a dog you need:
- Have brown felt in 2 shades and a white piece for the eyes.
- Black buttons or beads.
- Create a paper pattern and transfer it onto felt.
- Cut out the pieces from the fabric.
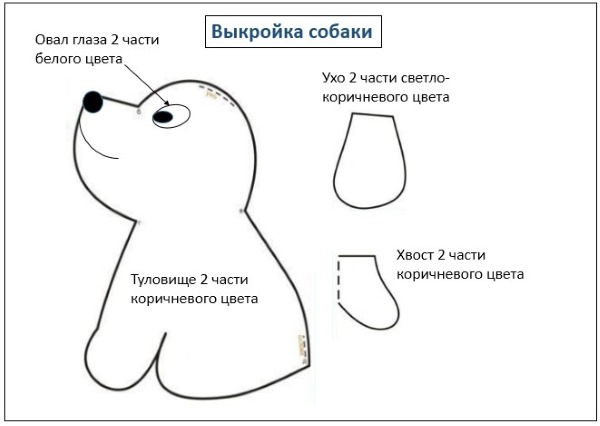
Dog bonding:
- Sew on eyes and ears.
- Sew the tail.
- Embroider a smile and mustache, sew on a nose from a button.
- Connect the 2 body parts and sew, not forgetting about the tail and the hole at the bottom.
Mouse
The method of sewing a mouse is described in the fairy tale "Teremok".
Turnip
The turnip is sewn very simply from 2 yellow pieces of the pattern and green felt tops.
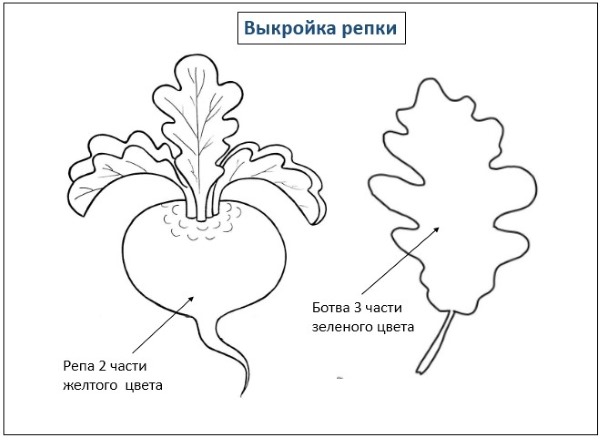
In this case, it is necessary to fill it with synthetic padding. Do not leave any holes.
Kolobok
One of the oldest and most popular fairy tales is represented by the following characters: grandpa and grandma, fox, wolf, hare, bear and bun. A spread book is perfect as a scene.
Step-by-step description of sewing the characters of the fairy tale "Kolobok"
It would be better to sew the characters first, and then proceed to the stage and decorations:
- Kolobok
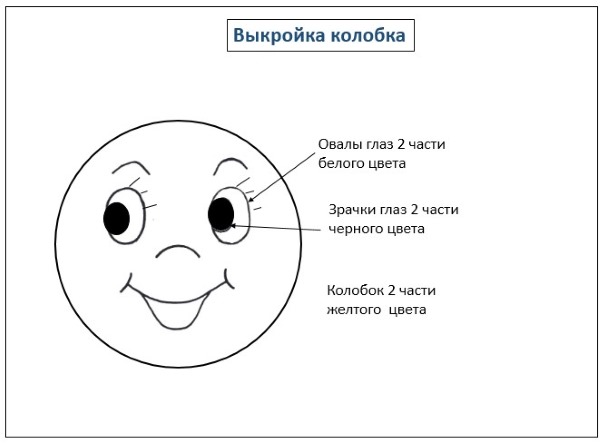
It is sewn from 2 circles of yellow felt, on one of which facial features are embroidered (eyes, smile and rosy cheeks).
- Grandmother and Grandfather.The algorithm for sewing toys is described in detail in the fairy tale "Ryaba the Hen".
- The Fox, the Wolf and the Bear.These characters can be sewn based on the algorithms in the fairy tale "Teremok".
Three Little Pigs
Finger theater made of felt with your own hands (patterns will help you make original characters) is represented by two animals: a pig and a wolf.
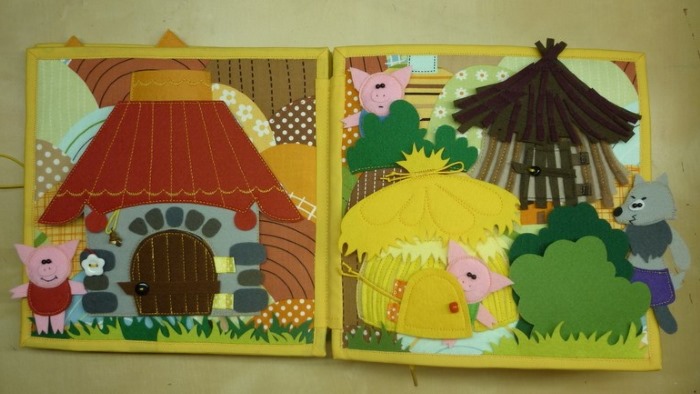
To make the game more interesting, it is better to use three different patterns of pigs and sew a three-dimensional house-hut and a flat scene in the form of a forest with a path and trees.
Piglet 1
To sew the first piglet you will need:
- 2 shades of pink felt;
- ready-made eyes, ribbon or lace for the tail;
- make a paper pattern of all the components using the template;
- transfer it onto the fabric, outline and cut out all the parts.

Connecting the parts of 1 piglet:
- Sew the snout and ears onto the front side, embroider the nostrils, and glue on the eyes.
- Sew hooves onto the upper and lower limbs.
- Put the 2 body parts together and sew them together, inserting the hooves. Don't forget to leave a hole at the bottom between the legs for the toe.
- Sew the head from two parts and fill it with synthetic padding, then attach it to the body.
- Form a tail from a ribbon or cord and sew it on the back.
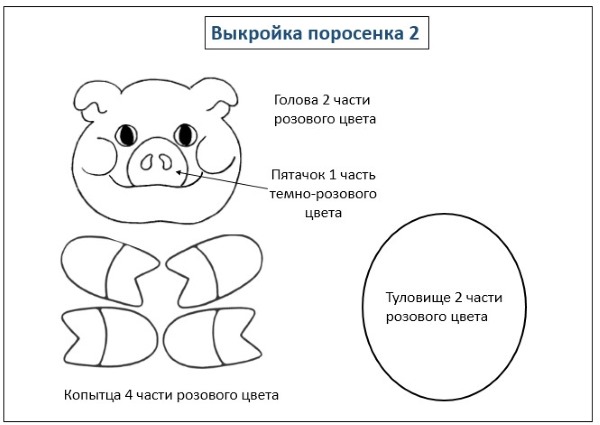
Piglet 2
To sew the second piglet you will need:
- other 2 shades of pink felt;
- eyes and pink lace;
- We prepare the pattern and felt parts in the same way.
Assembling the parts of the second pig:
- Sew a snout to the head, form nostrils, embroider a smile and make eyes.
- Sew 2 parts of the head and stuff with filling.
- Sew all the hooves onto one part of the body.
- Sew the body parts together, leaving an opening at the bottom.
Piglet 3
To make the third little pig, follow the instructions from the fairy tale "Masha and the Bear".
Wolf
The wolf is sewn according to the algorithm from the fairy tale "Teremok".
House and stage
These decorative parts can be sewn according to the examples and descriptions at the beginning of the article.
Seven little goats
To bring this wonderful fairy tale to life, you will need patterns of 3 animals (a wolf, a goat and a kid), as well as a scene with a house.
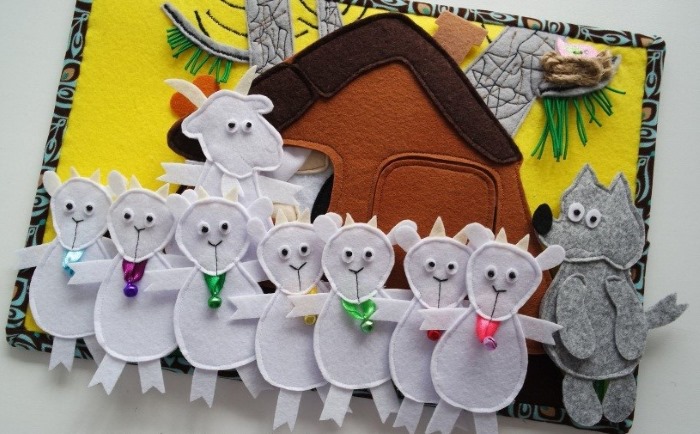
This is what the finished composition might look like.
Kids
You will need seven patterns for the kids, but to make them different from each other, you need to tie multi-colored bows to the finished toys or number them.
To make the kids you need:
- white and gray felt;
- black beads or eyes (7 pairs);
- multi-colored ribbons;
- prepare a paper pattern and transfer it onto the fabric;
- trace and cut out 7 sets.
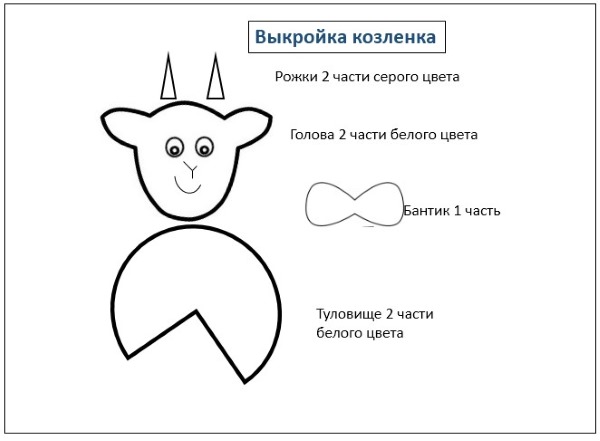
Assembling the kid:
- Glue the eyes onto the face, embroider the nose and smile.
- Sew the head from 2 parts, fill with padding polyester, sew on horns.
- Sew the 2 parts of the body together, leaving an opening at the bottom.
- Connect the head to the body, attach a bow to the neck.
- Repeat for 6 more kids.
Goat
The mother goat is sewn from 2 main pieces of white fabric according to the pattern.
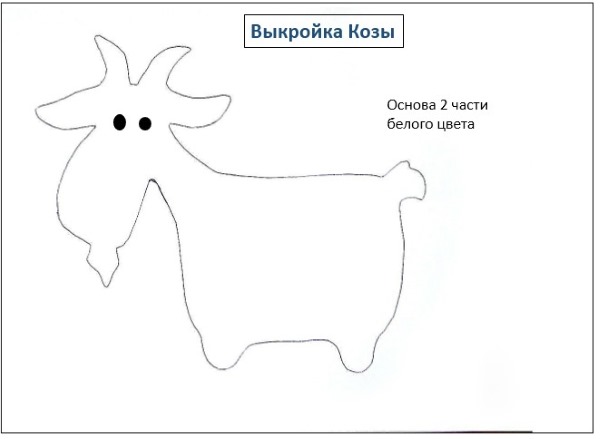
The eyes are glued on and the nose and smile are embroidered.
Wolf
The wolf is created according to the algorithm from the fairy tale "Teremok".
House and stage
These decorative parts can be sewn according to the examples and descriptions at the beginning of the article.
Three bears
The fairy tale "The Three Bears" is created very quickly, since one pattern of a bear is used (the clothes of the characters and the size of the figures change), a template of a girl and decorations with a stage.
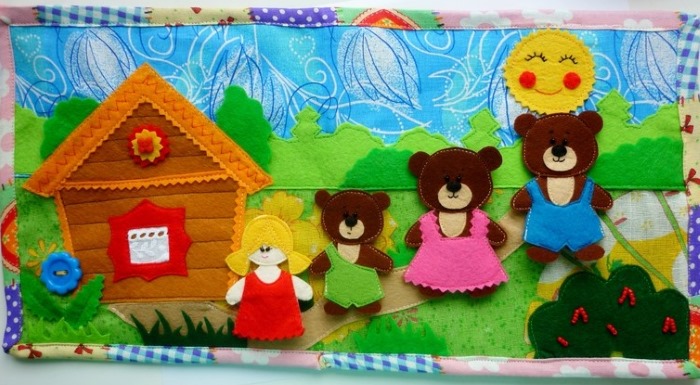
This is what the scene looks like.
Bears
To make the bear parents, you can use patterns from the cartoon "Masha and the Bear".
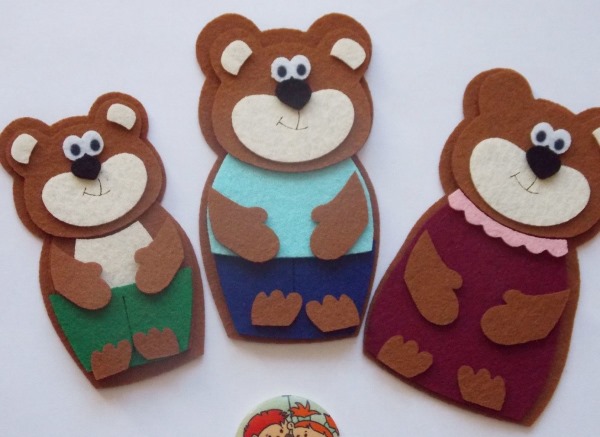
Make the bear cub similar, but smaller in size.
Girl
To create a girl, use the pattern of Masha from the same cartoon.
House and stage
The decorations are created in the same way as in "The Speckled Hen".
Smeshariki
A DIY felt finger theater (patterns with step-by-step instructions included) for "Smeshariki" will attract the attention of fans of the animated series. The game set consists of characters and a stage.
You will need 9 characters (teenage children (Krosh, Yozhik, Nyusha, Barashik), adults (Losyash, Pin), and elderly (Kar Karych, Sovunya, Kopatych)). All patterns are quickly made, since the basis is a circle (recommended diameter - 5 cm).
Patterns with templates:
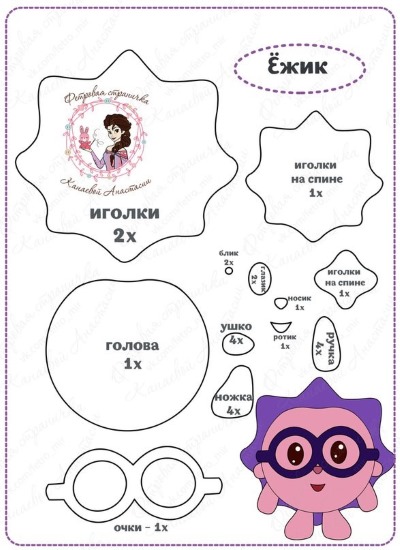
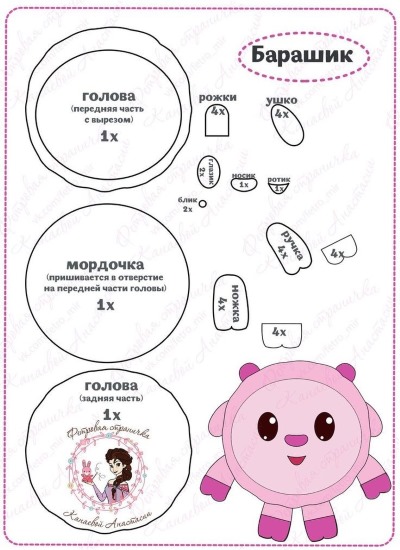
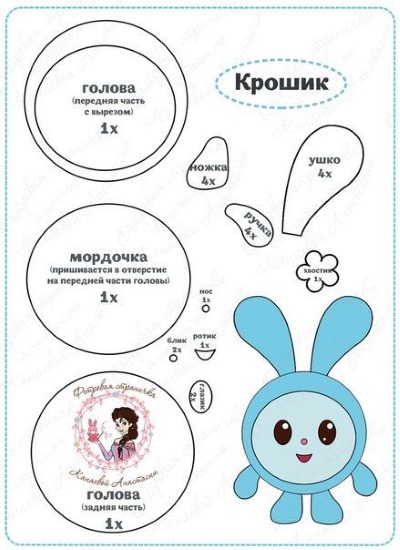
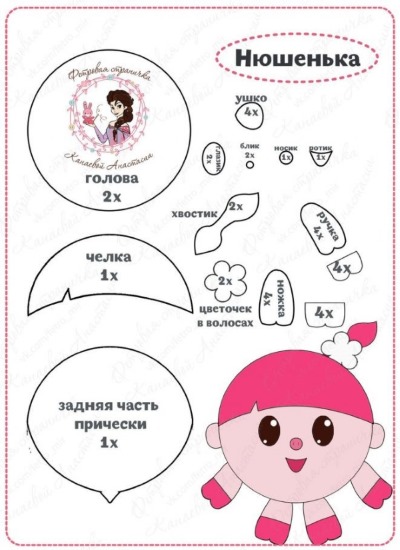
Making Smeshariki:
- create a paper pattern using the template;
- attach it to felt fabric, trace and cut out all the details of the toy;
- connect the parts and sew them one by one, starting from the front side;
- don't forget to leave holes for your fingers.
The stage for playing the animated series can be the technology described at the beginning of the article - a spread in the form of a book with decorations (forest type).
Hare's Hut
To create a finger game of the fairy tale "Zayushkina Izbushka" you need to make a house, a hare, a fox, a bear, a wolf, a rooster and a dog. The most suitable house will be a three-dimensional toy with windows and balconies, where you can place dolls during the play of the fairy tale.
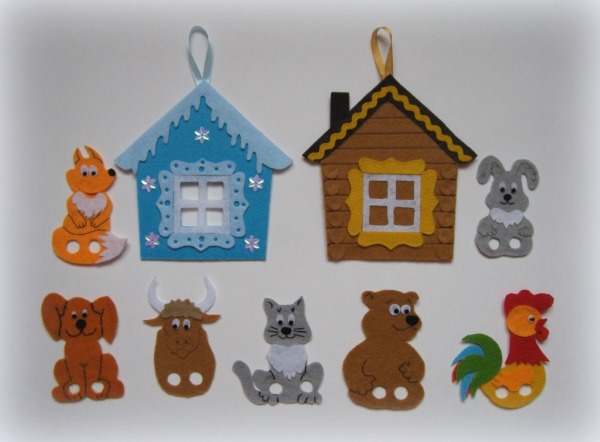
To make a hare, fox, bear, wolf, you can find a description with patterns in the fairy tale "Teremok". Take the dog's template from the fairy tale "Turnip".
Rooster
To make a rooster you will need:
- multi-colored pieces of felt fabric;
- eyes or beads;
- make a paper pattern in parts and use it to cut out the constituent parts of the rooster from felt.
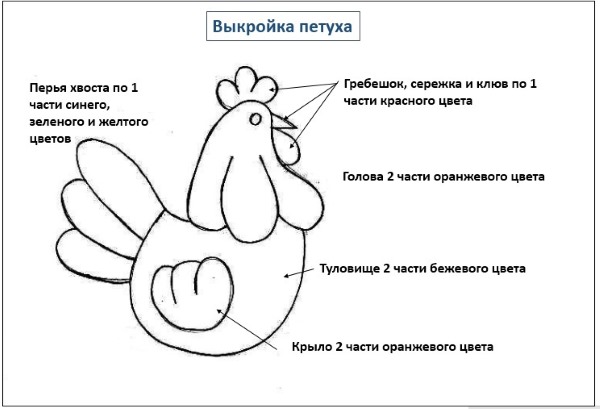
Assembling the rooster:
- Head (glue on the eyes, sew the 2 parts of the head along the sides, not forgetting the comb, beak and earring).
- Fill with synthetic padding.
- Sew or glue the wings to the body on both sides.
- Sew the 2 body parts together, inserting the tail feathers. Do not sew the opening at the bottom.
- Connect the head and body.
To make a three-dimensional house, find the description at the beginning of the article. The fairy tale is ready.
The game will comprehensively develop in children:
- creative and acting skills;
- emotional experiences;
- positive motivation for communication and learning;
- vocabulary;
- intonation, imagination;
- goodwill and responsiveness.
It is not so important which of the presented fairy tales will be chosen for creating a finger theater from felt with your own hands. And the proposed patterns and templates will significantly reduce the time of sewing the game, which, if desired, can be turned into a universal encyclopedia of Russian folk tales.
Author: Polovnikova Lyubov
Article formatting:Natalie Podolskaya
Video about felt figures
Finger theater from felt - master class on creation:
Great, I just got a kindergarten assignment. It will help me. Thanks 🙂
How great! Thank you very much, I have been looking for instructions with patterns for a long time 🙂
Thank you
Such wonderful characters and houses.
Special thanks for the patterns))
Thank you! Your article with such wonderful patterns, photos and detailed comments is the most valuable gift. Thank you!!!! I will definitely write about how I make the theater.
Thank you very much! Now I can please my twin granddaughters with a cool gift!
Thank you very much! This is a significant help for my work with children! Thank you! With respect, Alla
Hello! Thank you for your creativity! Please send me my email.
Thank you very much for such an interesting and detailed explanation! Good luck to you!