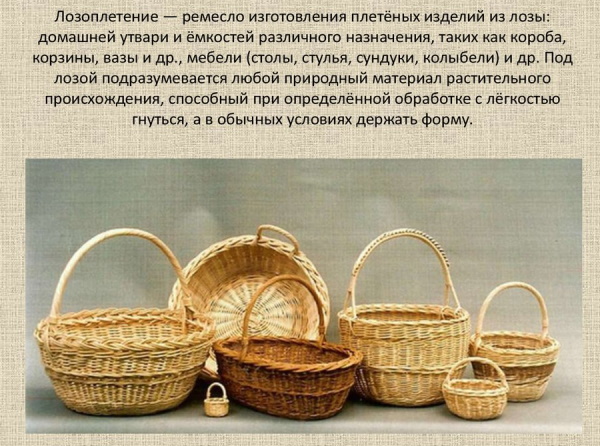
Basket weaving refers to decorative arts. Willow twigs can be used to make dishes, baskets, garden furniture, and various interior decoration items. Beginners should know how to properly prepare and store the material. It is also important to read several step-by-step instructions to understand how to weave items of different shapes and sizes.
Preparation of material
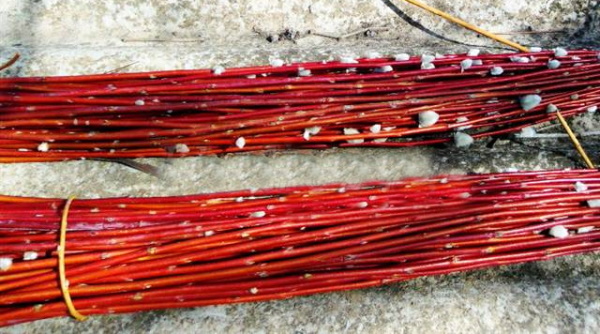
You can stock up on vines at any time of the year, however, experienced craftsmen advise doing this in winter. Branches that were cut in summer or early autumn do not need additional processing, but over time they become dry and brittle faster than those collected in winter.
The "winter" vine has thick bark that is easy to separate from the branches.
Cleaning takes place in 4 stages:
- The prepared rods are placed in a saucepan. If the rods are long, they are carefully twisted at the bottom, like spaghetti.
- Pour cold water and put on the stove, turning on high heat. When the water boils, do not turn off the stove. The rods should boil for 2-3 hours.
- Then the branches are removed from the pan and filled with ice water.
- After 20 minutes, the bark is carefully pulled off by hand.
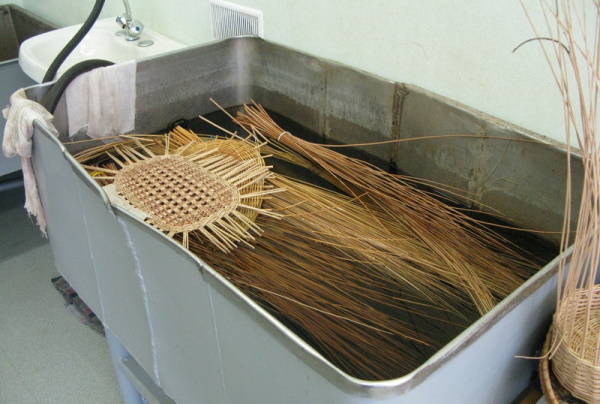
A sharp temperature change destroys the connecting fibers of the wood, which is why the bark easily separates from the branch, like a shell from a boiled egg. You can avoid boiling the twigs, but soak them in water at room temperature and leave them in a warm, dark place for 12 days. The branches will absorb the moisture, and the bark will peel off on its own.
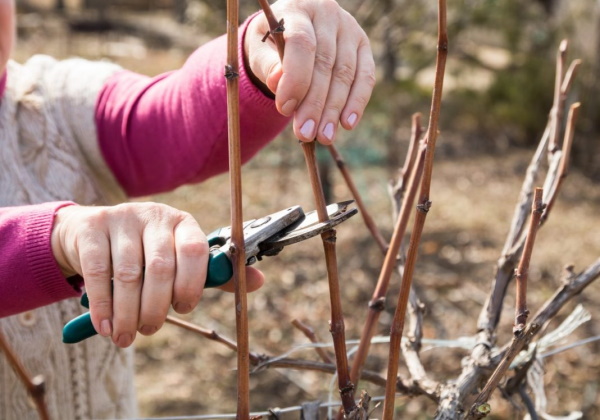
Cutting branches
The vine is cut from the tree with sharpened tools. Secateurs, garden shears or a knife with a beveled blade will do. The cut is made at an angle, that is, diagonally. A gap must be left from the stump or trunk to the cut line, 1.5-2 cm in autumn and winter, 3.5-4 cm in spring.
It is prohibited to use an axe to harvest material. This tool leaves an uneven cut and lifts the bark of the plant, which has a detrimental effect on its health. Mold forms on the willow at the site of an incorrect cut, and pests can get under the bark.
You need to cut carefully, without leaving burrs on the bark or protruding wood chips. A rod cut in summer or spring must be immediately cleaned of bark. In 3 days it will harden and dry, and it will be difficult to remove.
It is also important to pay attention to the thickness of the branches. The table shows which rods are suitable for weaving and how they are used.
| Thickness of willow rod (cm) | Bark color | Application in weaving |
| 0.5 – 1 | Red-brown | Suitable for weaving basket handles, lids and decorating edges. |
| 2 | Burgundy, brown | Used for weaving basket walls, bottom, and lid. |
| 2.5-3 | Green, gray, brown | Strong branches are needed to assemble the frame of the product. |
It is important that all branches are smooth, without knots or defects.
Drying and storing rods
Basket weaving seems like a difficult task for beginners, but experienced craftsmen claim that if you learn how to properly dry and store the prepared material, the process of making crafts will be easier. After the sample, the branches need to be sorted.
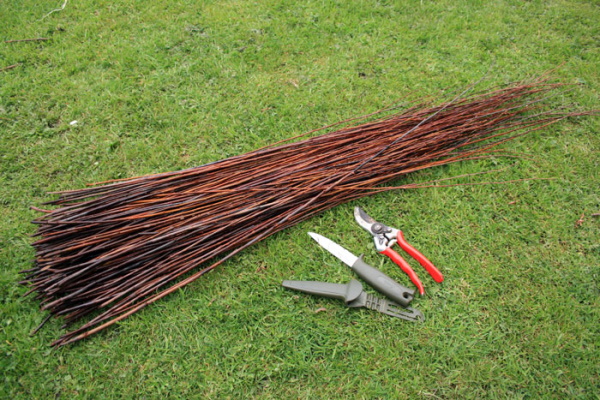
The rods are conventionally divided into 3 types:
- short (length 0.5-1 m, diameter 2.5-5 mm);
- medium (length 1.2-2.5 m, diameter 5.5-10 mm);
- large (3 m and more, diameter 10.5-15 mm).
Wicker with a diameter of 16 mm or more, most often used for weaving furniture.
For convenience, small twigs are tied into large bundles of 100 pieces. Medium-sized branches are put into bundles of 50 pieces, and large ones of 25 pieces. Before this, all the twigs must be dried, otherwise they will rot, become covered with dark spots and lose their shine.

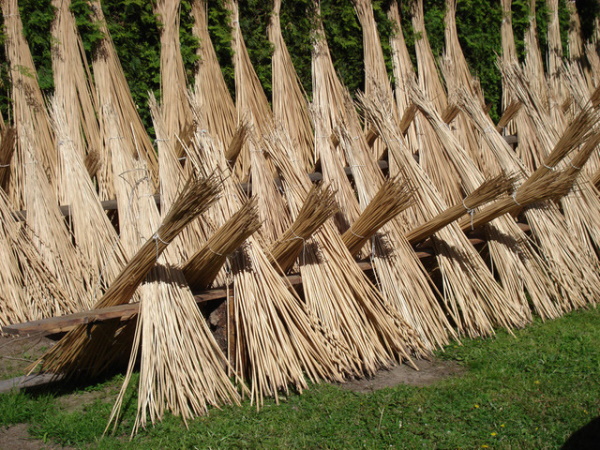
In summer, the branches are dried in the open air. They can be left on the balcony in a shaded corner. A tray of poles should be placed under the rods so that air can ventilate from all sides.
Every 3 days the whole material should be turned over, otherwise one side will remain lighter than the other. Under the influence of direct sunlight the wood dries unevenly. It loses its rich color and flexibility, and also cracks.
If the weather turns bad during the drying process and there are prolonged rains, the rods should be moved under a canopy. It is worth remembering that under such conditions the drying process will take a long time. There is also a possibility that the rods may lose their beautiful white color, they will become gray or yellowish.
During drying, the condition of the material must be monitored. It must not be over-dried, otherwise the rods will become dry and brittle. For complete drying in the open air, the branches need to lie for 2-3 days. During the rainy season, the drying time increases by another 3 days. Then the material is collected in bundles and left in the open air for 2 days.
Green branches should be stored in a dry and cool place. In a warm room with high humidity, the material will become moldy and turn black. In winter, you can leave the branches outdoors, but remember that dampness and severe frost negatively affect their appearance, so the bunches must be covered with tarpaulin and covered with snow.
Large bundles of rods are best stored on lattice pallets. Circulating air prevents the formation of fungi and mold. The lattices are located 0.4-0.5 m above the ground. The finished bundles should be laid in rows, perpendicular to each other. If all storage conditions are met, the prepared material will be suitable for weaving for 5 years.
Painting the vine
When green branches are boiled, the wood of some willow varieties is colored red-brown. This material is used as is, without artificial tinting. The natural color of these branches is considered very beautiful. It suits almost any interior, so it is highly valued by buyers.
Experienced craftsmen advise bleaching rods that have darkened over time. One of the easiest ways is fumigation with sulfur in a hermetically sealed container.
Algorithm of actions:
- The branches are dipped in cold water and laid out on a grate.
- The amount of sulfur is calculated based on the proportions of 60 g per 1 m3 of container volume.
- The sulfur is set on fire. A grate with rods is placed in a clay vessel.
- When the substance flares up, all the cracks in the vessel are sealed with clay.
Fumigation of branches takes from 3 to 6 hours.
There is another method of bleaching, using sulfuric acid. To do this, you need to prepare a solution: 100 parts water, 70 parts slaked lime and 2 parts sulfuric acid. A glass tray with this mixture is placed in the chamber and all cracks are closed.
For every 1 m3 of the bleaching vessel volume, there is from 1.2 to 1.8 l of liquid. All components react and release vapors that lighten the surface of the rods. This process takes about 2 days.
You can also lighten the material by leaving it in a special solution for 24 hours. It is prepared as follows: 1 part of bleach is mixed with 14 parts of water. The mixture is diluted with 1-2% sulfuric acid.
Types of weaving for beginners. Description and features
Wicker weaving (for beginners it is important to learn each type of weaving separately) is usually done from left to right, that is, the working wicker always remains on the left.
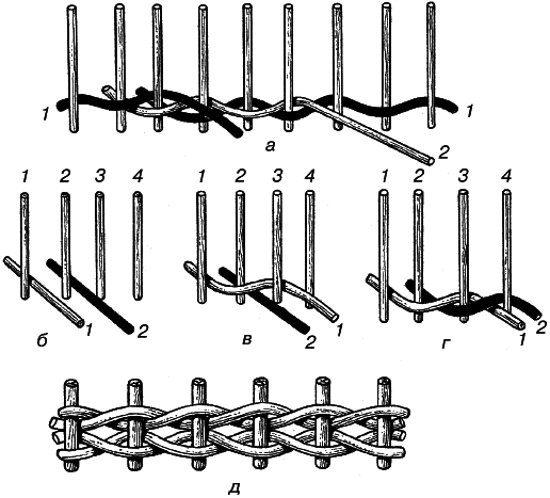
There are several types of weaving:
- in 2 rods;
- in 3 rods;
- weaving in layers.
The method where 2 rods are used at once is one of the easiest to perform. In the finished product, the vine not only braids the frame, but also intertwines with each other. The products are strong and reliable.
Weaving from 3 rods is a little more complicated. It is used to make especially strong objects, and also to make transitions between horizontal and vertical parts of the product.
Layered weaving resembles the usual one, but the direction of the rods is different. They should look up diagonally and be at an angle of 10-15 degrees. The greater the slope, the higher the weaving layer. New rods are inserted to the left of the previous ones, then woven between the base of the frame. The branches are alternated, laid out so that the weaving is beautiful from the outside and from the inside.
DIY Basket for Beginners
Wickerwork for beginners always begins with making a small basket. This is the easiest craft, where simple weaving is used. Step-by-step instructions will help you weave a beautiful basket quickly and easily.
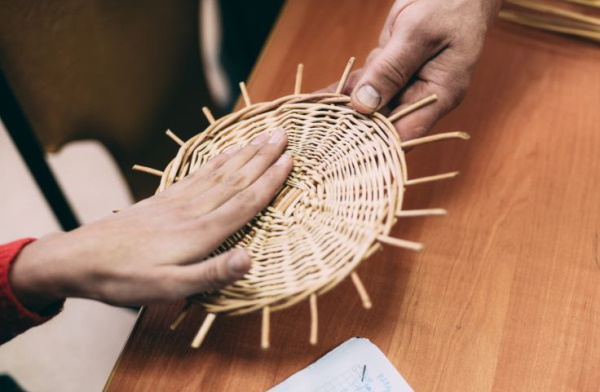
Weaving the bottom
The basket model described in this master class is useful for storing fruits and vegetables, and is also suitable for carrying food on a picnic. Baskets are woven starting from the bottom.
Algorithm of actions:
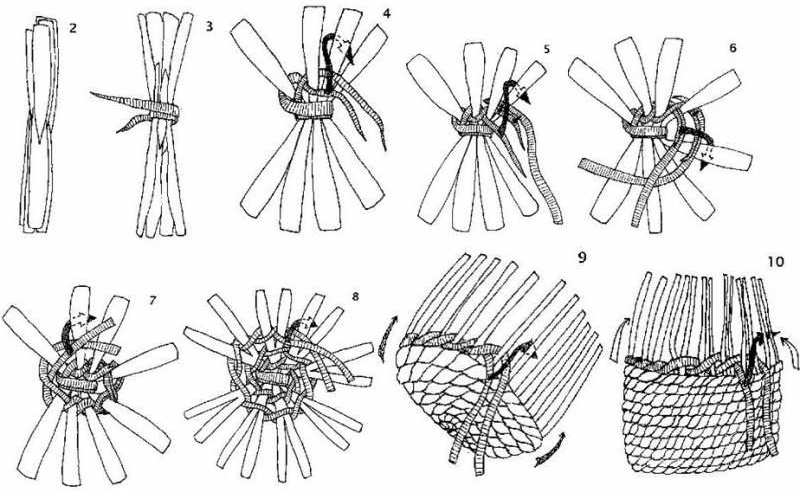
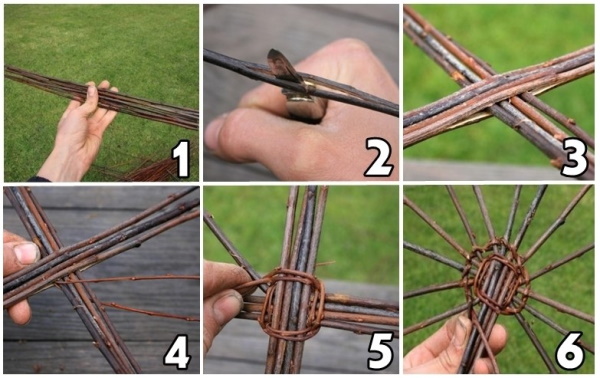
- Prepare 8 rods of medium thickness. Find the middle of 4 of them.
- Using a sharp knife, cut small indentations and push the remaining vines into them. Arrange the twigs crosswise.
- Weave the center of the cross with thin rods so that the branches do not fidget and are not pulled out. After 3 turns, you need to move the rods apart. The finished structure now resembles a sun with 16 rays.
- Next, braid each rod separately with a "snake". You need to be more careful and make sure that the distance between the rods remains the same.
- When the branches run out, you need to weave in more. Sharpen the tip of each new vine and carefully push it into the 2 previous rows of braiding. Cut off the protruding end of the old rod with pruning shears.
- There are 16 rays on the bottom of the basket. It is inconvenient to work with such a number of rods. To make the task easier, you need to weave in another branch. Using an awl, an additional rod is placed between the weaving of the 2 previous rows.
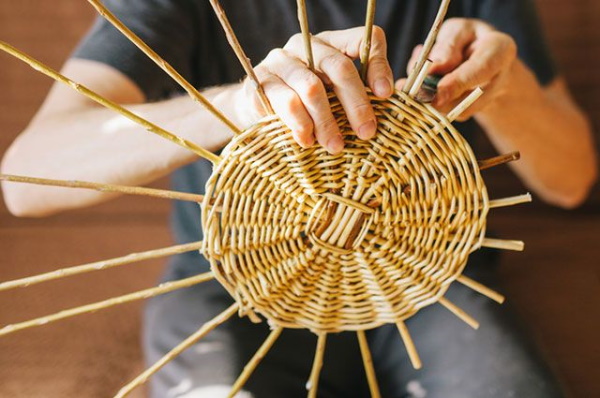
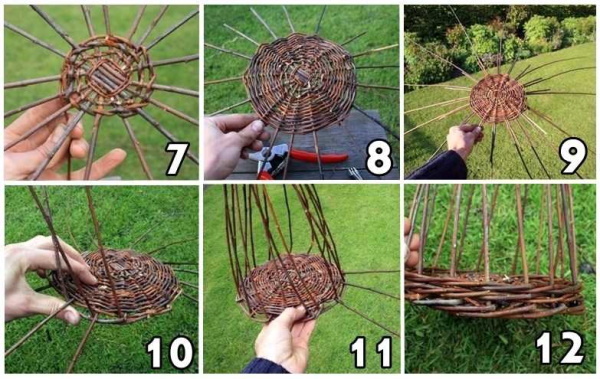
Then weaving continues according to the familiar pattern until the bottom reaches the required parameters.
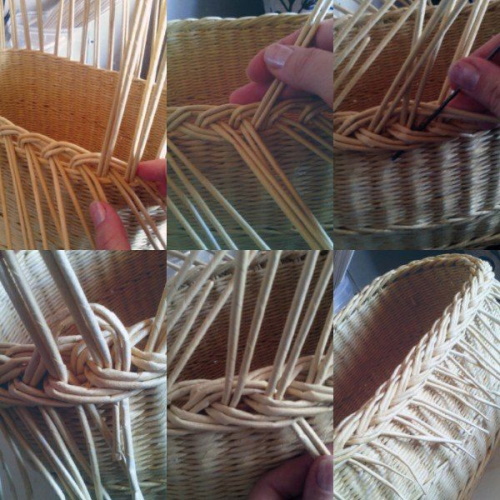
Transition to the walls
To weave the side parts of the picture, you will need thicker vines.
Algorithm of actions:
- Sharpen the ends of the new rods with a knife.
- Insert the rods into the weave so that each spoke of the frame has a new element. Crooked branches should be placed with the defective side inward.
- Remove old ends completely with a sector.
- The first spoke needs to be bent to the left and pulled under two adjacent branches, then bent upwards.
- Also bend all the other spokes of the frame.
- In the 1st row, 3 rods should be placed along the spokes. Bend the left branch to the right and place it in front of the 2 nearest rods. Bend it behind the 3rd spoke and pull it forward.
- Weave 2 rows in the same way, then switch to classic weaving.
- Attach another branch to each spoke. Weave all the elements in turn. It is important to remember that the direction of their growth should move along the left hand.
- Place the thick end of the vine behind 1 spoke, pull the second one through the front, and place the third one behind. Secure the new rod behind the spoke on the right.
- Weave in new willow branches in the same way until the end of the row.
Continue working until the walls of the basket reach the desired height.
Binding the edge and handles
The edges of the basket can be braided as follows:
- Bend one spoke to the right and down. It will be located behind the next 2 rods.
- Pull the spoke out behind the other 2 rods.
- Pass the needle behind 1 vine, then back.
- Repeat these steps with the remaining parts of the frame.
- At the end of the weaving, cut off the protruding vine from the inside of the basket and tuck it between the weaving.
Now we need to make handles for the basket.
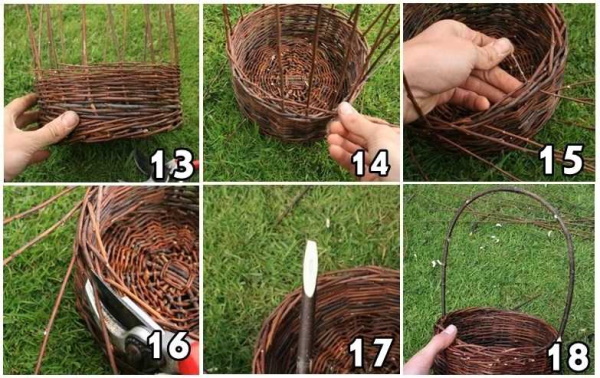
Algorithm of actions:
- Decide on the size and shape of the handles. Take a thick and flexible rod, bend it into a semicircle and cut off the excess ends.
- Sharpen the rod with a knife on each side and insert it into the wall of the basket, pushing both ends under the weave.
- Braid the handles with thin willow twigs. It needs to be inserted into the cracks located near the ends of the handle.
- Twist a thin rod around a thick one several times. Pass it under the braided edge of the product, then bring it out and tighten.
- To secure this captivity, you need a small rod. It should be inserted next to the handle and wrapped with thin vine. The end of the winding should be hidden between the woven rows.
The wicker basket is ready. You can spray varnish it, dry it and use it.
Other master classes on wickerwork
Beginner wickerwork masters should try to make different wicker crafts. Below you can see 3 step-by-step master classes. Following these instructions, you can weave beautiful and functional things that will decorate your apartment or country house.
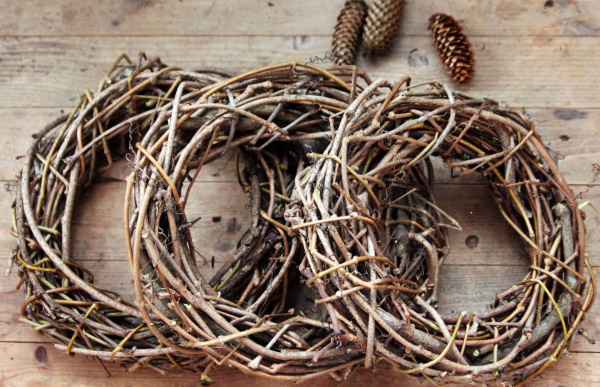
Wreath for decoration
A vine wreath can be used to decorate the front door or window.


For weaving you will need:
- thin willow branches;
- plywood or a wooden board that will completely fit the wreath;
- compass;
- hammer;
- small nails (preferably without heads);
- pruning shears;
- twine;
- thin copper wire.
Algorithm of actions:
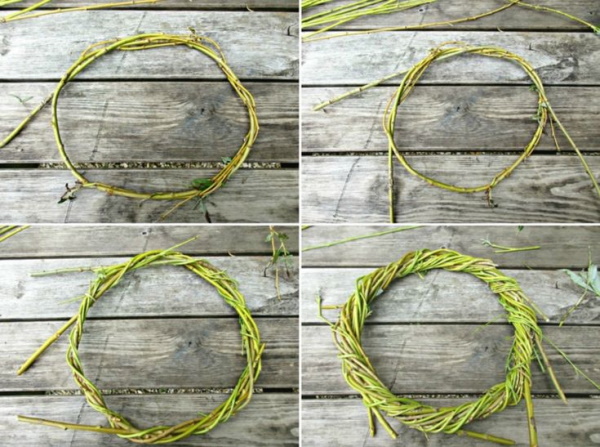
- Draw a circle 30 cm in diameter on the board.
- Drive nails along the marked line, at equal distances from each other. They should hold firmly in the wood and not fall out. The number of nails should be odd.
- Now the branches need to be intertwined in a "snake" pattern between the nails. Push 1 branch behind the nail, then in front of the nail, and so on to the end. The weaving continues until the branches reach the nail heads.
- Cut the twine into 10 cm long pieces and tie the wreath so that it does not fall apart when removed from the nails.
- If the nails don't have heads, it will be much easier to remove the wreath.
- Cut and remove the ropes.
- For reliable fixation, tie the vine with wire. It will be invisible among the branches and will not allow the workpiece to unravel.
- If there are any protruding branches, they should be carefully cut off with pruning shears. And the ends should be hidden under the weaving.
A willow wreath can last for more than 5 years. Each season it can be decorated differently, for example, covered with pine cones, spruce branches or Christmas balls.
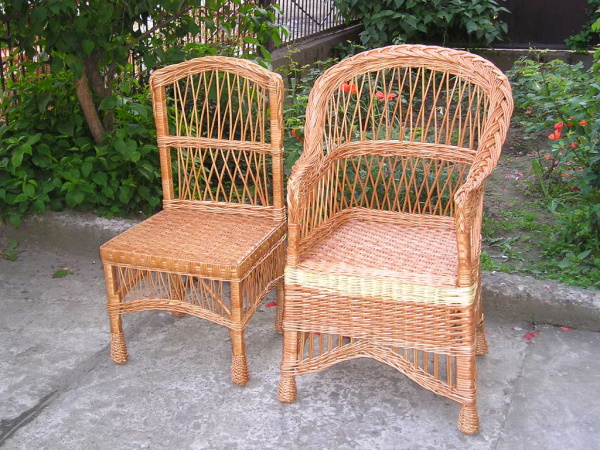
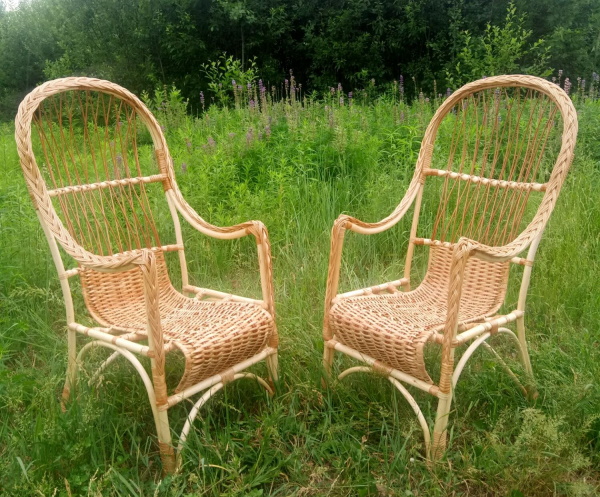
Simple wicker chair
Weaving a large chair from scratch is quite difficult, so beginners can use a wooden frame of a child's chair for practice. It needs to be sanded and polished with sandpaper.
What else is needed for work:
- willow rods of different thickness and length;
- straight thick rods;
- PVA glue;
- sawdust;
- strong rope;
- sandpaper;
- small nails.
Algorithm of actions:
- Strengthen the crosspiece of the back of the chair with a thick willow rod.
- Now you need to make arcs that will strengthen the seat. Cover the back of the chair with 2-3 thick rods, the ends of which should come out onto the seat itself.
- Check the frame for cracks and chips. Fill the defects with a mixture of sawdust and PVA glue. Let the chair dry, then sand down any uneven areas with sandpaper.
- On the frame, make markings with a pencil under the rods in those places where the main weaving will take place.
- Select a vine that is long enough to reach from the crossbar to the top point of the back.
- Nail the ends of the rods from below and tie them in the middle with twine.
- Fill the seat base with classic weaving up to the middle of the back.
- The remaining ends of the rods need to be crossed over each other and secured with small nails.

To make the work look finished, the chair should be lightly scorched with a gas burner. This technique will help get rid of small burrs and unevenness. Then the chair should be covered with wood varnish and dried.
Tableware for decoration
Wicker dishes can be used to decorate racks, shelves and even walls. One of the most popular options for such dishes for decoration is a wicker bottle.
How to make it:
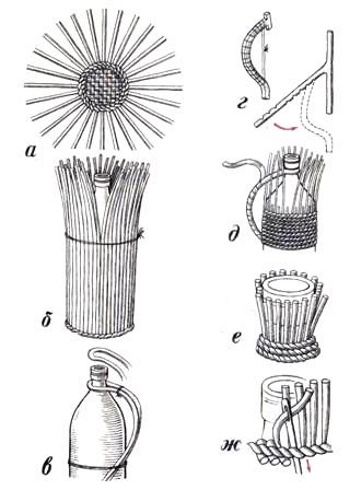
- Prepare 25 thin rods.
- Place 12 rods crosswise, pulling them into bundles of 6 pieces. Interlace the middle with 1 thin rod.
- Weave the bottom with 2 rods until it reaches the desired size.
- At the border of the bottle bottom and the wall, cut off the excess rods of the bottom with pruning shears. Insert new rods and bend upwards. Make 25 frame posts in the same way.
- Weave 10 rows on the walls, then join the posts in pairs.
- Weave another 25 rows, pressing the rods to the shape of the bottle.
- Braid the last row with a 3-strand braid.
- Skip 5 cm and make another 20 rows. Then leave another 1 gap 6 cm wide.
- Weave 1 row and pull the ends of the paired posts to the right. Pull through the next 5 frame posts. Cut off the excess.

The finished craft should be covered with clear varnish.
Methods of finishing the edge of a product
Wickerwork (for beginners it is important to practice decorating the edges on products of different shapes) always ends with finishing the edges so that the craft does not fall apart. You can braid the remaining rods, or you can simply bend them inward, hiding the ends of the vine under the weaving of the walls.
At the end of the work, the craft should be carefully examined. The protruding ends should be folded to the wrong side and cut off. Then polish the product with fine-grained sandpaper and brush off the crumbs with a soft cloth.
Care of finished products
If you cover a wicker product with 2-3 layers of varnish, it will last for 5-7 years. The crafts do not require any special care. It is recommended to periodically wipe them from dust with a damp cloth and not leave them in the sun so that the vine does not dry out.
It doesn't take much time to learn the basics of wickerwork. Beginners need to follow step-by-step instructions and listen to the advice of experienced craftsmen. To begin with, it is important to master simple weaving, and when the work turns out neat and beautiful, you can move on to more complex methods.
Video about basket weaving for beginners
Wicker bottle:
I dreamed of learning to weave since childhood. I love landscape things made of vines in the garden. Fences around swings, etc., arches. Thank you, you are wonderful.