Decoupage is a technique of decoration in handicrafts, a special kind of art that allows you to transform various household items and objects for the better, make them more beautiful and unique. Thus, even the oldest wooden objects, dishes and many other things have a chance to become updated and in demand, since beautiful applications can be made on their surface. This does not require large financial costs, but only the enthusiasm of the master and a few improvised materials.
What is this?
"Decoupage" as a term came to us from the French language. The literal meaning of the word is "to cut out". This type of handicraft requires pictures on paper and the tools needed to cut, process and use them.
- Decoupage on a wooden surface (furniture) is quite easy and quick to do, even for a novice craftsman, provided that all the necessary tools are available.
- Decoupage on glass requires some knowledge and diligence. This technique is considered more complex, especially for beginners.
- Decoupage with napkins is also quite an unusual, but fascinating process of decorating household items. The technique has its own characteristics and nuances.
Tools and materials for wood decoupage
A beginner will need the following basic tools, equipment and materials for work.
| Tools and materials | Purpose of items and tips for choosing |
| Scissors | To cut out paper patterns, you need to have large and small scissors with sharp ends. |
| Brushes | You will need a couple of brushes of different sizes: for applying glue, varnish and paints to the base. Wide flat brushes from No. 8 to No. 20 are suitable for applying primer, varnish or covering the product with varnish. For drawing small details with paints, it is better to take thin brushes made of natural bristles of sizes from No. 0 to No. 4. |
| Foam sponges | A sponge is convenient for applying primer or paint to a wooden surface. For these purposes, you can buy a decoupage sponge or make one yourself by cutting a dishwashing sponge or fine-pored foam rubber into several pieces. |
| Sandpaper of different grain sizes | It will be needed to rub out unevenness on wood, dried paint or varnish. "Sandpaper" on a woven base has a long service life and does not stain light-colored products. |
| Palette knife | A novice craftsman can replace this tool with an unnecessary plastic card. But if you plan to do decoupage in the future, it is better to buy a palette knife right away. It simplifies the application of structural paste, covering cracks and chips. |
| Thick transparent film | With the help of film, you can more easily transfer a thin napkin to a wooden surface. A stationery file will also work for this purpose. |
| Glue | It is best to buy special glue for decoupage. But if you can't find it, then PVA glue will do. It is important that it is of good quality and does not turn yellow or peel off over time. |
| White primer | The primer is necessary to increase the adhesion of the material to the wooden workpiece. It allows you to hide small defects in the wood and reduce paint consumption. The primer must be white, since it will lighten the surface of the wood, and the paper motif applied later will retain the brightness of its colors. It is best to use a primer, but if you do not have one, you can cover the wood with acrylic or water-based paint diluted with water to the required thickness. |
| Acrylic paints of different colors | To begin with, you can select only the tones necessary for a specific product or purchase several popular colors and, by mixing them, obtain a rich color range. |
| Acrylic varnish | The product is finished with multi-layer varnishing with periodic drying. It is recommended to use water-based varnish. Its advantages include quick drying, no odor, and easy washing off from brushes. |
| Supporting materials | These include pencils, a ruler, an eraser, toothpicks, masking tape, and other items that can help with the work. |
| Drawings on paper | It is better to start learning decoupage with rice paper or a decoupage card. If you have some experience, you can work with thin napkins. |
Types and tips for choosing paper for decoupage
In decoupage, the main material is thin paper with a printed design.
For handicrafts, special materials are most often used:
- Three-layer napkins. Only one top layer with an image is applied to the product, the lower layers are carefully separated. Thin napkins easily merge with the surface and do not form a difference in height. The material must be glued very carefully, since it is easily deformed when stretched. Working with it requires certain skills. You can buy napkins individually or in a whole package.
- Rice paper. The material has higher strength compared to napkins, as well as cost. The paper does not tear, does not form folds and fits well on curved surfaces.
- Decoupage cards. They are characterized by high strength and low elasticity. Cards can only be applied to a flat surface.
Decoupage on a wooden surface can be done with pieces of wallpaper left over from renovation, magazine and newspaper clippings, and scraps of multi-colored fabrics. With these things and imagination, you can create an original craft from both a new blank and an old wooden object. The main thing is to decide on a creative idea and execution technique.
Master classes
It is better for a beginner to start decoupage on a wooden surface using flat blanks. With a little experience, you can move on to decorating curved, rounded and other intricate shapes. The master classes below present various techniques and methods of working with decoupage on wooden products.
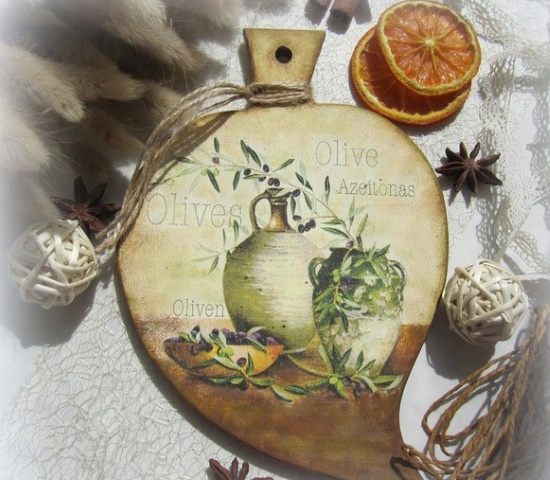
Decoupage of a kitchen board with a napkin
This kitchen utensil is ideal for decoupaging your first items. The paint and paper motif lie well on the flat board.
 To work you will need:
- wooden cutting board;
- a napkin with a design you like;
- white primer;
- acrylic paints;
- decoupage glue;
- acrylic varnish;
- water;
- scissors;
- sandpaper No. 1;
- sponge;
- stationery file;
- wide brushes for glue and varnish;
- round and thin paint brushes;
- palette for mixing paints.
Master class:
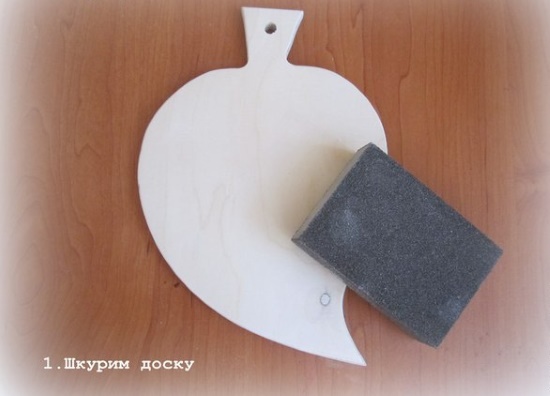
- Prepare the wooden blank for decoupage. It should be even and smooth, so use sandpaper to sand all sides of the board.
- Seal the sides of the product with strips of masking tape to avoid staining them with paint later. Only one side of the board is allocated for decoupage, the other surface will be the working surface.
- Cover the decorative side of the board with primer using a foam sponge. Leave the material to dry. Sand the dried layer with sandpaper and apply primer again. After the next layer dries, also carefully sand it with sandpaper.
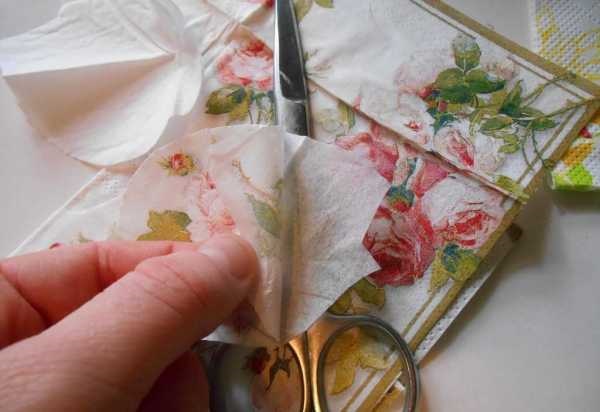
- Tear off the motif you like from the napkin and separate the top layer with the picture. The torn edges of the napkin are easier to "connect" with the main background. But if the picture has clear, simple contours, you can cut it out with scissors.
- Prepare the paper element for gluing. To simplify the task, you can use a stationery file. You should wet it with water, using any spray bottle. Then you need to put the napkin face down on the file and spray water again so that the paper is completely wet. In this case, the napkin will stretch a little and increase in size by about 1 cm.
- Very carefully straighten the napkin with your fingers in the direction from the center to the edges. You need to act very carefully, but even if the napkin is slightly torn, do not throw it away, just smooth out the torn area. At subsequent stages of work, these places need to be glued, painted and varnished with periodic drying, and then lightly sand the segment.
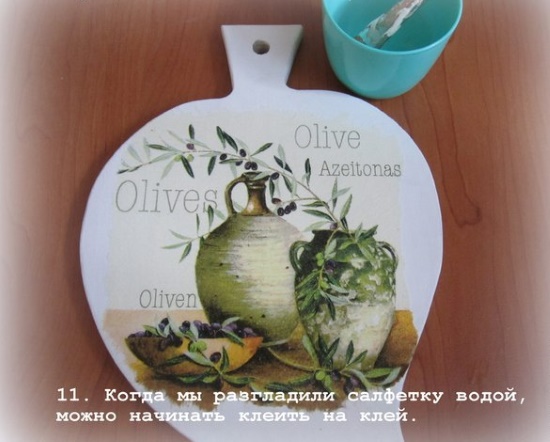
- Take the file by the edges, turn it over and apply the napkin to the board. Using a sponge or roller, iron the picture, starting from the middle and moving towards the edges. This will smooth out any creases and remove air from under the paper.
- Remove the file very carefully, starting from the corner. At the same time, hold the corner of the wet napkin with your finger so that it does not tear or stretch after the film during removal.
- Using a flat brush, apply glue to a damp napkin. Start from the center. If the glue is thick, dilute it with water. Tear off any excess paper on the sides with your fingers.
- After the glue has dried, carefully sand the torn edges of the paper on the sides of the board.
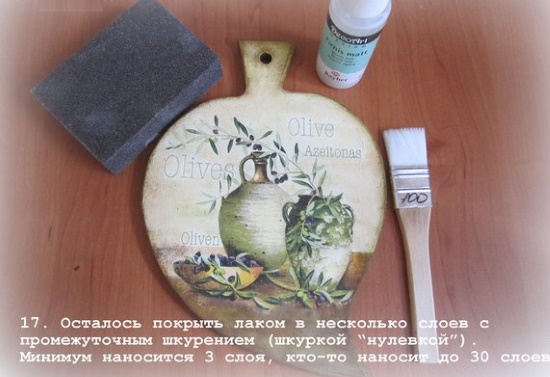
- Apply acrylic varnish to the surface with a flat brush and let dry for 2 hours.
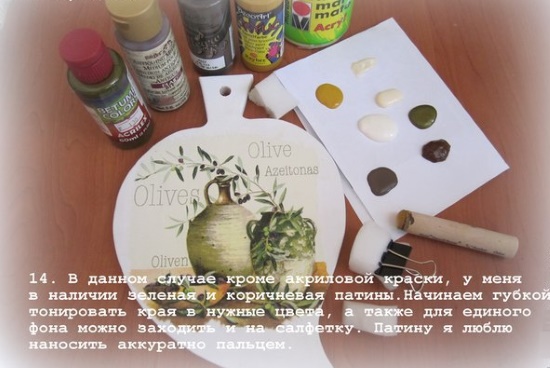
- By mixing, select the necessary shades for finishing the background of the board so that it blends harmoniously with the background of the napkin and the torn edges become invisible. To get a light shade of any color, add white paint to it. To make a darker shade, you need to mix the original color with a small amount of black paint. Then, using a thin brush, finish drawing some elements of the picture.
- Apply a thin layer of acrylic varnish to the dried paint. After 2 hours, re-varnish the product.
- Remove the strips of tape from the sides.
- If necessary, sand down excess paint or any uneven areas with sandpaper and apply a finishing thin coat of varnish.
A kitchen cutting board decorated with decoupage will not only be used for its intended purpose, but will also become a decoration for the kitchen. To make it last as long as possible, do not soak it in water or wash it with abrasive cleaners. Washing the craft with warm water under the tap using dishwashing detergent is enough. After washing, the board should be dried with a towel.
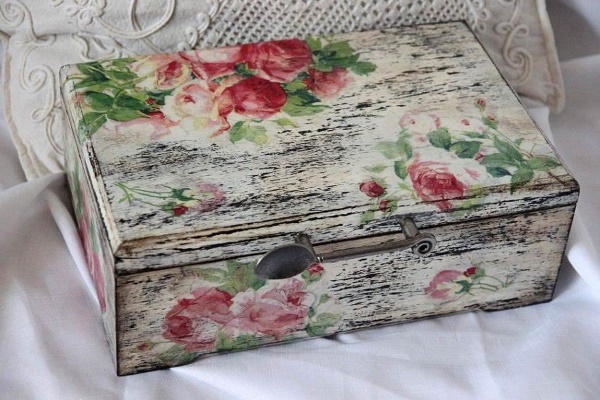
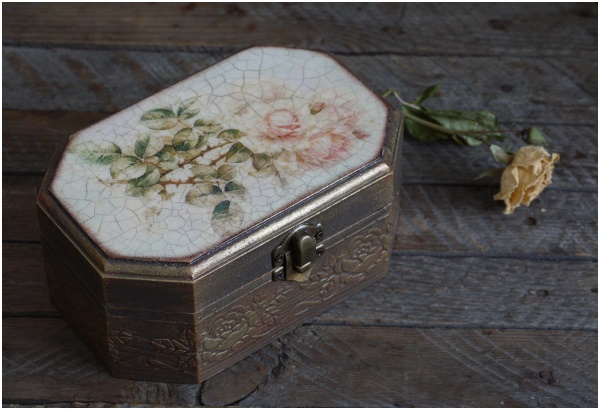
Decorating a box with a decoupage card
The complexity and duration of work with a decoupage card depends on the type and density of the paper itself. The easiest to work with is a rice decoupage card. But many manufacturers make cards on regular paper with a density of 40 to 80 g / m. The thicker the card, the more difficult it is to hide its borders on the product. Knowing some techniques will help simplify the task.
To decoupage the box you will need:
- wooden box;
- decoupage card with a density of 70-80 g/m;
- white primer;
- structural paste or putty;
- acrylic paints;
- decoupage glue;
- acrylic varnish;
- water;
- scissors;
- sandpaper No. 1;
- sponge;
- stationery file;
- masking tape;
- stencil with a pattern;
- palette knife;
- flat brushes for glue and varnish;
- thin paint brushes;
- container for soaking the card;
- palette.
 Master class:
- Start your craft by sanding the entire surface of the box.
- Apply a thin layer of primer to all sides of the box using a sponge, patting motions. After it dries, sand away any uneven areas and prime again. Repeat the sanding procedure if necessary.
- Prepare a decoupage card. For gluing, you can use the entire sheet of the card, which will clearly lie on the entire surface of the box lid, or just part of it. In the latter case, you should cut out the desired image with scissors.
- Soak the card in slightly warm water for 5 minutes. Remove the picture from the water and place it face down on the file. Lightly blot the card with a napkin. It is important to remember that after soaking, the card will stretch by 0.5-0.8 cm at the edges. Therefore, it is worthwhile to calculate in advance how much surface the decor will occupy.
- Apply glue to the surface of the box. Apply a thin layer of glue to the back of the card, paying attention to the edges and corners.
- Using a file, transfer the map to a wooden surface. While the glue is still wet, you can lift the edges and carefully slide the map over if it doesn't fit as planned. The file should remain on the map, so it will be easier to adjust the motif.
- Smooth the image through the file with a foam roller, pushing out air bubbles from under the card. This process resembles gluing wallpaper. Then carefully remove the stationery file, holding the pasted card.
- After removing the film, smooth out the motif with a wide brush moistened with glue. Apply varnish to the dried lid of the box and leave for 2 hours.
- Using a stencil and structural paste, add texture to the product. This can be done on the ends of the box or on the border of the card with the wooden surface. In the latter case, this technique is used to mask the joints. Using masking tape, you need to fix the stencil and evenly spread the structural paste over it with a palette knife. Immediately after this, carefully remove the stencil.
- Tampon the sides of the box with the selected paint, highlighting the bulges with a darker or lighter tone. If necessary, paint some elements with a brush.
- Cover the box with several thin layers of matte or glossy varnish, allowing it to dry periodically after each application. After the third layer, you can sand it with sandpaper.
Decoupage on a wooden surface can be done with either 4 or 40 layers of varnish. A large number of layers gives the drawing “juiciness” and realism. But this only applies to glossy and semi-matte varnish. Multi-layer matte varnish coating – on the contrary, muffles the colors of the picture, so it is suitable for the last 2-3 applications, that is, the finishing coat.
High-quality multi-layer varnishing distinguishes the work of a beginner from that of an experienced craftsman. This procedure takes the most time in the decoupage process. Depending on the composition of the varnish, temperature and humidity conditions, each layer of varnish dries from 2 to 12 hours. But the end result is worth the effort and time.
Decoupage of a chest of drawers with antique wallpaper
With the help of wallpaper, you can decoupage both small and large surfaces, such as furniture. The general principle of work is similar to decoupage with a napkin or a card, but there are some peculiarities.
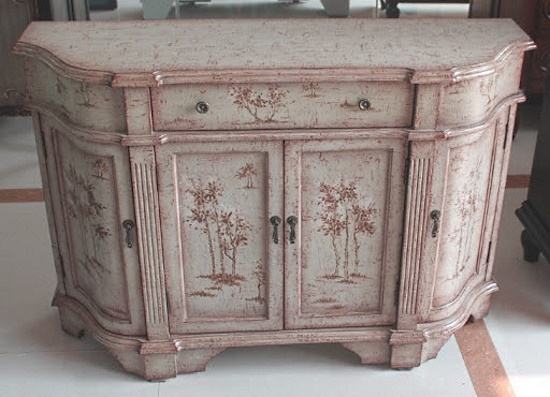
To work you will need:
- dresser;
- paper wallpaper;
- white primer;
- putty;
- acrylic paints;
- PVA glue;
- water;
- alcohol;
- acrylic varnish;
- paraffin;
- scissors;
- ruler;
- pencil;
- sandpaper with coarse and fine abrasive surfaces;
- palette knife;
- roller;
- flat brushes for glue and varnish;
- Round and thin paint brushes.
Master class:
- Prepare the chest of drawers for decoupage. The furniture should be smooth and without damage. If there is any, you should repair it with putty and a palette knife. Small defects can be sanded with sandpaper. The product should not be varnished, since there will be no adhesion between the surface and the material.
- Degrease the work surface with alcohol.
- Take measurements of the work surface and cut the wallpaper strips according to the measurements.
- Prepare a solution of glue with warm water. Using a wide brush, apply the liquid to the back of the canvas and to the surface of the chest of drawers.
- Apply the wet canvas to the wood and smooth the material with a roller. If folds form, take the end of the canvas and peel off part of the wallpaper, smooth it out and smooth it to the wood again. It is much easier to work with dense material than with napkins or a decoupage card.
- After drying, the canvas should be coated with varnish twice, allowing it to dry periodically after each application.
- Give the product an aging effect by scuffing. To do this, cover the corners and sides of the chest of drawers with rich-colored paint and let it dry. Then rub these areas with paraffin, and then apply a layer of light-colored paint. After drying, lightly rub the surface with sandpaper to reveal the "scuffs".
- Apply several thin coats of varnish to the chest of drawers to give it a finished look.
The variety of decoupage techniques and modern paper motifs provide unlimited possibilities for decorating wooden products.
On any surface you can make an artistic painting applique, which, with the skillful work of the master, will be subtly imitated under painting, and realistically become akin to the product.
Author of the article: Inna Chaplich
Video on the topic: decoupage on a wooden surface
Wood decoupage for the kitchen - master class: