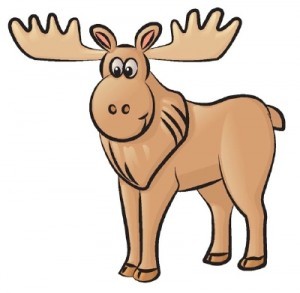
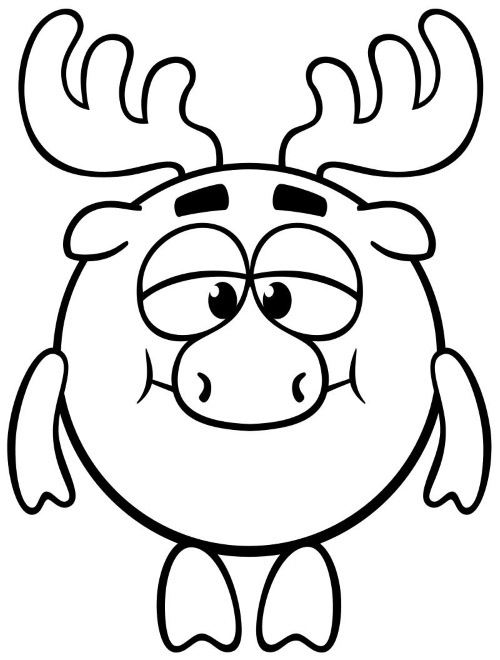
Moose are large animals with long, branched antlers. Large representatives of mammals are shown to children in a cartoon style - a striking example is the hero of the TV series "Smeshariki" Losyash. It is quite easy to draw him and other animals, using a simple pencil and a few tools.
Pencils, paper and supplies
To draw an animal with a pencil, you will need the following set:
- simple pencil;
- eraser and sharpener;
- a sheet of good paper;
- compasses, rulers.
You can also use gel pens, colored pencils or felt-tip pens, watercolors and gouache as auxiliary materials for coloring the resulting sketches.
In cartoon style
Elk (drawing for younger children) is a majestic, large animal. It is quite difficult to draw, but you can consider a more accessible option that is suitable for drawing by children aged 6-7.
Step by step process
Stages of work execution:
- On a clean sheet of paper, use a compass to draw a large circle.
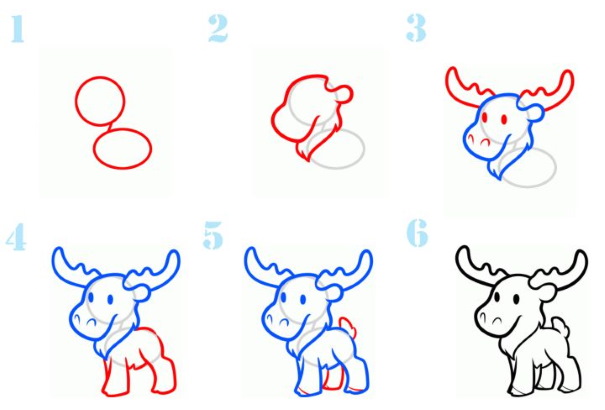
- At the bottom, visually mark half a circle, draw, starting from the visual line, a slightly flattened oval and connect these figures with an inclined line.
- Using a pencil, draw the main elements of the moose's head, and also add fur on the neck.
- Using curved and zigzag lines, draw the horns, add oval eyes and arched nostrils on the animal's face.
- From the previously drawn oval, form the character's body and legs. To draw the legs correctly, you can first draw several rectangles, which you can then transform in accordance with the drawing.
- Add small details: the tail and the leg located at the back, and also mark the line of the animal's hooves.
- Use an eraser to remove all unnecessary elements and draw all the details of the drawing with a gel pen or a black felt-tip pen for greater precision.
The resulting drawing can be used as a set for a further painting, or as a complete one.
With shading
Elk (drawing for children in pencil) is a rather complex animal in structure and shape. Older children will be able to draw it in more detail using a step-by-step process.
Step by step process
Algorithm for performing work:
- On a clean sheet of paper, draw a large circle using a compass. On the left side, draw a smaller circle, placing them approximately on one parallel line.
- On the right side of the previously drawn circle, draw a small circle intersecting with the surface of the main one.
- Add additional details – lines connecting the 2 large circles and lines dividing the small circle.
- On a circle of a smaller diameter, draw the shape of the moose's face, adding rectangular details and drawing small eyes.
- In the upper part of the previously drawn circle, draw long horns (using curved and zigzag lines).
- Draw ears under the previously drawn horns, and also draw the horns themselves and the muzzle.
- Add lines for the beginning of the body and neck, and mark the boundaries of the back at the top.
- Continue drawing the back line and add elements of the front leg and thigh.
- Continue drawing the back leg, belly, and the line of the second back leg.
- Use an eraser to erase all auxiliary details and draw the main lines with a black felt-tip pen or gel pen for detailing.
The resulting image can be colored, shaded, or left as is.
How to detail an image:
- Add light strokes to the horns with a simple pencil. The color should be slightly translucent, as this part has a pronounced yellowish tint.
- Darken the lower part of the belly and the sides with more active movements of the pencil. To draw the fur, you can use various textured hatching.
- Determine the average shade of the drawing and fill the main part of the drawing with it.
- Fill the animal's hooves and eyes with a dark solid color.
- Fill the area under the animal with vague outlines of a light shade.
- You can also draw additional elements next to the moose – stones, grass, trees and other animals.
Additional elements will also require adding shadows.
With paints
Elk (drawing for children with a simple pencil with the addition of various colors) turns out to be quite realistic if you use various detailed elements. Such a drawing is the result of quite painstaking work, which is suitable for older children.
Step by step process
You can draw an animal using the following system:
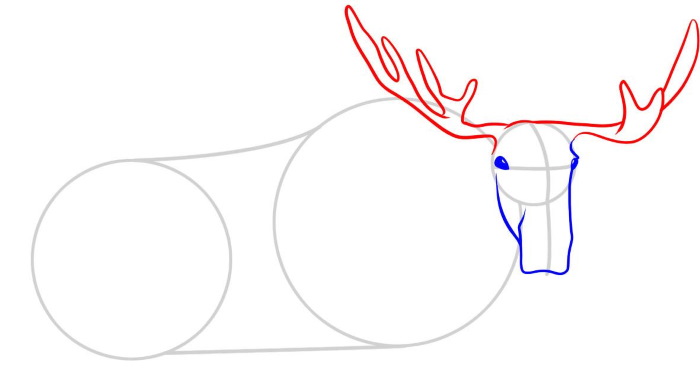
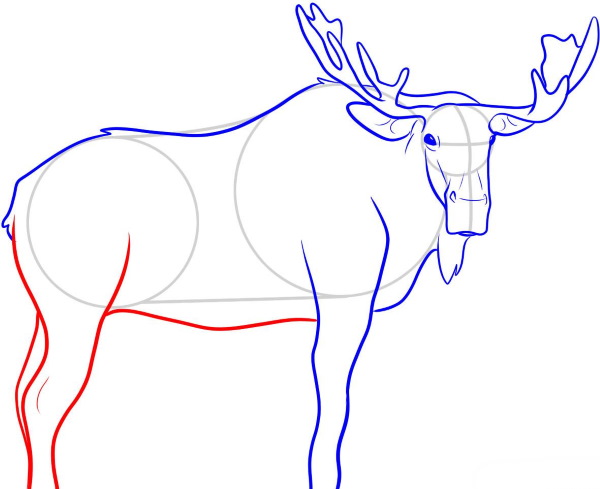
- At the top of a clean sheet of paper, draw a small circle using a compass. Having determined a point, slightly to the right and below the previously drawn circle, draw a larger circle (approximately 2 times larger in diameter than the previous one).
- On one parallel line with the drawn circle, draw a medium-sized circle. Using slightly curved lines, connect the small and large circles that formed the moose.
- From the smallest circle, draw a curved line, giving direction to the animal's muzzle.
- At the top, draw curved, arched lines that form the moose's antlers.
- At the bottom of the drawing, draw 4 lines – as shown in the drawing, forming the legs of the animal.
- Using the drawn diagram, add the outline of the moose's muzzle, and also draw the eye located on the previously drawn line.
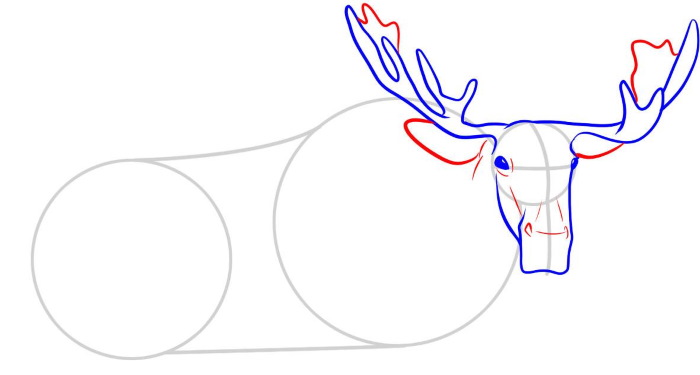
- Using the lower neck as a base, add textured fur using small, zig-zag sharp lines.
- Using a simple pencil, outline the previously drawn lines that form the moose's antlers, and also add two rounded ears.
- At the bottom of the neck, draw another row of fur to show texture.
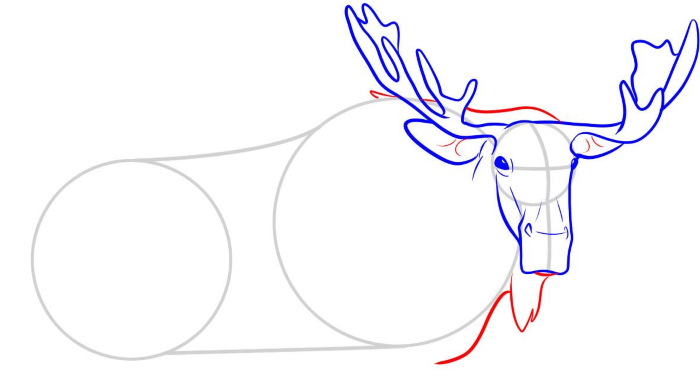
- Use smooth lines to connect the area of the animal’s head, neck and pelvis, and also draw the front legs together with the hooves – as shown in the picture.
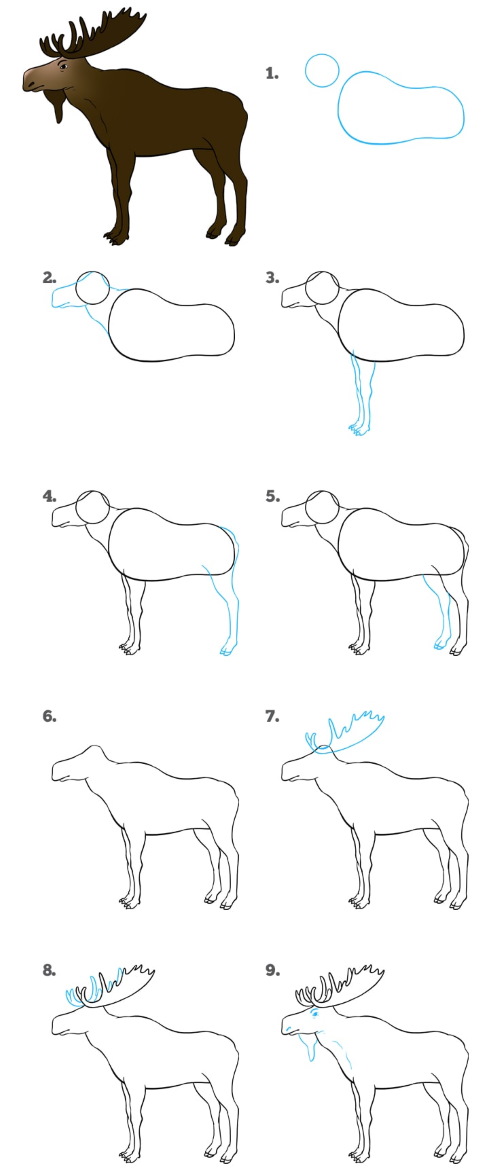
- Add the belly line using the same technique as for the neck and chest, and draw the back leg according to the drawing.
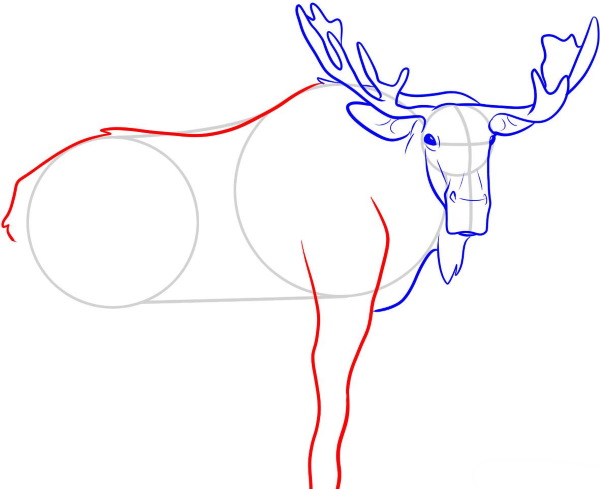
- Continue drawing the lines of the back, forming the tail and thigh with the leg of the animal.
- Remove all unnecessary lines with an eraser, add a few lines that create volume, show the distribution of muscles on the legs and fold lines.
The finished drawing can be decorated with shadows, or left as is.
You can add some color to the drawing to make the details more pronounced:
- Take yellow as a base. Paint the entire sketch with a light shade, generously diluted in water.
- While the drawing is drying, you can mix light and dark shades of brown on the palette.
- When the paint has dried a little, apply dark strokes in places where natural shadow should be located.
- Using a thin brush, first apply a small amount of black paint and draw the pupils and hooves of the animal.
- Fill the whites of the eyes with white paint and make small strokes on the moose's antlers.
- Fill the rest of the drawing with light paint, adding a small amount of dark brown for greater harmony.
Dry the resulting drawing thoroughly.
Simple option
Moose (cartoon drawing for kids) can be presented to children as a harmless cute animal. To such an extent, it can be expressed on paper using a cartoon style, which is suitable for young children who are starting their journey in learning about animals.
Step by step process
Algorithm for performing work:
- On a sheet of paper, draw a figure resembling an "eight". The upper part of the figure should be slightly larger than the lower part.
- At the junction of the 2 figures, slightly above the "knot", place an uneven oval. Also add 2 curved lines on the sides of the lower oval - as shown in the picture.
- At the bottom of the figure, add 2 elongated, thin rectangles.
- Inside the top figure, draw 2 connected ovals, as well as small black dots inside them – the character’s eyes.
- From the previously drawn rectangles, draw figures that look like several connected hearts – the moose’s legs.
- At the top, make sketches of the character's future horns and ears.
- Detail the horns as shown in the picture, add some fur.
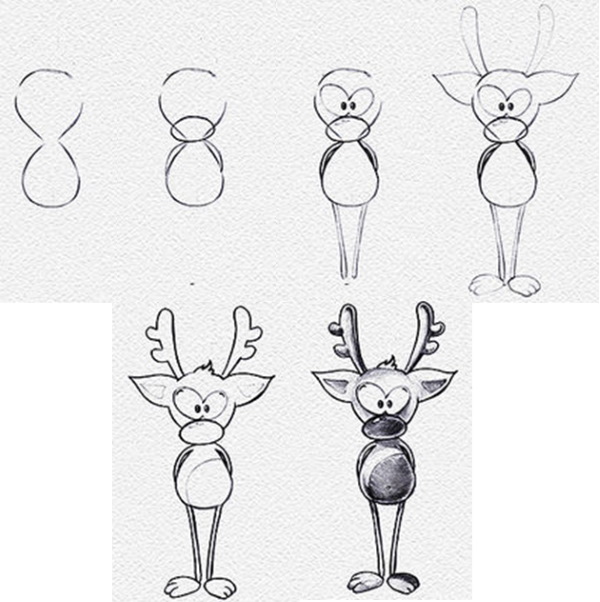
As a final touch, you can add some shadows according to the example drawing.
Using complex geometric shapes
Older children can draw a moose using a simple diagram. This drawing looks quite accurate, but is not burdened with a large number of complex elements.
Step by step process
Algorithm for performing work:
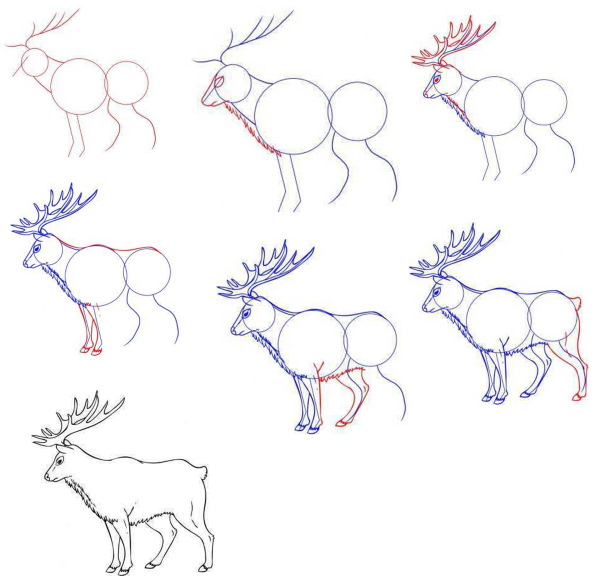
| Stage | Description of the stage | Image |
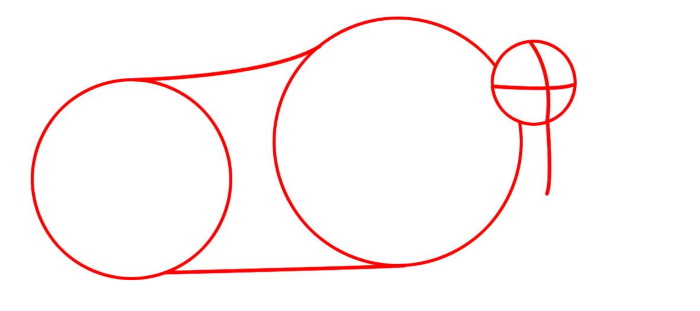
| 1 | Draw on a clean sheet of paper a structure consisting of a pear-shaped body and 2 circles of different diameters. The pear-shaped oval forms the body of the animal, so it should be located in the middle of the sheet of paper. On the left side is a large circle, on which, in turn, is a circle of a smaller diameter. These figures form the neck and head of the moose. | 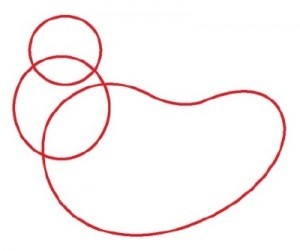 |
| 2 | Using curved lines, connect the front part of the body, forming the body and the beginning of the back of the animal. Determine the visual middle of the structure, draw the front leg of the moose, forming a hoof at the bottom. In the back of the drawing, draw the thigh and leg of the animal, also forming a hoof. | 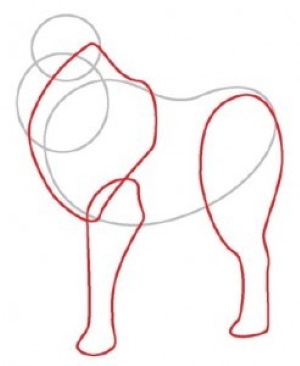 |
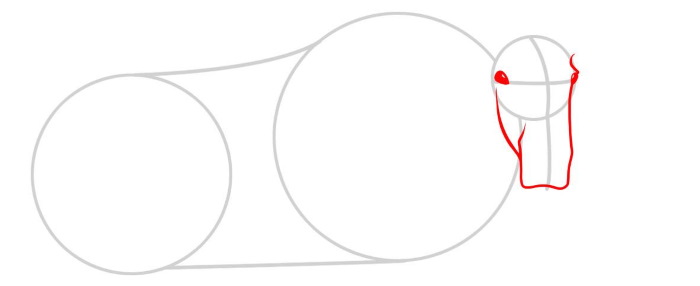
| 3 | Next to the thigh of the back leg, draw a figure that resembles a leaf or an oval with sharp ends - the tail of the moose. Using a small circle as the outline of the animal's head, draw a broken parallel line and design the horns with zigzag lines.
Add front and back legs. | 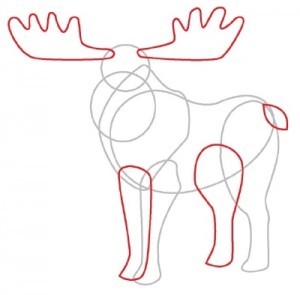 |
| 4 | On a circle of a larger diameter, draw a pair of eyes for the moose, along with pupils and rounded highlights. Add a small grin using a curved line.
Add parallel lines to form the fur on the chest, and also draw and detail the animal's hooves. |  |
| 5 | Use the eraser to remove all unnecessary elements of the drawing.
If desired, draw additional details on the drawing or decorate the space around it. Outline the main elements with a black marker. | 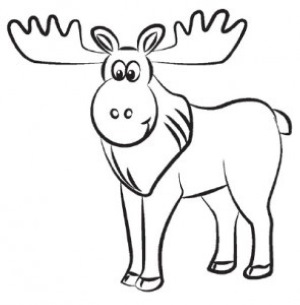
|
The resulting image can be used as a finished drawing, or as a sketch or coloring page.
Quick drawing
It is quite difficult to depict the animal. A quick way to draw a moose is to draw it without any additional elements.
Step-by-step process of completing the work:
- On a clean sheet of paper, draw a curved shape that forms the upper jaw and head of the animal - as shown in the picture.
- Starting from the top point, draw a figure resembling a leaf – the moose ear. In the lower part, extend the drawing of the animal’s head – draw the lower jaw.
- Using an uneven, slanted line, draw the moose's neck.
- Place the pencil on the right point of the ear and draw a curved, slightly slanted line that forms the upper part of the moose’s body – the back.
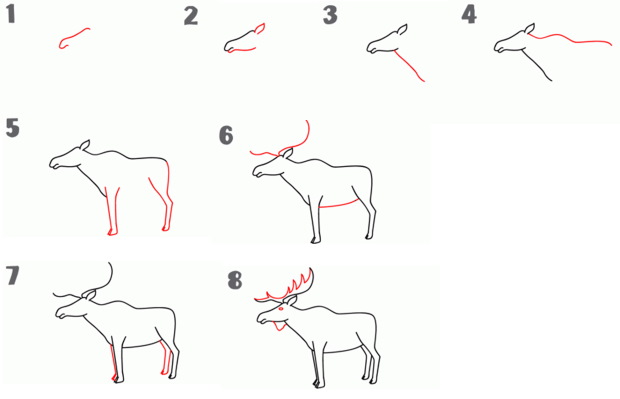
- At the bottom of the drawing, draw the animal’s hips and legs, along with the hooves.
- Connect the moose's legs with a continuous line to form the belly area. Add curved lines above the head to sketch out the antlers.
- Draw paired legs with hooves.
- Detail the head area, as well as add the chin and draw the top of the horns.
Add light shadows to the drawing or color it with paints.
Easy drawing
As an educational game, you can draw a funny moose. The drawing is cute and easy to work with, which can keep children busy and help them develop fine motor skills.
Step by step process
Step-by-step process of completing the work:
- On a clean sheet of paper, without any additional tools, draw an uneven, elongated oval, as shown in the picture.
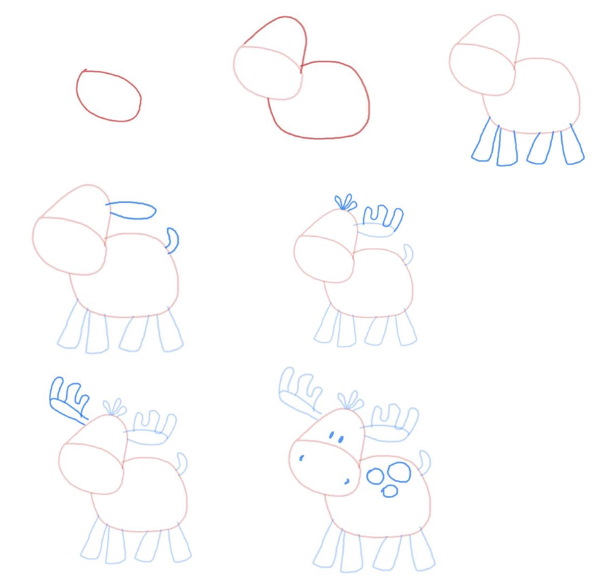
- Add a semi-oval on top, resembling a cap. Also add a rounded rectangle, forming the body of the animal.
- Draw 4 rough rectangles at the bottom of the drawing.
- On the right side of the previously drawn "hat" draw another oval - as shown in the picture. In the upper right part of the rectangle draw a short, curved tail, resembling a comma.
- Add a small mane to the top of the "hat" and draw a zigzag pattern on the top of the moose's horn.
- Add another horn to the left side of the head, drawing it using the same pattern.
- Draw nostrils and eyes on the muzzle. On the body – a drawing.
Trace or color the finished image with pencils.
Useful tips and recommendations
When working with pencils and drawings, you can use the following recommendations:
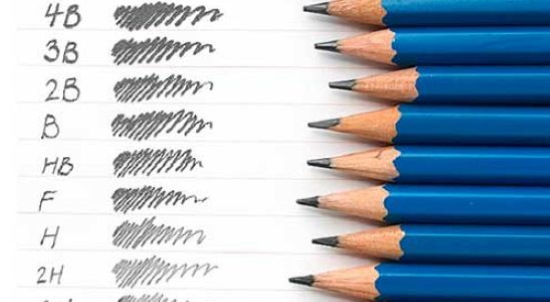
- use several types of pencils for drawing. Soft lead allows you to create more delicate and smooth lines, which can then be easily removed with an eraser - it is suitable for applying light shadows and sketches. Hard lead is needed for drawing small details, clear lines and shading;
- quality paper is the key to a good drawing. A thick white sheet can withstand many changes made to the drawing, and it does not distort the image when using paint;
- for drawing, you can buy an easel for your child, especially when working with watercolors or gouache;
- there is no need to restrain the child during drawing or at the stage of coloring the sketch. Showing interest in the process allows developing not only fine motor skills, but also imagination;
- If the child is too young to draw, you can buy the appropriate coloring books. During the procedure, the child memorizes the lines and also gets acquainted with the world around him. Subsequently, the child will be able to reproduce similar features on paper.
Using these recommendations, you can make it easier for your child to learn how to draw.
Coloring pages
You can also use the following coloring pages at the training stage:
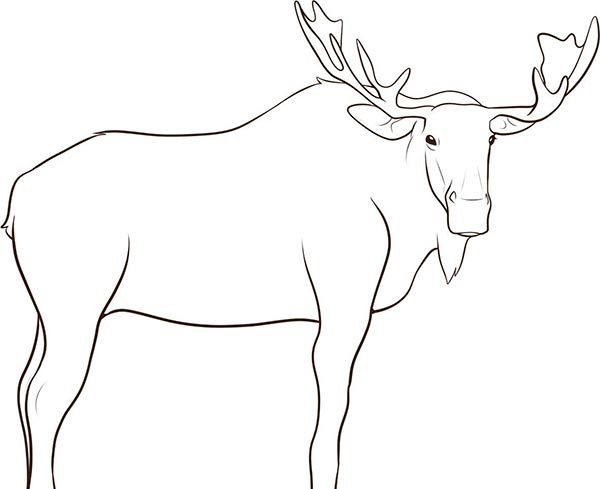
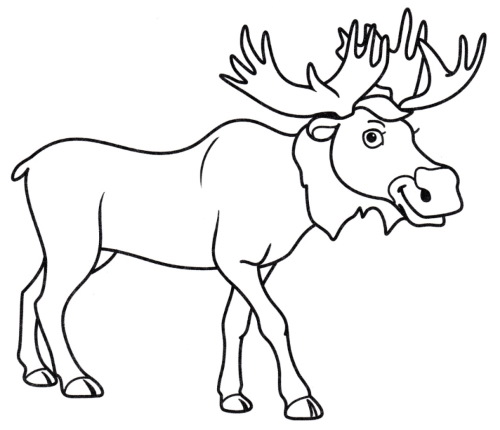
- elk without additional figures and drawing details – suitable for studying a specific animal;
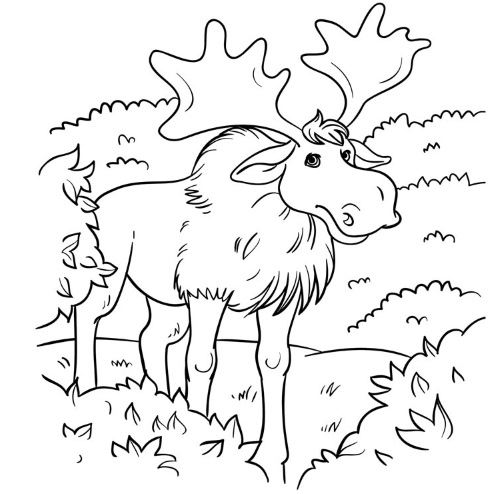
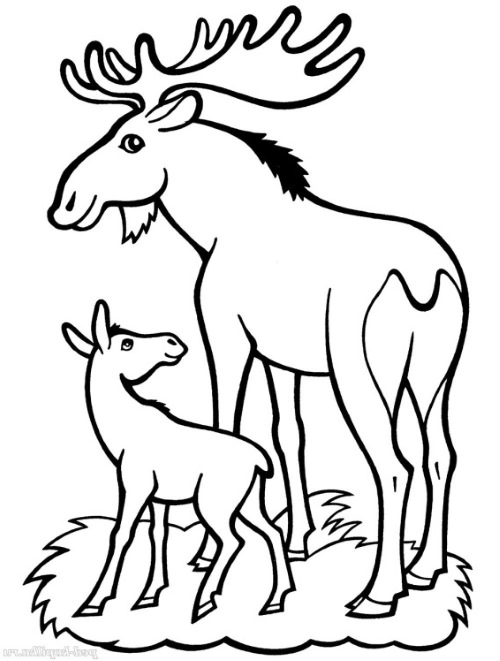
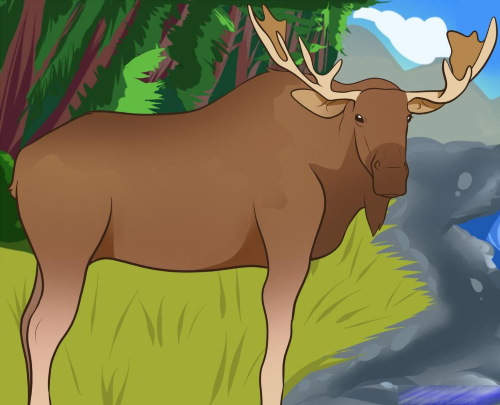
- animal against the background of its environment - can be used to study flora and fauna, as well as to determine the habitats of various animals;
- Elk with a calf - allows the child to learn the names and appearance of animals and their cubs.
The best option for younger children is a coloring book in the form of cartoon characters.
Elks are large, majestic animals that are the closest relatives of deer. In size, elks surpass many forest dwellers, as individual representatives can reach up to 800 kg, while the average weight of a brown bear is half as much.
It is quite difficult to depict an ungulate, as the drawing must have a large number of details and elements. A more simplified version of drawing an animal is suitable for children, which can be viewed in the article.
Video about drawing
Moose - drawing for kids: