Crafts made with children from tree leaves are a great way to spend time usefully. Joint work will help direct the child's thinking in the right direction, while simultaneously developing the ability to work with their hands. If you don't have real leaves, you can cut them out of scrap materials. Templates can be found on the Internet in ready-made form.
The benefits of applications for child development
Making appliques is a fascinating process that promotes the development of children and easy meditation for adults. With the help of such a hobby, you can help a child expand his horizons and imagination. Also, creating an applique develops fine motor skills from an early age. Interest in this type of creativity manifests itself early, which develops the child in a variety of ways.
The main advantages of working on appliques:
- the establishment of discipline;
- instilling accuracy and perseverance;
- development of intelligence;
- concentration of attention;
- getting to know the world around us.
When creating applications, the child, together with other children, is taught group work and the ability to find an approach to peers.
It is better to start working with easy applications and progress to more difficult ones.
Thus, the child develops not only the ability to work with his hands, but also to think, fantasize, come up with ways of working and implement ideas into reality. Frequent creation of appliques will help the child to look for ways of using other materials at hand to work with crafts.
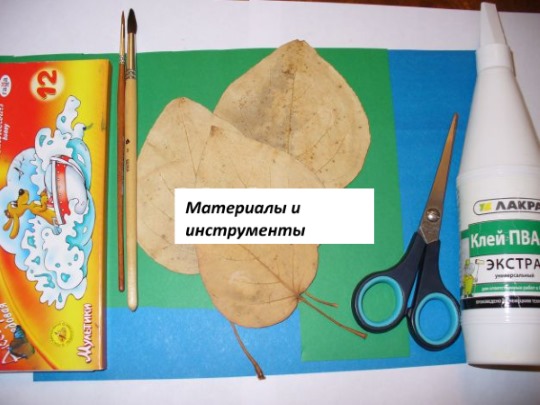
What you need to make crafts from leaves
Tree leaves (cutting templates are useful in winter, when there are no leaves on the trees) are the most easily accessible material, and therefore crafts made from them are the most common.
To create entire compositions from leaves, auxiliary materials are required, such as:
- scissors;
- glue;
- album paper;
- pencil;
- threads.
Depending on what exactly is being created from the leaves, the list of necessary materials is expanded.
How to Make an Applique from Paper and Tree Leaves: Step-by-Step Instructions
Leaf applications can be created in any number of different ways.
In addition to the main material, this type of creativity can use:
- pebbles;
- moss;
- loose tea;
- buckwheat.
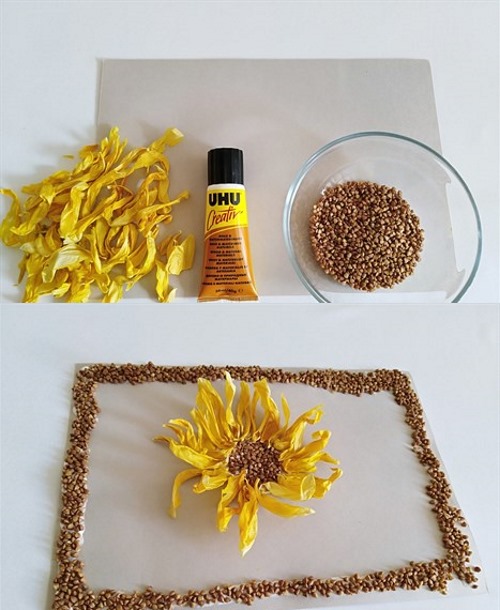
The above materials serve as additional ones and help to improve the picture, filling the resulting voids. Thick paper is used for the background, which is the basis for applications.
To make appliques, you first need to decide what exactly will be created. The drawing is applied with a pencil on paper and the process of gluing the leaves begins. From the collected leaves, those of the appropriate size are selected and attached to the drawing with glue.
If you are creating an applique with animals or flowers, you can cut out the missing parts of the picture from paper and paint them. In some cases, it is permissible to use colored paper or cardboard.
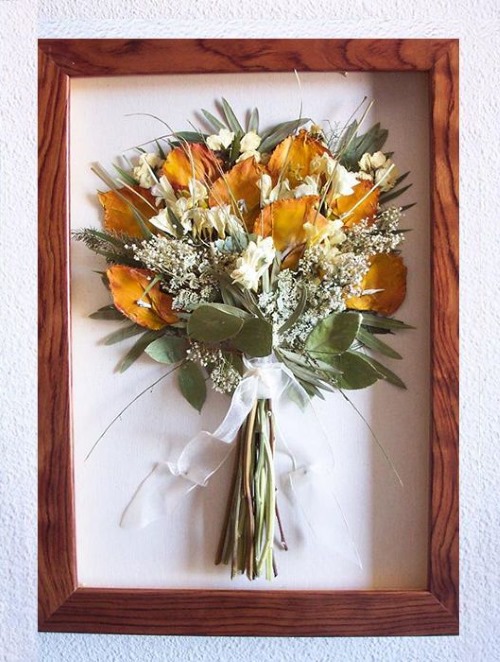
Autumn bouquet
You can make different flowers from leaves and create a whole bouquet, for example, of roses. For this you will need leaves of different sizes with stems and threads.
Step by step actions:
- Fold a small sheet of paper in half (fold the top to the bottom).
- Roll up the resulting sheet, starting from one edge. This will be the core (if the leaves are narrow, this step is omitted).
- Fold the remaining leaves in the same way and wrap them around the core until the rose is the desired size (if the bouquet consists of buds, you will need fewer leaves).
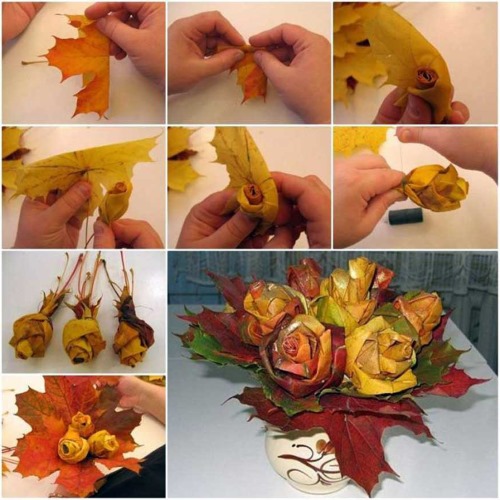
- Use threads to secure the bottom of the rosebud, capturing the tops of the leaves and stems.
- When the roses are ready, create a composition by filling the spaces between the flowers with leaves.
Animals on paper from leaves
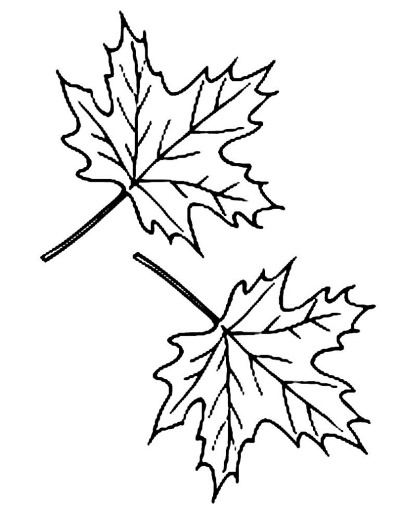
Depending on the leaves you have, you can make different animals using paper as a base. To make, for example, a butterfly, you will need leaves for the wings and the base. The wings can be made from 2 large leaves (for example, maple) or from 2 large and 2 smaller ones.
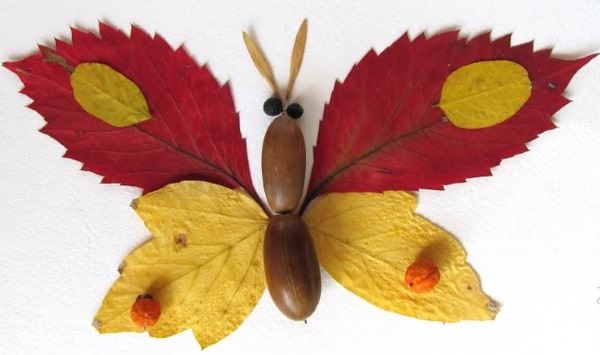
Step by step actions:
- Glue a narrow and long sheet onto the paper.
- Attach one large sheet to the right of the base at the top. Glue a smaller sheet to the bottom of this sheet.
- Repeat the same on the other side.
- Use a pen to draw the butterfly's horns.
Animals can be made in 2 ways: entirely from leaves and using a drawing. In the first case, all parts of the animal's body are made from leaves, selected according to size and shape.
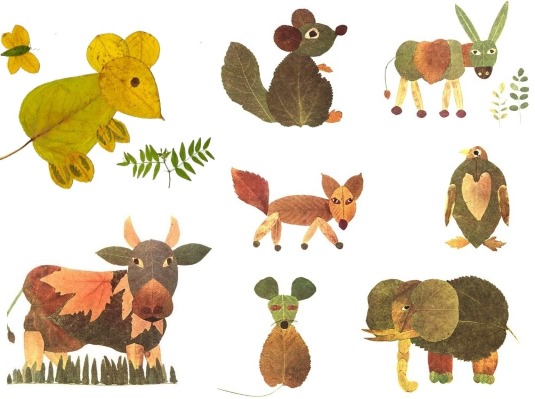
In the second case, the desired animal is drawn on paper, for example, a hedgehog. The body of the hedgehog is colored with pencils/markers, and leaves are glued in place of the needles.
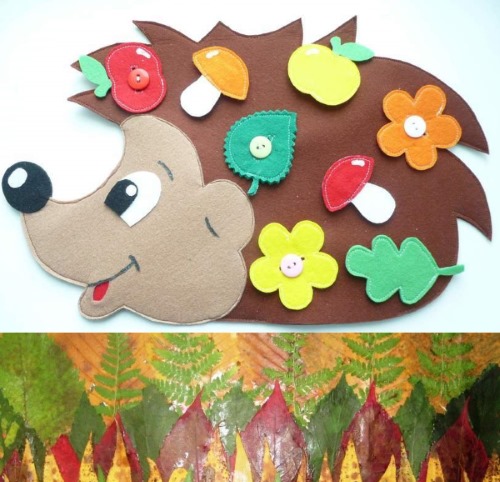
Leaf and felt applique
From felt and leaves you can make a whole composition “hedgehog in the forest”.
To create it, you need to have on hand:
- red felt;
- white felt;
- green felt;
- brown felt;
- tree leaves;
- album sheet;
- scissors;
- simple pencil;
- brown pencil;
- threads;
- needle;
- glue.
Step by step actions:
- Draw a hedgehog in the middle of the album sheet. Color the muzzle.
- Cut out the hedgehog's body from brown felt.
- Make small fly agarics from white and red felt.
- Cut out small apples from red and green felt.
- Sew the mushrooms and apples to the hedgehog's body and glue it to the drawn one.
- Glue the existing leaves to the bottom of the hedgehog, completely covering the bottom part of the drawing.
- Glue the remaining leaves into the empty spaces, creating the effect of falling leaves.
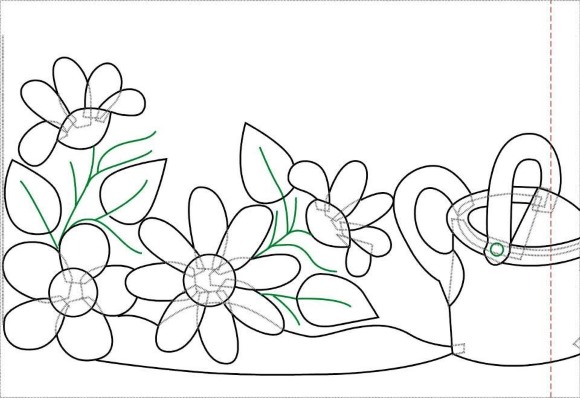
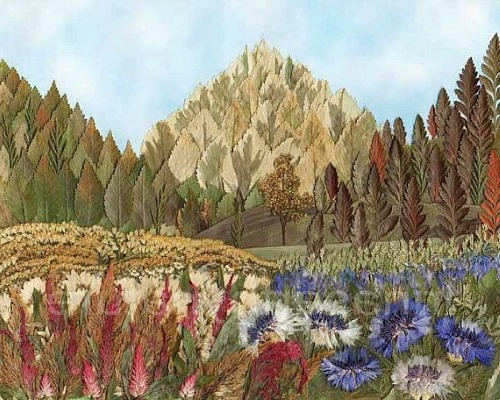
Landscape applique made of leaves
Tree leaves are used to create beautiful landscapes using paper as a base. The most common type of landscape is a forest. If there are no leaves, they can be cut out of paper or felt. The process of creating leaf templates with step-by-step actions is described below.
To create a picture from leaves, you will need:
- paper base;
- paints;
- glue;
- leaves.
Step by step actions:
- Use a pencil to draw the necessary drawing on paper (in this case, a forest is being created, so trees, the sky and, if desired, a lake/river are drawn).
- Paint the sky, river and tree roots.
- Glue the leaves to the trees and to the ground.
Flower Petal Appliques
You can work with both dried and fresh flower petals.
To dry petals you can use:
- book;
- microwave oven;
- iron.
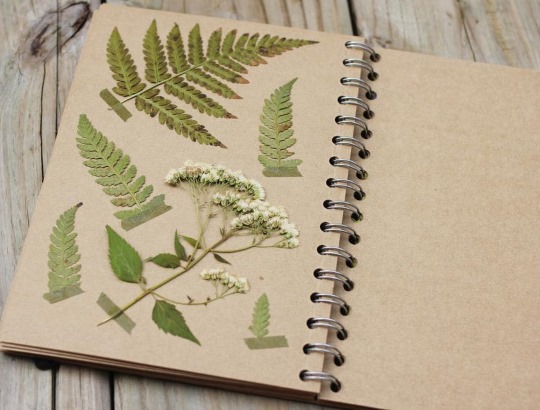
Sometimes, three-dimensional paintings are created using dried flowers without a press. To do this, the flowers are hung upside down and kept in a warm place until the desired result is achieved. Flower petals are an ideal material for creating appliques. They come in different colors and shapes, which allows you to create interesting compositions.
When creating flower appliques, it is worth considering the color of the petals used. When choosing colored petals, you can use white or pastel colors. For white flowers, such as chamomile, the background must be bright.
If you don't have live flower petals, you can cut them out of:
- colored paper;
- corrugated paper;
- felts;
- fabrics.
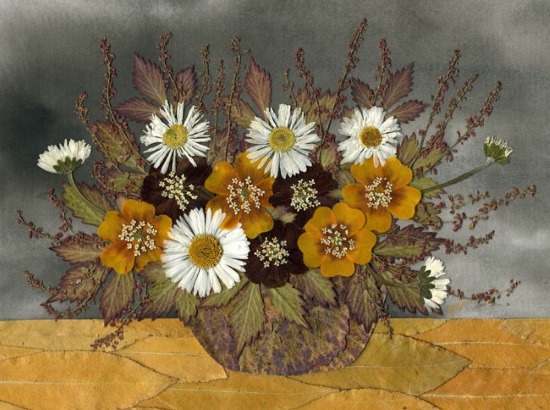
Chamomile
A beautiful applique can be made in the form of a bouquet of daisies using the following materials:
- paper;
- chamomile petals;
- paints;
- pencil;
- bright yellow chalk;
- glue.
Step by step actions:
- On paper, make a sketch of the stems and draw a daisy at the end of each.
- Glue real flower stems onto the drawn stems or paint them.
- Draw a circle around the core of the chamomile and coat it with glue.
- Crush the yellow chalk and sprinkle it into the center of the chamomile, without leaving the circle.
- Glue chamomile petals around each core.
- In places where there are voids, you can glue long thin leaves or draw them. To complete the picture, you can use poplar fluff, dry tea or pebbles.
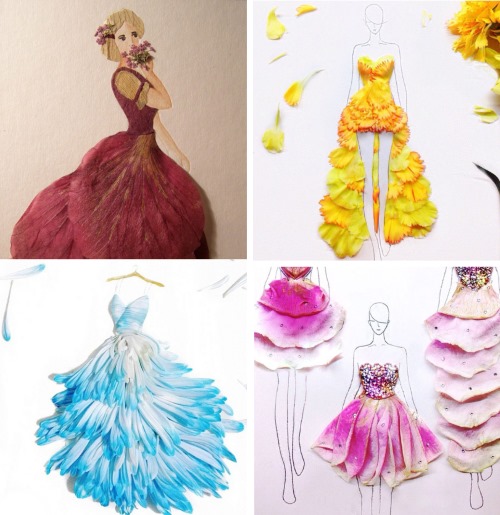
Lily
Lily petals have an oblong oval shape and come in a variety of colors. Each flower has 6-10 petals attached, so you'll need several flowers to create a voluminous applique. You can make a very beautiful butterfly or create an elegant ball gown from lily petals.
For the second option you will need:
- paper base;
- pencil;
- lily petals.
Step by step actions:
- Draw a silhouette of a girl on paper.
- Paint the upper part of the body to match the color of the existing petals or choose a suitable one.
- Starting from the bottom edge of the dress, glue the flower petals, moving upwards. Each subsequent layer should slightly overlap the bottom one. For a more complete picture, you can draw a hat, to which you can also glue a petal.
- The remaining empty space can be colored with colored pencils, draw a house, sky, sun, rain - any weather and complete the composition. From petals you can make a whole ball masquerade, drawing several silhouettes and dressing them in a "lily dress".
Rose
Rose petals have an ideal shape that can be used to create many pictures and appliques. You can also make dresses, butterflies, and various animals from them. The easiest option for appliques from them is to create a picture of a vase with a bouquet inside.
| To do this you will need: | Step by step actions: |
|
|
Tulip
Tulips are bright sunny flowers that come in different shades. The flowers have from 5 to 8 petals, so creating a picture requires several flowers. They have the shape of an elongated oblong droplet and are slightly concave inward.
From tulip petals you can make a beautiful voluminous flower, which is made from the following materials:
- album sheet;
- tulip petals;
- glue.
Step by step actions:
- Draw a medium-sized yellow circle on the base.
- Glue the tulip petals around it, one on top of the other. Make several turns around the core, slightly overlapping the petals. Start from the very edge, gradually approaching the middle.
- Decorate the remaining space with pebbles and colored glitter. You can make a few more smaller flowers and draw leaves, creating a wreath.
What can replace tree leaves. What materials are used to cut out leaf templates
Tree leaves (cutting templates can replace real leaves) are not in great demand in summer, and in winter and early spring they are impossible to find. Autumn leaves, which have a multi-colored color, are more often used for applications and crafts.
For such cases, there is a method that will help create autumn bouquets in the summer - cutting out leaves from scrap materials.
This could be:
- album sheet;
- felt;
- corrugated paper;
- colored paper;
- textile.
Supporting materials:
- simple pencil;
- ruler;
- eraser;
- colored pencils/paint;
- scissors.
It is recommended to choose scissors with a thin tip so that you can cut small teeth from the leaves. For convenience, it is better to take both small and large scissors at once.
When using a sketchbook sheet, you need to color the cut out leaves. For this, it is recommended to use paints instead of pencils, since the transition from one color to another is smoother with their help.
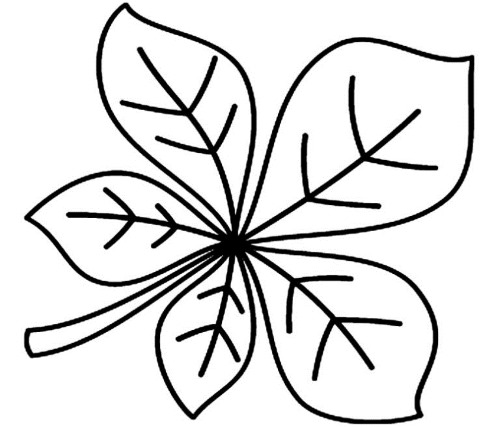
Maple Leaf Template
To make a simple maple leaf template, you will need:
- On paper, draw a straight vertical line with a pencil and a ruler. Length – 8 cm.
- Divide it in half and draw lines in the middle in different directions diagonally at an angle of 45°. The length of the lines is 4 cm.
- From the end of each line, step back 1 cm to both sides and 7 mm down. Put dots. Connect the top of the lines and the dots with an arc line, concave inward.
- From the end point of the arc at the top, draw a line down 2.5 cm.
- Connect the bottom point of the drawn line with the side end of the arc. Repeat on both sides.
- Connect the lower points of the arc on both sides with the same long arc, concave downwards.
To make the maple leaf look more natural, you can draw it at an angle.
Oak leaf template
The oak leaf has an elongated shape with rounded corners. For a more accurate template, it is recommended to look at images of oak leaves on the Internet.
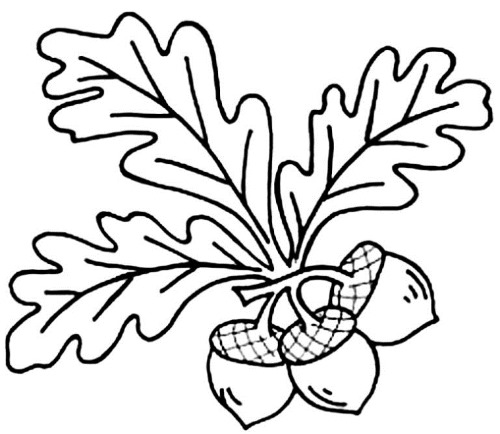
Step by step actions:
- Draw a vertical line 8 cm long on paper and divide it into 2 equal parts.
- From the top, draw lines 3 cm long in different directions at an angle of 45°. Extend the top of the line by another 2 cm.
- Divide the remaining part of the base into equal parts and draw the same lines from each in different directions as from the top. Extend the end by 2 cm and put a dot in the middle.
- Outline all corners with smooth wavy lines, without reaching them, along the entire perimeter of the drawn base of the sheet.
- At the bottom, capture the marked point with a smooth wave. If necessary, the stem can be extended to the desired size.
Grape leaf template
The grape leaf is a more labor-intensive process. It consists of many teeth around the entire perimeter of the leaf.
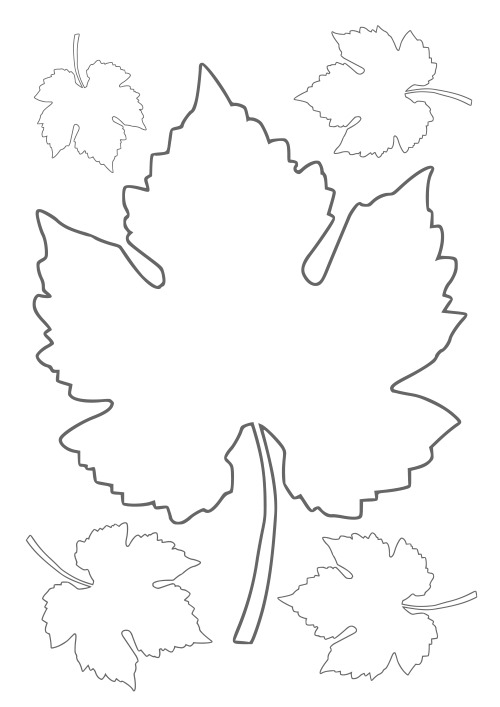
To make a grape leaf template, follow these steps:
- Draw a vertical line 6 cm long on the paper.
- From the end of the base, draw the same lines in different directions, 6 cm long, at an angle of 45°.
- Divide all lines into 2 parts and put dots. From the top dots draw lines 2 cm long to the left.
- From the bottom points, draw lines 3 cm long to the left.
- Between the lines drawn to the side, draw a line in the other direction, 2.5 cm long.
- Draw lines like a grape leaf with pointed corners around the entire perimeter.
Chestnut leaf template
Tree leaves (cutting templates are made on white paper, which is then painted with paints) come in different shapes and sizes.
The chestnut leaf has the shape of an elongated droplet with sharp teeth around the entire circumference.
It is drawn as follows:
- Draw a straight vertical line 12 cm long.
- Count 4 cm from the bottom and put a point. From this point, draw 2 lines diagonally upwards in different directions at an angle of 45°. The length of the line is 10 cm.
- From the same point, draw lines at an angle of 90° in both directions.
- Draw the next lines from this point at an angle of 135°.
- Draw short symmetrical straight lines from each line on both sides at an angle of 45° and 4-6 cm long (longer at the top, shorter at the bottom).
- Outline each line with the shape of an elongated droplet with teeth along the entire perimeter.
Apple tree leaf template
Tree leaves (cutting templates will help make the work easier, eliminating the need to draw leaves on paper each time) are best done on thick paper. The apple leaf is the easiest to draw.
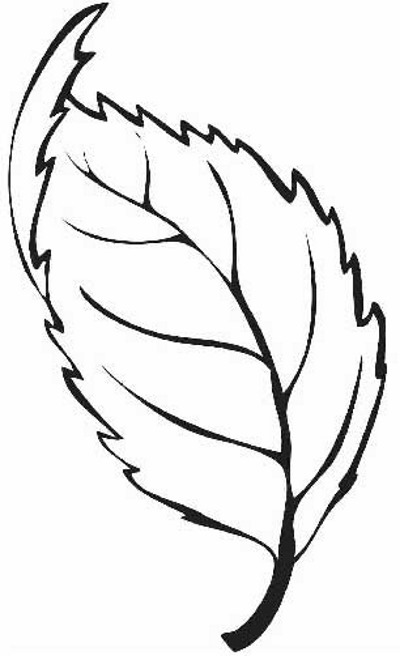
It has the shape of an elongated oval and is drawn as follows:
- Draw a straight vertical line 7 cm long.
- Outline this line with the shape of an elongated droplet, similar to an apple leaf.
- From the straight line, draw small symmetrical lines to the edge of the outline on both sides at 45° angles.
Birch leaf template
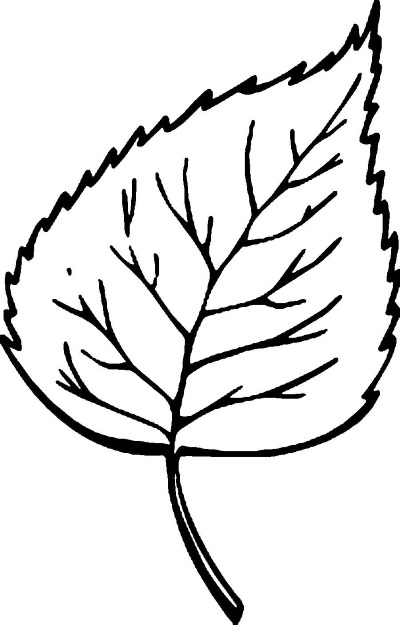 To create a birch leaf template you should:
- Draw a straight vertical line 7 cm long.
- From the bottom of the main line, count 2.5 cm and put a point. From it, draw two straight lines in different directions at an angle of 45°, 4.5 cm long.
- Count 2 cm from the drawn lines and draw the following lines at an angle of 45° in different directions. Length - 3 cm.
- Count another 2 cm and draw identical lines 2 cm long.
- Draw lines to create a rounded drop shape.
- The lower part of the leaf has the widest shape and is connected by an arc, concave inward.
Making crafts and appliques helps not only develop a child, but also reveal abilities. With the help of such creativity, you can instill in a child a love for the environment, careful treatment of the living world.
While doing the work, the child learns to use available materials and see possible usefulness in the things around him.
Tree leaves do not require financial expenditure and are not a hard-to-find material, which allows you to create new crafts at the request of the child. The process of collecting leaves is a fascinating activity, during which you can talk about the names of trees, their functions and seasons.
In winter, you can make them from scrap materials and continue creating. To cut out leaves by hand, it is recommended to make a template or download a ready-made version from our article.
Article formatting:Natalie Podolskaya
Video about crafts from leaves
Tree leaves - templates for cutting in this video: