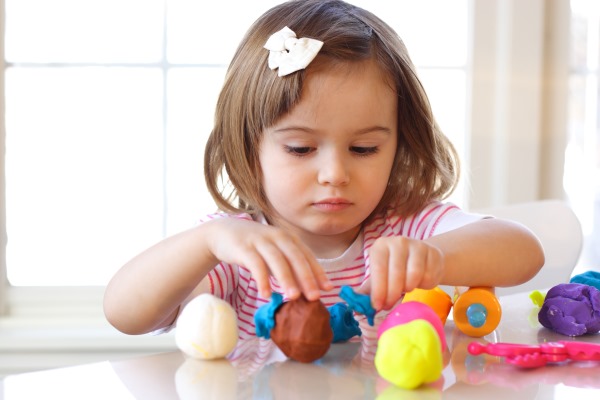
Modeling with plasticine allows children aged 5-6 not only to create, but also to develop important qualities and skills. Step-by-step master classes on modeling help make it more exciting.
Features of modeling with children 5-6 years old
Modeling from plasticine for children aged 5-6 has received an important place in the educational programs of kindergartens. It is a creative process that accelerates the development of psychophysical skills in preschoolers.
Modeling classes help develop:
- fine motor skills;
- concentration of attention;
- imagination;
- memory;
- perseverance;
- patience;
- speech skills.
Modeling stimulates the parts of the brain responsible for fine motor skills, as well as the speech center. Neural connections are created, and children learn speech faster.
While modeling, children learn to fantasize and think creatively, which will be useful both during school years and in adulthood.
What you will need for the craft
For modeling you will need special tools:
- Modeling board.
- Plastic knife.
- Glass: regular and serrated.
- Toothpicks.
- Pen rod.
- Brush.
- Cardboard for compositions.
Regular plasticine of medium density is suitable for making crafts.
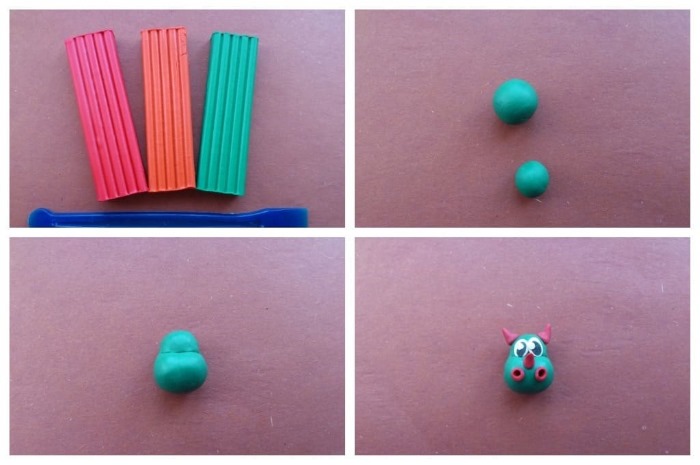
The necessary colors of plasticine for the presented master classes:
- “Tiger”: two bars of orange plasticine, a little white, black, pink and green;
- “Pizza”: red, burgundy, brown, beige, black, green.
- “Human head”: beige, brown, a little black, pink, blue and white.
- “Dragon”: bright colors of orange, yellow, green, and also a little black and white.
- “Dinosaur”: 2 bars of green plasticine, a little brown, black and white.
- Composition “Autumn”: gray, black, yellow, purple, blue, light blue, red, orange, beige, brown.
- Composition “Bullfinch”: light blue or blue, white, black, red or pink, brown, green.
How to sculpt animals from plasticine. Master class
Modeling from plasticine for children aged 5-6 is no longer difficult, since most of the techniques have already been mastered. With the help of step-by-step instructions, a child of this age can easily mold a cute figurine of this tiger, consisting of simple parts.
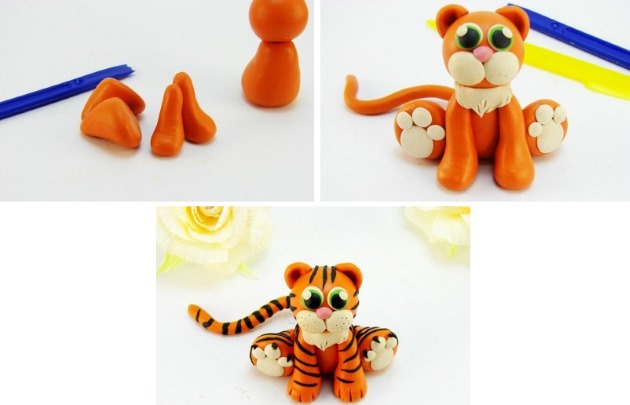
The sequence for creating a tiger is as follows:
- Cut off 1/3 of a block of bright orange plasticine. Roll both pieces into balls.
- The small ball will be the tiger's head. From the second ball, a part of the plasticine is pulled out into an oblong body.
- Using a toothpick or a match, connect the head and body together.
- From the second block of orange plasticine, 1/3 is also cut off, from which the hind legs are made. This part must be kneaded and divided into 2 equal pieces, which are given a shape similar to a cone. From the wide side of the cone, form the feet.
- For the front paws, a piece of plasticine is rolled into a sausage, then cut into 2 parts. From these, paws with thickened feet are made.
- Glue the paws to the tiger's body.
- Roll and attach a long tail from a thin sausage to the body.
- Make small round ears with indentations and attach them to the head.
- Create the animal's face using white flat cakes and a pink plasticine nose.
- The tiger's eyes are made from round white, green and black flats, stuck on top of each other. You can add highlights around the edges of the eyes.
- Attach a white chest to the neck from a strip of plasticine, on which fur is drawn with a stack.
- White cakes are glued to the hind legs to serve as pads and toes.
- Now it is necessary to create black stripes. A very thin sausage is rolled from black plasticine, short sections of which are stuck all over the tiger's body. Claws on the hind legs are also made from them and glued into the recesses of the finger pads made with a stack.
- Use a stack to make cuts to mark the toes of the front paws. 15 Use a toothpick to make dots on the white part of the tiger cub's muzzle.
The plasticine tiger is ready.
How to mold food from plasticine. Master class
Any culinary product can be molded from colored plasticine. In addition, plasticine food can be cut into pieces, which is much more interesting than toy food sets made of rubber and plastic. Molding a pizza and then cutting it into pieces and treating dolls and family members with it will be very interesting for a child.
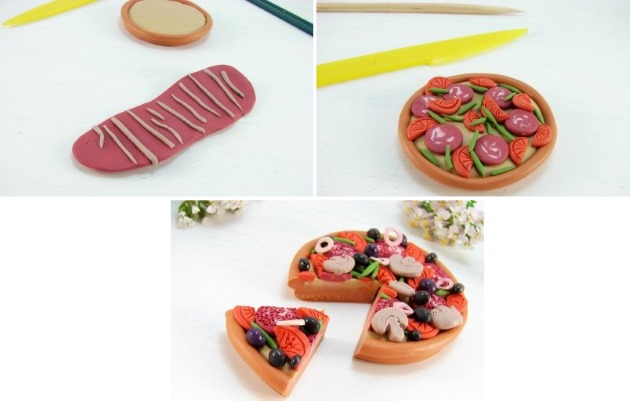
Step-by-step plan for making plasticine pizza:
- Mix brown and white plasticine until light brown. Divide the piece into 2 parts.
- Roll one part into a ball, then flatten it into a flat cake. Roll the other part into a long rope.
- Stick a thin beige flat cake onto the light brown cake. Attach a rope along its edge.
- Next, the pizza filling is created. To make the sausage, roll out a layer of burgundy plasticine and lay out thin white strands on it.
- This layer must be rolled into a roll and rolled out in your palms until it becomes dense.
- Then it is cut into rings.
- Round cakes are made from red plasticine and cut in half as
- tomato slices. The texture is drawn on them with a stack or a toothpick.
- Asparagus pods are rolled out of green plasticine.
- Sausage is placed on the crust, then tomatoes and asparagus.
- The champignon slices are molded from light plasticine. The relief of the mushroom is applied to them with a stack.
- To add texture to the sausage, use a toothpick to make numerous dots.
- The olives are molded from black plasticine. For shine, you can apply some clear nail polish here and there. It should not get on the other ingredients.
- For onion rings, mix together pieces of pink and white plasticine, then roll them into a sausage shape. It is divided into small pieces, which are rolled into rings, and then flattened.
- The pizza is garnished with mushrooms, olives and onion rings.
- If desired, it can be cut.
How to sculpt a human head from plasticine. Master class
Modeling a human head from plasticine helps children aged 5-6 learn about body proportions.
By going through a step-by-step master class on modeling a male head with your child, you can develop your child's attention to detail, since the head has many details. If something doesn't work out the first time, plasticine gives you the opportunity to correct all the shortcomings.
Step-by-step sculpting:
- A ball is rolled from beige or pale pink plasticine, which is given the shape of a human head and an oval face with a chin and forehead is formed. This is done using the techniques of pressing and pulling with fingers in the right places.
- From the side of the face, symmetrical cutouts for the eyes are made with the flat side of a plastic knife.
- A small piece of plasticine is attached to the center of the face, from which the nose is formed. It should be started from the bridge of the nose, smoothly increasing the tubercle. The places where the nose meets the face should be smoothed out, then the nostrils should be made with a toothpick.
- Next, using a stack, draw the lips with pink plasticine.
- The oval whites of the eyes are attached to the eye sockets.
- Blue circles with black dots for pupils are glued onto the eyeballs.
- The upper and lower eyelids are attached from thin sausages.
- Small oval ears are added to the head.

- Brown eyebrows are applied.
- A hairstyle is made from a multitude of slightly flattened brown sausages that cover the crown, temples and back of the head.
- To sculpt an older person, you need to use a stack to add wrinkles to the face, and make the hair gray with small strokes of white plasticine.
How to sculpt a dragon from plasticine. Master class
Modeling with plasticine for children aged 5-6 will be even more interesting if they are offered the creation of a fairy-tale character, for example, a dragon.
Step by step instructions:
- The creation of the dragon begins with the head. For this, a ball is rolled out of green plasticine.
- Attach a large green square-shaped bump to this ball, which is cut at the bottom with a stack to make a mouth. On the remaining part at the top, make 2 dents for the nostrils.
- Two small orange rings are placed into the nostril holes.
- Above the nostrils are attached oval eyes with black pupils.
- Next, a green teardrop-shaped body of the dragon is made.
- A thin sausage is rolled out of orange plasticine and cut into short segments. They are attached next to each other to the dragon's chest and belly.
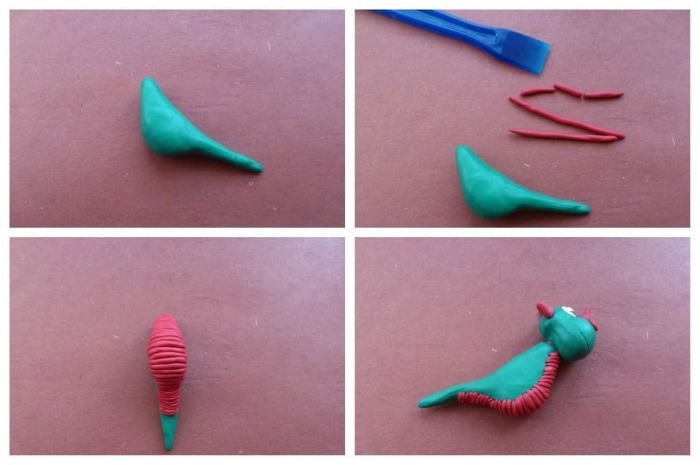
- Connect the head and body with a toothpick.
- The paws are made from 2 green triangles, the wide part of which is cut in the shape of fingers.
- A ball of orange plasticine is added to the tip of each finger.
- The paws of the lower limbs consist of feet and legs bent at the knees. On the feet, fingers are also made with a stack and orange balls are attached.
- The upper and lower legs are attached to the sides of the body. A long green tail is added to the back.
- The triangular, two-colored dragon scales are formed from an orange sausage, wrapped in a wide yellow flatbread and then cut into rings.
- These triangles are attached along the center of the back from the crown to the tip of the tail.
- Make 2 orange triangular ears and attach them to the head.
- Make a flat cake out of red plasticine and cut it into 2 equal parts in a zigzag pattern. To make them look like dragon wings, use a stack to draw the appropriate lines on them. After that, the wings can be attached to the back.
The fairytale dragon is ready!
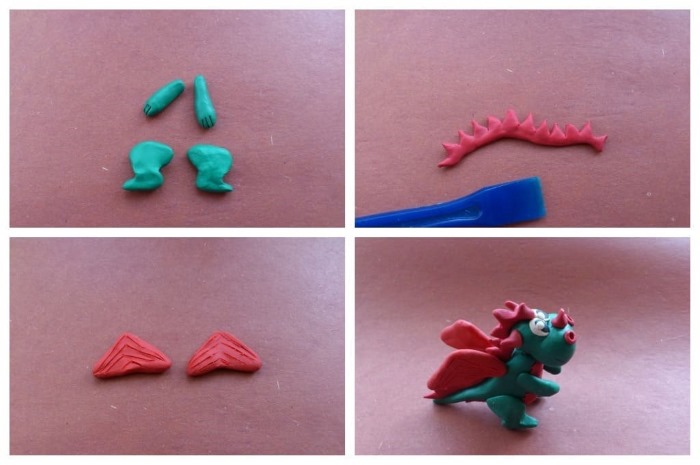
How to sculpt a dinosaur from plasticine. Master class
Dinosaurs are unusual animals that lived in ancient times. During the process of modeling, you can tell your child facts about their life and varieties.
Step-by-step diagram of sculpting a dinosaur:
- Cut a third off a green block of plasticine and roll it into a dinosaur head in the shape of a ball. Then create a triangular shape with soft corners from the ball.
- For the body, you will need a whole block of green plasticine. It must be thoroughly kneaded, then given an oval shape, which should be transformed by stretching into an oblong drop.
- Using a toothpick, the two pieces are connected together.
- To make massive dinosaur paws, you need 4 green balls of the same size.
- The balls are rolled into sausages, then legs are formed.
- The paws need to be connected to the body, for this their edges should be slightly flattened.
- We make a large collar for the dinosaur. To do this, we roll out a flat cake from a piece of green plasticine.
- An arc-shaped strip is cut out of it with a stack, then a zigzag pattern is created along the edge with a serrated stack.
- The collar is glued to the top of the dinosaur's head and the jagged edge folds back beautifully.
- On the head, near the collar, we attach a pair of beige horns.
- A green horn is glued to the nose.
- Triangular green plates are attached along the back and tail.
- Now it is necessary to make a two-color plate. To do this, roll a piece of brown plasticine into a sausage shape, which is then wrapped in a thin black flat cake.
- From the resulting piece you need to form a rectangle and cut it into 7-8 strips.
- Stick them on the dinosaur's back and press them into the body.
- Attach white eyes with black pupils to the head.
- The entire surface of the back of the ballpoint pen is given relief to the dinosaur skin.
- The stripes are drawn with a stack along the collar, the mouth line and the tips of the paws.
The dinosaur is ready.
Compositions for modeling with children in kindergarten on the theme of winter, autumn, spring
Plasticine modeling for children aged 5-6 years should contain compositions from different seasons. This allows children to learn, understand and remember the characteristics and differences of natural seasons.
Below are examples of autumn and winter compositions.
Composition "Autumn"
This master class will show you how to convey the mood and colors of late autumn:
- To depict a leaden sky, you need to mix dark and bright colors. To do this, combine the following colors of plasticine: gray with black, yellow with purple, blue with black. You will also need a piece of blue.
- Using your fingers, start spreading yellow-purple plasticine onto the paper from the top corner, and draw a blue stripe below.
- Smear a dirty yellow spot over the blue color with your finger, stretching it in all directions like the meager rays of the sun.
- Fill the sky completely with a grey-black and blue-black mixture to represent the looming clouds.
- Extend the blue stripe across the lower part of the sky for contrast.
- For the ground, use a mixture of brown, white and yellow plasticine. This mass must first be kneaded in your hands, then spread onto the bottom of the cardboard.
- Fill the empty space completely with this mixture up to the blue stripe.
- Sculpt dark brown branches and a flat tree trunk, as well as yellow and orange foliage.
- Glue branches and a trunk as a tree on the left and a bush on the right. The branches should be tilted to the right, as if they were being bent by a strong wind.
- Stick yellow leaves on the branches and under the tree.
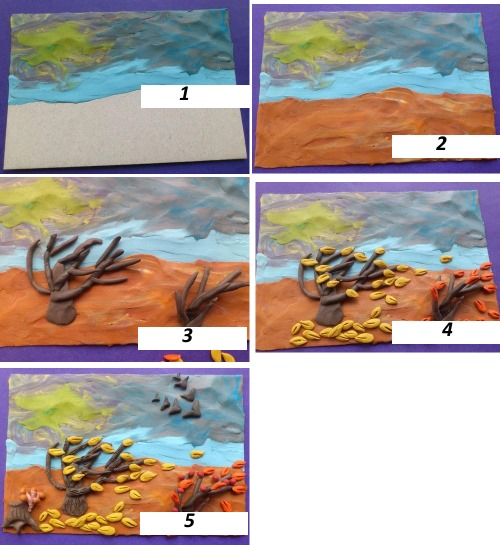
- Press down on each leaf with a stack so that a strip in the form of a vein remains.
- We add orange leaves to the bush and also go over them with a stack.
- We sculpt additional details: a brown stump, beige honey mushrooms, black birds.
- They are all attached to the painting.
- Add rose hips to the bush.
The autumn composition is ready.
Composition "Bullfinch"
This master class is about sculpting a bright volumetric composition of a bullfinch on a branch:
- Cover the cardboard with a thin layer of a mixture of white and blue or blue plasticine. The blue and white plasticine should not be mixed until completely homogeneous, it is necessary that the marble streaks and inclusions remain visible.
- Roll out a long sausage from the brown block, tapering towards one end and widening towards the other.
- To make the needles of the spruce branch, prepare many thin green threads from plasticine.
- Glue the brown branch approximately in the center of the picture, roughly diagonally.
- Next, fragments are torn off from the green threads, folded in half and attached to the branch as Christmas tree needles. This is the only long and process in creating the composition.
- The entire branch must be filled with needles.
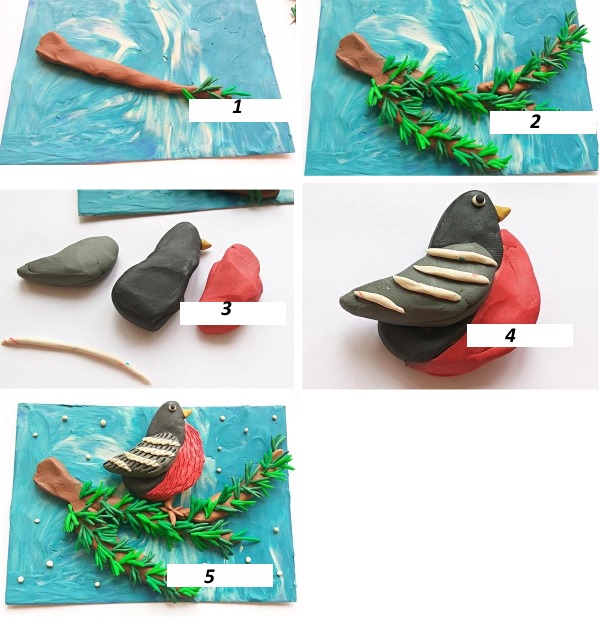
- You can add more branches below and above the main one, keeping in mind that the central part of the picture should be left for the bullfinch.
- To make the bird, you need to mold 2 thick flat cakes: black for the body and red for the breast. Give them the desired shape.
- You will also need one grey wing with 4 thin white stripes.
- Fasten the body to the chest and attach the wing to it.
- Attach a white circle eye with a black pupil and a triangular yellow beak to the head.
- Attach the bullfinch to the background above the branch.
- Make a brown paw and attach it to the bird and spruce branch.
The winter composition is ready.
Modeling with plasticine is a good way for preschool children to usefully spend some of their free time.
Article formatting:Natalie Podolskaya
Video about modeling from plasticine
Plasticine modeling for children 5-6 years old: