If you want to radically change your image, try on a new look or create a carnival costume, an artificial beard can help. The product can be purchased in a store or made with your own hands, using various materials at hand that are available at home.
What can you make a fake beard from?
A beard made by hand can be done in several ways., each of which is characterized by positive and negative qualities, as well as the degree of realism.
If you have drawing skills, you can draw a beard and moustache on your face. You can also glue strands of hair to your skin or attach hair crumbs. However, the most popular method is to apply or glue the finished craft along the hair growth line.
Classic methods involve creating a product by fixing hair bundles to a textile material. In this case, the base can be chiffon, woven fabric or tulle.
Using a hook, strands are woven into the base, fastened in a self-tightening knot. In this case, you need to process the entire strand or each hair separately.
A latex base is suitable for making the accessory. In this case, liquid latex must be applied to the glass plate in several layers. Each layer should be placed along the contours of the beard shape.
Afterwards, strands need to be applied to the formed film, which then need to be fixed to a latex base. As a result, you can create an accessory with a rubber base. However, such a design requires special care, because it is characterized by a short service life.
If complex plastic make-up needs to be applied to the face to create a balding wig or an old man's mask, it is advisable to implant the locks into a plastic part. This will make the product look more realistic.
This type of work requires a special awl. This technique is often used when creating wax figures. The strands must be stuck into cold or warm wax using an electrically heated needle.
Depending on the purpose of use and the required level of realism, the following materials can be used to create a beard:
- paper sheets;
- cotton wool;
- artificial or natural hair;
- fur;
- wig;
- yarn.
What you will need for the job
When choosing any material for creating an artificial beard, you need to stick to the same scheme. Initially, you need to make a base using the measurements taken. Further actions will depend on the level of realism you want to achieve.
For example, for children's parties or matinees, it is acceptable to create a simple beard, by which one can determine that the product is artificial. For these purposes, imitation hairs can be glued or sewn with thread material.
To change the image, the false beard must have a high level of realism. For these purposes, you need to work with a latex base or in the tambour technique.
In the latter case, the material must be attached to the fabric with a hook, placing the imitation beard hairs on the thread weaves. To make the product thick, you need to create 2 knots. In other cases, you need to make only 1 knot.
To work you need to prepare:
| Material type with tools | Features of selection |
| Needle | To easily thread the threads and secure them to the base, you need to use a thin needle with a rounded edge. |
| Glue | The glue must be safe for the skin. At the same time, it must qualitatively fix the material to the base, providing long-term durability of the accessory. |
| Hook | It is required in cases where it is necessary to pass yarn or thread material through the base. |
| Material | A beard can be imitated using hair, fur, wool, yarn or artificial material. The main thing is that the material has a natural look and matches the image. |
| Scissors | To cut the thread material and give the product the required shape, the scissors must be sharp. |
| Warp | The base can be thick paper, fabric or mesh. The base can be anything, but it should allow for high-quality fixation of the hairs that imitate a beard. |
When choosing a material, it should be safe and comfortable for the person who will wear the beard. In this case, it should not provoke the occurrence of discomfort with an allergic reaction.
The material must match the chosen method of fastening. For some designs, special adhesive tapes or glue are suitable. In some cases, the material must be fixed with strands or loops to create a natural look.
To close the edges of the base and give the product a more harmonious appearance, it is permissible to use a decorative tape that can be fixed to the skin. Instead of decorative tapes, you can use special adhesive plates, with which you can easily fix the product on the face.
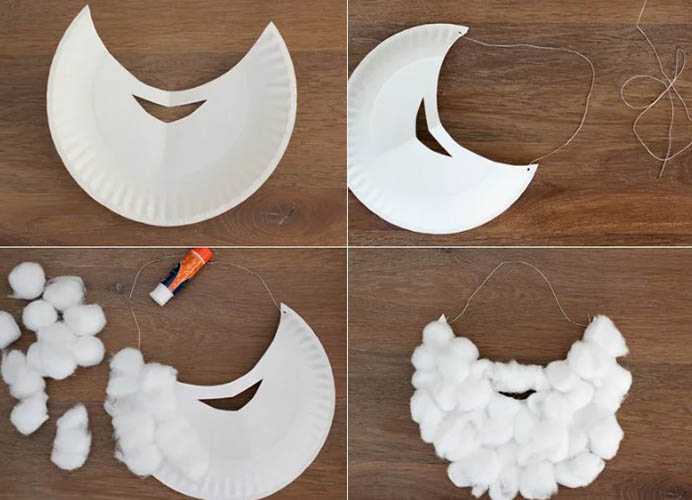
Cotton wool beard
A beard can be made with your own hands from ordinary cotton wool as an additional element to a carnival costume, if the realistic factor is not necessary. However, it is advisable to create this product together with a mustache for a more harmonious design of the image.
Necessary materials and tools:
- 200 g of cotton wool;
- glue gun;
- elastic band 50 cm long;
- stapler with scissors and pencil;
- A3 thick paper as the basis for the structure (can be replaced with cotton fabric).
Step-by-step description of the work:
- To build the basic foundation, first take measurements. To measure the appropriate width of the structure above the upper lip, use a measuring tape. The resulting result will be the width of the mustache and beard.
- To measure the length of the product, take measurements from the lower lip to the middle of the chest. Also measure the circumference of the head from behind. Take this measurement from one ear to the other.
- To make a mustache template, draw an infinity sign with pointed edges. Later, the shape of this drawing can be adjusted to the face.
- For the beard pattern, focus on the length of the future craft and the width of the mustache. For convenience, you can draw a symmetrical triangle with rounded sides on the sides. The base of the figure should be depicted as an arc.
- Cut out the elements shown with scissors. Mark the size of the back head circumference on the elastic bands.
- To increase the strength of the product, glue cotton material onto the paper base.
- Secure the ends of the two cut out pieces with the elastic using a stapler.
- Form small balls from cotton wool, the diameter of which should vary within 5 cm. Fix the prepared blanks with a glue gun to the outside of the structure.
- To increase the density of the cotton wool blanks, roll the balls in your hands and lightly coat them with glue and leave to dry.
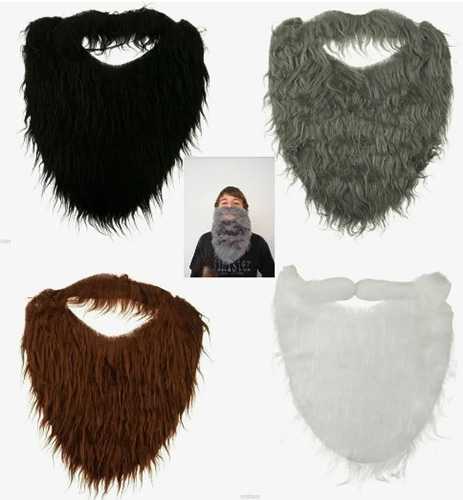
Beard made of fur
You can create a fur beard with your own hands to make the craft look more realistic. It is permissible to use old things made of fur to make the product. The material can be natural or artificial.
List of tools and materials:
- fur;
- scissors;
- elastic band for fastening;
- felt-tip pen.
Step-by-step description of the work:
- On the back of the fur material, use a felt-tip pen to draw the outline of your own chin. The shape will depend on the type of beard you want to get.
- Cut out the resulting part. Then make a hole for the mouth on the blank.
- To fix the structure on the face, sew an elastic band to the product. The length of the elastic band should be such that the beard stays well on the face.
When trying on a fake beard, you need to put a hat or other headwear on your head so that the elastic band is not visible. If there is no headwear, you need to glue pieces of fur to the elastic band.
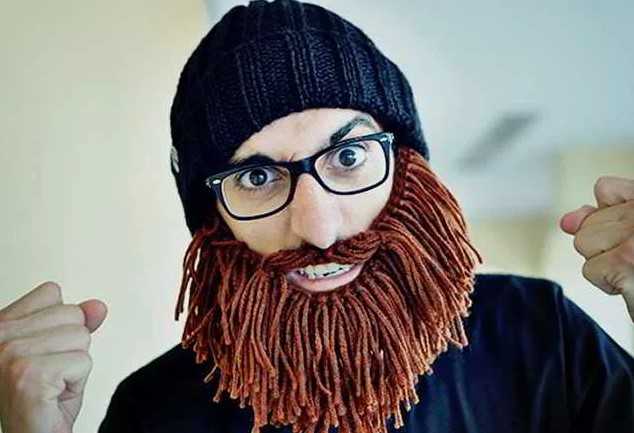
Beard made of yarn
A do-it-yourself beard made of yarn can be created from threads that are applied to the base, or from a ready-made knitted item. When choosing an option, you need to rely on the final result that you want to get. If you have no experience in creating such crafts, it is best to make a design from an unnecessary sweater that has a neck.
Necessary materials and tools:
- needle with acrylic thread material;
- scissors;
- old turtleneck sweater.

Step-by-step description of the work:
- Cut off the neck from old clothes using scissors. Additionally, make a hole in the lip area.
- To prevent the knitting thread material from unraveling, process the cut with a needle and yarn.
- To embroider artificial beard hairs, use a gypsy needle with acrylic threads.
- Fix the needle and thread to the lower area of the cut, pulling it through in the form of loops. Pull the loops through to the required length of the structure.
- To complete the image, additionally create a mustache. This element is created using a similar pattern. However, the loops should be shorter than the beard. In this case, the needle with the thread material should be fixed to the upper side of the cut.
- The thread material should be sewn into the cuts symmetrically to create a harmonious image.
- The number of loops on both the right and left sides should be the same.
- In the area of the moustache, the thread material on each side can be twisted into a bundle and fixed to the base of the structure with a needle. Thanks to this, this detail will look neat.
If you want to make a beard from yarn, the thread material should be embroidered with loops, fixing it to a structure made of felt or paper, which is backed with fabric material. When processing the base with yarn, you need to move from the bottom to the top of the beard.
To modify a finished accessory, thread loops can be cut with scissors.
Paper beard
To make an artificial beard for a children's party, it is acceptable to use ordinary sheets of paper.
List of tools with material:
- A3 paper, which will serve as the basis of the structure;
- A4 paper in the amount of 10 pcs.;
- glue stick;
- elastic band 50 cm long;
- tape measure with pencil;
- stapler with scissors.

Step-by-step description of the work:
- First, take measurements to make the accessory. A child's head will be about 25 cm in circumference from one ear to the other. The width of the beard together with the moustache will be approximately 20 cm (to determine the exact size, take measurements from the front from one ear to the other).
- To determine the length of the beard, measure from the lower lip to the center of the chest area. The result should be about 28 cm.
- On an A3 sheet of paper, mark the extreme points with a pencil. First, draw the mustache, then the beard contours. Cut out the resulting blanks with scissors.
- Transfer the size of the occipital area to the elastic band to cut off the required length.
- Use a stapler to secure the beard, moustache and elastic band together to create the base.
- Cut A4 paper sheets in half along the width. Cut the blanks into strips, not reaching the edge. The result will be paper fringe.
- Roll each strip individually onto a pencil or curl it with scissors to make the paper wavy.
- Using a glue stick, attach the paper strips to the base of the beard, starting from the end.
- If the strips are very long and extend beyond the base of the craft, cut off the excess.
- Glue the next strip overlapping to hide the fastening area.
- Glue the mustache in a similar manner.
From the wig
A beard can be created with your own hands from an old and unnecessary wig.
To do this, you need to prepare:
- white wig with medium length strands;
- a needle with white thread material;
- glue gun;
- a regular elastic band 50 cm long;
- a measuring tape with scissors;
- A4 felt paper.
Step-by-step description of the work:
- First measure the area for creating the mustache. Transfer the obtained measurements to the felt material.
- Mark the same width of the beard according to the width of the moustache. Then transfer the base of this detail to the entire length of the A4 felt material.
- Transfer the required length to the elastic band to securely fix the structure on the face.
- Cut out the details depicted on the felt. After the blank, assemble them together, sewing them with white thread material.
- Starting from the frontal area, cut all the hair with scissors. Carefully fold the cut locks. Cut the strands only to the occipital area.
- This amount of hair will be enough to form a fluffy beard. Some strands must be left on the back of the wig so that the accessory looks more realistic. When putting on a hat, part of the white hair will be visible, and what will be hidden under the headdress should not be shown.
- Fix the cut hairs with a glue gun, starting from the end of the beard and gradually moving towards the moustache.
- To hide the area between the lips and the moustache, long hair can be fixed vertically so that it hangs down.
Practical tips and advice
The beard will be made quickly and easily if you take into account the advice of experienced needlewomen:
- When choosing a thread material for creating a beard, you need to focus on your own shade of curls. This helps to create a more realistic look of the product with the final image of the character.
- The length of the thread or other material should correspond to the required length of the beard. For example, if yarn is used as a decoration, the length of the threads should be the same. If you want to create a more voluminous beard, it is permissible to combine several threads of different lengths at once.
- To fix the structure to the face, it is permissible to use not only an elastic band. Cosmetic glue or special adhesive strips that can be attached directly to the skin are suitable for these purposes.
- The scissors must be sharp so that you can easily cut out the parts and shape the product.
- Before creating the craft, the yarn must be ironed. This helps to eliminate folds and create a smoother accessory.
- Taking into account the density and length of the product you want to make, you need to take the required amount of thread material in advance. To have a reserve, the threads should be longer than necessary.
- To prevent the thread material from unraveling, the ends of the threads must be secured with a knot or a small piece of tape.
To make a quality artificial beard, you need to choose a good material, as well as have practical skills. This will allow you to create a realistic model with your own hands
Video about making a beard with your own hands
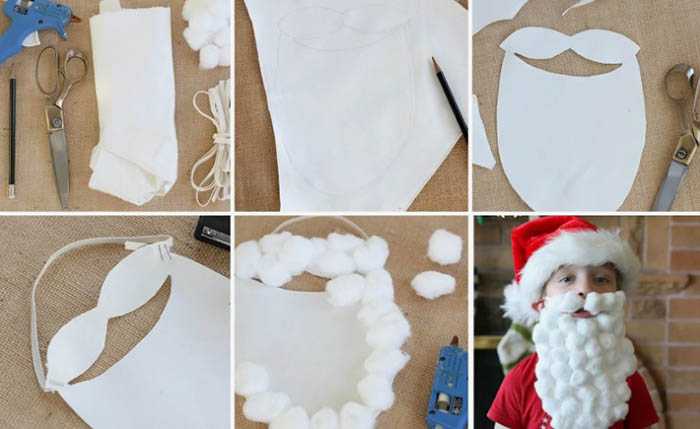
Master class: Beard for Santa Claus made of cotton wool: