Turtles have a hard shell that protects them from the dangers of the surrounding world. It serves as a kind of "home" for them. Sea turtles have flat and oval shells, while land turtles have convex and round shells. Their weight varies from 10 grams to several hundred kilograms.
Turtles are slow animals, they cannot run or swim fast. When drawing this animal, beginner artists can start with simple pencils to learn how to depict its basic contours.
More experienced artists can create more complex and detailed images using a variety of techniques.
Necessary materials and tools
The listed materials and tools play an important role in the process of creating a work of art. Their diversity allows you to implement ideas, creating unique works.
| Tools and materials | Brief description |
| Paper | It is a thin sheet of cellulose, which has a certain density and texture. Its format can be different, from small sheets to huge canvases. |
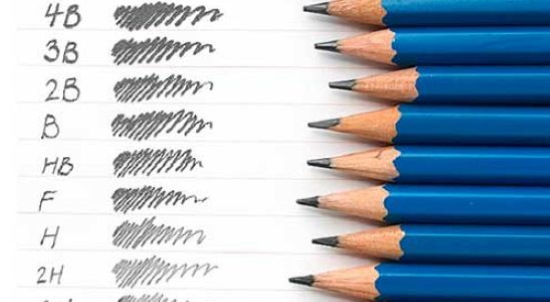
| Pencils | They come in different hardness (soft, hard, medium hard), which allows the artist to achieve different effects. They are used to create fine lines, shading and filling large areas of the drawing. |
| Erasers and pens | Erasers remove pencil marks, and kneaded erasers are used to soften lines and create soft transitions between shades. |
| Stencils | These are special devices that allow you to transfer images onto paper. They are often used to apply repeating elements to a drawing, such as ornaments or patterns. |
| Rulers, compasses | A ruler is a straight plate with divisions that is used to determine length and distance. A compass is used to draw circles and arcs. Both tools help the artist create precise and accurate drawings. |
| Sharpeners | Designed for sharpening pencils and maintaining them in working condition. |
Master classes
To create the most realistic image, it is necessary to take into account the proportions of the turtle's body. For example, the head should be small compared to the body, the tail should be long and flat, the paws should be strong and sturdy.
It is also important to pay attention to the details that make the turtle recognizable. These can be eyes, mouth, claws.
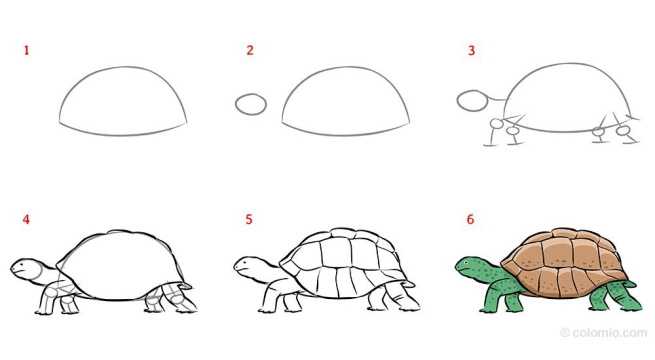
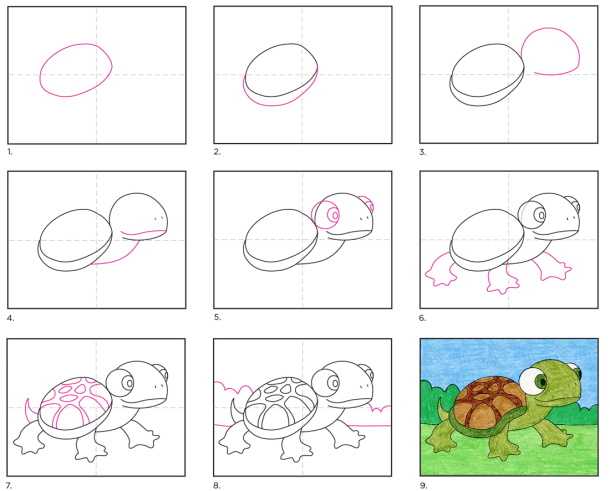
Simplified drawing (top view)
The turtle in the picture can be drawn with a pencil if you follow the steps described.
This master class will help you create an expressive drawing.
- Start by creating the basic shapes of the turtle. Outline its silhouette using simple geometric shapes. To do this, draw a horizontal line, which will be the basis of the shell.
Draw the rounded top of the turtle shell and 4 triangles to represent the front and back legs.
- To draw the head, draw a circle that will serve as the base. Inside it, add a couple of lines that will indicate the eyes and mouth. This will help give the head volume and expressiveness. This step is key, as the head determines the overall shape of the turtle.
To make it more realistic, draw in a few small wrinkles or lines to imitate skin. Use a pointed pencil to draw small details, such as the jaw.
- From the head, draw a curved line down to indicate the neck. It should be long enough to allow the turtle's head to move freely. Pay attention to the angle of the slope, as it should smoothly transition into the shell.
To emphasize the movement of the neck, draw a small indentation along it. It should be slightly longer than the head to create the impression of the turtle peeking out of its shell.
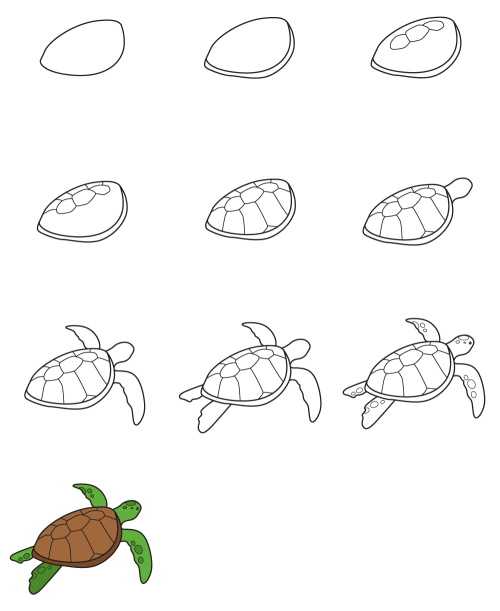
- Start drawing the shell. It should be oval-shaped and located on the turtle's back. Start with the outline of the shell, gradually filling it with details. Add volume to the shell using different levels of shading and shadows. This will create the illusion of depth and texture.
The shell should be positioned at an angle, creating the impression of volume.
- Draw the paws on the sides of the shell. The left front paw is not visible. The left back paw has only the toes and claws visible. The right front and back paws should be at an angle, providing stability and balance. Each paw has 4 toes.
To make the paws more realistic, add some small details, such as small folds of skin.
- Draw the tail, which should be short and thick. It starts from the back of the shell and ends with a sharp end.
- Give the toes and tail sharp claws.
- Add eyes and a mouth using ovals and curved lines. You can add a small nose.
- Use an eraser to remove extra lines and add shadows.
Recommendations:
- To create a realistic effect, you can use different shades of gray eyeshadow pencil.
- Work on details such as the pattern on the shell or the design on the turtle's neck to make it unique.
- A ruler and compass can be used to create a more accurate and neat drawing.
- Use pencils of different hardness to give the drawing volume and texture. Add shadows under the shell and around the eyes to make the drawing more realistic.
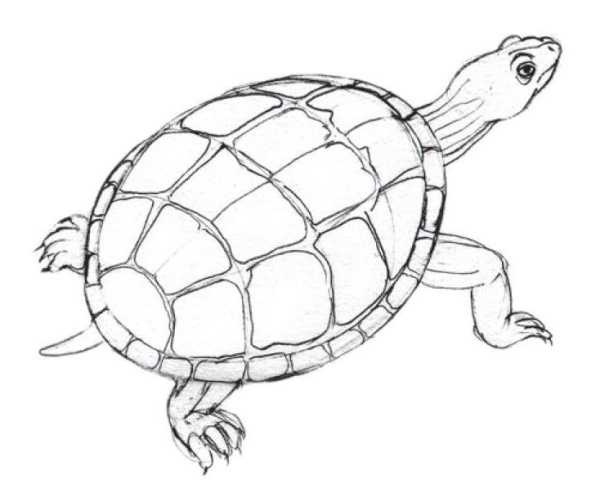
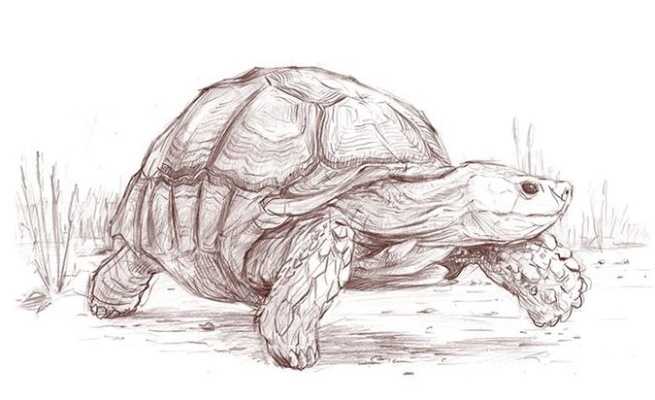
Side view
The turtle in the picture can be created realistically with simple steps and tips.
This:
- Draw a circle to form the base of the turtle's head. Use soft lines to give it volume and shape. Draw contours that will create the illusion of depth and volume on the turtle's head, such as the edges of the forehead and cheeks.
- Draw the neck, starting with an oval that connects to the head. Emphasize its shape, adding volume and shadows with light strokes. Pay attention to the curve. It should be natural and match the general position of the head.
Detail the neck by adding lines to indicate the texture of the skin or shell. Include small details such as folds or scales.
- Outline the main contours of the shell, starting from the base of the head and ending with the tail area. Determine the shape of the shell plates and their orientation. This may vary depending on the type of turtle. Give the shell volume using shadows and lines.
Separate the plates from each other by adding shadows and lines. Draw the ribs between the plates, creating relief. Pay attention to the overall shape and volume of the shell, including notches and protrusions.
- Add the front and back legs. The front legs should be small and strong, while the back legs should be larger and longer. The shape of the legs should be natural and anatomically correct to emphasize their mobility.
- Draw the claws. On the front paws they should be small and sharp, and on the back paws – larger and more powerful.
- Add details: eyes, nose and mouth. You can use compasses to mark the boundaries of each facial feature. This will help control the size and placement of the eyes, nose and mouth. Use straight or curved lines to create the outline of each part.
Add finer lines and strokes to form the outlines of the eyelids, mouth lines and other features of the turtle's face.
- Cover the head area with thin and darker lines to convey texture. Leave the areas around the eyes, nostrils and mouth light to highlight these features. Add small strokes in the hair, eyebrows and eyelashes.
Recommendations:
- To create a realistic drawing, you can use various techniques and tools, such as charcoal.
- Pay attention to details: pay attention to the shape of the eyes, the texture of the shell.
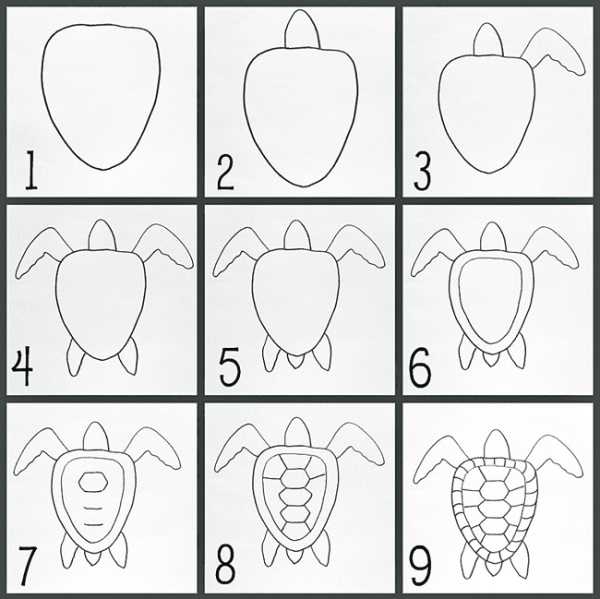
Stylized image
The turtle in the picture can be depicted by the youngest artists:
- Start with the turtle's head, draw an oval shape. Outline the outline of the head, slightly smoothing the corners and creating a smooth transition to the neck.
- Draw the neck that connects the head to the shell. Don't make it too long or too short.
- Create the shell using horizontal lines that start from the neck and diverge to the sides. Distribute them evenly and form a semicircular shell shape. Draw lines that divide it into segments.

- For each paw, draw 4 elongated ovals: 2 for the lower part and 2 for the upper part. Connect them with curved lines to create the outlines of the paws.
- Draw the turtle's tail, which should be long and thin. The tail ends in a sharp point. Draw it so that it looks like a continuation of the shell.
- Draw the turtle's mouth - a small curved line. The eye should be round and small. Place them on the turtle's face so that they blend harmoniously with the rest of the features.
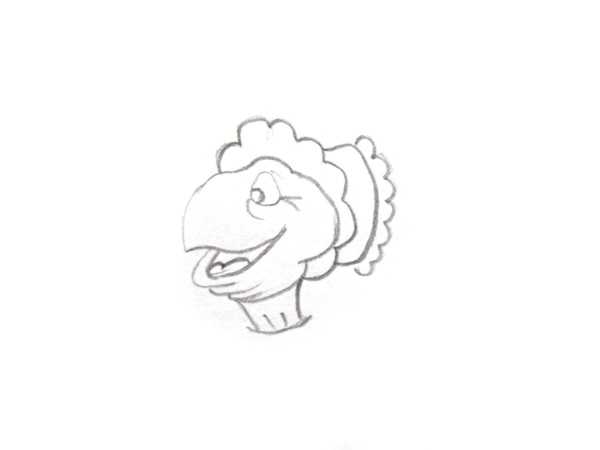
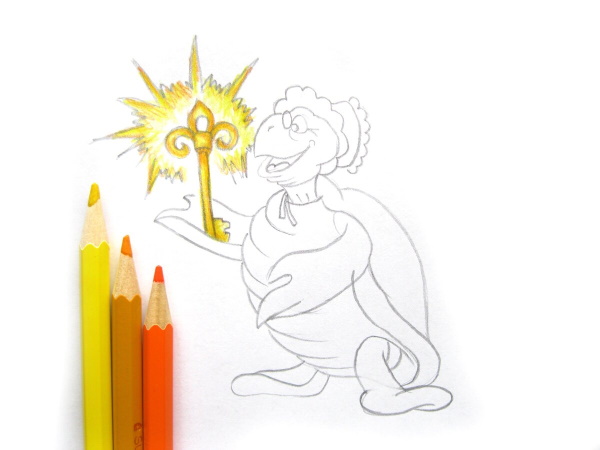
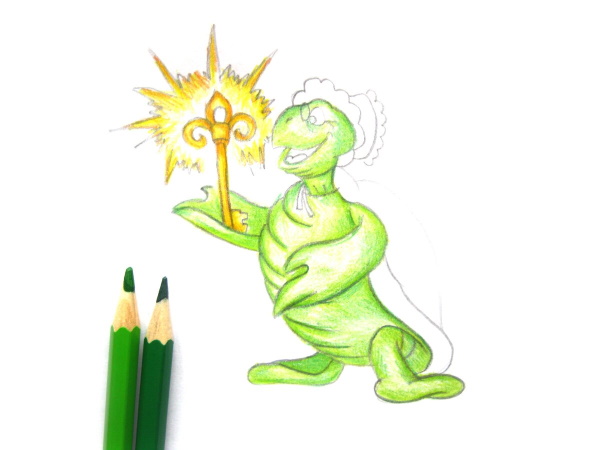
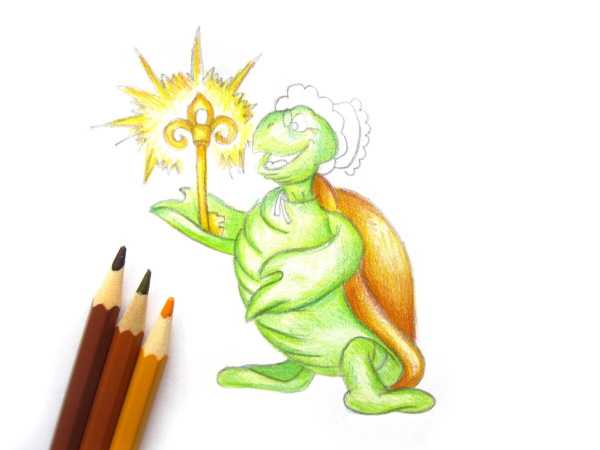
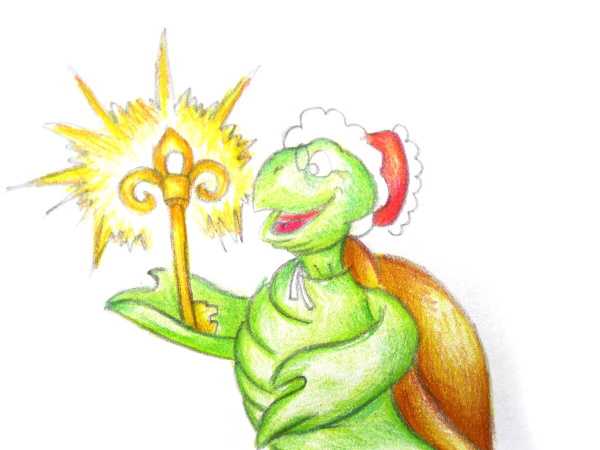
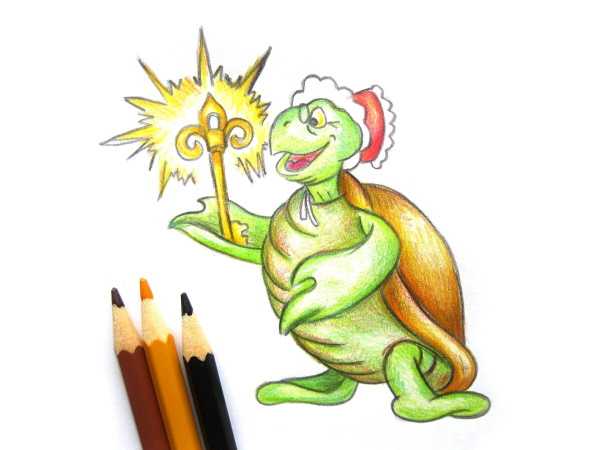
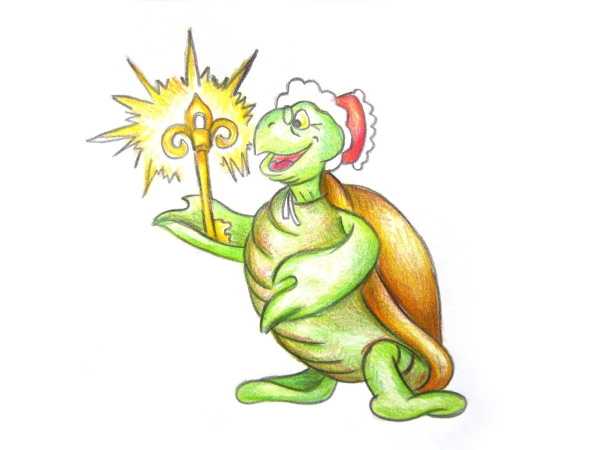
Tortilla with a golden key
Tortilla the Turtle is a popular character from A. N. Tolstoy's fairy tales "The Golden Key, or the Adventures of Buratino." She is wise and kind, and her image is often associated with longevity. She is depicted with a wrinkled face, a benevolent look, and a golden key in her paws.
Tortilla the turtle with a key can be drawn step by step:
- Make a rough sketch of the turtle to determine proportions and overall composition. Draw the basic shape of the body as an oval or circle, add the head and paws. The rough drawing should be done with light strokes that will be erased later.
- Start drawing from the turtle's head. Draw a horizontal line - the base of the head. Draw 2 arcs at the top and bottom - the contours of the head. To make the head round, erase the corners that remain on the lines. The shape of the turtle's head resembles an egg.
Therefore, when drawing, stick to the oval shape. You can use a ruler to draw the correct outlines.
- Draw the neck that connects the head to the body. It should be curved, like a real turtle. Add details such as folds of skin and fur on the neck.
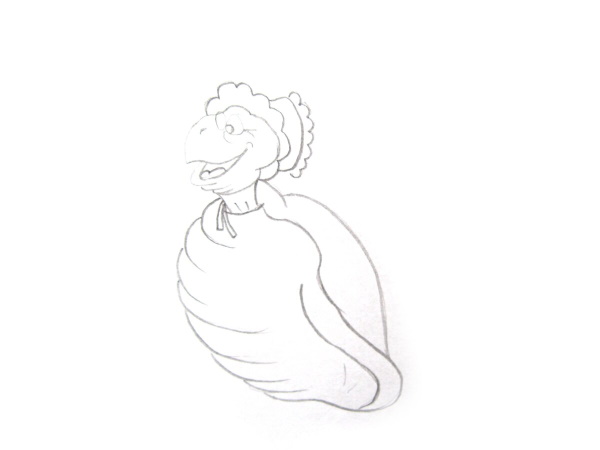
- To draw the shell, draw 2 vertical lines through the center of the head (left and right). Connect these lines with curved lines, forming the shape of the shell. For realism, depict unevenness and protruding parts on the shell.
You can add a few lines that imitate the texture of the shell - they will help make the drawing more voluminous.
- Draw the turtle's paws. Start with the basic contours. They should be elongated and slightly curved. The front ones are shorter than the back ones. Draw small details: folds of skin on the paws.
- A cap is a part of the turtle's clothing that is drawn on it in cartoons. Give the cap a rounded shape and add small decorative elements.
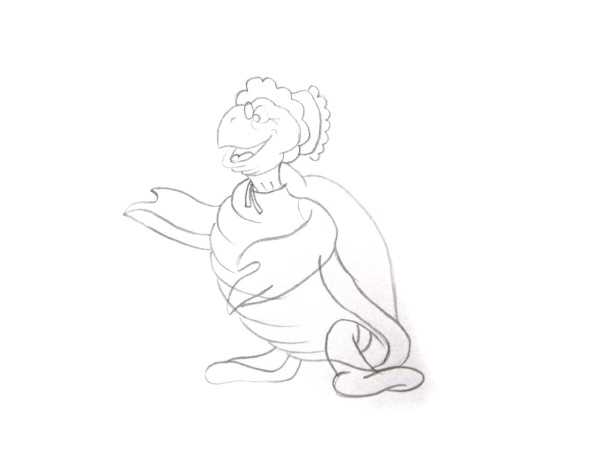
- Add eyes, mouth and nose. The eyes should be round and the mouth should resemble a smile. The nose, on the contrary, should have a slightly elongated shape, reminiscent of a beak. The eyes should be proportional to the overall size of the head and create an expressive look.
The nose should stand out against the face, and the shape of the mouth should emphasize the character of the turtle (it is kind).
- Add a golden key to the turtle's paw. This can be a simple circle with a bend in the middle.
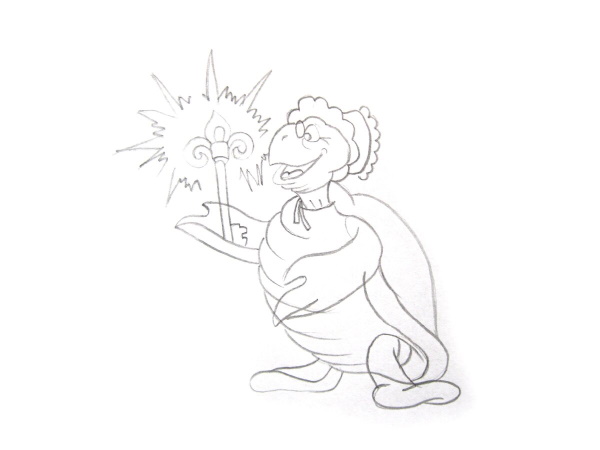
- Trace the outlines of the drawing with a pencil to make it clearer and more expressive. If necessary, make additional adjustments to the drawing.
- To give the turtle volume and realism, use several shades of green for the shell and neck, and brown for the paws. Color the eyes, mouth and nostrils.
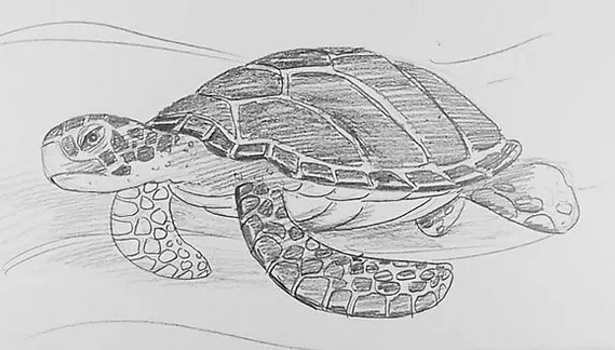
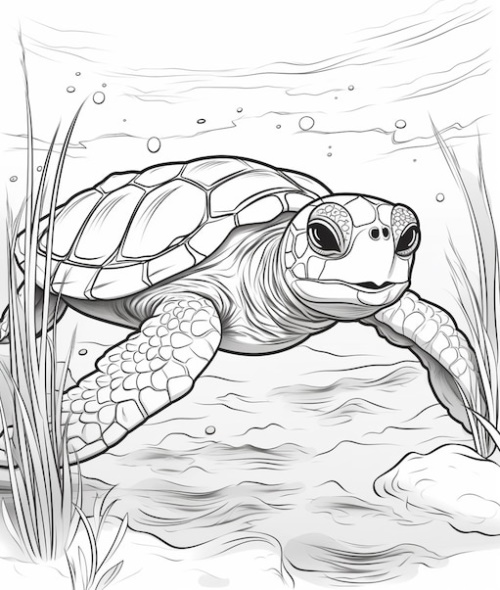
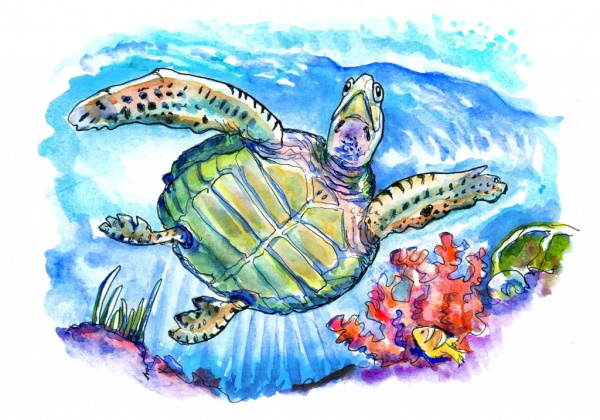
Swimming underwater
The turtle in the picture, which is swimming in a pond, can be depicted using the following steps. Determine the location and proportions of the turtle's body.
Start by sketching out the basic shapes:
- oval head;
- shell;
- rounded abdomen;
- elongated neck;
- paws.
- Draw an oval shape for the head. Inside the oval, add some curved lines to give it volume. Add a “V” shape to represent the turtle’s nostrils and mouth. Make the eyes round and add details to the nose and mouth.
To make the head voluminous, create shadows on the sides and under the chin. Do not make the eyes too big or too small, and the nose and mouth too pronounced. Add small lines around the eyes, which will give the image expressiveness.
- Draw a line from the head to the beginning of the shell, connecting them with a smooth transition. The neck should be long and narrow enough to match the shape of the head and provide a turn of the head.
For a realistic effect, make the neck slightly tilted forward. This will create the impression of the turtle moving and add dynamics to the drawing.
- The turtle's shell is oval-shaped. Draw it as an oval with the top tapering slightly toward the tail. Add small details inside the shell to give the impression of texture and volume. The bottom of the shell should be slightly curved.
Finish drawing the shell with hatching or shadows to add depth and volume. The top of the shell should be lighter than the bottom.
- To depict movement, the turtle's paws should be extended forward and slightly to the sides. Draw simple contours of the paws, work out the details. Mark the shadows under the paws to emphasize their volume and add realism to the image.
- Around and under the turtle, you can add seaweed and other underwater elements. They will help emphasize the feeling of the aquatic environment. Seaweed can be drawn using short wavy lines that follow the direction of the water flow.
- Add a background to the drawing, which can be a river bottom with rocks, sand and other elements, creating the impression of depth and reality of the underwater world.
- To add dynamics and immersion to the image, draw a few bubbles around the turtle's paws or on the surface of the water. They will help emphasize the movement of the water and the smooth swimming of the turtle.
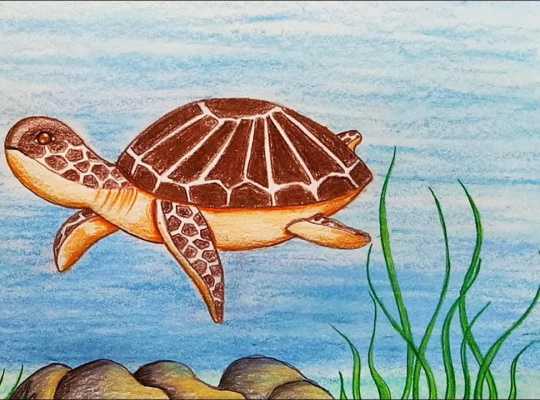
- Add shadows to emphasize the volume and depth of the drawing. Color it. To make the image look more realistic, use shades of green for the algae and brown shades for the turtle shell.
Little turtle in cartoon style
In cartoon art, some features of characters are often exaggerated and hyperbolized, making them more expressive and memorable:
- In the sketch, depict an oval body, a triangle-shaped head, short legs and a tail. Do not make detailed drawings to keep the image simple and light.
- Draw the head using the resulting sketch as a guide. Draw a line along the oval of the body, which will serve as the border of the head. Pay special attention to the expression of the turtle's face. It should look friendly and cute.

Add a few extra details, such as big eyes or a smiling mouth.
- Draw the neck. Its length depends on the position of the head in the sketch. If the head is high, the neck will be shorter, if the head is low, the neck can be longer. The curve of the neck should smoothly transition to the shell.
- Draw the shell as a circle that crosses the turtle's neck and body. Divide it into several sections to give it volume. Make the shell slightly convex to show its strength and reliability.
To make the shell look cartoonish, you can add some fun details. For example, you can draw patterns or pictures on it, make it brighter or lighter than it usually is in nature.
- Draw the turtle's paws. They should be small and rounded. Four toes on each paw make the image more detailed and interesting. Each paw should be the same length and shape.
To create a cartoon effect, you can draw short, pointed nails.
- Add a tail. It should be thin and curved. It can also have a small pointed tip. For a fun effect, you can draw a tail with a few short pointed hairs at the end.
Tips for Beginners
To improve your drawing skills, it is recommended to practice regularly and study different techniques. It is useful to analyze the works of other artists to see the variety of approaches and styles.
| Basic principles | Brief description |
| Object analysis | Look closely at the image of the turtle. Pay attention to its shape, proportions and details. |
| Contour construction | Start by sketching the basic lines of the turtle: · heads; · neck; body; · tail; · paws. Maintain natural proportions. Remember that the front legs should be shorter than the back legs. |
| Detailing | Add more details to the drawing, such as:
· eyes; · mouth; · nose; · claws; · shell. Use different shades of pencil to create volume and texture. |
| Highlighting shadows and highlights | Determine where the light falls on the turtle and create shadows in the appropriate places. This will make the drawing more voluminous and realistic. |
| Adding the finishing touches | At this stage, you can use lighter shades of pencil to highlight certain elements and give the drawing a finished look. |
| Final revision | Check the drawing for errors and make adjustments if necessary. Make sure all lines are clear and neat. |
Drawing a turtle helps develop fine motor skills, imagination and creativity. In addition, it helps develop observation skills and attention to detail.
Therefore, it is often used for educational purposes to teach children to recognize and depict animals.
Video about drawing
Turtle - drawing: