Foamiran is considered to be an ideal material in terms of its characteristics., which is suitable for making flowers. The main feature is the availability of a large variety of colors of this product. From it you can make decorations for lamps, decor for carnival costumes and even crafts.
The most relevant area of use is the creation of flower arrangements, which can be used in various creative fields. Due to the possibility of coloring, the convenience of working with the form when heating and cutting, many note foamiran as the most attractive for creativity.
Necessary materials and tools
A popular trend in the creative world has become the use of foamiran as a material for creating flowers and various compositions that can be heated, bent and shaped.
It is also fashionable now to create interior items decorated with foamiran. The most popular direction is considered to be the decoration of lamps, despite the possible contact with the heating element.
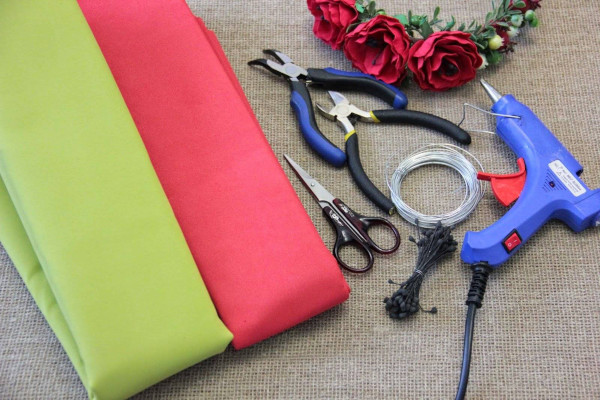
To work with foamiran you will need a basic set of tools:
- Cutting out shapes – they are needed for cutting out a large number of parts of the same shape.
- Scissors – for cutting out the created parts.
- Wax crayons – it is best to choose chalks that do not have gloss. When painting foamiran, chalks without gloss can be shaded. Gloss leaves an oily trace that cannot be stretched into a gradient. The most suitable for such work are chalks of the Malevich brand.
- Lighter – when it is necessary to give parts bends or special shapes, foamiran is heated and clamps, bends and stretching of the canvas are performed.
- Paper Sculpture Tools – stacks help to achieve a beautiful pattern and design on the surface of foamiran.
- Hot glue – Although foam rubber melts under the influence of hot temperatures, hot glue is the optimal tool for gluing large and small parts. When the glue gets on the surface, it can foam, so you should work with it quickly.
Foamiran can be of different colors and thicknesses. As a rule, the thinnest sheet of foam rubber has 1.5 ml. This material is suitable for small parts. The thickness of 3 mm is felt when cutting out parts and heating them. It is convenient to make stretching, heating and pinching from it - it heats up, but does not burn to the formation of holes.
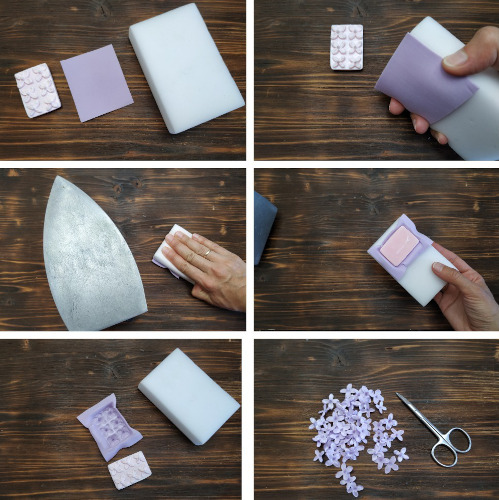
A lamp made of foamiran can be made without special tools. The material can be shaped even with an iron.
By the way, if you need to make an imprint of a tree leaf, all you need to do is use a heating device and a towel:
- You need to take two towels - terry and cotton.
- Place a thick sheet of paper or white cardboard between the towels.
- Place the foamiran piece on a white sheet and cover with a sheet of thin paper.
- Place a towel made of cotton or other thin material on top.
- Heat the iron to the minimum temperature, for example, in the "nylon" mode. Place the iron on the towel and press down.
- The iron should be lifted and placed on the surface, without moving it over the towel as when ironing clothes.
- Once the imprint is formed, the foamiran piece must cool.
Some characteristics of foamiran should also be taken into account.
In its properties it is similar to isolon, but differs in its operating parameters:
| Parameters | Foamiran before and after working with it | Izolon before and after working with it | ||
| Cleaning | Can be washed with water and soap | Not recommended | Can be washed with water | Use only water |
| Elasticity | Depending on the degree of heating, it can be elastic and soft. | When heated, it remains dense and holds its shape; to add bends, you need to wait until the parts cool down. | ||
| Heat resistance | Low, melts and burns easily | High, high temperatures and time are required for melting. | ||
| Plastic | Average | High after heating | Low | Average after heating |
| Allergens | None | None | After heating, vapors may be released. | |
| Smell | There is a chemical smell | There is a burning smell left | Absent | |
| Hardness level | High | Short | High | |
| Deformation | Zero | Saves the configuration | Always retains its configuration, but only when exposed to heat. | |
| Moisture resistance | Tall | Tall | ||
| Thickness | From 1.5 to 3.5 mm | From 1 to 60 mm | ||
| Thermal conductivity | 0.35 W/(m*K) | From 0.036 W/(m*K) with thermal resistance up to 1.89 ms/W | ||
| Density | 100 kg/m3 | From 25 to 200 kg/m3 | ||
| Operating temperature | From -60C to 100C and above | From 60C to 100C and above | ||
Foamiran lamp can be combined with other materials that are resistant to heat. You can decorate a ready-made lamp bought in a store.
Also, creating a lighting fixture according to your design is not difficult. In order for the foamiran product to last a long time, it is recommended to use LED lamps or fluorescent lamps that do not heat up too much.
To choose high-quality foamiran, you should not save. You can buy Chinese or Iranian material. In the first case, foamiran will deform faster, lose its shape after work, and be crushed under mechanical impact.
Iranian foamiran is considered to be the highest quality, most durable and less flammable. Its price is higher, but it is much easier to work with.
Flower-shaped lamps
In any area where there is an element of floristry, masters divide the production of flowers into basic, simple and complex:
- Basic flowers – simple to make, containing 1-2 elements of technology. They are considered quick to make and assemble. These include hydrangeas.
- Simple flowers – they can be made in a short time; the process is not labor-intensive. These include peonies and roses. The details need to be processed before cutting and assembling. Sometimes additional decoration of each leaf is required, for example, for peony roses and Austin roses.
- Complex flowers – these include chrysanthemums, crocuses, lilacs. The flowers consist of small parts that need to be manually processed and painted before assembly. It is not difficult, but the process takes a lot of time.
Compositions from different types of flowers are complex because it is difficult to immediately combine different types of plants to obtain a beautiful and expressive result.
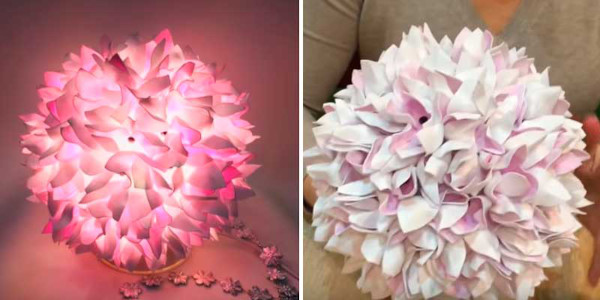
Basic flowers for the lamp
It is easiest to make hydrangeas from foamiran. The lamp turns out lush, voluminous and without gaps. With such flowers it will look like a night light, however, hydrangeas can be made white or light blue so that the light passes through the flowers better.
For this master class you will need:
- thin foamiran up to 2 mm thick;
- lighter or gas burner;
- scissors;
- stencil;
- wax crayons;
- art knife;
- pencil;
- hot glue;
- ball-shaped lamp.
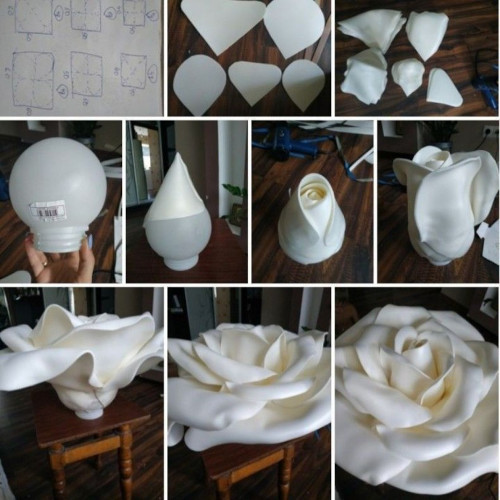
First, you need to prepare stencils or use a pencil to outline the contours of the future hydrangea petals.

- On a sheet of foamiran you need to place a quatrefoil and outline it. The petals should be high, about 4-5 cm high from the center.
- Cut out all the petals and color as desired.
- The resulting buds with petals need to be "revived" by giving them a shape. To do this, light a lighter at a distance of 6-7 cm from the bottom of the petal and draw along the contour of the petal. You cannot hold the flame under the foamiran motionless.
- Once the material begins to fall, you need to stretch the petal slightly to create a bend or wave in the outline.
- It is also necessary to warm up the center of the flower and bend the petals to the opposite side of the base so that the edges look up.
- The resulting flowers need to be prepared in the amount of 30-35 pieces for a lampshade diameter of 13-15 cm.
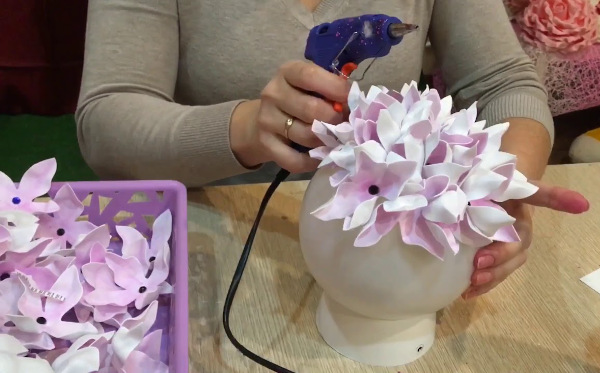
- To place the hydrangea on the lampshade, you need to heat the hot glue to medium temperature (when the glue still stretches behind the tip of the glue gun) and glue each bud, starting from the center of the ball.
- Each subsequent circular row should be placed closer to the previous one so that the upper petals rest on the lower ones, without hanging down or creating voids.
This lamp with hydrangeas can be additionally decorated. For example, glue black beads or shiny rainbow rhinestones to the center of the buds.
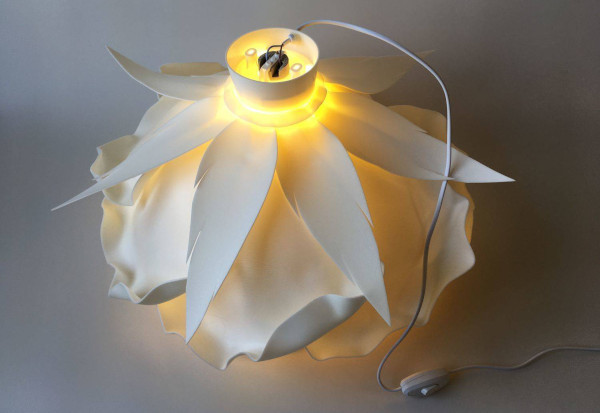
Peony Shaped Lamp
The peony is considered a simple flower in technical execution, but it belongs to the type of large buds. These are flowers closed to the center, the petals of which are tightly adjacent to each other.
For this master class you will need the same tools and an iron with towels, but the foamiran should be 1-2 mm thick, no more. So from a thin material you will get more realistic petals.

- The iron should be clean, as well as the towels. Additionally, you should prepare two sheets of A4 paper of regular size or thick white cardboard.
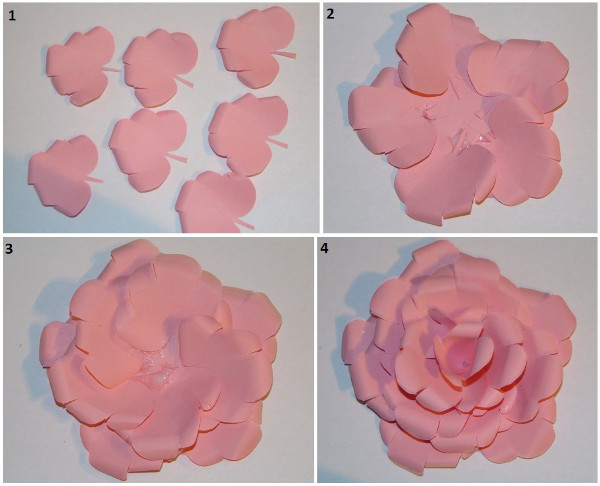
- On a pink or red sheet of foamiran, you need to draw the future petals. If this is difficult, you can print out the petal blanks and scale them to the circumference of the lampshade.
- For a ball with a diameter of 10 cm, you will need about 50 petals. The material consumption will be about 3 m.
- Each petal needs to be cut out; you can do without painting.
- To get "torn" edges of petals, you need to heat the foamiran product as much as possible and stretch the petal from the center to the edge with your fingers. Use a lighter to additionally treat the torn edge.
- The first petals should be bent toward the center, forming a semicircle. They should completely envelop the ball and imitate the shape of the lampshade. The center of the lamp does not need to be covered, since the foamiran sheets are dense, and the light will hardly pass through 3-4 petals folded almost on top of each other.
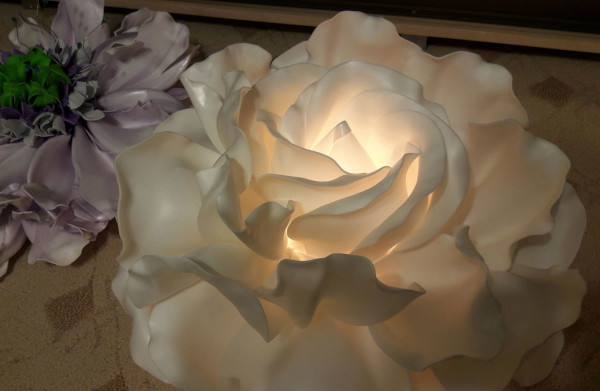
- The closer the buds are to each other, the dimmer the night light will shine. You can make one large flower for one lamp by placing peony petals around it.
A foamiran lamp in the shape of a large peony will look beautiful in a bright interior.
If you take a material of pastel colors, you can make a multi-colored peony, but it will turn out to be a complete composition due to the muted shades. Such lamps can be used as a night light in the bedroom, decoration for the living room and as a sconce in other rooms.
Lamp with roses
Roses of different types can be of any size. The smaller they are, the more voluminous the lamp will look. There will be no voids due to the small buds.
They, like in bouquets, fill the space and do not allow light to pass through. Thin material is suitable for creating small buds, but the thickness of foamiran 2-3 mm is the ideal layer for creating large flowers.
To work you will need:
- foamiran 2-3 mm thick – 4-5 m;
- scissors;
- foil;
- soft wire;
- tape;
- iron;
- pencil;
- candle or lighter.
For this work, you can take white foamiran and color it with wax crayons as desired.
Colored foamiran is suitable for creating blanks without painting:
- From a sheet of foamiran you need to cut out petals with a diameter of 3-4 cm. You can increase the diameter - it affects the size of the flower.
- Each sheet must be placed on an iron heated to a temperature corresponding to the “wool” or “synthetics” settings.
- If the foamiran starts to deform, cool the iron. You can use a candle or a lighter, but remember that they heat the material unevenly.
- The heated edges of the petals need to be stretched to the sides and bent on a pencil, giving the petals their shape.
- To ensure that the roses are not placed close to the surface and do not interfere with each other in the composition, it is recommended to raise several flowers above the surface of the lamp. To do this, roll the foil into a ball and thread the wire into it, leaving 2 cm of free edge.
- You should also cut semicircles from foamiran to form buds. You can skip this step if the roses should be flat and no more than 2 cm high.
- The semicircle should be rolled into a cone and the free edge should be glued. The cones should be put on the foil ball and glued to the base.
- You need to glue the petals to the formed buds, starting from the top and moving down to the base.
- The wire with the bud should be inserted into the lampshade, bending the edge to attach the buds from the inside. You can also use nippers to remove the excess length of wire.
- The base of the roses needs to be glued to the lampshade with hot glue.
To decorate a lamp with roses, you can use spray paints, glitter and sparkles of different shades.
Lamps of other themes
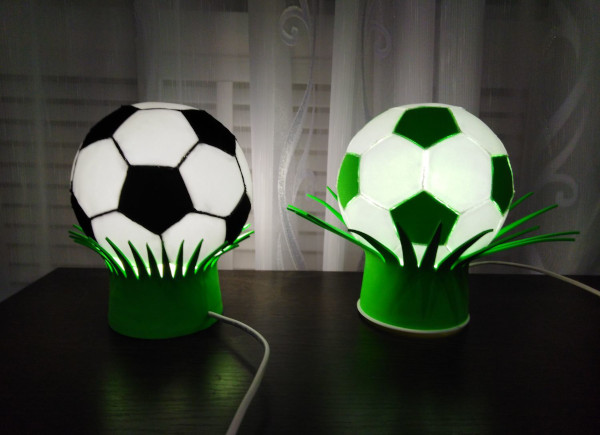
A lamp made of foamiran can be made in the theme of favorite cartoon characters, fruit compositions. To decorate a boy's room, the lamp can be made in the form of a football, for a girl's room - in the form of a doll.
Fruit compositions are also popular – there are night lights designed in the shape of pineapples, apples, sea creatures and even planets.
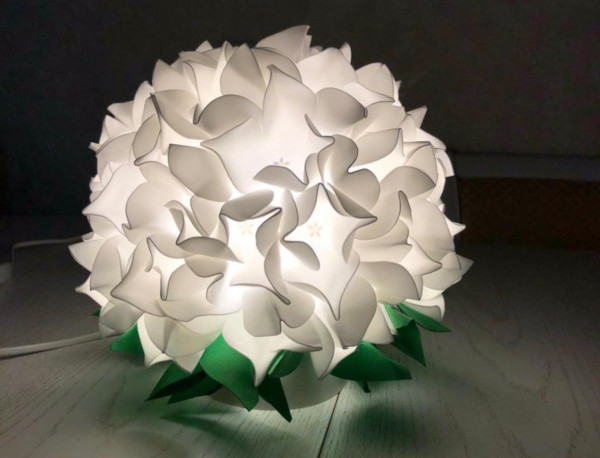
A ball-shaped lamp can be made much faster than a flower bud arrangement:
- You will need a standard set of tools, white and black foamiran.
- From the sheets of material you need to cut out pentagons of the appropriate size.
- The lampshade must be immediately covered with foamiran using hot glue.
- The joints of the parts should be decorated with black stripes 2-3 mm wide.
- The lower part of the lampshade may not be completely covered with foamiran; it is permissible to decorate the free part if it is not possible to select the required size of the pentagons.
This lamp can be placed in a children's room, kitchen or hallway. It is suitable for thematic interior design, even when there are no prerequisites for increasing the number of light sources. Another interesting option for lamp design is a fruit theme, in particular, pineapple.
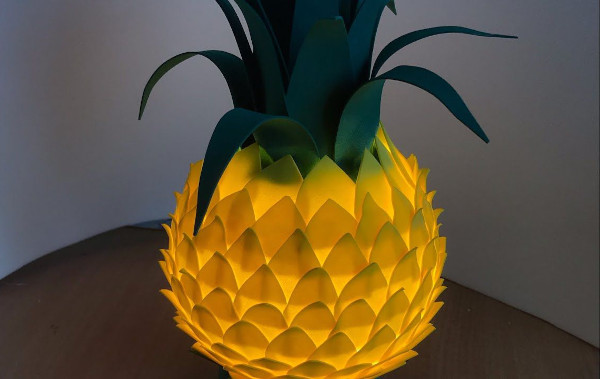
It's not difficult to make:
- From yellow foamiran, you need to cut 60-70 petals in the shape of an isosceles triangle with slightly convex sides. This will help imitate the pineapple peel.
- From green foamiran you need to cut a strip 40 cm long and about 12-15 cm high. Everything will depend on the size of the lampshade. It is advisable to choose an oval lamp so that the pineapple turns out more realistic.
- The strip of green material needs to be folded in several layers and the corners cut out in the shape of tall triangles to imitate the “cap” of the fruit.
- The foliage should be glued to the surface of the ball around the circumference with hot glue. It should be taken into account that the higher the pineapple greenery, the less stable it is and the more susceptible it is to bending and losing its shape.
- The petals do not need to be heated, just glue them to the base with hot glue.
- You need to start from the top rows, going down the rows to the base.
The finished lamp will look great in a child's room, kitchen or bathroom to maintain a warm and cozy atmosphere.
Lamps decorated and decorated with foamiran can also be used as a gift. Standard ball-shaped lampshades are easy to find in the store, which makes such crafts affordable and inexpensive. Hand-made lamps can be timed to any holiday, setting the mood for the recipient of the gift for a long time.
Video about a lamp made of foamiran
Master class on creating a beautiful lamp from foamiran: