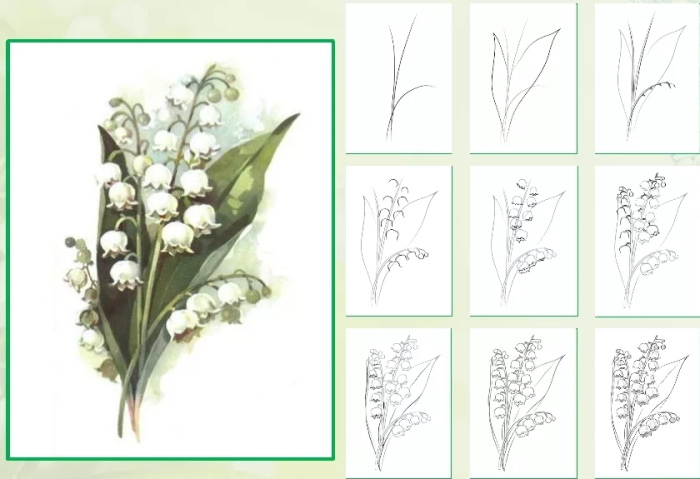
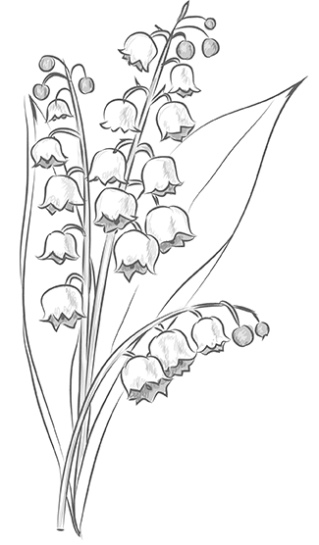
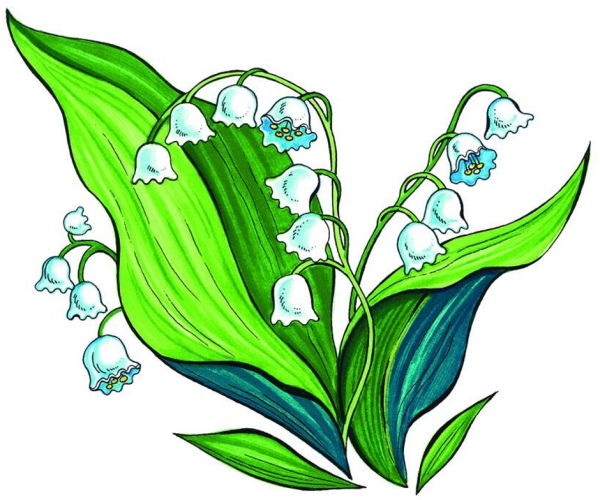
Drawings of flowers and plants for children are easy to make. Floral theme compositions can consist of 1-3 stems with buds and leaves, a bouquet. Lily of the valley is attractive for drawing - wide elongated leaves, simple shaped "bell" flowers. Even a 3-4 year old child can handle the technique of creating a pencil drawing and painting.
General rules for drawing lily of the valley
Lily of the valley (drawing for children includes a sketch, coloring) is familiar to children, since the plant attracts attention in the first months of spring.
To depict a flower, choose:
- album sheet;
- simple graphite pencil;
- felt-tip pens, pencils or paints in green, blue, pink, and gray colors.
Recommendations:
- Pastel shades will be needed at the stage of giving a small volume to the inflorescences. In the simplest version of the drawing, the buds can be left white, with the leaves brightly colored green. Then it is better to complement the work with a clear outline.
- The child can be asked to outline the dimensions of the future image in advance, leaving white fields on all 4 sides of the paper sheet. This will create a decorative and visual composition, a kind of "passe-partout" when placing the finished drawing in a frame. When working with pencils and paints, it is important not to rush the young author, to show how to cope with difficult elements.
- Drawing of the plant begins with the outline of 1-3 long stems, on which the outlines of buds and flowers are then marked.

- On the sides, the image is supplemented with 2-3 wide, elongated leaves, almost as long as the stems. Closer to the base of the lily of the valley, you can draw 1-2 small leaves.
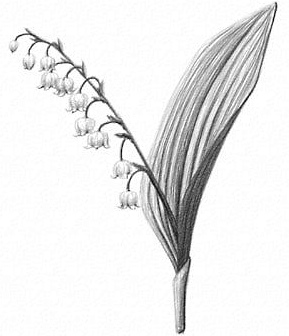
- Children remember the lily of the valley for its large number of bell-shaped flowers, evenly spaced on short stalks along the entire length of the stem. At the last stage of drawing, the lower flowers are painted in a light bluish, gray shade - the shape of the elements is emphasized. The upper buds inside the contour are outlined in the same color. The technique will make the image naturalistic and voluminous.

- Lily of the valley leaves consist of many longitudinal veins, they are outlined at the final stage (like the entire drawing) or highlighted in dark green. The background is given a light grassy shade.
- The background can also be left white or painted any soft color. Alternatively, the lily of the valley bush is depicted growing on the ground, so blades of grass are drawn next to the flower, and the soil next to the plant is painted.
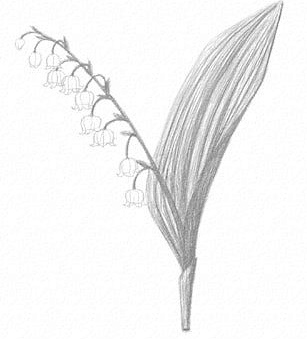
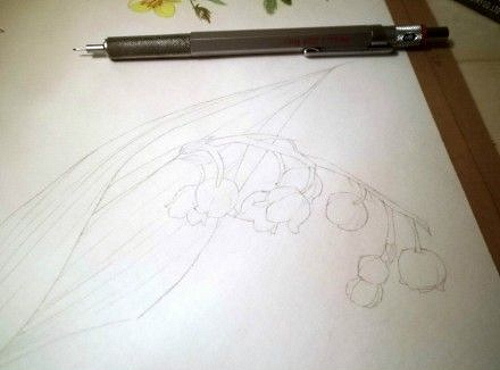
How to easily draw a lily of the valley with a pencil
Pencil drawing is easy to do, an eraser is used to correct failures in creating details. It is better to choose paper that is thick and smooth enough, so that the pencil strokes can be easily applied to it.
High-quality sheets will preserve the little artist's images for a long time and make drawing comfortable for the child.
What tools will you need?
To depict a spring flower, use the following tools:
- simple pencil;
- soft eraser;
- pencils of emerald, green, blue colors;
- black pencil for outlining the image.
It is better to use pencils that give clear, rich colors. When pressed, such a pencil leaves clear lines. A weak "wax" shade is given by tools of inadequate quality. The pleasure of drawing will be reduced to nothing, the drawing will not be bright.
How to draw
Below are the basic steps for drawing a pencil image.
| Stage | Description |
| 1 | Marking the boundaries of the image on paper: put small lines, which are erased with an eraser at the end. |
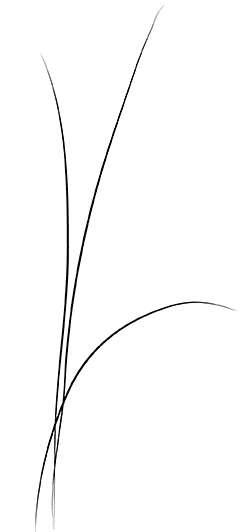
| 2 | Draw a thin stem: starting from the middle of the lower edge of the composition, draw one line upward, deviating at a small angle from the vertical. Next to it, draw another, forming the outline of the stem. |
| 3 | To mark the location of the flowers, short peduncles are placed in a checkerboard pattern along the upper two-thirds of the stems. The upper bud is placed on the stem tip. |
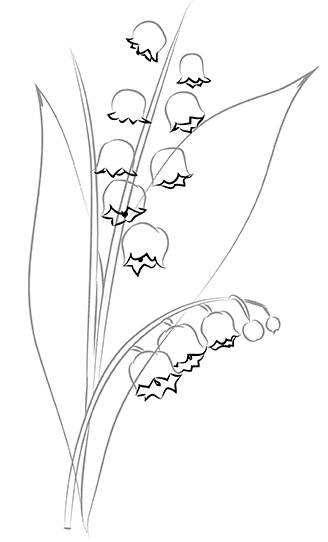
| 4 | Rounded "bells" with a wavy line along the corolla (at the bottom of each flower) are drawn to the legs. All lily-of-the-valley flowers "look" strictly downwards, leaning in one direction. You can explain to the child that the lily-of-the-valley inflorescences are always directed toward the ground, this is its distinctive feature. |
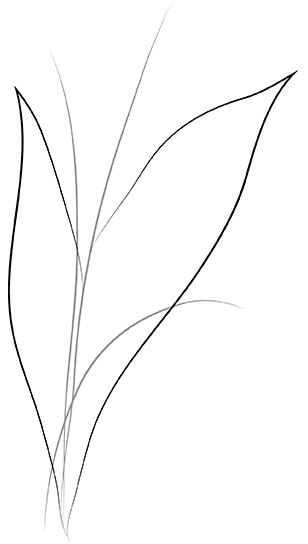
| 5 | On the side from the starting point of the stem, draw a wide elongated leaf, slightly lower in height than the stem with flowers. The leaf can be divided in half by a longitudinal line. The composition is supplemented with another leaf, slightly smaller than the first. |
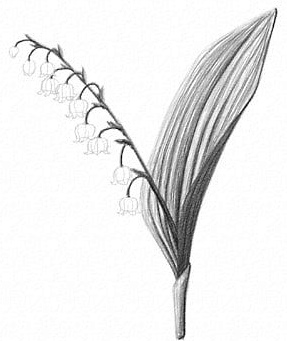
| 6 | The resulting image is colored: the leaves are green, the stem and branches on which the flowers are held are emerald. Vertical veins are drawn on the leaves in dark green. The flowers are given volume with a blue pencil, coloring only their lower parts and leaving a white rounded area on the petals near the stems. |
How to complete a drawing
A thin black pencil can be used to outline the plant elements. Thick lines are avoided to avoid giving the image a rough outline. The background is lightly shaded with light green or blue.
The strokes are placed in one direction, pressing lightly on the pencil.
Lily of the valley
Lily of the valley (the drawing for children is adapted according to the details of the image) comes in different types.
The May lily of the valley has the following characteristics:
- long stems and peduncles;
- up to 20 rounded white or pinkish flowers, the corolla of which ends with 6 small teeth;
- elongated leaves framing the stem near the root.
What tools will you need?
To draw this type of plant, you will need the following materials:
- a thick sheet of album paper;
- simple pencil;
- eraser;
- bright green, emerald, pink pencils.
To color the leaves of the plant, you can use soft colored wax crayons - they will give richer colors, and it will be easy for the child to color large elements. Small flowers are given volume using a regular light pink colored pencil.
How to draw
To complete the work sequentially, follow the steps given in the table below.

| Stage | Description |
| 1 | In the center of the sheet, outline the contours of the stem with long 18-20 peduncles, which are staggered and have a semicircular downward slope. The stem itself is depicted as slightly inclined to one side. |
| 2 | At the top, draw a ball of the first unblown bud, then add 2 more ball-buds on each side. In nature, you can often find such a lily of the valley, in which the upper "bells" retain buds when the rest of the inflorescences have opened. |
| 3 | Then the remaining flowers are depicted, gradually increasing the size of the latter a little. The lower corolla of each flower is bordered with a wavy line. |
| 4 | From the base of the stem, 2 lily-of-the-valley leaves originate. They are drawn wide, with thin, sharp ends at the top. |
| 5 | Lily of the valley is painted starting with light pinkish "bells". The pink pencil is pressed half-heartedly, conveying the tenderness of the petals. The upper, unblown ones can be given a greenish tint. |
| 6 | The leaves are first painted with green chalk, using dense vertical strokes. Then the veins, the sharp top of the leaves, the stem, and the peduncles are drawn in emerald. |
How to complete a drawing
To make the image more graphic, the outline of the plant is outlined with a black gel pen or a thin marker. Alternatively, outlining is excluded, then the background is painted with any delicate shade - blue, green, grayish-pearl.
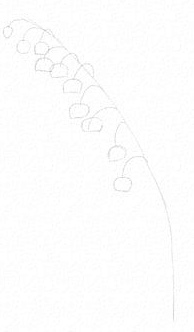
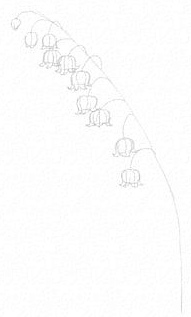
Leaning Lily of the Valley
The composition consists of 1-2 stems bent to the ground in the form of a semicircle, and leaves located in the background. All lily of the valley flowers in this position will be directed downwards with wavy corollas. The child's attention should be drawn to this nuance when depicting a bent plant.
You can complicate the drawing by depicting some of the “bells” open, with noticeable soft yellow stamens.
To convey volume when painting such a flower, the inner surfaces of the petals are made darker than the outside. The leaves are given life by making them slightly wavy along the contour.
What tools will you need?
For a clear, bright drawing, you can use felt-tip pens or markers.
You will need the following tools:
- thick paper (for drawing or watercolor)
- simple pencil for sketching;
- eraser;
- wide markers of dark green, grassy colors;
- light blue, gray markers.
How to draw
The table contains a detailed description of the drawing stages:
| Stage | Description |
| 1 | They outline the composition: in the center they place two stems with flowers leaning over each other. They plan to depict lily-of-the-valley leaves as a background, in the background. They do not forget about the fields of the drawing. |
| 2 | The stems of the plant grow from one root, so they are drawn emerging from one point at the bottom of the image, in the form of semicircles, one above the other. |
| 3 | Behind the stems, a mass of 3 leaves is depicted. |
| 4 | On each stem, peduncles are marked, directed downwards. |
| 5 | Draw rounded "bells", starting with the smallest ones at the top of the stem. Draw the lines of the wavy corollas parallel to each other. Then the flower will look naturally inclined. |
| 6 | When coloring with felt-tip pens, you can suggest that the child use a clean paper square, placing it under the palm of the hand with the tool - this way the elements will not get smudged, and the drawing will remain neat. |
| 7 | Light blue color gives volume to the inflorescences. With a gray marker, finely shade the lower wavy parts of the flowers, this will additionally emphasize the shape. Then, with a green marker, densely paint over the leaves, trying to avoid chaotic strokes. |
| 8 | The final stage: the stems, veins and ends of the leaves, and peduncles are painted dark green. |
How to complete a drawing
You can paint the remaining background with light gray, trying to carefully apply strokes inside the intended compositional square. For this purpose, you can use a light pink shade that contrasts with green.
With one leaf
Lily of the valley (a drawing for children can be done using different techniques) is depicted using a stencil for a plant leaf. An interesting technique using a foam sponge will make painting an element very fast and effective.
The execution of the work is complicated by adding a small vase to the composition, which is also painted through a stencil. Children are asked to depict a lily of the valley with 1 leaf in a vase, the shape and color of which the child thinks out himself. The option will be interesting for younger students, senior preschoolers.
What tools will you need?
- 2 thick sheets of paper;
- simple pencil;
- the brush is thin;
- eraser;
- emerald and green gouache;
- markers of light pink, light gray colors;
- scissors or a paper cutter;
- a board or any work surface on which to cut the stencil;
- foam sponge;
- palette;
- container with water;
- soft cloth.
How to draw
Using the table as a guide, complete each stage of the work:
| Stage | Description |
| 1 | On 1 sheet, mark the area where the flower will be placed, planning a place for a large leaf. Draw the outlines of the stems. If you choose the option with 1 stem, make the details large enough so that the image does not look too small on the paper. |
| 2 | The contours of the peduncles and flowers are outlined. |
| 3 | On the 2nd sheet, use a simple pencil to draw the outline of a wide leaf of the plant proportionate to the stem. It can be made slightly wavy by sharpening the upper tip. |
| 4 | Having placed the paper with the outlined lily of the valley leaf on the board, cut out the drawing along the contour. Here, adult supervision is necessary. It may be better to cut out the stencil without the direct participation of the child, to eliminate the risk of injury. |
| 5 | The resulting paper stencil is placed on 1 sheet with the image of lily-of-the-valley inflorescences, checking the combination of elements. Then the stencil is put aside. |
| 6 | On sheet 1, start painting the lily-of-the-valley "bells" in light pink, giving them volume. Finish the stage by outlining all the flowers on one side in light gray - this will create a small shadow of its own on the flowers themselves. |
| 7 | They move on to the stage of working with the green parts of the plant. A thin brush is dipped in water, excess liquid is blotted off, then green paint is taken and the stem and peduncles are carefully painted. The paint is allowed to dry completely. |
| 8 | The next step is to use a stencil. Place emerald and green gouache on the palette side by side, without mixing. There should not be too little paint. Take the stencil and place it on the original drawing with the stem, in the previously chosen position. It is important to press the stencil tightly near the cutout so that the paint does not flow beyond the contour of the lily-of-the-valley leaf. |
| 9 | A dry foam sponge is dipped with its lower wide edge into two colors at once, without moving it. Having collected a portion of gouache of 2 colors, with one movement the sponge is drawn, immediately painting the entire area of the cut out section. The stencil is carefully removed, raised vertically. The movement of the hand with the sponge should coincide with the direction of the veins on the lily of the valley leaf - the effect of mixing green and emerald colors will help to display the picturesqueness of the greenery of the plant. |
| 10 | The resulting leaf may blur a little at the edges - this is corrected with a brush with emerald paint. Accentuate the sharp tip of the leaf and darken its beginning. Then you can outline the stem and peduncles on one side with the same color - this will add volume to the image. |
How to complete a drawing
The combination of colors and thin black outlines of the drawing details will make the image graphic and clear. An interesting effect is achieved by combining thin and thick contours. The first outlines light elements, the second - details that are in the shadow.
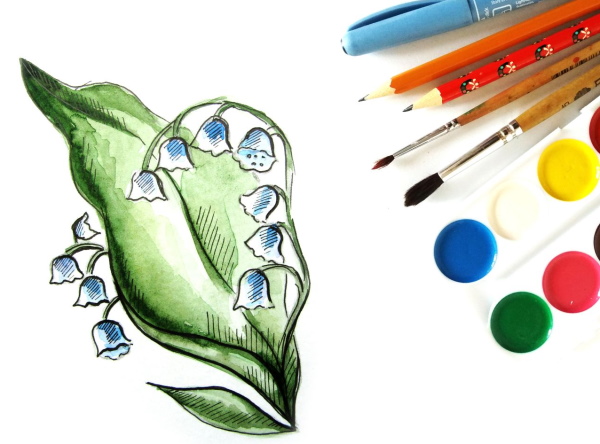
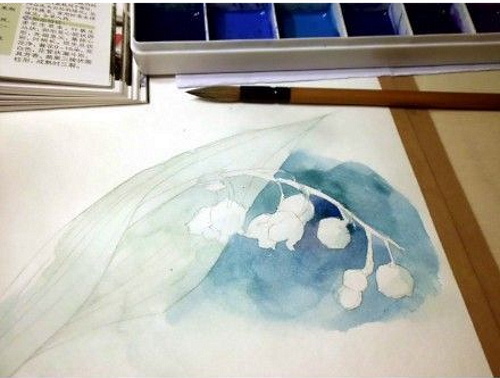
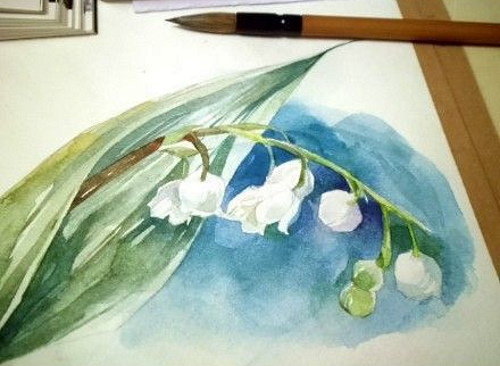
With paints
Lily of the valley is depicted not only with gouache. A drawing for children can be painted with watercolors. It is often used in children's creativity, but the child needs to be shown the principles of working with paints.
Recommendations:
- Choose thick watercolor paper with a rough surface - it absorbs water pigment well.
- When doing a preliminary pencil sketch, an eraser is almost never used - the eraser erases the top layer of paper, which spoils the quality of the coloring.
- Use round brushes with soft bristles.
- The water used to rinse the brush is changed frequently to avoid “dirty” shades.
- The new tone is applied only with a clean brush; a cloth is needed to remove excess moisture.
- Do not reapply on a wet layer of paint to avoid pellets forming.
- The first works are done in pure colors so that the young artist can get used to the new material. The drawing of a lily of the valley is well suited for the theme of the first watercolor works.
What tools will you need?
Select the necessary materials:
- watercolor paper;
- thin, thick brushes;
- simple pencil;
- water container;
- green, yellow, emerald, blue paints;
- palette;
- a soft cloth.
How to draw
The sequential execution of the work is shown in the table below.
| Stage | Description |
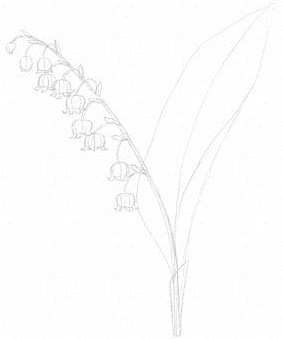
| 1 | In the center of the composition, outline the outline of the stem, slightly leaning to the side and ending in a semicircle. |
| 2 | On the side opposite the slope of the stem, draw 2 long pointed leaves. On the other side, draw a smaller leaf. |
| 3 | On the stem, peduncles are depicted, inclined to one side, then flowers with wavy corollas are drawn. |
| 4 | Now the paper sheet needs to be slightly soaked in water so that the watercolor paints the surface evenly. A wide brush is used to collect some clean water and, with parallel movements, it is applied over the entire area of the drawing, and it is allowed to dry completely. |
| 5 | Apply a little blue paint to the palette with a brush and dilute with water to a light blue shade. Paint all the flowers with the resulting tone. Leave to dry. |
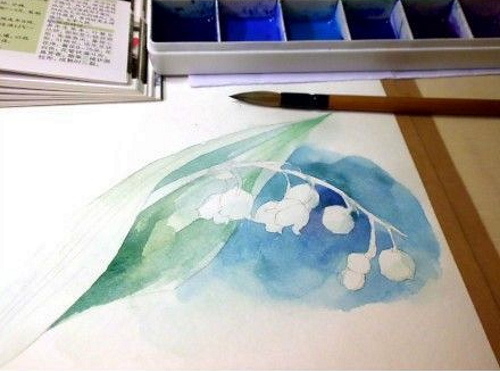
| 6 | Next, on the palette, mix the blue pigment with water again until a more saturated blue is obtained. On each flower, on one side, draw its own shadow, applying thin strokes in a rounded manner (according to the shape of the flowers). From below, border the corollas with the same tone. The result is voluminous inflorescences. |
| 7 | The paper is left to dry. Using a wide wet brush, apply grassy green to the palette. Once the desired bright shade is achieved, you can ask the child to add a drop of yellow. The lily of the valley leaves are painted with vertical strokes. |
| 8 | While the paint is still wet, the top and the beginning of the leaves can be accented with emerald, using the "wet on wet" technique. With this technique, the tones are mixed directly on the drawing, making the image picturesque. The paint is applied carefully, lightly touching the paper, then the layer is allowed to dry. |
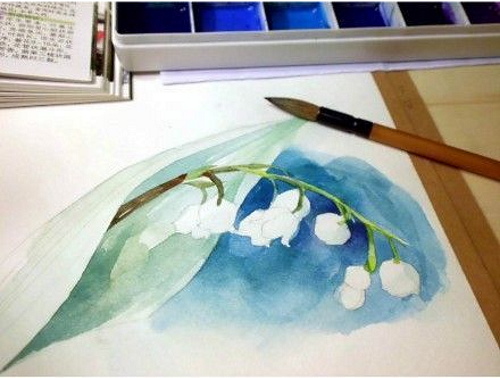
| 9 | Using a thin brush, paint the stems and peduncles. Repeat first with green, then with emerald. |
How to complete a drawing
Watercolor work is usually not supplemented with tracing, preserving the airiness of the drawing; If desired, you can paint the background in a light tone using a wide brush.
With cotton swabs
Lily of the valley (a drawing for children can be made on the theme “Bouquet of flowers”) is depicted using a simple object - a cotton swab.
What tools will you need?
The child is asked to select the following materials:
- a sheet of colored cardboard (the work will look spectacular on blue, yellow, pink, light blue, light green);
- soft simple pencil;
- eraser;
- gouache in white, blue, green, yellow colors;
- round brush;
- 1-2 cotton swabs;
- palette;
- rag (to remove excess paint from the brush);
- container with water.
How to draw
| Stage | Description |
| 1 | The fields of the composition are outlined, and a bouquet is drawn in the center: 3-5 lily-of-the-valley leaves, several stems slightly inclined in different directions. |
| 2 | On the palette, mix green and a little yellow gouache. Using vertical movements of the brush, paint the leaves. Allow the layer to dry. |
| 3 | More green is added to the yellow-green. The veins of the leaves and their contours are drawn. |
| 4 | The resulting tone on the palette is changed by adding a little blue. The resulting emerald color is used to draw the stems, indicating the bottom and pointed tops of the leaves. Now the paint should dry completely. |
| 5 | On a palette, mix white gouache and a drop of blue separately. Dip a stick into the paint and, pressing lightly, imprint small round flowers on the stems. If desired, the inflorescences can be made white-yellow, white-pink. Dry the paint layer. |
How to complete a drawing
Add a "zest" to the work: dip the stick into whitewash and print tiny white highlights on each "bell". Apply thin veins to the leaves with a light yellow-green shade. To add graphic quality to the composition, you can outline the stems and flowers with corollas with a black gel pen or marker. Elements highlighted in the foreground will create volume in the work.
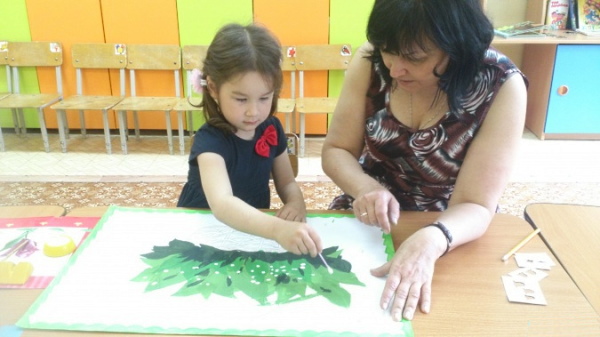
Lily of the valley is easy to draw, but to help your child create a drawing, you can first find a photo of the plant on the Internet or in an encyclopedia. On a spring walk, you can draw your child's attention to the shaded corners of the park and forest - that's where you can find small clearings with flowering spring shoots.
Children are always interested in natural materials, observing living plants. Skills will help the young artist in depicting flowers, teach attention to detail.
Video on the topic: pencil drawings for children - lily of the valley
Drawing of lily of the valley with a pencil for children: