To sew clothes or create a beautiful pattern, you need to be able to do hand stitching with a needle. They can be basic, additional, decorative or hidden and are classified according to the direction and type of stitch.
Where are hand stitches used?
Beautiful stitches are easy to make by hand with a needle, as there are more than 20 forms of hand stitches. The name of the stitch depends on how the stitch is made on the surface of the material. The stitches are made in the form of loops, crosswise, diagonally and straight, as well as crosswise and diagonally. The variety of stitches made by hand is very large.
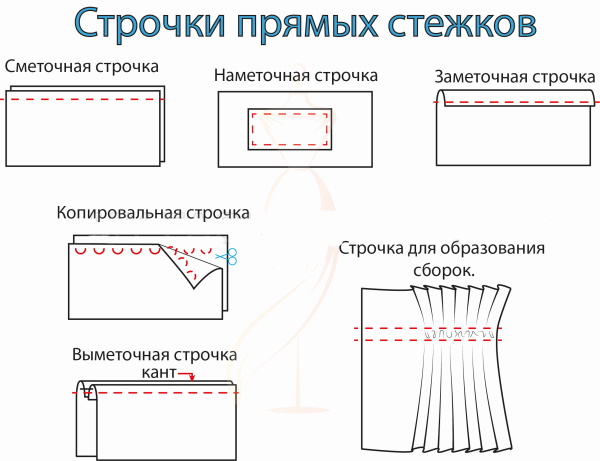
Straight seam type can be:
- to form assemblies;
- copying;
- basting;
- estimating.
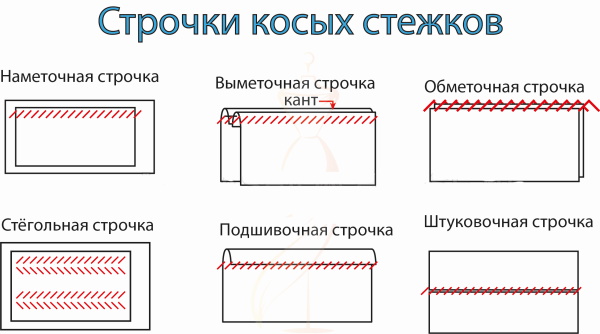
The oblique type of stitching can be:
- basting;
- overcast;
- hemming;
- quilting;
- stucco.
Beautiful cross stitches can be used for hemming and finishing, loop stitches are used for overcasting loops and edges. Special stitches created by hand with an embroidery needle allow you to fix a seam and sew buttons.
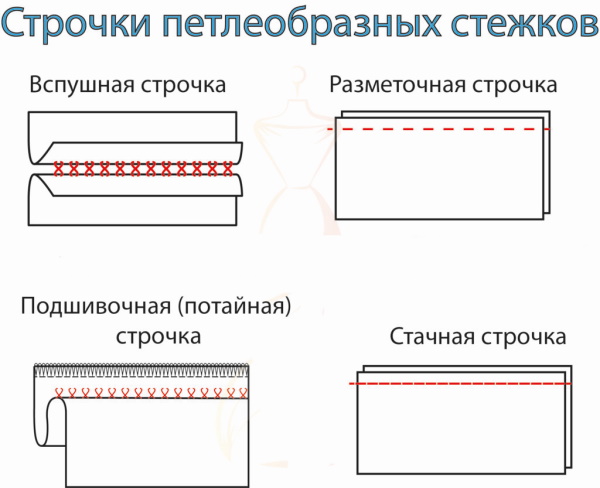
The loop type of seam is:
- fixative;
- copying;
- hemming;
- marking;
- stable.
Various seams are used for:
- short-term bending and fixing of elements;
- decorative framing;
- imitation of stitching stripes;
- framing the borders with a hem or overcast;
- joining elements with hidden permanent stitches or decorative stitches.
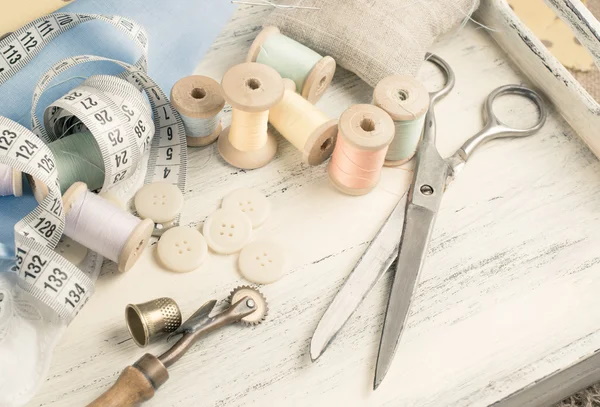
Selection of materials and tools
Accurately selected threads allow you to make beautiful seams with your own hands. The variety of sewing elements can be confusing, so before visiting a store, it is recommended to familiarize yourself with the variety of thread material and needles that are available.
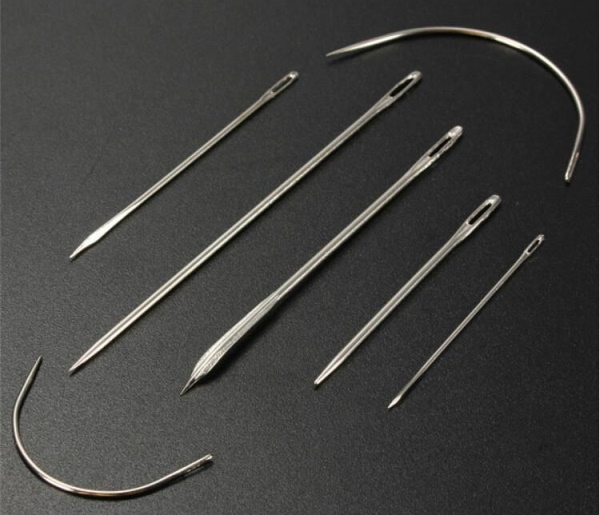
Types of sewing needles that can be used:
| Purpose | What are they? |
| For beads with beads | They can be thin, elongated and flexible. |
| For decorating materials and fabrics intended for furniture upholstery | They can be straight or curved with a wide opening to allow thick yarn to slip through. |
| For artificial leather and natural materials | It has an individual feature in the form of a triangular tip. |
| For use with decorative materials of medium density | Short and with a large opening. |
| To hide holes | Equipped with a wide opening for threading yarn in several layers. |
| For textiles | They have a rounded end, so they do not destroy the loops. |
| For seams | They can be of a shortened type with a round hole at the end. |
| For sewing | They can be pointed with a wide oval-shaped opening. |
| Needles for handwork | They are a versatile tool for various types of sewing. They are characterized by different sizes and can be used for thin or thick thread materials. |
When purchasing a sewing tool, you need to take into account the following features:
- Each activity requires individual selection of the right needle. For example, you should not cross stitch with a tool with a blunt end.
- The thread material and the needle must be the same thickness.
- The higher the quality of the material from which the tool is made, the better it will pass through the fabric. Materials whose price is much lower than the original will deform the canvas, causing tightening due to the nicks on the tip.
- It is not permitted to use rusty or bent needles.
The type of the planned activity determines the set of necessary threads. For basting and temporary works, you can use thin thread material that can be easily torn. Synthetic and other strong yarn is used for strong stitching of things and their elements. During embroidery, special decorative yarn is used.
Beautiful stitches and hand needlepoint techniques
The various techniques for creating hand stitches are very easy and understandable.
Tips for performing various techniques that should be followed while hand sewing:
- Work must be carried out only on a flat and level surface.
- The sewing needle must match both the fabric and the thread material.
- To make the work easier, it is recommended to use a thimble. It is usually put on the middle finger of the hand that holds the needle.
- During work, it is necessary to control the thread material so that it is not overtightened.
Back the needle
Beautiful stitches can be made manually with a needle in different ways. For example, a backstitch is made from the outside and can resemble a machine stitch. However, from the back, the stitch will look sloppy because the seams are long. This type of stitch is used to firmly join elements of products in hard-to-reach areas.
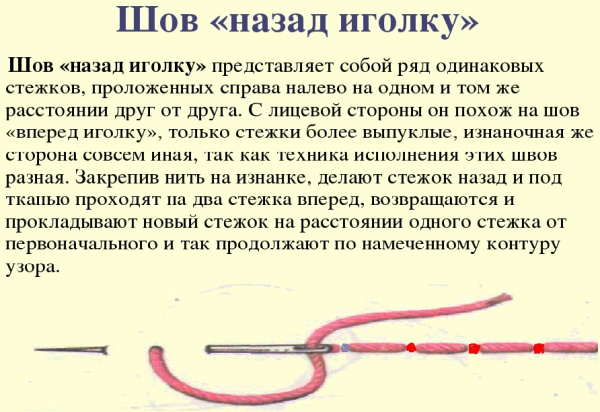
The order of creating a line is described in the following points:
- Pierce the fabric with the tool from the back side, bringing the yarn to the top.
- Create a 3mm seam to the right.
- Pass the tool again onto the outer part on the left through 3 mm from the hole area.
- Create a step to the right again by inserting the tool into the structure in the area where the previous puncture was located.
- Continue this sequence of actions until the line is finished.
- Secure the yarn in a convenient way.
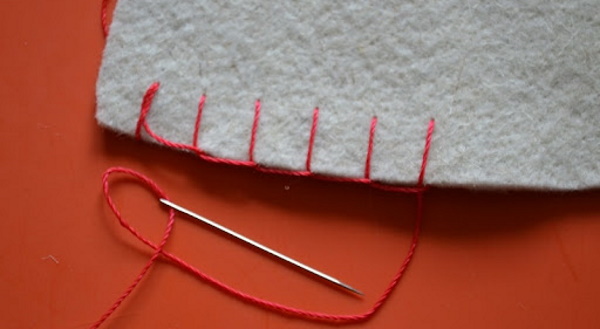
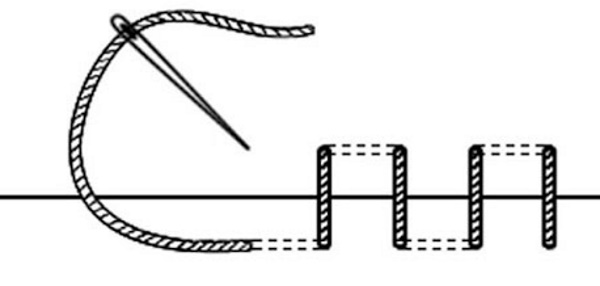
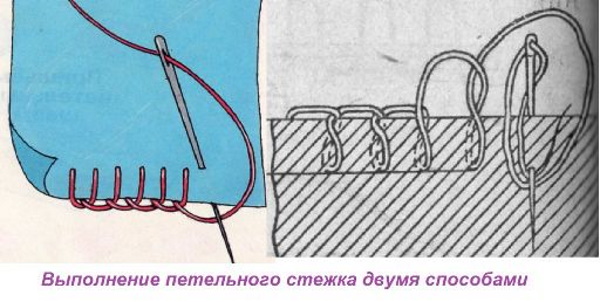
Loop option
The loop type of seam is universal and decorative. Thanks to it, it is permissible to carefully process the ends of felt, fleece, and also to make belt loops or loops. It is permissible to overcast the edges of various fabrics so that they do not crumble and have a neat appearance.
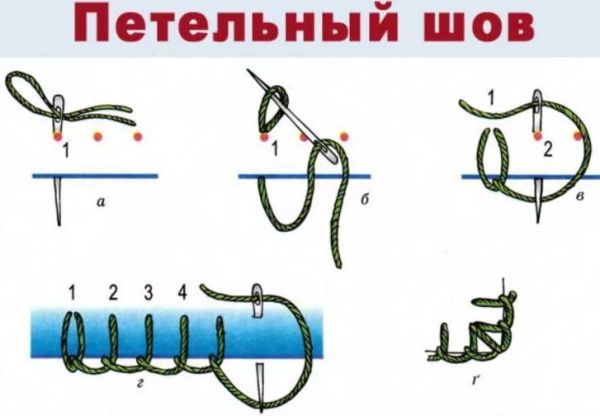
Step by step description:
- Start the stitching from the left, placing the material edge down.
- Thread the tool from below and secure the yarn with a loop at the end.
- At a distance of 5 mm from the end of the cut and 4 mm from the original hole, insert the tool, pull the yarn out, passing the working thread material from below. Tighten the loop a little.
- Repeat similar actions until the end of the treated area.
The width of the stitch depends entirely on the desired density of the border finish. When overcasting loops, the new stitch should be placed close to the previous one.
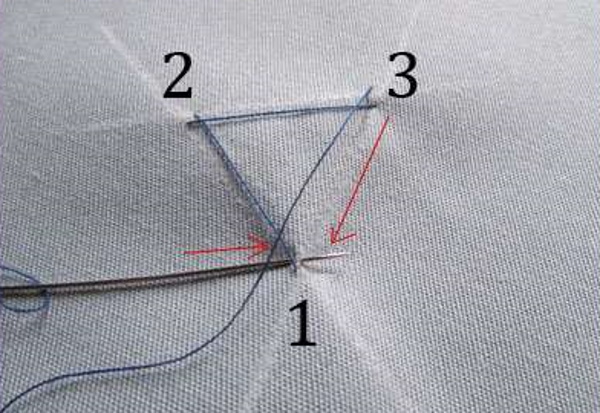
Christmas tree
Beautiful stitches by hand with a needle are used for semi-moving joining of several fabric panels. One of such seams is the "herringbone". It is designed for stitching the lining to the main product or hemming knitted items. Blind and hem stitches are recommended to be made from thin but strong threads.
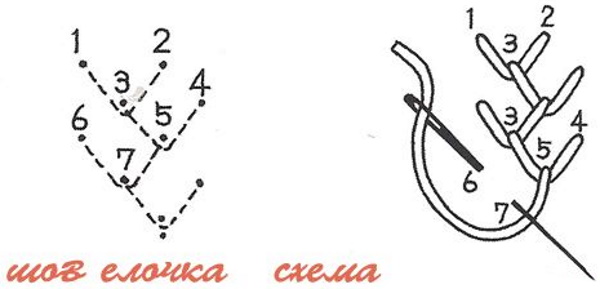
Instructions for creating a seam:
- Place the material in front of you with the edges folded to the wrong side. Start sewing from the left.
- From the back, insert the tool into the lower section of the element and pull it upward, creating a stitch diagonally to the right at an acute angle.
- On the left, grab 2 threads at the junction area of 2 elements and remove the tool.
- At the bottom of the material, to the right at an acute angle, pass the tool from the contact strip of the elements and pull it to the left through 2 mm.
- Continue making stitches until the seam is complete.
- Fasten the thread.
Tambourine
For decorative finishing of the edge, a chain stitch is often used. Thanks to this technique, it is possible to recreate an entire pattern.

Sequence of actions:
- From the wrong side, pierce the material and pull out the thread, laying it out in the hole.
- Insert the instrument into the first puncture area to the required length of the seam and withdraw it. Hold the loop with your finger and pull it slightly.
- Repeat the actions to form a chain of oval elements.
As a result, on the back side you will have a continuous line of regular stitches.
Blind stitch
The blind stitch is well suited for sewing a handmade pillow. Since it is not visible, it is perfect for joining 2 elements.
Step by step process:
- Thread the yarn through a sewing tool and tie a loop at the end.
- Pass the needle through the material from the inside of the fold so that the knot can be hidden.
- Place the tool opposite the passage of the first seam. Insert the needle inside the opposite fold of the fabric. To make the stitch invisible, insert the tool at 2 points and opposite each other.
- To make a new stitch, pull the tool straight out approximately 0.5 cm. Pull it out straight again from the same side.
- Pull the thread through this seam and pass the tool to another part of the material, inserting it into the opposite point on the fabric.
- Pull the yarn through and repeat step 4 again on the opposite side of the fabric.
- When the steps are completed, the seam will look like a ladder.
To make the stitch invisible, you need to pull the yarn and smooth out the seam. You also need to match the threads to the color of the material so that the stitch is as hidden as possible.
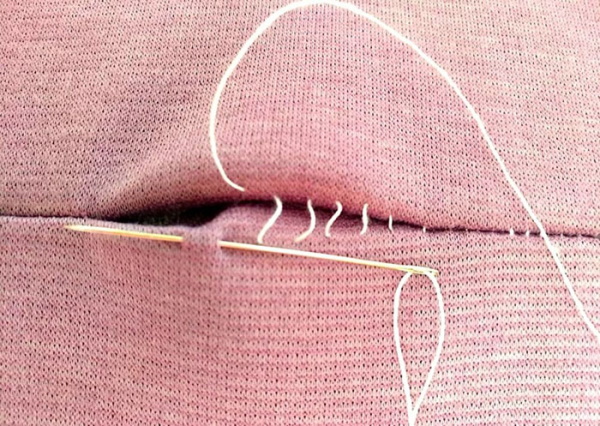
Straight stitch
Even wide stitches are often used to create basting. If you need to create a strong line, sew the elements with short stitches.
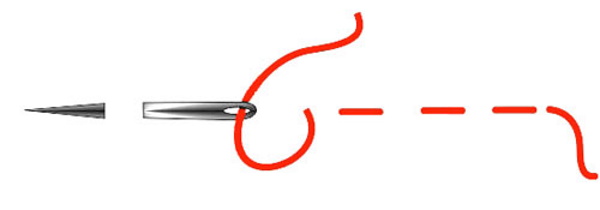
Step-by-step execution of a straight line:
- Thread the yarn into the needle and tie a knot at the end. Bring the tool through the material from the back so that the yarn knot is hidden.
- Move the needle approximately 0.5 cm and insert it through the fabric to the wrong side.
- Move the tool straight forward 0.5 cm and, continuing the straight line, pull it outward.
- Repeat steps 1-3, keeping equal distances between seams, until the desired location is reached.
- When finished, the stitches will look like dotted lines.
Cross stitch
Beautiful hand stitches with a needle, made for hemming the hem on the outside, are almost invisible. This stitch allows the hem to have mobility and is one of the best methods for hemming tablecloths. The method is ideal for sewing tape on curtains, hemming a sofa cover.
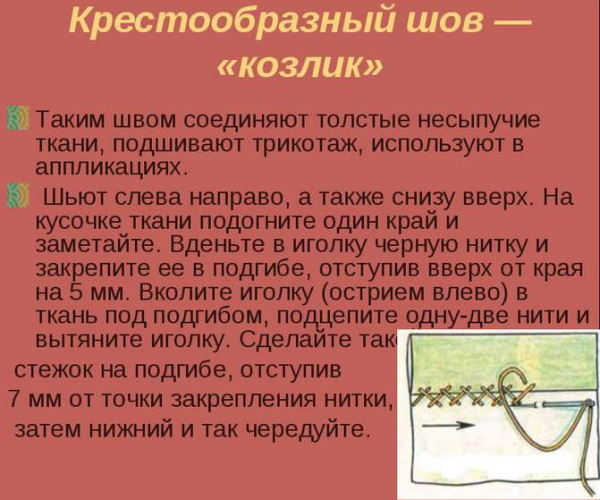
Step-by-step description of how to make cross stitches:
- If possible, iron the fabric before you start sewing, which will make working with the material much easier.
- Thread the yarn through the tool and tie a knot.
- Starting from the back, move the tool upward to mask the knot.
- Pull the yarn through, insert the tool into the fabric a little higher and to the right by 0.3 cm.
- Bring it out to the left at a distance of 0.3 cm.
- Send the tool down, crossing the last seam in a downward diagonal.
- Bring the needle out on the right at a distance of 0.3 cm from the entry at the bottom. Pull the thread material tight to align the stitching.
- Repeat the above steps until the stitches are finished, keeping the cross motion.
Seam over the edge
This technique is based on diagonal, short stitches and is well suited for sewing patches on clothes. After joining 2 elements, the seam is almost invisible, and the time for execution is minimal.
Step by step instructions:
- Thread the thread material into a sewing tool and make a knot at the end.
- Move the tool forward approximately 1 cm, wrap it around the edge of the fabric and pass it from bottom to top.
- Repeat step 2 until the seam is the desired length.
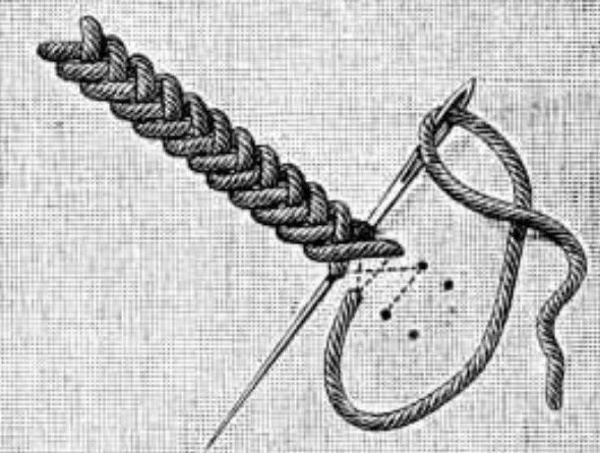
French tack
The French tack allows you to secure the lining hem to the hem of the main fabric. The result is a jumper of thread, thanks to which the lining will not come off the bottom of the material.
Sequence of actions:
- Make up to 3 long seams between the hem of the fabric with the lining.
- Join the thread seams using a buttonhole stitch facing upwards.
- The seam loops should be placed quite tightly against each other.
Dotted line
Dotted line is one of the varieties of the seam called "back needle". The technique is suitable for sewing zippers, as well as other details based on velour or velvet. The thread material must be selected according to the shade of the fabric, the sewing tool must be thin and pointed.
Step by step process:
- Pull the tool from the right side from the back.
- Sew a stitch, picking up 2 strands of yarn to the right.
- Pull the thread material from the back side and move it to the outer area, keeping a distance of 5 mm from the first puncture with the instrument.
- Create a small stitch on the right again.
- Repeat the sequence until the canvas is finished.
- Secure the thread in a convenient way.
Hidden
A needle can create not only decorative seams, but also invisible ones. The item looks much nicer and neater due to the lack of a stitch. Often, such seams are used to connect elements from the outside. For example, to repair clothing that has a hole, or a seam on a child's toy.
The step-by-step process of creating an invisible line is described in the following points:
- Turn the edges of the parts that need to be sewn inside out.
- To get a straight and invisible stitch, the edges of the fabric must have clear fold edges. To do this, it is enough to iron the material.
- From the reverse side, insert the tool under the fold and pull it out.
- Along the strip perpendicular to the fold, pass the sewing tool into the edge of the other product, pull the needle inside the fold.
- After 4 mm, pull out the thread material.
- Again, lay the thread perpendicularly and pass it through the fabric being sewn from the opposite side.
- The strength of the stitched seam depends on the stitching steps. The more of them, the stronger the seam.
- When finished, secure the yarn with a knot.
Macrame
The "macrame" stitch is very convenient to use for joining leather goods, their substitutes or other strong materials, the ends of which do not unravel. This type of stitch allows you to fix the cut of several parts quite firmly. It can also be used for upholstery of furniture elements or car interiors.
First, you should sew a machine stitch or a backstitch along the border. The stitches will be the basis for the next work. For working with thick material, you need to use a thick tool with a blunt end and synthetic yarn.
The creation procedure is described in the following steps:
- First, fix the yarn through two edges with several stitches. Use the punctures that were made when creating the machine stitch.
- Using machine stitches, work from the outside.
- Pass the yarn through the seams one by one, lacing through 1 stitch.
- At the end of the work, tighten the working yarn and form a beautiful and strong seam.
To sew beautiful clothes, you need to master stitches, lines and seams, because without these skills it is impossible to process the edges of the fabric or connect the elements of the cut together. Stitches are the interlacing of threads obtained during the piercing of the fabric manually with a needle at two points, while maintaining a small distance from each other.
Video about beautiful stitches by hand with a needle
4 Hand Stitches Everyone Should Know: