The bear is one of the most dangerous forest predators, with a large, stocky body structure, strong paws and thick fur, and is also one of the favorite characters in children's fairy tales and cartoons.
It is quite easy to draw a bear on paper with a simple pencil, but it is recommended to do it step by step, focusing on detailed master classes, and strictly observing the anatomical proportions of the predator's body.
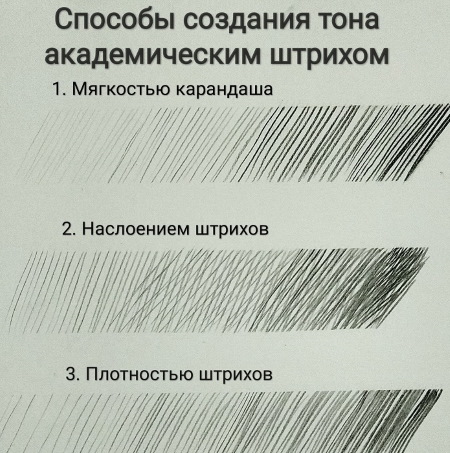
Features of the drawing and necessary tools
The bear is a forest dweller, also living in the Himalayan mountains, jungles and beyond the Arctic Circle. Despite the huge variety of breeds, the appearance of the animals is practically the same.
So, all bears have:
- large and stocky build;
- powerful chest, but a fairly short neck;
- strong paws with claws;
- high withers;
- very thick, completely covering their body with fur.
Predators can move on either 4 or only 2 hind legs. Their gait becomes shuffling and seems slightly awkward, which does not prevent the animal from running very quickly.
All of the above anatomical features must be shown in the drawing.
Materials needed for work:
| Paper | For drawing, you can use white Whatman paper, A4 or larger, as well as thick album sheets. The latter are recommended for children's creativity due to their density, which allows you to easily remove schematic lines from the sketch many times. |
| Pencils | When drawing you will need simple graphite pencils with: · H and HB pencils – used for drawing the contours of the drawing; · B-pencil – used for outlining the contours of an image, performing shading and placing shadow accents. |
| Eraser | When drawing, it is best to have a regular office eraser (for example, Koh-i-Noor) and a kneaded eraser - a special, easy-to-clean, wrinkle-resistant eraser that removes pencil particles from the sheet without smudging the drawing. |
| Additional materials: | · colored pencils;
· felt-tip pens; · gouache; · pastel; · colored markers |
How to draw a bear with a pencil
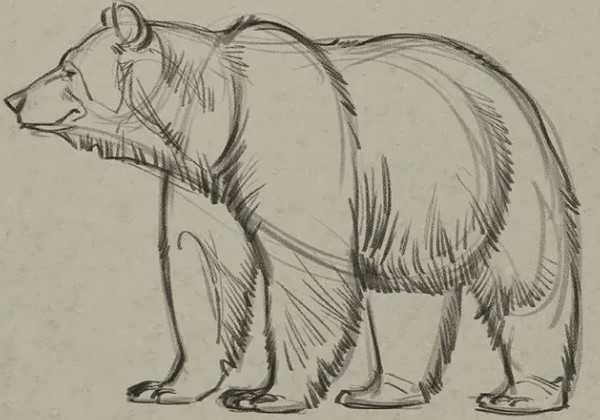
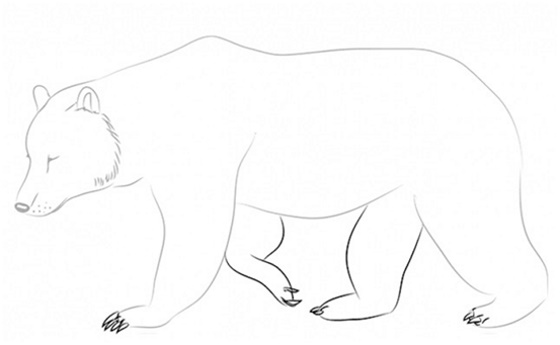
Bear is a pencil drawing created using simple geometric shapes – ovals, circles, as well as straight and curved lines.
To depict a predator you will need:
- Take a hard pencil (lead H) and sketch the bear's body on a sheet of paper using two circles of almost the same size. Connect them with short lines, and slightly in the distance outline the animal's round head.
- Connect the head to the body with slanted lines, creating an elongated, massive neck of the predator, and add paws to the body circles using ovals. The bear's tail is quite short and is depicted in the form of a small, elongated triangle.
- Also draw the front and back legs with ovals, mark the fingers and claws with short strokes, and start working on the muzzle, which has an elongated rectangular shape.
- Draw the bear's ears in the drawing using small circles, and detail the muzzle using thin horizontal stripes, depicting the tip of the nose, mouth, and eyes.
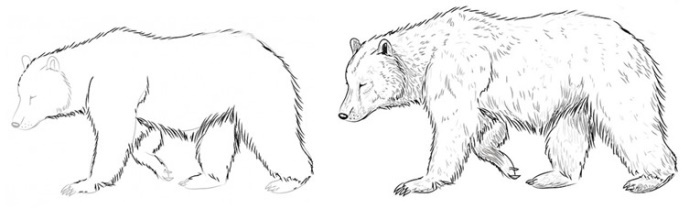
Using an eraser or a kneaded eraser, remove all auxiliary lines from the drawing and, using a soft pencil (lead B), cover the bear’s entire body with fur, depicting it using short strokes directed from the head to the hind legs.
Between the front paws, on the chest of the predator, it is also necessary to draw a fur (wool) collar with strokes. The main work on the drawing is finished. If desired, the resulting bear can be colored with a pencil or paints.
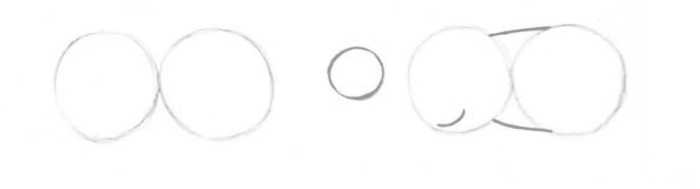
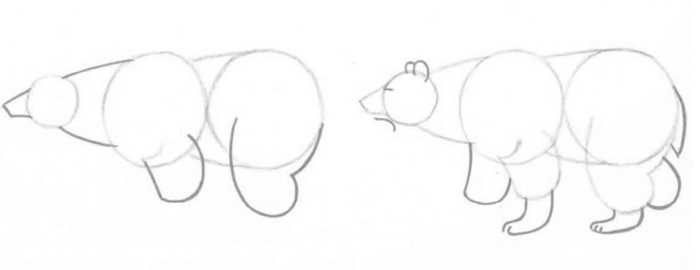
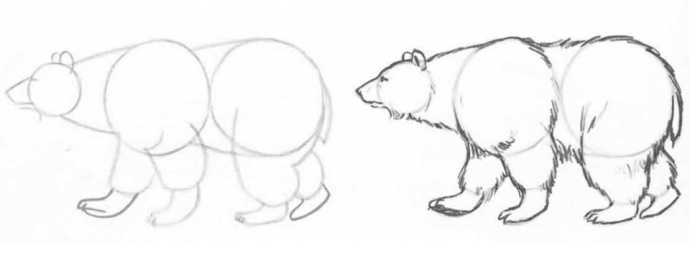
In another version of the image of a bear, you should first decide on the location of the drawing on a sheet of paper, using 4 points to determine the future location of its paws, head and body, and then:
- On the left side of the face, draw a circle for the head and divide it into 4 sectors with two perpendicular lines.
Using them as a guide, mark the location of the bear's eyes and nose, and then draw its muzzle and detail it by adding oval ears to its head. Use shading to depict the fur.


- At a short distance from the muzzle, draw 2 ovals - marking the location of the shoulder blades and pelvis of the predator, connect them with lines, forming the outline of the body and draw the paws.
- Draw the paws, depicting the claws on them with pointed ovals, and then erase all the auxiliary lines from the drawing with a kneaded pen or eraser.
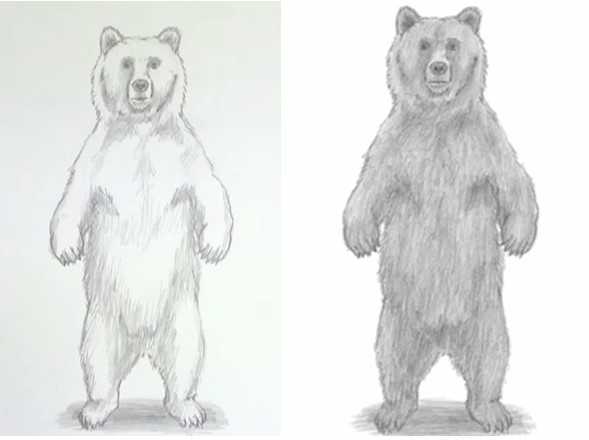
- Moving from the animal's nose to the tail, using shading made with a soft pencil, cover the bear's body with fur. To add fluffiness, thin, curved light lines are used, applied over the entire surface of the drawing.
This can also be done using shading made with an H or HB pencil (with a hard or medium-hard lead).
How to draw a bear head
If you want to depict only the massive head of a bear on an album sheet, you will need:
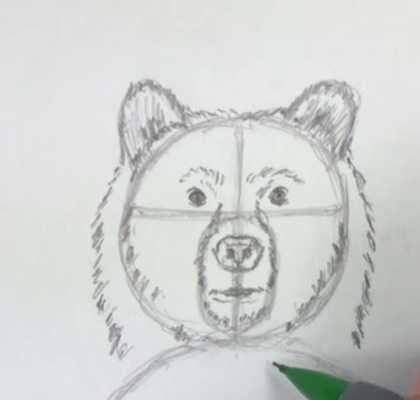
- Place a horizontal rectangle in the central part of the sheet, then inscribe an oval into it and divide it into 2 parts with intersecting horizontal and vertical lines.
- In the middle of each of them, draw 2 additional lines - a red one - to determine the level of the nose, and the bear's eyes will be located immediately under the green one.
- From the center of the oval to its upper border, draw 2 diagonal lines (thereby creating an inverted triangle with an acute angle).
- At the intersection of the diagonals with the green line, draw small elongated oval eyes. The nose, in this case, will be located in the space between the red line and the horizontal axis.
- Draw a line of the mouth under the nose.
- Place small round ears of the animal under the eyes on the green line.
- Draw a massive neck with lines extending downwards from the oval.
- Use a kneaded pencil or an eraser to remove all auxiliary lines from the drawing, and then use shadows to visually stretch the bear’s muzzle.
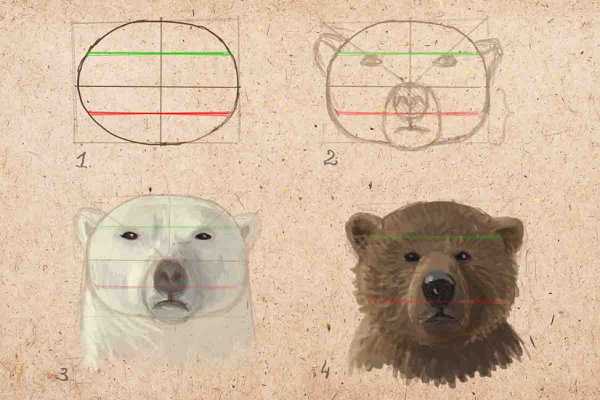
- Using short strokes of a soft pencil, moving from the nose to the head and neck, depict thick fur.
- If desired, using several shades of brown or white (depending on the breed of predator), you can make its fur thicker and shinier.
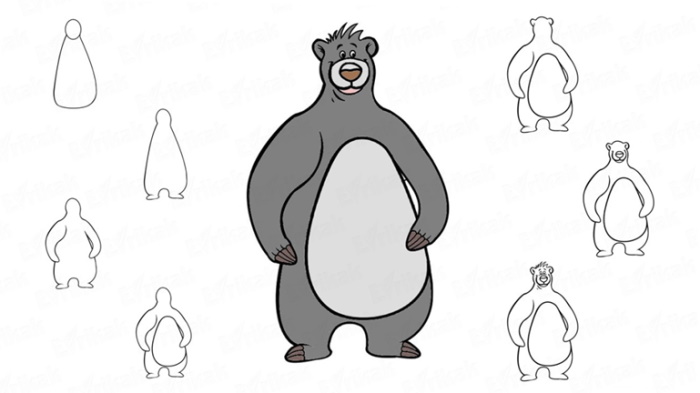
How to draw a bear on its hind legs
A bear (a pencil drawing requires precise marking with lines on an album sheet of the position of the body, paws and head of the animal) standing on its hind legs is depicted using 3 main circles located on the sheet, in this case it is necessary:
- Place circles on top of each other - 2 large ones (for the chest and pelvis) and one smaller one - for the head.
- Divide the circle-head with vertical and horizontal lines into 4 sectors (2 parts). In the lower part, focusing on the intersection point of the lines, schematically depict the bear's nose, and attach oval ears to the sides of the head.
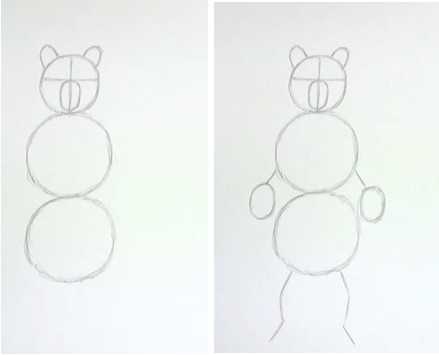
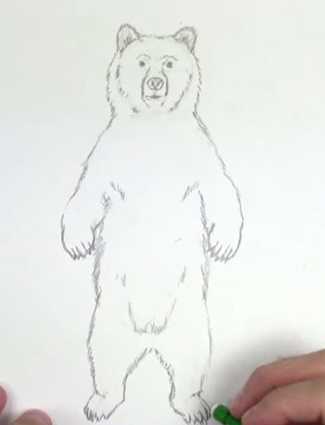
- Use clear lines and 2 circles to mark the location of the animal’s paws.
- Detail the image by drawing the bear's eyes, nose and mouth. Apply shadow accents to the drawing to draw out the animal's muzzle, and use short strokes to depict its fur.
- Connect the ovals with lines, finishing drawing the body and paws of the animal, draw claws on them and also, using hatching along the edge of the drawing, depict the fur.
Using pencils with different lead thicknesses, place shadow accents on the image, thereby making it more voluminous, and using different thicknesses of lines made with a soft pencil, cover the entire body of the bear with thick fur.
How to draw a mother bear with a cub
When drawing a she-bear with a cub, auxiliary lines are always used to clarify and correct the sketch.
To do this you should:
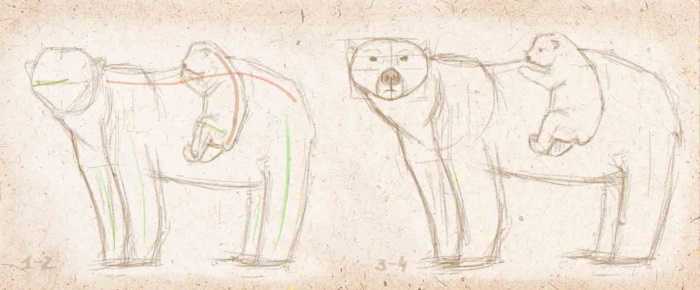
- In the middle of the sheet, using two rounded lines connected to each other perpendicularly, depict the position of the body of the she-bear and the bear cub, and using green lines added to it, depict the position of the legs.
- Around these lines, using simple geometric shapes – ovals, rectangles, circles, outline the figures of animals – the body, head and legs.
- Refine the silhouette by rounding and making the schematic lines smoother.
- Divide the oval of the muzzle into 2 parts with lines intersecting at an angle of 90° (horizontal and vertical) and mark the location of the nose, eyes and mouth.
- In each part of the oval, draw 2 more auxiliary horizontal lines, and then 2 diagonals coming out of its central point. At their intersection, place the bear's eyes, and at the bottom of the oval, depict her nose and mouth.
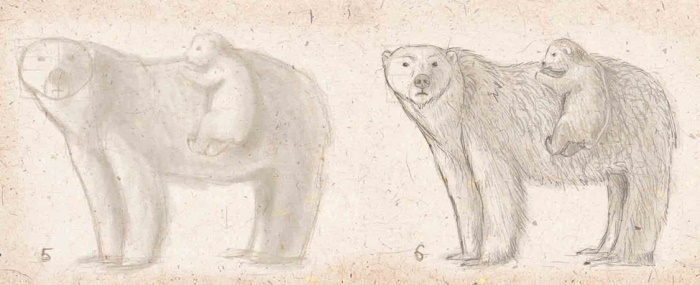
- Using small circles, draw the ears.
- Use an eraser or a kneaded eraser to remove auxiliary lines from the drawing and apply a shadow to it to give the image volume, having first determined the light source.
- Using short strokes, cover the animals' bodies with fur.
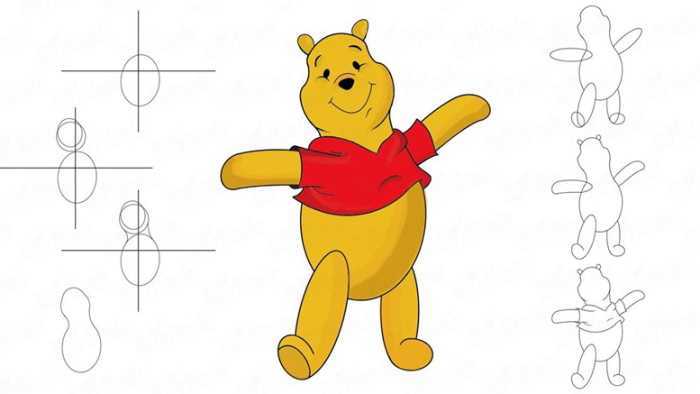
How to Draw Winnie the Pooh
The bear (a pencil drawing allows you to depict both a forest predator and a cartoon character) Winnie the Pooh is made using several wide, not quite regular ovals, which helps to accurately convey his fairly dense body structure.
In this case, you need to:
- Using a simple pencil with an H lead, draw a voluminous, wide oval on a sheet of paper and divide it in half with a horizontal line.
- Using the line as a guide, make small roundings on both sides, marking the bear cub’s head and body, and then using small elongated ovals, outline its paws and ears on the drawing.
- Detail the muzzle by adding 2 small circles for the eyes, arched eyebrows and an oval nose.
- Draw the pupils, eyebrows, nose and mouth, and finish drawing the nails on the paws.
- Add an irregular oval to the drawing for the muzzle, and then color (darken) Winnie the Pooh’s paws, ears and pupils with a simple pencil.
- Using an eraser or kneaded paper, remove all auxiliary lines from the drawing and outline its contour with a soft pencil (lead B or 2B).
Disney's Winnie-the-Pooh differs from the Soviet bear in the elongated proportions of his body with longer paws and short ears.
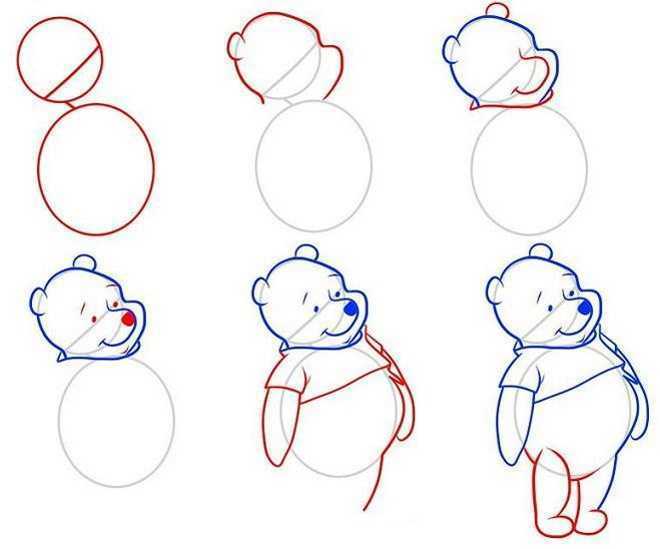
When drawing it you need to:
- First, draw two straight, cross lines in the center of the album sheet. You can do this by hand or with a ruler, and then draw a large oval-body to their center so that most of it is located at the bottom of the drawing.
- At the top, at a small distance from the body, draw a small circle for the head with a compass and add another one to it, located a little lower, more voluminous circle, which will allow you to more correctly convey the shape of the bear's muzzle with voluminous cheeks.
- Connect the head and body of the Disney character with smooth curves of two lines, and then carefully erase all the auxiliary lines with an eraser or kneaded eraser.
- Give the head the correct shape, indicating the bear's plump cheeks and draw two elongated ovals at the bottom of the body for Winnie the Pooh's lower limbs.
- Add elongated ovals for the front paws on both sides of the body, give them the correct shape, and draw 2 additional small circles for the feet to the lower paws.
- Draw 2 small ears on the top of the head and add a T-shirt to the drawing – Winnie’s everyday clothes.
- Use small strokes to outline Pooh's face, and then begin detailing his facial features - drawing his nose and a thin arc of a smile.
- The bear's eyes are depicted in the form of volumetric dots, and 2 small curved arcs are used for the eyebrows.
- Use an eraser or a kneaded eraser to erase all the auxiliary lines from the drawing and color the bear with a pencil or a marker of a rich yellow color. A red marker will work for a T-shirt. The nose and eyes of the cartoon character should remain black.
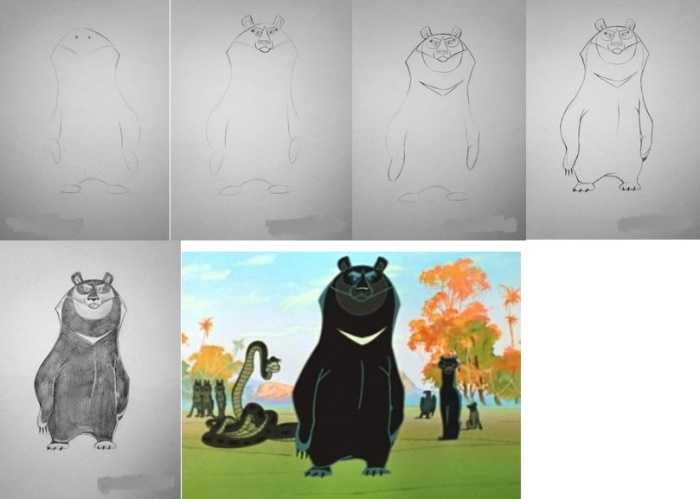
How to draw Baloo the bear from Mowgli
Baloo the Bear is the hero of the animated film Mowgli, the best friend and mentor of the main character. It is done on a sheet of paper with a simple pencil and gray markers or pencils.
When drawing you also need to:
- Draw an oval-shaped head and a large, elongated body that widens towards the bottom on a sheet of paper.
- Correct the contours of the drawing and add Baloo's legs with one curving line.
- Draw massive, long paws and a white semicircle for the bear's belly using arched lines.
- At the top of the head, draw small oval ears and detail the facial features - using a rounded shape to depict the mouth, a small oval nose divided by a horizontal line and small round eyes.
- Draw fingers and claws on the paws and hair on the head.
- Erase all the auxiliary details from the drawing with an eraser or a kneaded eraser, outline its contour with a soft pencil (with a B or 2B lead) and color Baloo the bear with a gray marker or colored pencil.
When drawing the bear Baloo from the Soviet cartoon "Mowgli" you need to:
- First, sketch out his body on a piece of paper, and then draw his face in detail.
- Add a powerful neck to the image of the character and draw his paws with claws.
- Remove all auxiliary lines from the sheet with an eraser, outline the contours of the drawing with a soft pencil (B or 2B) and use it to shade it black.
- If desired, the drawing can be colored.
How to draw a teddy bear
A bear (a pencil drawing that small children can make together with their parents or caregivers) can be depicted on paper as a favorite plush toy.
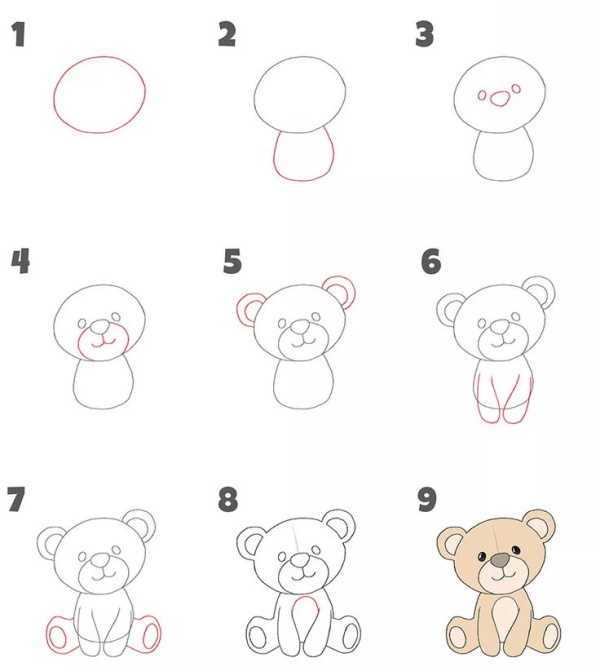
To do this you need:
- First, draw an oval on a piece of paper for the body, and above it, draw a circle for the bear’s head and draw curved vertical lines in them.
- At the bottom of the circle-head, place a small oval - the muzzle, and attach elongated ovals for the front and back legs to the body on both sides.
- Draw round ears on the head, and add slightly elongated, irregularly shaped circles to the lower limbs for the feet.
- Place small circles inside the ears, front paws and nose, ovals on the back paws and use black dots to mark the bear’s eyes.
- Using an eraser, remove all auxiliary elements from the drawing, detail the muzzle - using short strokes to depict the brow ridges and nose, and rounded lines for the mouth.
- Trace the outline of the drawing with a soft black pencil (lead B and 2B) and color it with pencils.
How to draw cuddly bear Kesha
Even a small child can easily draw Be-be-bear Kesha, for this you will need:
- Place a large square for the head on a sheet of paper and round off its sharp corners.
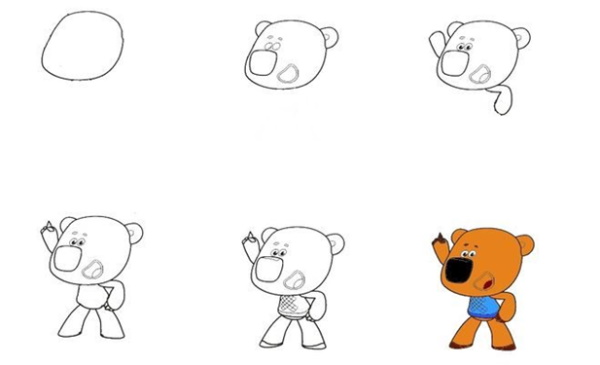
- Draw ears in the shape of 2 semicircles, and inside, using the same square, but smaller in size, mark Kesha’s nose.
- Draw round eyes above the nose, making sure to include a pupil, brow ridges above the eyes, and a mouth resembling an elongated semicircle below the nose.
- Draw 2 expanding lines for the body from the head down and connect them with an arc. On the body, mark the T-shirt by drawing 2 parallel horizontal lines.
- Draw rectangular forearms, smoothly turning into ovals of the hands, paws, add claws. The hind legs are depicted in the form of elongated rectangles and are supplemented with feet made in the form of wavy lines.
- Draw a cross on the chest made of two ovals and draw lines around it.
 |  |
- Color the bee-bee bear light brown, his T-shirt blue. The nose, feet and inner parts of the ears - with a dark brown pencil or marker.
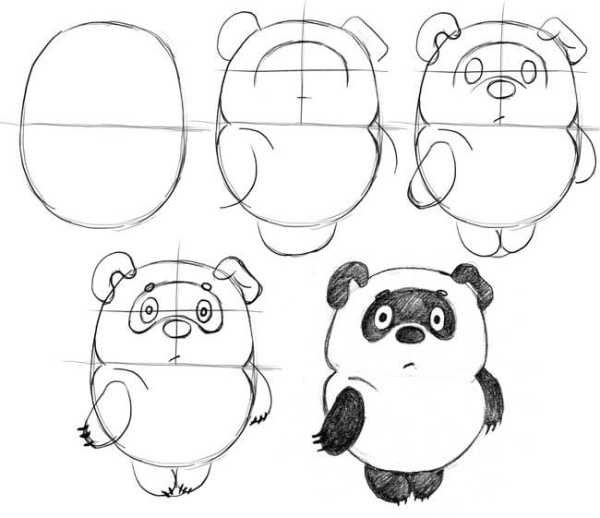
How to Draw Kung Fu Panda
The bear (the pencil drawing is created by alternating different densities of pencil lead) from the animated film "Kung Fu Panda" Po has a round head, an elongated body and paws with fingers, as well as an original black and white coloring.
Work on it begins with determining the character’s location on the sheet.
In this case, it is necessary:
- At the top of the sheet, draw a circle and divide it with two intersecting horizontal and vertical lines.
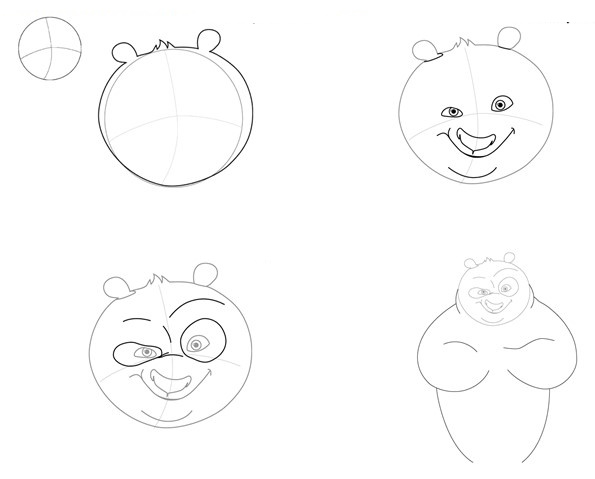
- Draw the outline of the head with ears and hair on the head. Under the ears, draw the lines necessary to separate the color of Kung Fu Panda and draw his eyes, nose, ears and chin.
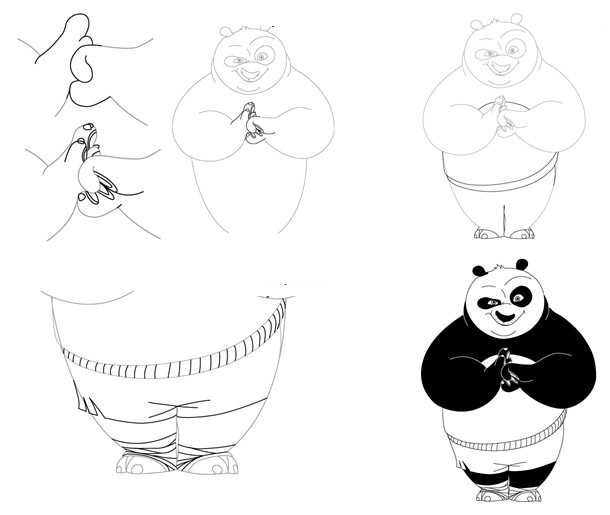
- Draw the borders of the black spots around the eyes, and then draw the line of the body and paws with smooth lines.
- First draw the outline of the toes on the paws, and then add claws and pads.
- Draw a curved line above the arms, separating the panda's coloring line, and then draw the belt and paws.
- On Kung Fu Panda's legs, draw elastic bandages and shorts using additional lines.
- Use an eraser or a kneaded eraser to remove all auxiliary lines from the drawing, outline its contours with a soft pencil (B or 2B) and color in Poe’s ears, circles under the eyes, upper body and legs with a dark marker.
Tips for Beginners
For beginners taking their first steps in the art of drawing, professionals recommend:
- It is essential to use pencils of different hardness when drawing.
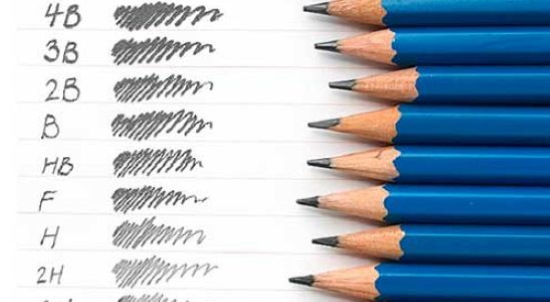
In this case, it is recommended to work on the sketch using a hard H pencil, and to outline the drawing and do shading with a softer B pencil. For precise drawing of small elements, you can also use HB mechanical pencils.
- When working with a pencil, hold it with your hand as close to the sharpened side as possible, which will allow you to control the pressure and make softer and more precise strokes.
- Constantly experiment, testing different shading methods and using different types of lines.
- When drawing, be sure to place a clean sheet of paper under your hand with a pencil, which will prevent you from smudging or erasing the lines you have already drawn.
When doing shading, you also need to focus on which side it was started from, and keep your hand on the side opposite from the work.
- After using an eraser or kneaded paper, be sure to carefully brush off any remaining small particles from the sheet of paper using a wide brush to avoid leaving dirty spots.
The bear is a formidable forest dweller with a massive build, strong large paws and thick shaggy fur, and is also a favorite character of children's cartoons.
When drawing it, it is of great importance to correctly observe the proportions of the body, while the basis of the drawing will invariably be simple geometric shapes drawn in pencil, carefully complemented by details that clarify the contour and shading used to depict the fur.
Video about drawing
Bear - drawing: