There are many decorative stitches and embroidery techniques. Most often, they are easier to embroider than cross stitch. Simple decorative stitches can be used for embroidery on fabric, not canvas. For example, you can decorate a tablecloth or jeans. Not only an experienced embroiderer, but also a beginner needlewoman can handle decorative stitches. The main feature of decorative embroidery is the abundance of seams and stitches.
Types of decorative seams
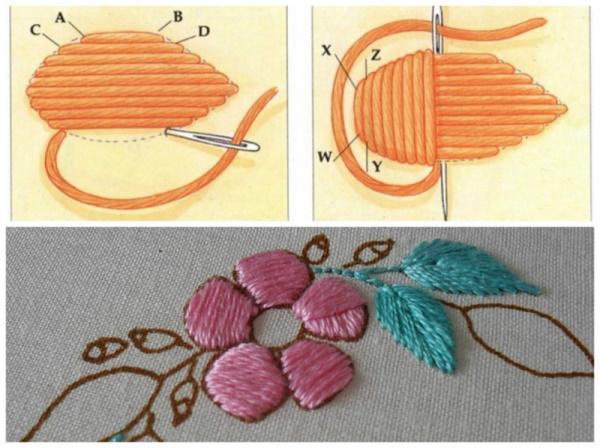
When making decorative stitches, the needle can move in different directions.
There are 4 main directions:
- The end of the needle points forward.
- The needle is directed backwards.
- The end of the tool points upward.
- The needle is pulled out of the fabric in a downward direction.
Running stitch, one of the simplest methods of decoration, can be used to divide embroidery into borders, to highlight the contours of embroidery, to stitch patterns on blouses or bags.
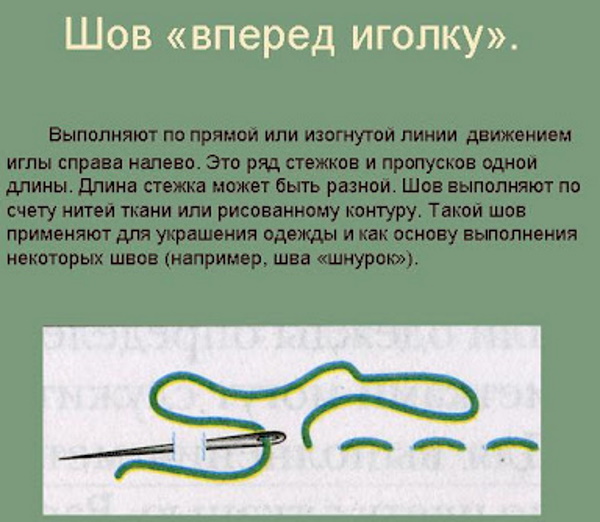
It is performed along pre-marked embroidery lines, threading the needle from right to left. The movement is always forward, and you can pick up 1, 2 or 3 stitches at a time. When stitching a line, make sure that the stitches are the same length. The back stitch is often used to highlight borders in cross stitch.
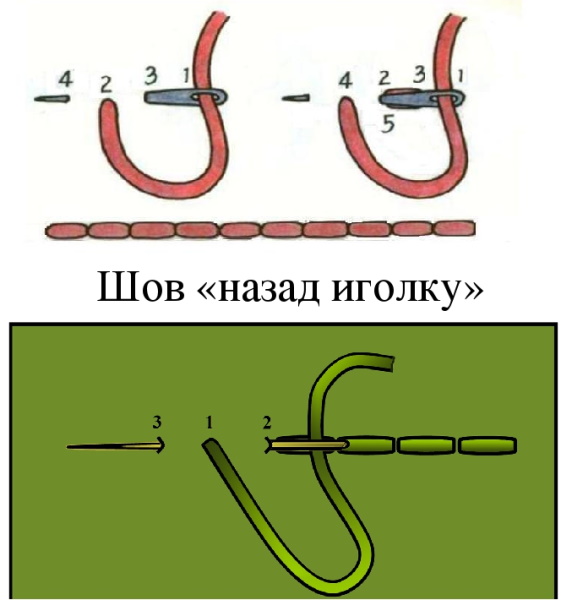
In addition, it has the names backstitch and line:
- Insert the needle to the front side, pierce the product with the needle to the right of the place of the 1st puncture of the fabric. The length of the stitch is the distance between the 2 punctures.
- Pull the needle through the back and pull it through to the front of the material and bring it out at the same distance.
- To sew new stitches, pass the needle from left to right and pierce the fabric where 1 stitch was finished.
- Pass the needle through to the back and pull out 2 stitches to the left on the front side.
- Insert the tool into the puncture that completed the last stitch.
Decorative stitches can be used to embroider floral patterns on clothing or interior items. By combining threads of different colors, you can decorate items with tree branches, leaves, seaweed, and ferns. The stitch, which looks like a fern, is used for these purposes. It got its name due to its appearance. The stitch consists of 3 parts that come from 1 puncture in the fabric. 2 of them are diagonal stitches. 1 stitch goes straight.
Other types:
- Decorative stitches for embroidery, in particular, the split stitch is necessary to highlight the contours of the image. The stitch must be embroidered with a thread in 2 folds. The line must begin with a stitch forward needle, then the needle should be returned to the front part at the end of the stitch. In this way, the needle splits the thread into 2 halves.
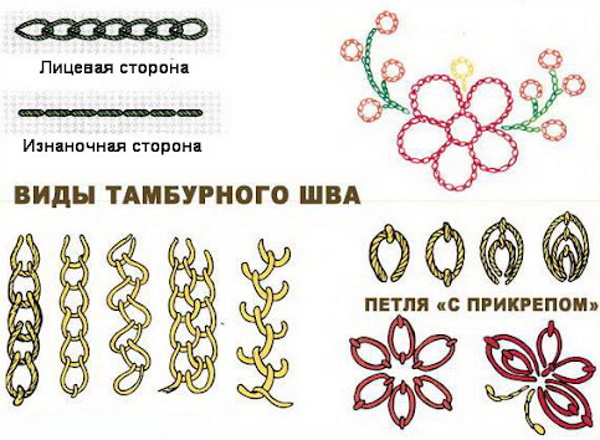
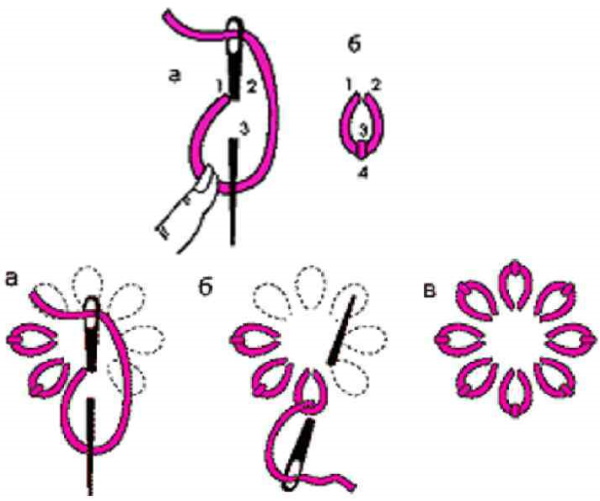
- The chain stitch is also a decorative stitch, which looks like a chain. Using a stitch similar to a chain, you can secure the edges of a product, embroider along the outline of a pattern, or create a motif in openwork embroidery. To work, you need to mark 3 points on the fabric. Bring the thread out at point 1 and lay it out in the form of a small loop. Then stick the needle into point 2, which is located a few mm from puncture 1. The loop should not be completely tightened; it should be supported with a finger. Bringing the needle out at point 3, you need to tighten the thread. All the following components of the chain must be done in the same way. By changing the direction of the chain of threads, you can make a small stitch from point 1 to puncture 2. After this, you should bring the thread to the front side at point 3 and pass the needle under the previously made stitch. The working thread must be brought out on the back side not far from point 3.
- Another variation of the chain stitch is a loop with an attachment. The principle of its execution is that the fabric is pierced with a needle not in the same place from which it came out initially. It should enter the closest point to the 1st puncture. The needle comes out on the front side, but not in the center of the loop, but at the top of the arc. In the same place, this loop clings to the fabric. A loop with an attachment can be used to create flowers - daisies or cornflowers.
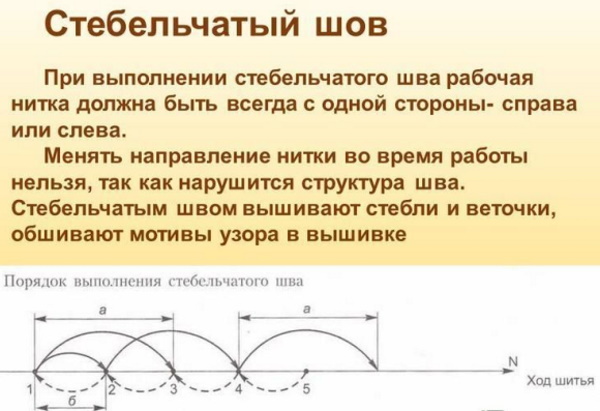
- For satin stitch embroidery, a stem stitch is used. It is several horizontally and closely embroidered stitches. The stitches are used to decorate the borders of the pattern. It can also be used to highlight small details on the embroidered picture. The stitch is embroidered from left to right. First, you need to secure the thread on the back side, then sew 1 stitch to the right. On the back side, you should return to the left and pull out on the face in the middle of 1 stitch. This step begins the 2nd stitch.
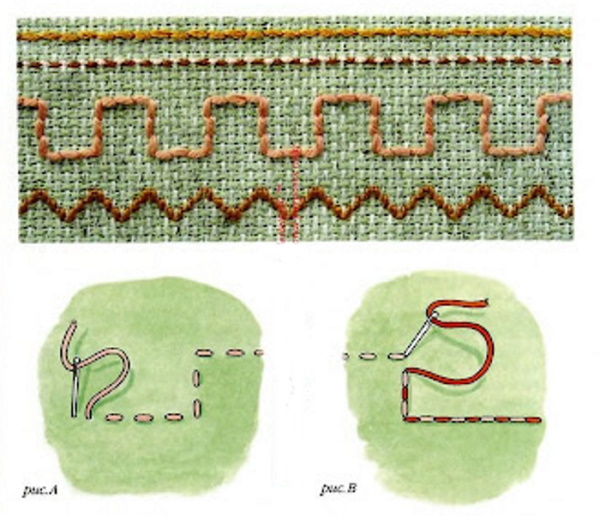
- Decorative stitches for embroidery are often made simply, for example, the Holbein stitch is a line of stitches forward with a needle. Its difference is that after stitching the line, the needle should be returned back, filling the empty spaces in the line of stitches. To fill the gaps in the line, you can turn the fabric over and stitch in the opposite direction to the very first stitch.
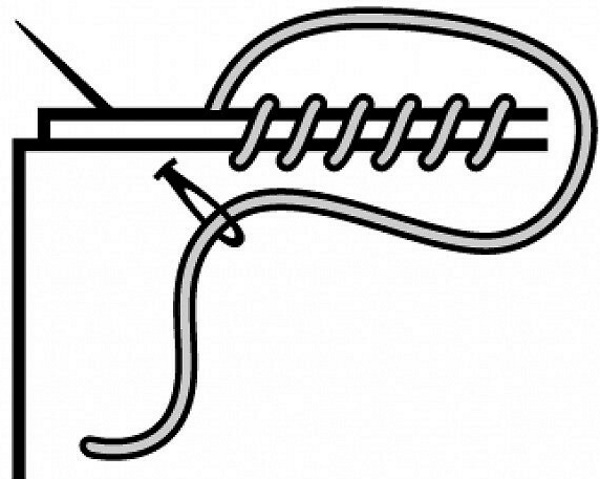
- The overcast stitch, overcast stitch can be used to create patterns, protect the edge of the product from fraying. The direction of the seam is from left to right. The thread should be in front of the needle, forming a loop. You should pull the needle with the thread from the wrong side to the front side. The thread should be lowered down and folded into a loop. When making a stitch on the wrong side, the thread should be placed under the tip of the needle.
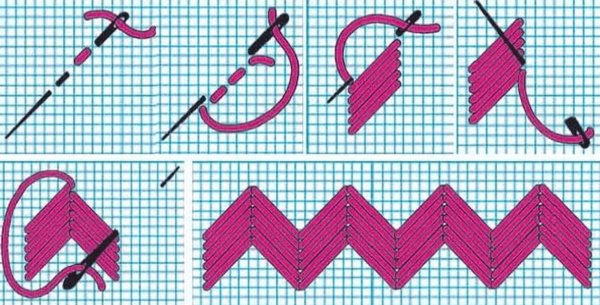
- Using the herringbone stitch, you can create plant motifs on the product. After securing the thread, you need to pierce the fabric with a needle and pull it from the inside to the front side. The working thread should be held under the end of the needle. As a result, 1 side of the seam is formed. The 2nd stitch is done in the same way, but on the opposite side of the seam.
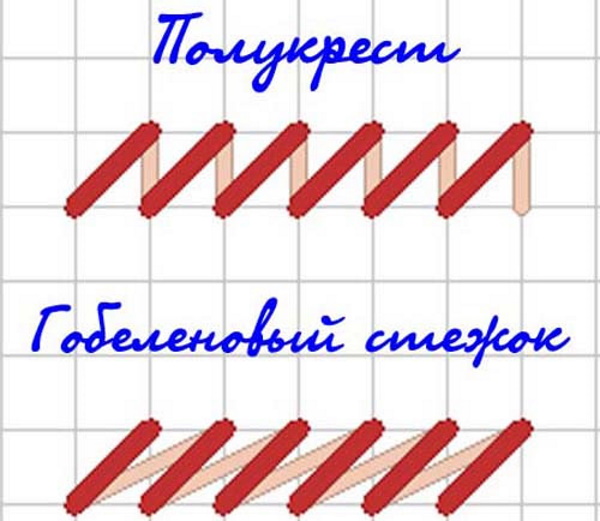
- The half cross stitch is part of a regular cross stitch. The stitch should start from the left and move to the right along the edge of the pattern. Then the movement is from right to left. A simple cross stitch is a stitch that is formed by crossing 2 stitches. It is most often used for embroidery on canvas according to an already marked pattern.
- The oblique stitch is used to fill patterns whose shape does not allow for equal stitches. At the beginning, stitches are basted forward with the needle. Then the entire surface of the pattern should be filled with small oblique stitches. They should be made from left to right.
- The polka dot stitch has a convex appearance because it is made in 2 layers. The borders of the pattern are basted with a forward stitch, and then a double-sided satin stitch is embroidered according to the shape of the seam.
- The French knot stitch is used for decorative purposes only. It has a beautiful appearance and can be used to make embroidery more prominent. The stitch can be used to add volume to the center of the flower.
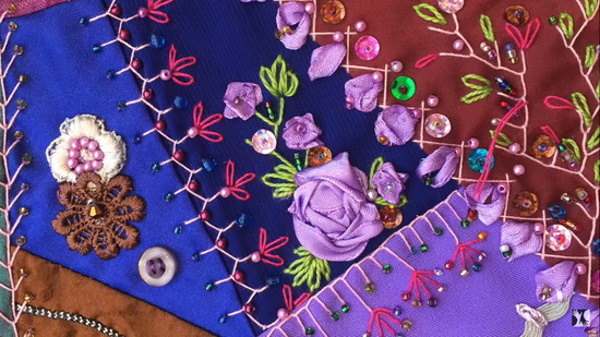
Crazy Quilt
Decorative stitches for crazy quilt embroidery are used to decorate fabric fragments and to secure the pieces together more securely. First, the patchwork blocks are assembled, then embroidery is done using multi-colored threads or yarn. Ribbons, beads, sequins, and any other decorative elements can be added if desired. It is important to remember that when making decorative stitches, you should not make knots in the thread.
To secure it, you need to thread the needle eye folded in half. 1 puncture of the fabric is made from the front side of the fabric to the back. In this case, without pulling the thread completely, you should bring the needle out at another point, closest to 1 puncture. You need to pull the needle through and thread it into the loop at the end of the thread. In this way, you can secure the thread without making knots in the fabric.
The scallop stitch can be used to decorate items made using the crazy quilt technique. The stitch should be made along the edge of the piece; it connects the piece to the background. However, this stitch can also be made not only along the edge, but also directly on the item itself. It can be used to create straight and wavy lines. It is also used to create plant and abstract motifs. To highlight the stitch more, you can choose threads of different colors.
You can do both a double and a triple scalloped seam. The principle of doing a double seam is that the needle must enter the same point on the material 2 times. A triple seam is done according to the same scheme, but the point on the fabric must be pierced not 2, but 3 times.
Small circular motifs are also made with a scalloped stitch. The stitch can be double or triple. When starting work, it is necessary to secure the thread at point 1. It should be held with a finger, directing it downwards. Having drawn a diagonal passing through points 2 and 3, pierce the fabric from top to bottom. When making a stitch, it is important to ensure that the thread is stretched evenly.
A variation of the scalloped stitch is the scalloped stitch with a bridge. The most suitable direction of execution is from left to right. 1 stitch is performed in the same way as for a regular scalloped stitch. After this, you should make a loop over the stitch and puncture it at point 4, exit at point 5. The needle must get into the loop, and pull the thread so that a loop-bridge is formed at the bottom of the stitch. To do this, you need to direct the needle from top to bottom.
The tambour stitch used in embroidery can also be used in the crazy quilt technique. The distance between the punctures in the seam can be increased, which will allow you to get a new type of seam - an open tambour stitch. It is done from top to bottom. The needle must be directed diagonally from the upper right corner to the lower left corner. It is necessary to pay attention to the fact that each puncture of the fabric at point 4 is inside the loop formed by the working thread.
To get a dense and convex ball, you can reduce the distance between points 1 and 3.
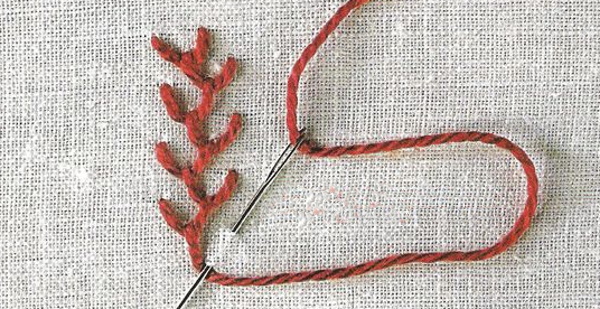
The loop stitch looks like a branch with leaves. It is used to create plant motifs on the canvas. The thread on the fabric should be secured at point 1, then punctured at point 2 and returned to point 3 so that the working thread is pulled under the needle.
The needle with the working thread should be pulled to the end. These actions help to form a leaf. Measure a small distance down and make punctures at points 4 and 5, while directing the needle upward diagonally. The needle should also be pulled to the end. The actions for making the next leaf are similar to the steps by which leaf 1 was stitched. They must be done in the opposite direction.
Satin stitch style
In satin stitch embroidery, all the previously mentioned stitches can be used. To make the transition of colors in embroidery smoother, to separate the shadow, shades, you can use tone satin stitch or artistic color satin stitch. Each row in embroidery should be made of short and long stitches, alternating them.
To add volume to the design, you can use the satin stitch technique with a layer. First, a layer of simple satin stitch with a layer is laid, and then these stitches should be covered with the same layer. It is important for beginner needlewomen to remember some rules.
Following them will make the embroidery more neat:
- To hide the pencil lines, you should make the outlines of the pattern with a small indent. This will help hide the strokes.
- The base should not be visible from under the embroidery. To achieve this, the stitches should be placed as close to each other as possible.
- To convey the effect of shadow on embroidery, you can also use stitches directed in different directions.
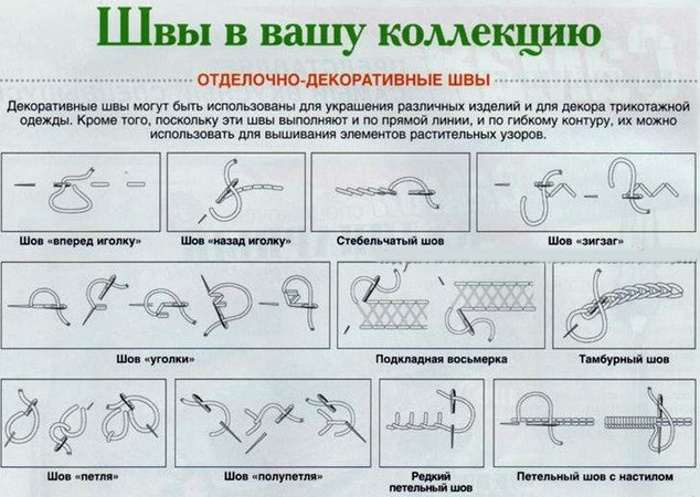
Decorative stitches in embroidery can be used for various purposes. They can be schematically conveyed in the table. There are many decorative stitches for embroidery, with the help of which you can improve the appearance of the finished product. A beginner embroiderer does not need to know about them all, already with the help of the simplest decorative stitches (for example, a back stitch) you can create beautiful and unusual patterns on a sweater or a bag.
Video about decorative stitches for embroidery
What types of decorative stitches are there for embroidery: