Modeling crafts from plasticine may be of interest not only to children but also to adults. Plasticine is one of those materials that can be used to create a beautiful sculpture regardless of skills. Having some experience working with plasticine, you can create a variety of products of varying levels of complexity and detail.
How to choose plasticine?
In modeling, success depends directly on the quality of the material that will be used in the process. Some companies produce good material that will have the necessary properties, for example, not stick to your hands, while others, on the contrary, may be too soft or collect dirt.
In order not to make a mistake with your choice, you need to:
- It is worth paying attention to the manufacturer of the modeling material. Domestic and foreign material may cost differently, but the quality will be appropriate.
- It is worth checking the composition of plasticine. It should not contain synthetic additives. The impurities in plasticine should be from natural products.
- Plasticine made from quality products should be easy to wash off your hands, regardless of the presence of soap.
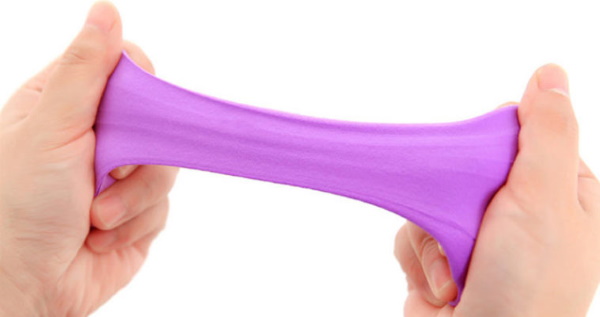
- Beautiful crafts from plasticine can only come from the material that will easily and quickly warm up in the hands. It should also be very flexible and pliable to deformation.
- It is necessary to pay attention to the color of plasticine. It is not recommended to use plasticine with acid colors. It is preferable to choose a material for modeling with natural but beautiful shades. Thus, the product will have an attractive appearance. In addition, natural shades will not remain on your hands, which cannot be said about bright colors.
Tools for plasticine crafts
Since modeling is a painstaking task, specialized tools come to the aid of fingers, which will help in the production of small details, or convey the necessary texture. Certain tools will not only help diversify the process, but also help keep your hands clean throughout the work.
- Modeling board. It will come in handy if the table may be dirty. The modeling board has a special flat surface on which it is most convenient to knead the plasticine, without leaving reliefs on the material.
- Rolling pin. This item can be replaced with any other round or oval device that is convenient for rolling out plasticine. Thanks to the rolling pin, the plasticine layer will be thinner, which means the finished product will look more aesthetically pleasing or have more details.
- Knife. In order to conveniently cut the plasticine in the amount required.
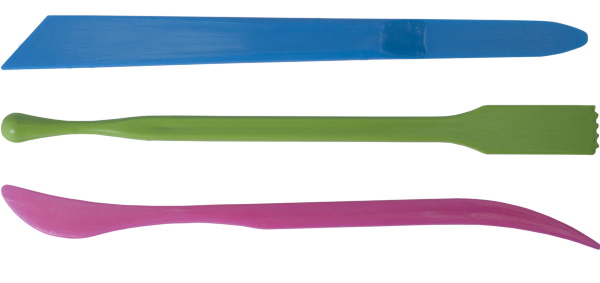
It is easier to make beautiful crafts from plasticine if you have all the necessary tools at hand. - Stacks. They are convenient for transferring texture to the finished craft. Here, everything depends on your imagination: if you use stacks of different shapes correctly, then truly interesting patterns and reliefs can appear on the finished form.
- Various unnecessary "garbage" can be useful in the process of sculpting. For example, foil will give an interesting texture, and beads or rhinestones can be used to decorate the finished figurine. The main thing is to carefully examine all unnecessary tools that may be useful for creativity.
Dolphin
What you will need to make a dolphin figurine:
- Sculpting tools. All necessary inventory is provided above.
- Blue and gray piece of plasticine. In order to get the most realistic shade, it is recommended to mix 2 colors.
- Black and white plasticine for eyes.
| Stage | Description |
| Color mixing | A medium-sized ball is rolled out of grey and blue. |
| Form creation | It is necessary to roll an oval, which will be narrowed on one side - this will be the dolphin's nose, and on the other side - more rounded, where the animal's fin will be attached. On the dolphin's nose you need to attach 2 small black circles - these are the dolphin's eyes. |
| Fins | The process of making fins is the easiest. They mold 3 triangles of the same size, 2 of which should be located on the sides, and the 3rd on the back of the waterfowl. |
| Tail | Using the example of fins, the tail is molded, but double. That is, its tail should consist of 2 triangles that are directed in opposite directions. |
| Creating relief | A stack or a regular toothpick will do for this. Several lines are drawn along the tail according to the shape. For more detail, you can make small nostrils on the dolphin's nose. |

A beautiful plasticine craft in the shape of a dolphin is ready.
Airplane
A beautiful airplane made of plasticine will serve as an excellent craft.
To make it you will need:
- 2 pieces of plasticine. To make the plane look more colorful, you can take contrasting tones that will go well with each other. For example, blue and red. The body of the aircraft will be made in a light sky shade, and the details will be red.
- Additional stacks. To give the finished plane an interesting texture.
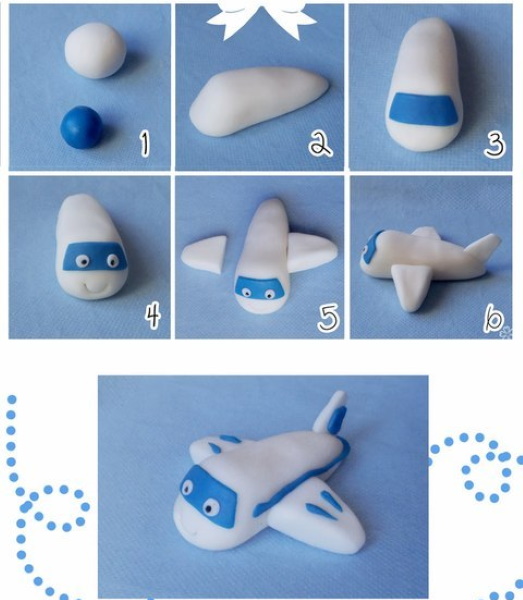
The sculpting process:
- Roll a ball of a certain color. The amount of plasticine should depend on the size of the desired figure, since this will be the basis of the future product.
- The ball must be rolled into an oblong oval, tapered at one end. This is the tail of the plane.
- We press the wide edge of the form with a stack, forming a recess for the window and the nose of the plane.
- From another color, you need to mold 3 small triangles, which will be the tail of the plane. 2 of them need to be attached to the sides of the tail, and 1 piece on top, like on a real plane.
- From the remaining plasticine, it is necessary to make 2 triangular wings, which will be 2 times larger than the parts made for the tail of the unit. They are attached to the side in the middle of the plane.
- Using plasticine, make several small circles, attaching them just above the wings. They will serve as the airplane's portholes. Also, don't forget about the front window, which should be a little bigger.
- You can use a stack to draw some details on the plane. For example, passengers in the cabin, who are visible through the window, or the name of the plane on its body.
Steamship
A beautiful plasticine craft in the form of a steamship or other seafaring vessel, which can decorate the desktop and diversify the space around, will turn out if you follow the detailed instructions. A steamship is a difficult figure, for the modeling of which certain skills are required.
What is needed to make a sailing vessel:
- Plasticine of 3 different colors. For example, brown (for the base), white (for the sides and details) and red (for the decorative lifebuoy).
- Stacks for cutting relief.
The sculpting process:
- You need to start with the bottom of the future vessel. To make it, you need to roll out a piece of plasticine. After heating the material and turning it into an oblong shape, one edge is folded upwards and the other is narrowed. The bottom of the steamer is ready.
- To mold the sides, take another color, preferably matching the bottom. This part of the plasticine is divided into 4 equal parts and rolled out, forming a kind of sausages, the length of which should correspond to the size of the bottom. At the edges, it is necessary to attach 2 rolled pieces, which will be the sides of the steamer.
- From plasticine of different colors, it is necessary to mold 2 parts: one of them is the captain's cabin, and the other is the steamship's pipe. The captain's cabin should be in the form of a square, and the pipe should be higher and thinner. 2 objects are placed inside the product.
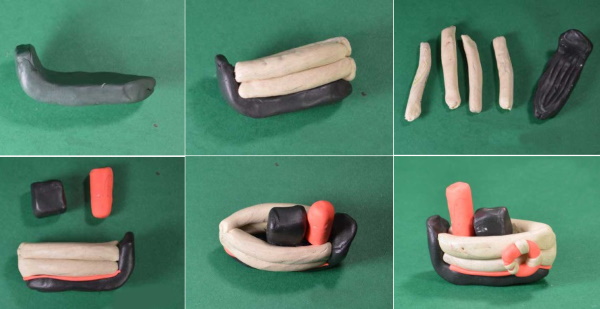
- A lifebuoy is an important attribute of any seagoing vessel. In order for the circle to seem more realistic, the most standard colors are taken - red and white. A small ring of the appropriate size is rolled out of red, and stripes on the circle for drowning people are made of white.
The steamboat is ready. On the same basis, you can also make a sailing ship and a boat, which will complement the marine theme well.
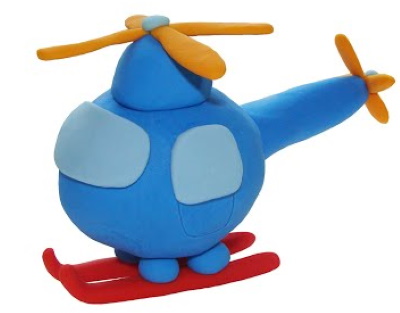
Helicopter
A beautiful plasticine craft in the form of a realistic helicopter will be the result of 2 hours of work. The helicopter blades will be able to imitate flight thanks to a simple mechanism made from improvised means.
To make it you will need:
- Plasticine of any color. It is recommended to take a lot of plasticine, since the helicopter will be quite voluminous.
- Pen. For decorating the tail.
- A few toothpicks for the blade mechanism.
- Pen tip.
- Metal rod.
- Glue.
The sculpting process:
- You need to start with the tail. For its base, you need a handle without a rod inside. The handle needs to be completely covered with plasticine. For greater realism, the tail of the helicopter should be tapered. At the thin end of the tail, you need to place a right-angled triangle made of plasticine, which will be the basis for the rear blade. At its end, make a small hole using a toothpick. One third of the toothpick itself will be the mechanism. From one edge, it is necessary to seal it with material so that the mechanism holds. The same is repeated in the middle of the toothpick. Thin blades are attached to the other edge, which are made by rolling out plasticine and forming flat parts in the shape of an elongated oval.
- Next comes the manufacture of the cabin, where the pilot is located. It should be slightly smaller in size than the tail. 5 parts are rolled out of the material. 2 of them are the side walls, 2 are the roof and floor, and the last is the front part. The side walls should have a trapezoid shape. The floor should hold the 2 walls together. The front part should be a curved shape with a recess in the front. The bend will be intended for the windows. It is recommended to fasten all the parts with hot glue for greater density.
- The base is ready. It remains to make the main blades. On the roof of the cabin there should be a small round bulge, inside which the tip of the pen is attached with the wide side down. A metal rod is inserted into it, on which the blades are located. For a more reliable fastening, they are fixed with hot glue. The support for the helicopter will be 2 toothpicks, which must first be broken in half. Each 2 halves are attached to the bottom of the helicopter, and 2 rolled pieces of plasticine are attached to them from below using hot glue.
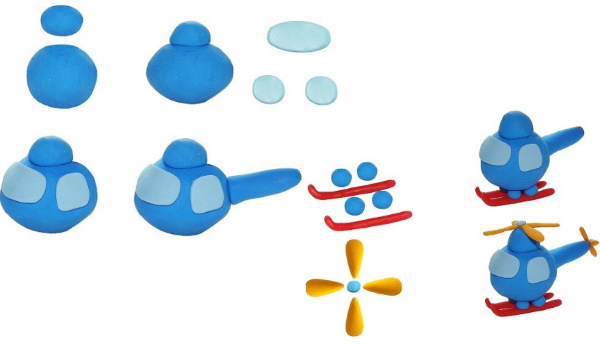
Using a stack, windows are cut out on the front part, the relief of the doors and other details that will give the helicopter a natural look.
Car
The simplest models include a passenger car. The sculptural material should be of 2 colors, of which the car will consist: one of them will be the color of the car itself, the other is white, which will be needed for the headlights, tires and number. A rectangle is rolled out of the first color, its thickness should depend on the size of the desired model.
The sides and future headlights are formed, they look different on each brand of car. The top of the car is formed from a smaller piece of plasticine of the same color. Here, marks are made for the glass, the upper part of the doors and the roof of the car. Then, using a stack, 2 semicircular connectors for the tires are cut out.
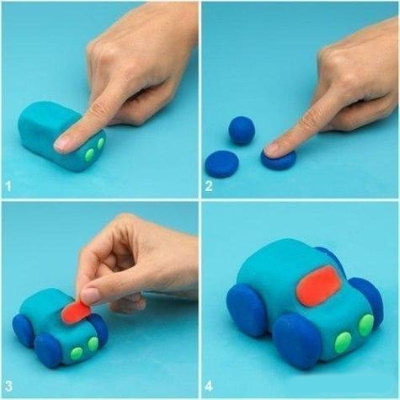
The tires are made as follows: the tire base is made from black plasticine, and the disks are made from white, on which you can make a relief with a stack or a toothpick. The same manipulations are carried out with the headlights. For them, you can use not only white, but also yellow, orange or even red material.
After selecting the shape of the glass, 2 identical parts are rolled out, which will serve as side glasses. It is also necessary to make the windshield and rear window white or light blue.
The final stage is the car numbers. To do this, cut out 2 rectangular plates on which the numbers will be applied. To make the numbers and letters look more realistic, use black gouache and a thin brush, drawing each symbol.
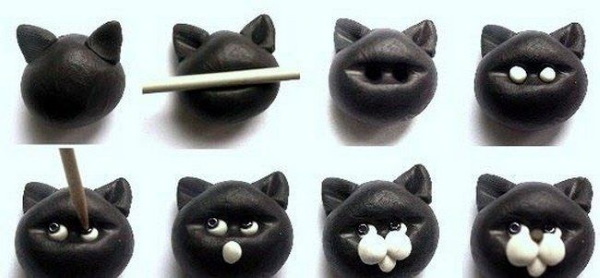
Cat
One of the most popular animals is a cat. There are no difficulties in its modeling either. In order to model a cat in a sitting position, you will only need the main color of the body, for example, black and white, as well as pink for the ears and green for the eyes of the animal. Modeling begins with the body. For its basis, a medium-sized piece of plasticine is rolled out in the shape of a pear.
The narrow part should smoothly transition into a graceful cat neck. It is necessary to remember that cats have an arched back when they sit, but do not exaggerate with this. Roll out a flat part of white plasticine, which should be attached to the stomach of a sitting cat. On the chest, white fur can be detailed with a stack or add fur using the plasticine itself.

The front paws of the feline are located slightly above the chest. It is necessary to roll out 2 identical black sausages, which are used to expand upwards. The thicker part is attached to a level above the white part of the chest. For the paws, 2 flattened balls are also separately rolled out, which will serve as paw pads. Fingers are cut out on them with a stack.
The hind legs are rolled out of 2 semi-volume ovals, which are attached at the bottom. White paw pads are also attached to them.
For the head, you need to roll out a black ball. On the sides, mold triangles that will be the ears. Even smaller pink triangles are attached inside. A small curved oval is made from white plasticine, which will play the role of the cat's mouth. A mouth line is cut out on it with a stack and a small pink nose is attached.
From white plasticine you need to make the whites of the eyes. A little less - the iris of the eye of green color, and then the black pupil. For more detail, you can make a small glare located between the iris and the pupil.
The final parts are the tail and whiskers. You need to roll out a long black strip and attach a little white plasticine to the end. The tail can be twisted in any position, depending on your imagination. For the whiskers, you can use regular thin wire or roll out thin parts from white or gray plasticine.
Eagle
Necessary:
- Glass or toothpick.
- Black, white and yellow plasticine.
Process:
- From a black and white piece of plasticine, you need to roll 2 ovals. The black one should be larger, this will be the bird's body. The white oval should be made smaller for the eagle's neck and head. Connect the 2 parts together.
- Three rounded wide strips are attached to the end of the body, which are the bird's tail feathers. A relief of real feathers is created on them with a stack.
- On the white part of the head, eyes are attached - 2 small black circles. Above them are overhanging menacing eyebrows made of white material. Between the eyes there should be a curved beak of yellow color.
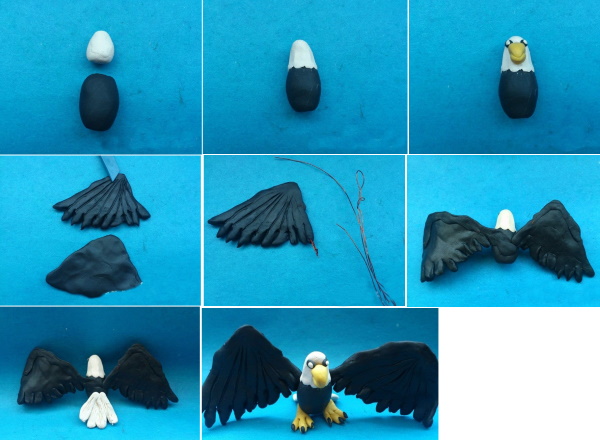
- The wings should be larger in size than the eagle. For the initial shape, you need to roll two figures that look like a right triangle with rounded corners. From the bottom, using a stack, cut out the tips of the feathers. The ends of the feathers may look lighter than the base, so it is recommended to mix the main color with white. The stack cuts out the shape of the feathers and gives them relief. There are many variations of their colors: black, brown, gray, sometimes even a red tint is added for greater contrast.
- The beginning of the eagle's legs are 2 small black paws. Then the claws are made, which are much larger than the paws. 3 large claws should be located in front, and one smaller one - behind.
Butterfly
For such a colorful insect as a butterfly, completely different shades can be suitable: from blue to red. Therefore, how bright the butterfly will be depends only on personal imagination. To decorate the wings, you can use rhinestones or beads.
The first step is to make the body of the insect. It is just a long strip with a tapered end. Several cuts are made along the width of the butterfly's body with a stack, which give it greater detail and realism. The antennae consist of 2 twisted thin strips that are located on the top of the body. Small beads can be used as eyes.
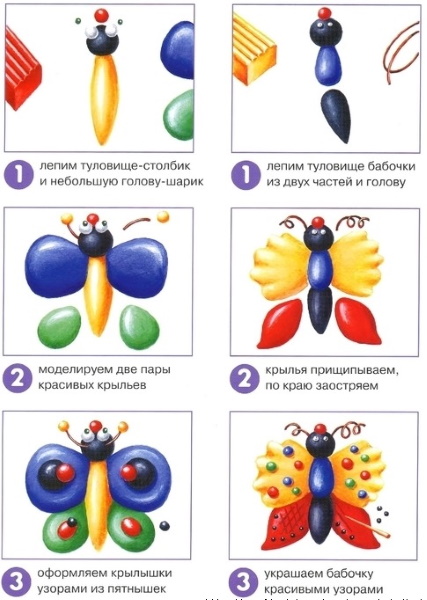
Wings can be of different sizes, with or without patterns, have some texture or not. They can also be cut with a stack, decorated with rhinestones and more. Here you can completely give free rein to your imagination.
Rose
The most popular flower is the rose. It can be made from different materials, and also molded from plasticine without any difficulties. It is recommended to prepare all the petals in advance. They should be both large and small. You need to start creating the bud with the smallest details, alternately connecting them in a circle.
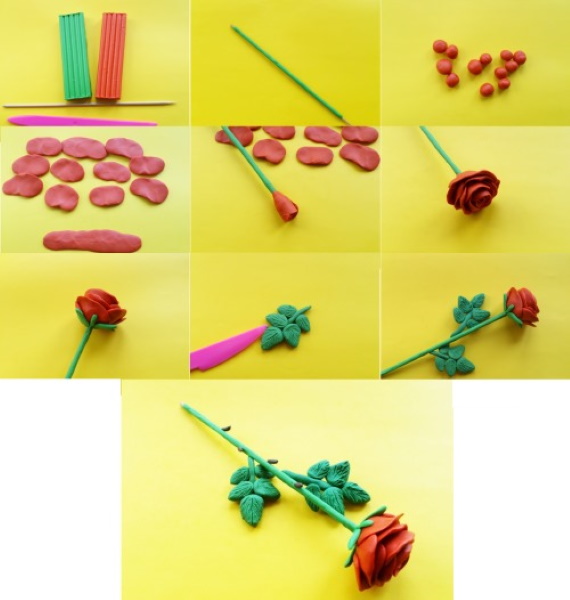
When it comes to the larger petals, you can curve them slightly to give the flower a bit of realism. The green stem of the rose is slightly thicker at the base than at the end. Several medium-sized green leaves should be placed under the bud, slightly protruding from the flower.
The rose has small leaves on the stem that bend slightly. You can make a relief of membranes on the leaves using a stack. Don't forget about the thorns. To get the color of natural thorns, mix green and brown shades. A beautiful craft of a rose made of plasticine is ready.
Video about modeling from plasticine
Plasticine for children, learning to sculpt animals:
I liked the rose the most, it's beautiful. It looks real. I have a question. How do you sculpt it? You have golden hands, you are great.
I couldn't find any good advice on modeling, but I came across a site where the author also shares secrets, and not only on modeling, but on creativity in general.