A great opportunity to express your creative potential is with the help of light plasticine. The structure of the airy material allows you to mold any figures from it, and after a few minutes it hardens, leaving the craft in a finished form.
That is why this material is considered one of the best for those who love modeling. After all, even when the finished product has dried, it can always be soaked in water and the plasticine returned to its original position.
Features of working with the material
Light plasticine figures attract attention, look aesthetically pleasing and picturesque regardless of the type of product. Light plasticine differs from regular plasticine in that the material hardens when the work is completed. If the simple plasticine that everyone is used to can be easily squeezed or the finished product can be broken, then airy plasticine holds its shape for a long time.
Air plasticine, regardless of the shade, is a very easily soiled material. Therefore, before you start sculpting the figures, you need to make sure that your hands are clean and dry.
The material dries quickly. This is worth keeping in mind after finishing work, since it may not be possible to return the remaining plasticine to the bag. In order to avoid this problem, you need to take care of an airtight storage container in advance. This can be any box or bag that does not allow air to penetrate. It should be stored in a dark and cool place so that the lightweight plasticine does not lose its properties after a long time.
This type of work is designed for speed. This is especially important when working with small parts. Because of their small size, they dry too quickly. Therefore, you cannot delay in attaching the parts to the base of the product, otherwise they will dry out and will not be able to attach properly.
Slime from light plasticine
Slime is one of the most popular anti-stress products at the moment. It is a jelly-like substance that does not stick to your hands. Such slime has the property of stretching. Slime can often be found on store shelves, but it can be made at home from lightweight plasticine.
To make slime at home you will need:
- Air plasticine.
- Mixing container.
- Water.
- Shampoo.
- Shaving foam.
In order for the finished slime to be even larger, you can use several packages at once. However, you should be careful when choosing a shade, since when mixing, you should get a beautiful color. It is recommended to use 2 colors, for example, bright pink and pink, but a lighter shade. This way, you will get an original and pleasant color of the finished slime.
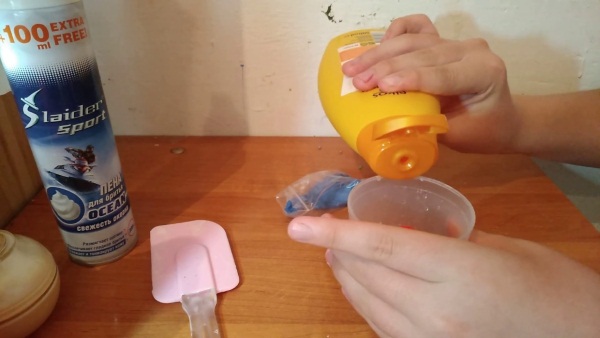
- You need to mix 2 packs of light plasticine. You need to achieve the effect that the color is uniform, without unmixed areas on the material.
- The mixed mass is placed in a container. Warm water is added to the light plasticine. Depending on the amount of material, the water should make the mass more liquid. The finished plasticine is mixed with water.
- Next, add a few drops of shampoo. It doesn't matter what kind of shampoo you use. You can choose a shampoo with a certain smell so that the finished slime will have a pleasant aroma. After adding the shampoo, the slime is mixed.
- The last step is shaving foam. This material should not be spared. The amount of foam should be equal to the amount of plasticine in the container. After the final mixing of shaving foam and plasticine, the slime is ready.
The slime, made of light plasticine, does not stick to your hands. It has a pleasant texture and does not make any extraneous sounds. To the touch, it feels like slightly melted marshmallow. Such an anti-stress will be a great thing to occupy your hands in your free time.
Clothes for dolls
One of the ways to make a toy original is to come up with clothes yourself. However, since sewing is a very complex process, such a material as air plasticine comes to the rescue.
One of the features of clothes made from such plasticine is that it is very easy to remove. Unlike regular plasticine, this one does not leave stains on the dolls' bodies that cannot be washed off. So you don't have to worry about the condition of the doll. If you work carefully, the toy will remain in its original form.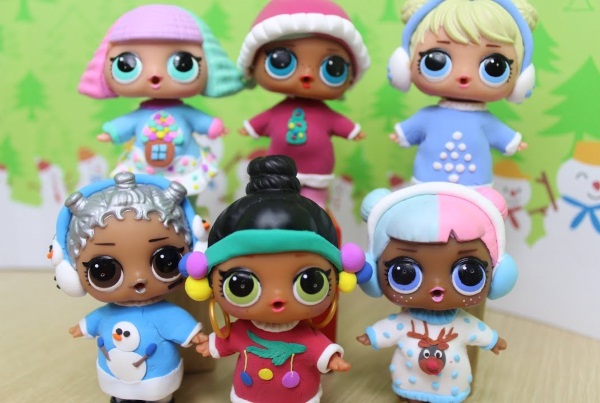
It is easy to make a dress for a doll from a pliable material:
- You need to sculpt clothes from top to bottom. Therefore, initially there should be a clear picture of the desired dress. You need to decide what the top will be: sleeveless, open or closed.
- Roll out 2 small circles from light plasticine: one for the front part and one for the back. Depending on the chosen style, the rolled material is attached to the doll. Do not press the plasticine tightly to the plastic. It is enough to make it stick to the model.
- Until the finished top has dried completely, it's time to decorate it. Rhinestones, beads or simple patterns made with a special stick are perfect.
- After the top part of the clothes has completely dried, you can start working on the skirt. If you want a fluffy skirt, you need to use a supporting material on top of which the skirt will be molded. Foil is perfect, as it can be removed without much effort upon completion.
- You can start creating the skirt. Here, just like with the top, everything depends only on your imagination. For example, you can make small dots along the hem of the skirt, which will give the image more details.
- In order for the finished clothes to shine with new colors, you can come up with an original belt. It will attract attention and give the image new features, distributing attention to accents. Such a belt can be of any thickness, and decorated as you like. Everything depends only on the imagination of the creator.
This instruction can also be used to make a T-shirt and shorts for Barbie. Clothes made of airy mass will look stylish not only on girl dolls, but also on boys. You can create unique pants and a T-shirt with a picture.
To make clothes look even more interesting, you need to add detail to the finished outfit.
How to diversify doll clothes made of plasticine:
| Beads and rhinestones | They are great for adding variety to outfits. Especially when it comes to evening dresses, which look so beautiful on a doll. Decorating clothes with beads and rhinestones, the outfit becomes more detailed. You can use materials of both contrasting and monochromatic colors. Each of these options will look great on the model. |
| Glitter glue | Suitable for decorating the bottom hem of a dress. Shiny glue, unlike beads, will not be as eye-catching. However, if you add it, the finished clothes will sparkle with new colors. You can draw whole drawings on a doll's product from glitter glue. |
| Toothpicks | In order to give the costume an interesting texture, toothpicks and all sorts of sticks are used. This also includes a cap, stacks and much more. Everything depends only on the imagination. Even with an ordinary toothpick, you can create a unique print on the doll's outfit. |
| Dye | To make the costume more detailed, you can use gouache paints. Many patterns or even drawings on a T-shirt or shorts for a doll will look very impressive. At such a moment, every child will feel like a great couturier. |
How to make food for dolls from plasticine
https://www.youtube.com/watch?v=e-yd7oJEO4c
Light plasticine figures look very attractive when they look like some food. Their modeling will not take much time, and as a result you will get a nice decor to diversify the doll game. In addition, decorative food made of light plasticine often flaunts in many photographs, arranging some compositions.
Dough products
Donuts, pies, hamburgers and many other products made from dough will look attractive on a toy table.

To make a plasticine donut, you need:
- Orange, white and pink airy plasticine. If desired, you can add a few more colors to make the finished donut brighter.
- Toothpick or glass.
The sculpting process:
- You need to roll out a small stick from orange plasticine. If the donut is planned to be too small, you need to do this quickly, because the material dries.
- The 2 ends of the stick need to be connected, thereby forming a hole inside.
- The base of the filling needs to be made with white plasticine. To do this, roll out a small flat cake, which is later placed on the top of the donut.
- Add sprinkles on top of the white filling. You can use several colors. Make several small sticks, carefully attaching them to the white filling. In addition to airy plasticine, you can add beads or glitter.
- You can use a stack of paint to draw several stripes at the top and bottom. This will give the donut more detail.
Candy
Light plasticine figures in the form of lollipops will look very interesting next to the doll. In order to prepare a lollipop, you need:
- red and white air plasticine. If desired, you can use other colors that suit the image better.
- Toothpick
There are no difficulties in the process of making candies:
- You need to roll 2 sticks of different colors. For example, white and red.
- The 2 strips of flowers need to be connected, but not glued together.
- From one end, you need to wrap the plasticine so that it forms something like a lollipop. The base is ready.
- To make a stick, you need to break a toothpick in half. In the place where a small tip remains, stick the stick.
Fruits
Making fruit doesn't take much time. This can be demonstrated by sculpting a watermelon.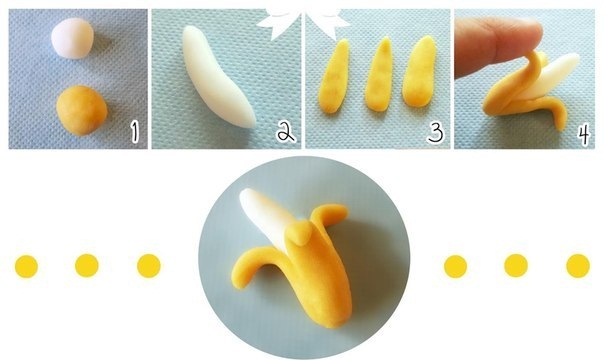
To do this you need:
- Air plasticine in green, white, red and black colors.
- Stack.
You need to start sculpting a watermelon slice by distributing the colors. The first thing to do is the base, that is, the green color. A small arc is made from it, which will be slightly pressed in.
White plasticine is added inside the green arc, which should completely cover the green interior. Depending on the thickness of the arc, a red circle is made. This will be the pulp of the watermelon. A triangle is cut out of the circle with a stack, which should fit tightly to the white part of the watermelon.
Next, several dots are made from black plasticine, which are bones. The most organic option is to add one bone in the middle of the red triangle, and two others - a little lower on different sides. Here everything depends on the imagination and the desired result.
Vegetables
Figures made of light plasticine, which represent vegetables, will look very natural. Especially if you choose natural shades. You can consider the example of carrots.
To do this you need:
- Plasticine of orange and green colors. In order to make the vegetable more realistic, orange color can be mixed with brown.
- Toothpick.
First, take orange plasticine. Roll a voluminous stick out of it, giving it the shape of a carrot. As a rule, this is a cone with rounded ends. While the material has not dried completely, you can make several lines along the radius of the carrot with a toothpick. Thanks to these simple movements, the carrot will acquire realism.
Next comes the green tail of the carrot. For this, you need to roll up several strips of green color, and then connect them with one side of the tips. The other end should be bent in different directions. Thus, the greenery of the carrot will acquire a lush volume. On the leaves, as well as on the carrot, you can make several movements with a toothpick. It will create the effect that there are membranes and a stem on the leaf.
Animals
Animals made of air plasticine look very interesting. Due to the unique texture of the material, the animals look three-dimensional. Such figures can be used as decor for a child's room or even for games.
How to make a penguin from plasticine
To sculpt a penguin you need:
- Black, white and orange air material
- Black gel pen.
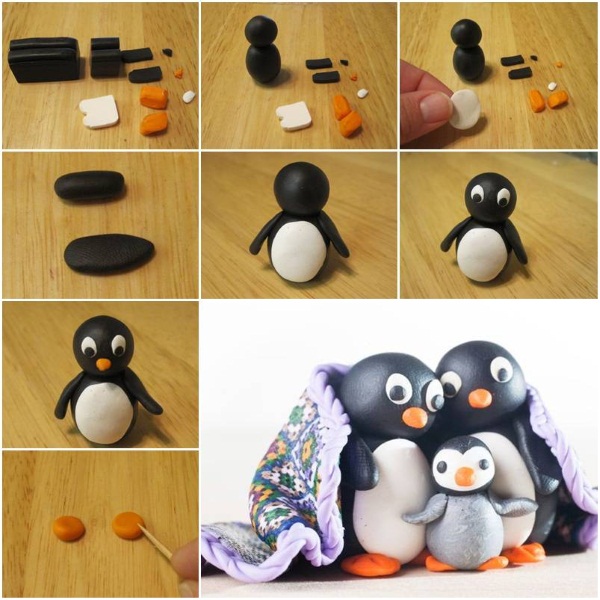
You need to start modeling with black material. Roll a large black circle of an oblong shape from it. This will be the body of the penguin, so here you should decide what size the finished craft will be.
A white flat cake is made slightly smaller, but also round. It can be narrowed towards the top, but this is optional. White plasticine will serve as the belly and face for the penguin. Therefore, it should be glued to the front side of the almost finished penguin.
With a black gel pen, put 2 dots on the head. These are the animal's eyes. The beak is made from orange plasticine. It should be a small volumetric triangle, which is attached in the middle of the eyes. From the remains of the orange color, 2 volumetric triangles are also made, which serve as the penguin's paws.
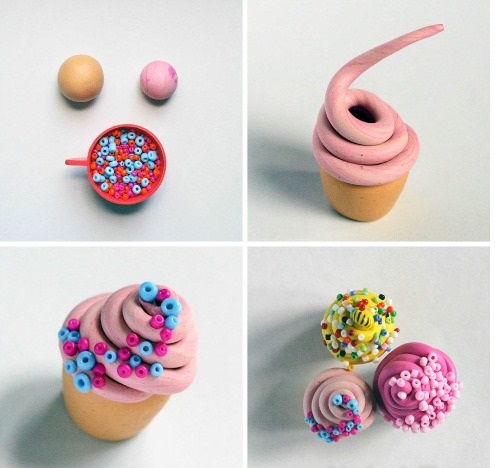
Figurines
It is easier to mold a figurine from light plasticine than it seems at first glance. For example, a figurine in the shape of a cupcake can be a great decoration for your desktop.
To do this you will need:
- Airy plasticine of beige, white and pink colors.
- Beads or other decorations
- Toothpick.
First, a cake basket is made. At this point, you will only need beige. A cylinder is molded from it, tapered at the base. A relief is made along the entire diameter of the finished basket using a toothpick.
For a more interesting filling of the cupcake, 2 colors are mixed. For example, pink and white. It can be left unmixed, thus leaving picturesque streaks of one tone in another. A long stick is rolled out of the finished mass. It is attached to the basket and twisted in a circle, thereby forming a cream.
Finally, the filling is sprinkled with beads or rhinestones. It will serve as a sprinkle on the finished cupcake.
Flowers
Sculpting flowers is not a very simple process. However, if you put in the effort, the result will be a beautiful product made of airy plasticine that will please the eye.
To make a flower from plasticine you need:
- Air plasticine of green and red color. Red color can be replaced if desired, since the color of the plant petals depends on it.
- Toothpick.
- Stack.
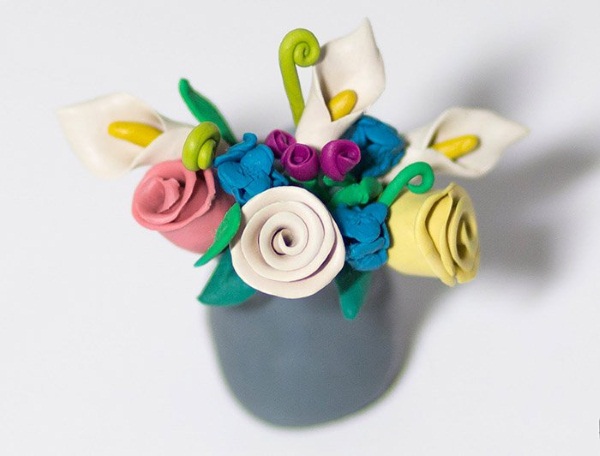
You need to start working with a bud. To do this, roll out several round or oval parts. In the case of flowers, accuracy is not important here. The parts can be of any size and shape. In total, there should be 5-8 petals. You need to start collecting with the smallest of them. The center of the flower is formed from them. Then, in increasing order, the entire flower is pasted over.
Next, you only need green. It is used to make a receptacle for the plant. To do this, you need to roll out an oval of the appropriate size, and then wrap it around the base of the petals from the bottom.
Next, the stem is molded by rolling out green plasticine, forming a stick. It remains to prepare the petals. To do this, several ovals are rolled out, from which, using a stack, the necessary petal shape is cut out. Finally, on the front side of the sheet, the stem and membranes of the plant are drawn with a toothpick.
Chips for games
Making a classic board game token is the easiest thing you can make from airy material. All you need is a pack of light plasticine and a minimum of effort.
A cylinder is rolled, tapering towards the top. In the process of modeling, you need to make sure that the chip stands firmly. You need to roll a small ball, which is attached to the top of the cylinder. The chip for the game is ready.
Badges and keychains
In order to add variety to your keys or bag, you don't have to go to the store for a keychain. Everything can be done at home using lightweight plasticine. For example, a keychain in the form of ice cream will look very interesting.
To sculpt it you need:
- Ring from an old keychain.
- Airy plasticine in beige, pink and blue. Pink and blue shades are used for filling ice cream, so you can take other colors.
- Beads for decoration optional.
- Toothpick.
Making an ice cream cone starts from the bottom, that is, from the cone itself. For this, beige plasticine is used. A cone with a pointed tip is rolled out of it. Until the cone hardens, a pattern is made on the cone with a toothpick.
Incomplete mixing of pink and blue will give a new shade - lilac. Thus, the ice cream will be 3 colors. A long strip is rolled out of the mixed mass, which will later need to be twisted, carefully placing it on the largest part of the cone. Sprinkle with beads or rhinestones on top.
To make sure that the ice cream remains not just a figurine but a keychain, a ring taken from a keychain is attached to the very top of the product. If the plasticine has hardened, you can use glue.
School Supplies Decorations
It is very popular at the moment to make “false” caps for pens in the shape of animals.
To mold a similar one in the form of a panda head from light plasticine you will need:
- White and black air plasticine.
- The handle on which the product will be attached.
- Black gel pen.
You need to start modeling with white plasticine. Roll a white ball out of it, which will serve as the panda's head. Ears and eyes are made from black mass. Since the panda has black circles, the eyes should be larger than usual. You can attach small parts of white material to them, which will serve as highlights in the eyes. Use a black gel pen to draw a neat nose between the eyes.
The product must be attached to the handle before it dries completely. You only need to pierce the head, putting it on the handle and make sure it is well fixed.
The finished figures dry out in a matter of minutes. It often happens that due to unsealed storage of lightweight plasticine, the remaining mass hardens. But do not rush to throw away the seemingly spoiled material. In order for the lightweight mass to acquire its former properties, it must be dipped in warm water, slightly crushing the plasticine in the liquid. After which it will regain its plasticity.
Article formatting: Vladimir the Great
Video about crafts from lightweight plasticine
Crafts from lightweight plasticine: