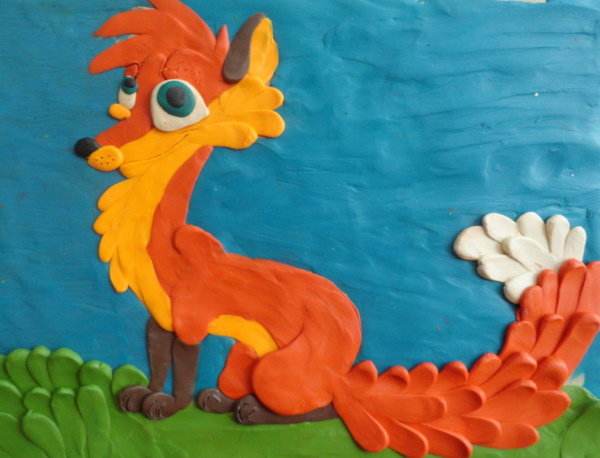
Plasticine art is a type of decorative and applied art that involves creating pictures by sculpting convex drawings and semi-volumetric objects on a horizontal surface (usually cardboard). After mastering the general technique, you can make combined pictures using additional plant seeds, beads and other materials.
The benefits of plasticine painting for child development
Plasticine is the main material in such work, the weight, shape and flexibility of which the child can feel independently. At the same time, fine motor skills of the fingers are well developed, and this is very important when preparing to write with a pen.
By making a drawing using the modeling method, he imperceptibly learns to plan his work, and when he becomes interested, to bring it to completion, which is difficult to achieve in children.
Each age has its own tasks that are aimed at helping in a specific area of development:
- At 2-3 years old, in addition to hand motor skills, drawing with plasticine stimulates speech skills.
The child needs to be interested by inventing an object together from minimal details in order to finish the work faster and get satisfaction from it. The presence of an adult is mandatory, and he should help with the choice of an image, direct to the development of perseverance, accuracy and concentration.
- At 4-6 years old, the child is already interested in creativity, and the parents’ work with him strengthens the psycho-emotional connection between them.
Each time during modeling, coordination of finger movements and eye develop. It is at this age that children like to create collectively, where communication skills are established. They begin to explain their choice, refuse correctly, proving their rightness.
- At 7-8 years old, already having some experience working with plasticine, the child approaches drawing with this material creatively, discovering new possibilities.
Now it is better to let them create pictures on their own that will express their emotions, dreams, and also relieve them of the stress and negative thoughts they have received. Like any creativity, this technique of classes gives children the opportunity to express themselves.
Preparation for the lesson
Drawing with plasticine on cardboard only seems difficult from the outside. You can't force a child to sit down right away to sculpt a picture if he is not interested in it. It is better to start doing the creative work yourself in front of him, saying your actions out loud.
Bright colors and curiosity should do their job, and the baby will come to the table, you should ask him to help you. You should buy a frame and offer to create a gift for one of your relatives. In order not to discourage his interest, you need to prepare well for plasticine painting.
To do this, you should purchase the following set:
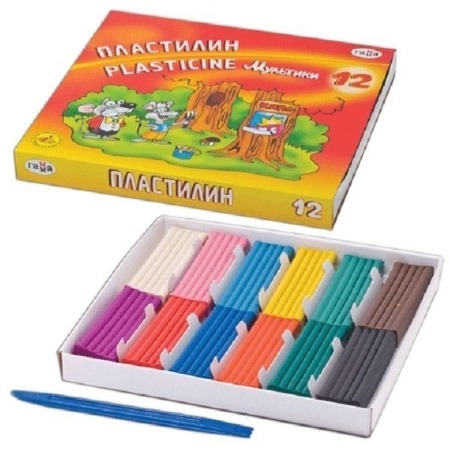
- Plasticine. It is better to take a package with no more than 8 colors. Otherwise, the child will be more distracted - you need to show that they can be mixed to get new shades.
For kids, you need to buy wax plasticine. It is much softer and easier for them to work with, otherwise you will have to warm it up.
- Thick cardboard (can be multi-colored). Such material does not deform during modeling, and the sheet of paper will have to be constantly held and adjusted.
In younger groups, it is better to cover it with tape so that the plasticine slides on it more easily and there is no chance of leaving greasy stains on which the material cannot be stuck.
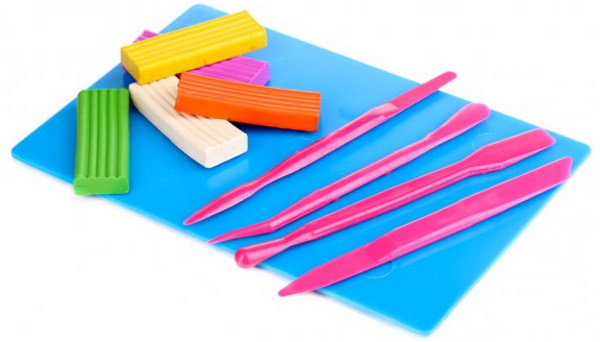
- Board. It is better to prepare the plasticine on a separate surface, creating a new model for the drawing, and then transfer it to the main sheet.
- A glass of water and wet wipes. Sometimes you will have to wet your palms to avoid getting them dirty and wipe them.
- Stacks. Special plastic knives are designed for plasticine, but they will be needed a little later, when the child is already familiar with this creative activity.
- Image. You can take it from any children's coloring book, draw it yourself, and an older child can come up with a theme himself.
If this is the first work on drawing with plasticine, then you can buy a ready-made set for such creativity, which are now sold in stores in a wide range. Children's perseverance is usually enough for 30 minutes. Therefore, you should not offer the younger group a difficult job.
It is necessary to choose the right workplace, which should be well lit and familiar to the child. In order for him not to be distracted, it is necessary to turn off the TV, put away smartphones, tablets and other distracting objects.
Techniques and methods of drawing with plasticine
Drawing with plasticine on cardboard can be done using several techniques that are already familiar from the lessons on modeling figures:
- Rolling a ball by making circular movements with a piece of plasticine in your palms.
- Rolling out a cylinder or strip with the palm of your hand on a board.
- You can pull back a piece of plasticine if some element requires it.
- The resulting balls and strips can be flattened on the surface.
It is for drawing with plasticine that smearing is used, carried out from left to right or from top to bottom, smoothing and pressing to create a flat, smooth surface.
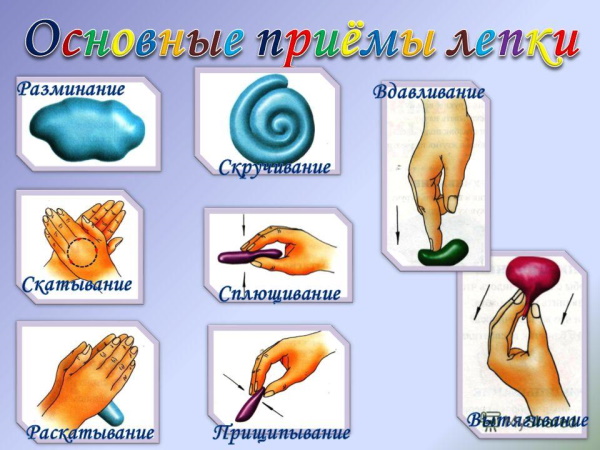
An auxiliary tool will help simplify the process. For example, using a medical syringe without a needle, make identical blanks, use a felt-tip pen cap to leave traces in the form of a drawing on the plasticine, and make notches on it with a plastic knife.
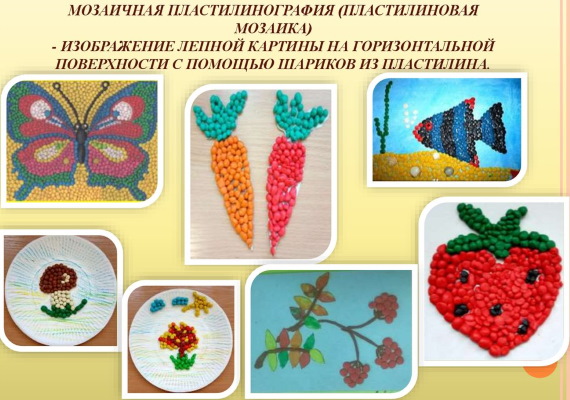
Types of plasticine art for children of younger groups
All plasticine work for toddlers and children of middle groups can be divided into several types:
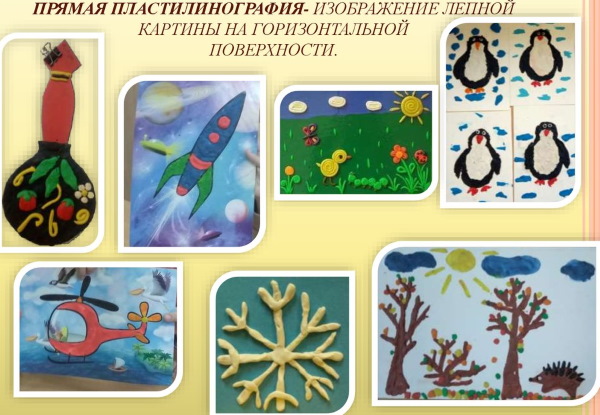
- Mosaic or straight. The drawing is made only from plasticine balls, where the students learn to select a color scheme and ensure that the filled space does not go beyond the outline of the drawing.
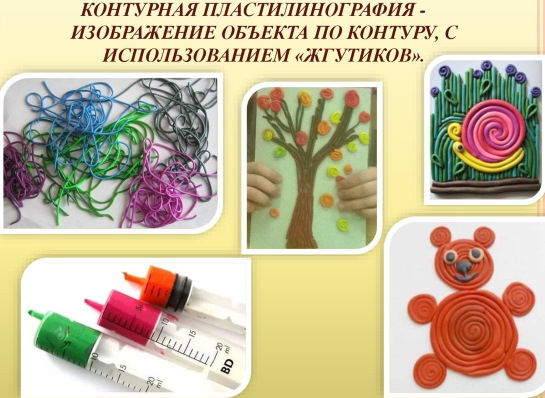
- Contour. When working with this type of plasticine art, it is necessary to first outline the silhouette of the object using thin flagella. The same technique can be used to fill the space. A medical syringe is often used for this.

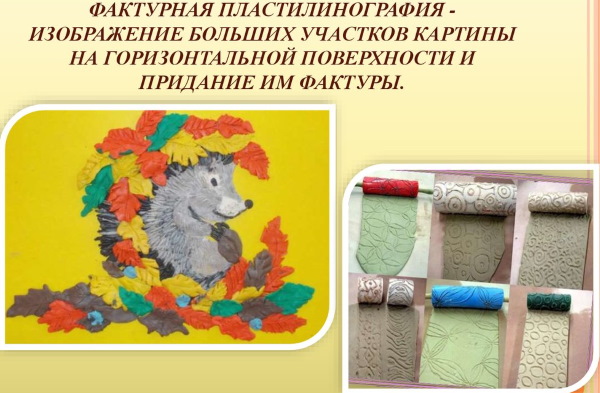
- Textured. A drawing protruding above the background by less or more than half, as well as, on the contrary, a deepening one, are a distinctive method of drawing in this type.
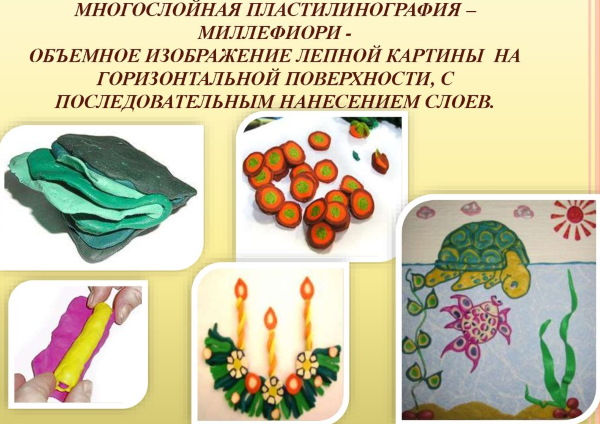
- Multilayered. This option is more suitable for depicting a landscape. During work, it is necessary to apply 1 layer on another. Sometimes it is possible to create a 3-D effect.
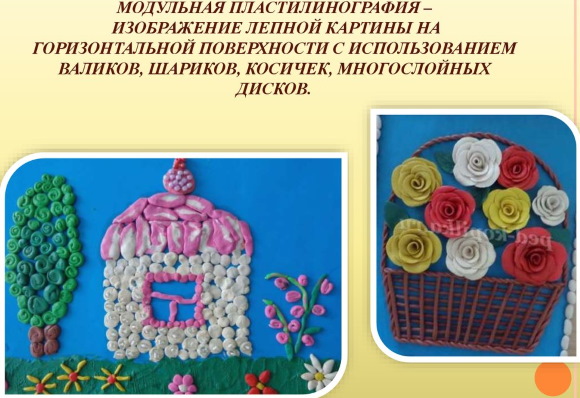
The last type is modular plasticineography, when the drawing is created using almost all the techniques of modeling (discs, balls, rollers, strokes and smearing). It is more suitable for the middle and senior groups of children, who by this time have already mastered them.
Painting with strokes
You need to pinch off the required amount of plasticine and place it on the index finger of your working hand or on a special plastic spatula.
Now you need to start applying it to the cardboard with chaotic, sharp movements.
Drawing with plasticine balls
Using a knife, you need to cut off a piece of the desired color, make a flagellum out of it first, divide it into equal pieces of the same size and roll each into a ball in your palms or on a board.
Flattening the rolled balls on the base
The prepared balls should be placed on the chosen place and slightly pressed with a finger on its center. It is better not to apply special efforts, as the rounded clear outline will be lost.
Smearing on a large surface
You can draw the background of a painting or color the figure inside using smudges.
To do this, simply pinch off pieces of plasticine of the desired color, place them on cardboard and smooth them out with your index finger.
Scratching patterns on a layer or parts of plasticine
This technique is required if it is necessary to make patterns not with other shades, but using a plastic knife or other tool, for example, with carving.
It is enough to determine the area on the work or a piece of plasticine, direct the device there and press with the required force.
Rolling plasticine sausages
Rolling sausages is often used to design the contours of a figure. But there are also drawings where this technique is used for the entire design.
To do this, you need to separate pieces from the plasticine, roll them out to the desired thickness between two palms or one on a board, and then stick them onto cardboard, having first measured the length and cut off the remainder with a knife.
Squeezing plasticine from a syringe
Drawing with plasticine on cardboard using a special syringe, where it is possible to remove the remaining mass, or a medical one without a needle. Having placed the material inside the device, you can squeeze it directly onto the drawing or transfer even sausages from the board.
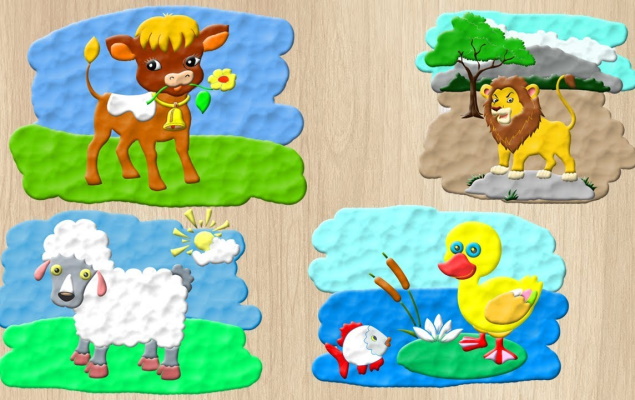
Ideas for children's drawings on cardboard
Using several works as an example, you can easily master the technique of drawing with plasticine. With the help of step-by-step instructions, you can start working with your child when he is ready for it. All works are made using different techniques.
But first, it is worth preparing the workplace properly so that nothing distracts, and if you notice that the baby is getting tired, it is worth taking a short break.
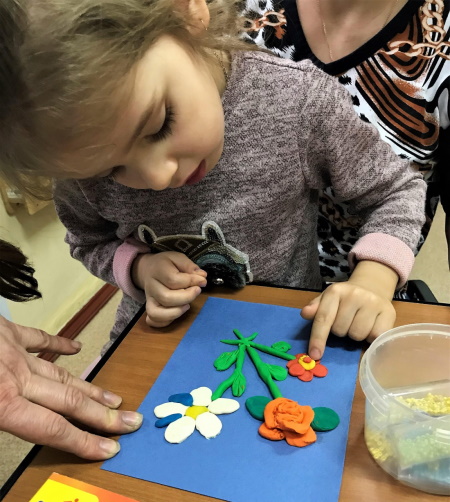
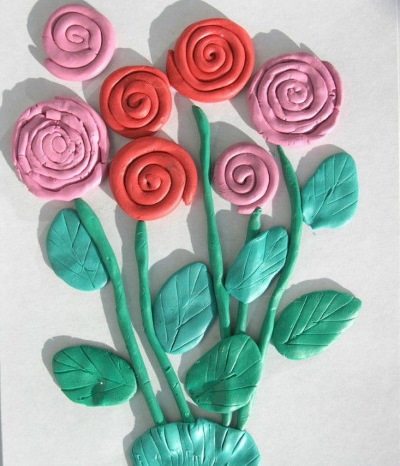
Flowers
To create flowers on the cordon with the help of plasticine, you can use many techniques. 2 options will be described: smearing and modeling, as well as balls on a template. The latter is perfect for kids.
The paintings look especially interesting if they are covered with clear varnish after completion.
Option 1
To complete this work, you need to prepare plasticine of 2 colors: white and yellow, as well as blue or light blue cardboard and a pen rod.
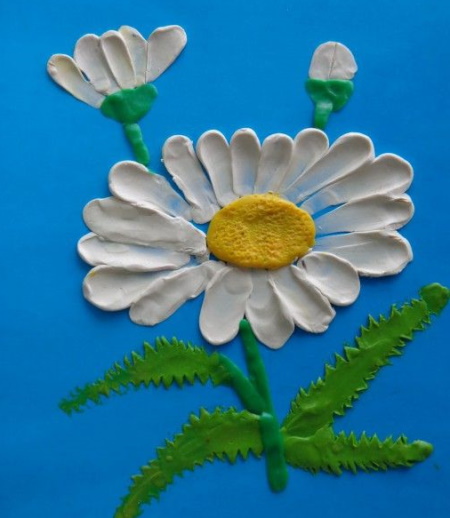
Step by step execution:
- For work, you don't need to make a sketch if the child already has experience. But for little ones, it's better to first draw daisies on cardboard, making the petals about 1 cm.
- You should take white plasticine, separate a part of it, and roll it into a thick sausage yourself or entrust this work directly to the child.
- Next, you need to cut it into equal pieces, from which you need to roll balls with your hands.
- Each of them needs to be placed on the top of the petal and pressed down a little so that they fill the space along the contour.
- Now you need to press on the plasticine and stretch it towards the middle, trying to make only one stroke.
- Repeat the described steps with all the drawn flowers.
- All that remains is to design the receptacle, for which you need to use yellow plasticine. You also need to roll balls out of it, put them in the middle, pressing them down a little.
- To give it the correct shape, you should take a pen rod and make many shallow punctures on the surface.
It is better to determine the number of daisies on the sheet yourself, and it is better to increase them if the child liked it. Additionally, some people draw natural lines on the petals with a knife, mold a stem from green with petals.
Option 2
For this you will need to draw a flower stencil. In this method you can use plasticine of different colors. If the child is very small, then you need to help him roll the balls, which are the main drawing technique here.
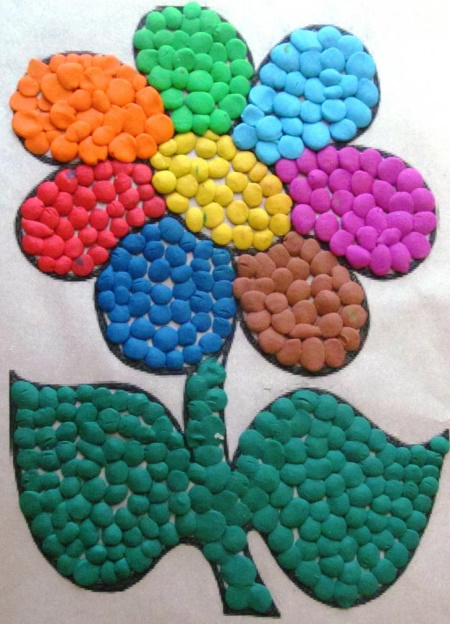
Step-by-step execution of the drawing:
- An adult should take a white sheet of cardboard so that the flower looks more colorful, and the child can clearly see the stencil. For the little ones, you need to divide the A4 format into 2 halves.
- On the sheet you need to draw a large flower with 7 petals of approximately the same size and a receptacle in the middle. To use only 1 technique, you need to make the stem and petals wide.
- Next, you should immediately take the dark green color, divide it into equal small pieces and roll balls out of it. Show the baby where to attach them, placing the first one yourself.
- To take up more space and use less plasticine, you need to press the blanks well. It is worth reminding the child that he cannot go beyond the stencil.
- Now you need to immediately make a receptacle from yellow, dividing it into pieces just like green and rolling them into balls. Attach the resulting blanks to the middle of the flower.
All that's left is to decorate the petals beautifully, using different colored plasticine for each. The technique of the balls should already be clear to the child.
Ladybug
Drawing a ladybug on cardboard with plasticine will also help develop the child’s imagination, because it is always found in nature, where there are flowers and other plants.
The work can be made using different techniques. Often children are offered to simply smear the material of the desired color on the stencil. The descriptions suggest making a textured craft in 2 ways, the choice of which depends on the age of the "master".
Method 1:
- First, you need to decide on the background of the work. If you have colored cardboard, you can take blue, symbolizing the sky, or green and cut out of it, for example, a leaf where the ladybug will sit. On a white sheet, you need to smear plasticine with the chosen shade over the entire surface.
- Now you need to take the red plasticine, separate 1/3 of the piece from it, and roll it into an oval in your hands.
- While it is still soft, you need to place it in the middle of the cardboard and press it down first with your palm, and then straighten it with your fingers to create a narrowed part at the bottom.
- The edges can be adjusted with a plastic knife - this will make the picture look more voluminous. It is also necessary to divide the ladybug's body into 2 parts, running it lengthwise and pressing it down a little.
- Next, you need to separate 1/5 of the black plasticine, roll it into an oval, place it on top of the red piece on the cardboard and straighten it with your fingers, forming a semicircle.
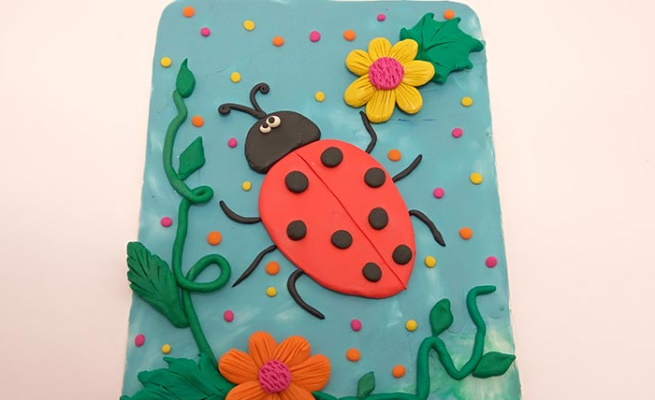
- To make the spots, simply roll small black balls, flatten them a little with your fingers and attach them evenly to the red body.
- For the eyes, you need to roll white balls, flatten them with your fingers and attach them to the head, and make pupils from small black balls.
- All that's left is to design the black paws and whiskers. To do this, simply roll 8 thin sausages: attach 2 of them to the ladybug's head, curling the ends a little, and place 3 on each side of the body, bending them equally in different directions.
Next, you can use your imagination and make multi-colored flowers and green stems, grass.
2nd method:
- For this option, you should immediately prepare 2 syringes (medical without a needle or specially designed for plasticineography. It is good if you bought wax plasticine, otherwise you will need a 0.5 l jar with hot water.
- Now you need to prepare the base. In this case, you need to cut out a leaf-shaped form from green cardboard.
- Next, you need to cut off 1-3 pieces of black and red plasticine, knead one in your hands, giving it an oblong shape that will easily fit into a syringe, and place a different shade in each.
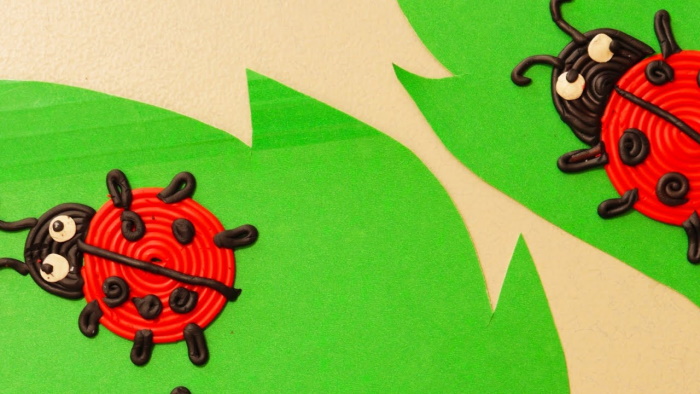
- The syringes should be dipped into hot water, and after 1 minute, they should be taken out one by one and strips should be squeezed out onto the work board. As soon as the plasticine inside starts to freeze, change the devices around.
- When there is nothing left in the syringe, you need to start decorating. To do this, first take 1 end of the red strip and twist it into a snail of the desired size, and then attach it to the cardboard.
- Repeating these steps with black, you need to change the shape of the circle, making the head an oval, and attach it to the body.
- From the remaining red strips you need to roll 6 small flat circles, which will be spots that distinguish the ladybug from other insects.
- Use black flagella to create 6 legs on the sides of the body and 2 antennae on the head.
The final touch to the painting will be 2 eyes, which can be made from a small amount of white plasticine and pupils from black.
Recommendations from psychologists and teachers
Plasticine art is designed for children of junior, middle and senior groups. It is necessary to choose the right methodology of classes so that children are not only interested, but also easy to perceive.
Main teaching methods:
- Showing finished works. Here it is important to interest the kids by showing them illustrations, as well as the actions they will have to perform.
- Verbal method. Children should be talked to, clearly explaining all actions.
- Practice. You need to do the exercises first in a playful way, showing the techniques of working with plasticine, and then experiment with simple drawings.
For middle and senior groups, classes are conducted to improve the acquired knowledge, and I allow them to make fantasy drawings.
A child loses interest in work if:
- he was given low-quality material (plasticine that was too hard, greasy, or had a strong smell);
- he is left to his own devices (it is essential to help him and talk to him);
- too high requirements (work should be selected according to age);
- long-term activity (breaks are necessary).
Drawing together on cardboard with colorful plasticine by children can strengthen their relationships. However, one should not single out someone's work as the best. It should be explained that everyone sees the world in their own way, and it is as diverse as their images.
Video about plasticineography
useful and interesting publication