Candy boxes are made of food paper or pressed cardboard. The basis is created by the development schemes. This is a convenient way to store and transport unassembled models.
To make several packages of paper or cardboard for candies with your own hands, you can use regular food cardboard or thick paper.
The classic way
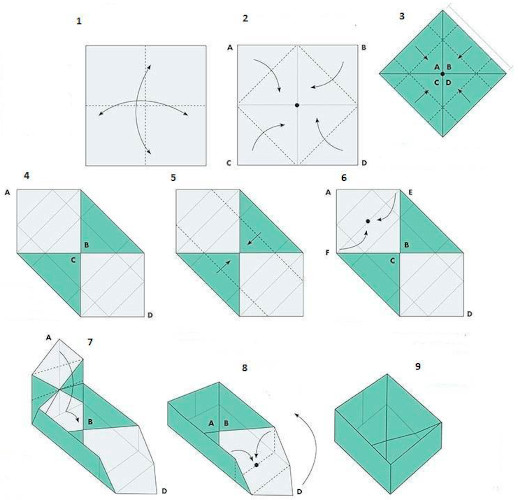
One of the universal methods of folding paper to form a box is a square scan. You can use thick cardboard or food paper, then the scheme will need to be adjusted. To put candies in such a packaging model, you will have to put food film on the bottom of the base.
You can make a DIY candy box in a few steps:
- Prepare cardboard of any color, a ruler and scissors.
- A square with one side 30 cm long should be cut out of paper.
- The other sheet should have 29*30 cm length of two sides. This will be the smallest sheet of the rectangle.
- The square needs to be folded diagonally - first fold along the first diagonal, then repeat with the second. The folds will be the guides.
- The resulting fold lines need to be outlined with a pencil.
- All corners of the square need to be bent towards the center of the sheet. Then bent back.
- Bend the corners to the center again, then bend the newly formed corners to the center again. Do the same on the opposite side.
- The central square formed by the fold lines is the future bottom of the box.
- Next, you need to bend the two sides of the square by pulling them by the corners.
- The side ribs on both sides rise up to form the walls of the box.
- In the area where the side forms a diagonal perpendicular to the plane, you need to make a cut. There should be only four of them.
- The sharp ends need to be bent inward, and the tips covered with the inner parts of the formed triangle that are not bent all the way.
- The second part needs to be folded in the same way as the first.
- The box is ready. You can glue the ends of the paper if you wish.
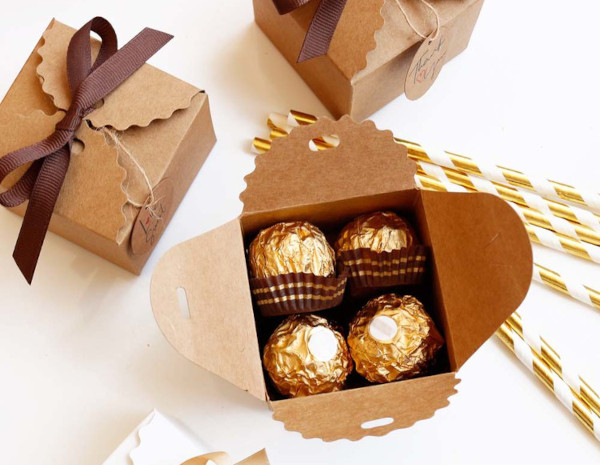
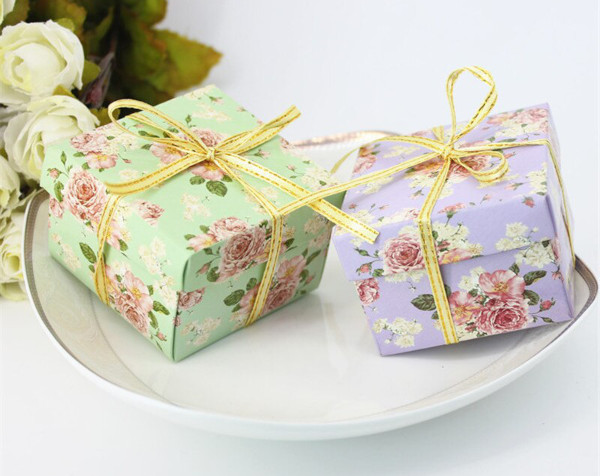
A DIY candy box can be made from colored cardboard. It can be filled with wrapped candies to prevent open contact of the food product with air. The box should be additionally packed in transparent food film, or lined with wrapping paper, tied with a bow.
Box with lid
An alternative option could be a box with a lid. It can be made of cardboard or thick paper. Depending on its content and weight, you should choose more or less thick cardboard. To diversify the traditional square box due to the shape, you can make it in the form of a triangle or a polygon.
The lid can be removable or integral with the body of the box.
Master class of a box with a solid lid:
- If the box needs to have a side length longer than 15 cm, you will need a sheet of paper or cardboard A3-A2.
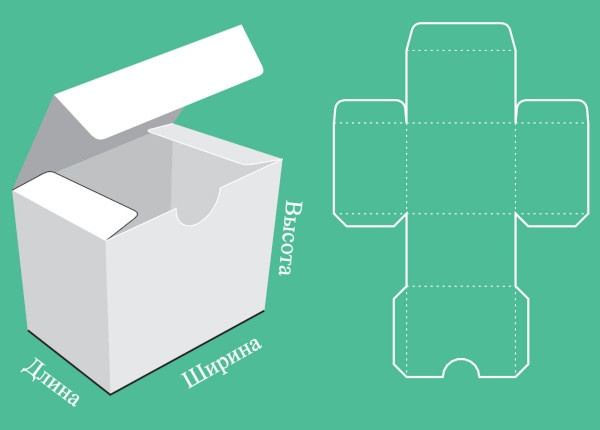
- Create a pattern for the box using the diagram and cut it out.
- If there is no diagram, draw a square schematically using a ruler.
- From the square, draw 4 more squares with “tongues” for gluing.
- On one side of the additional square, you need to draw another square with a long "tongue" to imitate a clasp. This will be the lid, and the additional squares will serve as the walls of the future box.
- If you plan to make a low rectangular box, you can change the height by reducing the two parallel lines on the sides. The width can be varied by the two upper and lower lines.
- The cut-out diagram needs to be folded. To assemble the box, you should make folds under the ruler in the drawn areas.
- If the cardboard is thick, then the folds need to be made using cuts. It is advisable to have a stack for pressing the cardboard or use a stationery knife. It is important to observe the depth of the cut and adjust the pressure.
- The sides need to be glued with dry glue, office glue or PVA glue. The "tongues" should be inside.
- The longest part is not glued. One free square will imitate the lid. Its side parts are short, but they need to be bent to form a "stand". They will go inside the box.
This box is suitable for most sweet gifts. Unfortunately, it is not always possible to create even cuts from household cardboard. Many resort to buying pressed cardboard for such purposes. It bends better, holds its shape well, but its price is an order of magnitude higher.
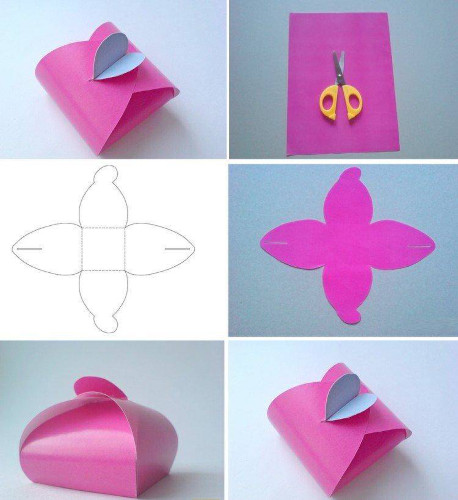
If you compare it with ready-made boxes, of course, the cost price will be much lower for a homemade creation. A DIY candy box can be made with a removable lid.
In this master class it will have the shape of a polygon:
- Draw the bottom of the box on the cardboard in the shape of a triangle. The dimensions can be any.
- All three sides need to be drawn in the form of rectangles on each side of the triangle. This will result in a bottom with petals in the form of rectangles.
- From one side of each rectangle you need to draw a "tongue". The adjacent side from the inside will be glued to it.
- Having cut out the pattern, you can assemble the box. You will get the base.
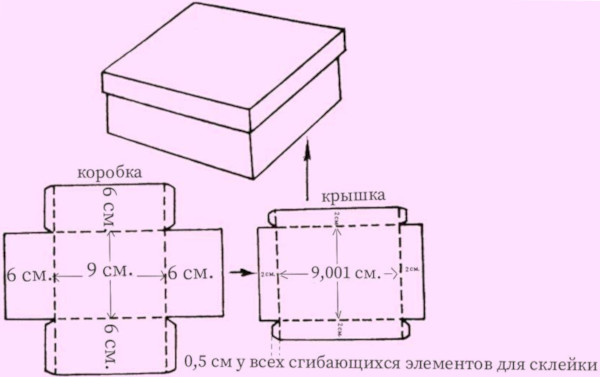
- To create the lid pattern, take the size of the triangle base and increase it to 0.5 cm. If the cardboard is thick, increase the size to 0.8 cm, leaving room for folding the sides into the joint.
- Using the same scheme, you need to draw the layout of the lid, only the length of the side (rectangles) should be much narrower. For example, 3 cm.
- For each rectangle, you need to draw a rectangle of 2.9 cm. On the side, on one side, make “tongues” so that
- According to the principle of assembling the box, you need to assemble the lid. But first, you need to fold each side (rectangle) in half along the long side.
- The extra 2.9 cm will be glued to the 3 cm long base. This is to seal the sides.
- The “tongues” need to be tucked under the rectangle of the adjacent side, which will then be glued to the base.
If the cardboard is too thick and the "tongues" cannot be glued without causing the lid to become skewed, you can separately glue the three sides together using masking tape.
Then you should bend the additional parts of the side and glue them to the bases of each of the three sides. In this case, the edge of the joint will rest against the additional 0.3 cm that were left in reserve.
Origami method
A DIY candy box can be made without using glue. This method is the most convenient when you need to urgently create gift packaging. Such containers can be used both for storing small items and for gifts.
The origami technique allows you to make boxes of different sizes from regular paper or thick cardboard:
- For ease of use in origami, it is recommended to prepare thick paper or cardboard in A4 format.
- The paper should be folded in half and the crease should be made so that it is visible when the paper is unfolded.
- The right and left edges need to be folded in half towards the center.
- Turn the sheet of paper clockwise and fold the right edge to the center fold.
- The bottom of the sheet should be open.
- The same must be done with the left side of the sheet.
- All corners should be folded back and the fold lines should be clearly visible.
- Next, the right edge of the sheet must be folded to the left, and the edge itself must be directed towards the vertical fold line.
- The right upper edge needs to be folded inward. Do the same with the right lower corner.
- On the left, both edges, top and bottom, need to be folded with the front part inward.
- The left side should be folded in half towards the center.
- Fold the left side again from left to right.
- The pieces on the left and right need to be turned back and then folded along the bottom pieces parallel to the fold lines on opposite sides.
- The corners should be pressed inward so that the box is held together by the folds.
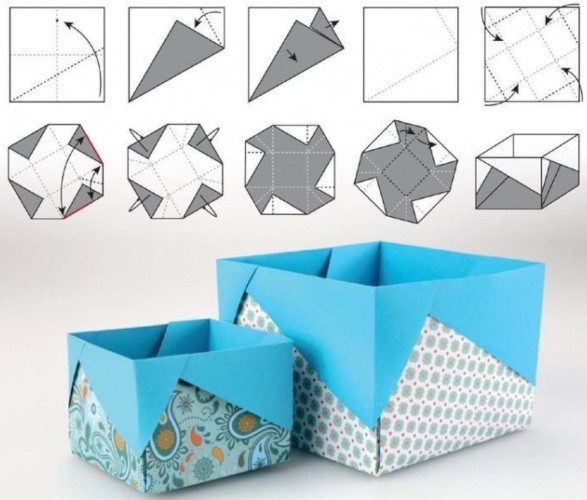
This box can be made larger or smaller. Thick paper without embossing is suitable for complex origami, but softer paper is suitable for simple box assemblies.
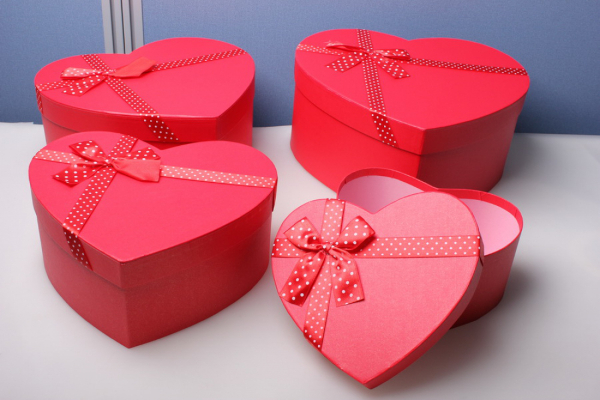
Heart-shaped box
To create a stylized package, you will need thick cardboard of any color. As a rule, it is more difficult to work with, so the tools you will need are a stack to imitate fold lines, a pencil and a ruler. You can use liquid or solid glue. Decoupage glue solution will not work.
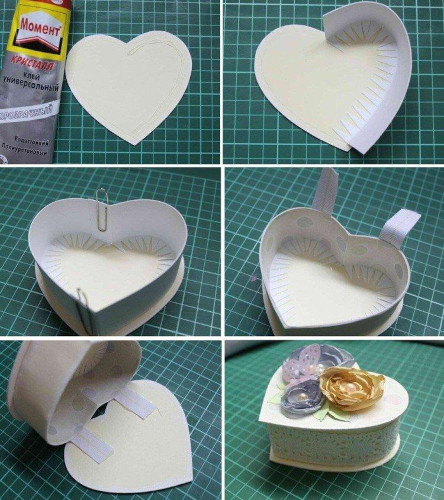
- To make the box symmetrical and even, it is advisable to draw a circle of any size, but not less than 20 cm in diameter.
- Marking two circles will create even, symmetrical sides for the heart shape.
- The circle should contain several equal segments that form the shape of a heart. Therefore, they should be marked according to the formula - the length of the circle should be divided into equal parts, taking into account the reserve of the segment for protrusions.
- The width of the side walls should be at least 2 cm so that the depth of the box can accommodate even small candies.
- For the indents, you need to make “tongues” that will serve as a place for gluing the parts of the box.
- The bottom needs to be cut separately. To make it more compact, it is enough to make two such parts and glue them together. It is not recommended to use liquid glue here, as the cardboard can deform and the bottom will become crooked. As a rule, a form is placed on the main bottom, the "tongues" are attached to it with glue, and another bottom is placed on top, covering all the joints and unevenness of the fasteners.
- Once you have cut out the pattern, you can begin assembling it. The two parts of the heart need to be glued to the base. From the inside, the two halves can be secured with masking tape.
- To make the lid hinged, it is recommended to make fastenings on tapes from the outside. Then these places need to be decorated.
- The inside of the box can be decorated with colored paper, fabric or artificial filling – paper, shavings, flowers.
- The outer side can be decorated with lace, paints, fabrics.
- If you want to create a three-dimensional design, you can use putty or modeling clay.
A DIY heart-shaped candy box can be decorated in the style of the upcoming holiday. For example, for March 8, you can make several clay numbers and attach them to the lid. It is also acceptable to make several flower arrangements. They will be appropriate on such a box regardless of the occasion.
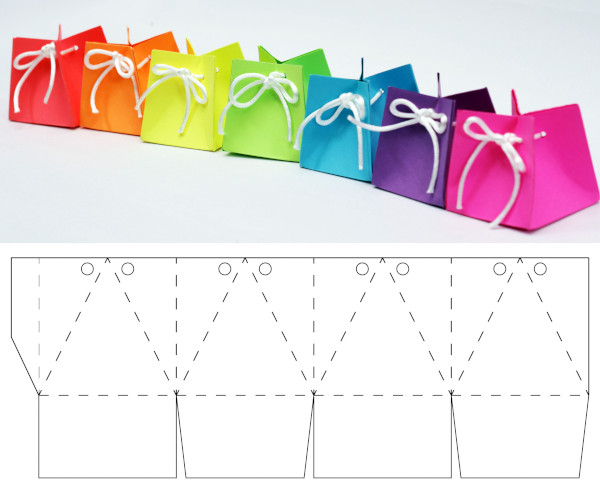
Gift box-bag
Such boxes are considered the most convenient and budget-friendly in terms of cutting and assembly. They come in different shapes and designs.
| View | Assembly feature |
| Rectangular smoothed | Assembly from a single sheet without glue, you will need scissors. |
| Triangular pyramid | Assembly from a single sheet, you will need scissors and glue. |
| Bag-package | You will need a whole sheet, assembled using glue. |
The master class will consider the option of creating a box-bag from a rectangular sheet:
- You will need thick or even glossy paper. You can use thick food cardboard.
- On the sheet you should draw a pattern for cutting. The center will be an equilateral square.
- From each side of the square you need to draw vertical rectangles, and smooth out the top two corners.
- Above each two rectangles, you should make a cut, and on the other two, draw “caps” - these will be the future handles for the bag.
- Cut out the future box according to the diagram and press the fold lines – the four sides of the square.
- Assemble the box so that the two sides with handles are at the bottom, and the sides with cuts are at the top.
- The handles need to be threaded through the slots that were made in advance. You can use a stationery knife.
It is nice to give handmade sweets in such a box. You can put small chocolates or complement the small gift with a postcard.
Decorating the box
A simple box made with your own hands may not seem as attractive as the one on display in a store.

There are several simple ways to decorate ready-made boxes or those you make yourself:
- Decoupage – the box is coated with a thin layer of PVA glue solution with water 1:1, and then pictures or napkin cutouts are placed. The finished drawing is covered with PVA glue (without water).
- Imitation of volume – any box can be rubbed. It is enough to rub the top layer with sandpaper and apply putty. Before it dries, you can press beads, glitter and beads into the mass. A relief box will cause more delight.
- For a visual effect, you can also decorate the box with fabric. Either sew a cover or glue fabric to each side of the box - it's quick and easy. And the pattern is already ready, all that's left is to imprint it on the outside of the box.
- Burlap and rope will also be a beautiful decoration for any box. You can make ribbons and bows from the materials, and also decorate the surface with asymmetrical pieces of burlap.
A box of any shape, created with your own hands, will look great with handmade chocolate, candies from the store.
There are also different techniques for decorating ready-made boxes. They can be applied to hand-made items.
| Seal | Flexo printing | Printing on cardboard before making a box. Portable color printers are available – they can easily handle this task. |
| Lamination | The cardboard is covered with adhesive paper with an image. You can also use ready-made stickers for mini-printing. | |
| Varnishing or embossing | The finished material can be treated with various non-aggressive materials. | |
| Case | Made of fabric | A cover is sewn separately from any fabric that will fit the box. This option is suitable for long-term storage of sweets. |
| Scrap-booking | 3D modeling/decoration | In the creative scrapbooking technique you can use everything, especially materials for creativity or nail design. |
| Coloring | Stencil technique | To do this, you will need a ready-made or self-created stencil. A drawing is applied over the stencil in dots or with a sponge. When the stencil is removed, the pattern remains. |
Boxes decorated in the style of one of the techniques can be used to present any gift, as well as sweets. Even when there are no ideas, and you want to present sweets from the store effectively and beautifully, it is recommended to focus on decoration.
Since all boxes made by hand differ in quality from the original production products, you can play up this nuance and make an element of decor, not only beautifully decorating the gift, but also bringing beauty to the interior style.
Video on making a candy box
How to make a candy box with your own hands: