Filet crochet is a simple technique that was once used to create decorations for folk costumes, for sarafans or a towel for a wedding ceremony. The base is a mesh fabric that looks like a fishing net.
In the crochet technique, such a base is built from empty cells in the form of figured loops or a combination of rhombuses, hexagons and other volumetric figures. Knitting patterns allow you to create unusual pictures in the form of butterflies, stars, animals and more.
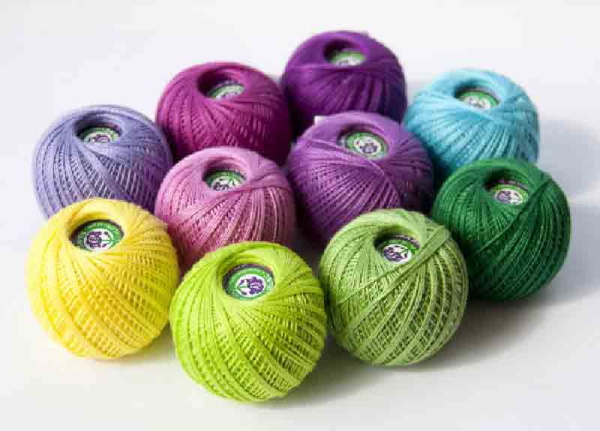
What threads are used?
Filet crochet patterns often turn out uneven due to differences in the length of the top loops. This can also be affected by deformed columns. To avoid this, it is necessary to tie the edges of the entire pattern with single crochets.
When choosing threads, it is also important to take into account the composition features.
The following problems may arise due to the wrong choice of yarn:
- Pattern distortion: Since filet crochet patterns consist of empty or filled cells, the work requires using thin yarns that will fit the empty stitches and fill them to form the pattern.
- Empty cells should be knitted from air loops, and filled cells - with double crochets. Due to the difference in knitting the loops, distortions in the pattern may occur if the threads are too thick.
- An incorrectly read diagram can also affect the pattern diagram. It is worth paying attention to the rows: if there is a numbering, you should knit from the first to the last row.
If there is no numbering, you need to navigate by the cells: a lasette in the form of an empty cell indicates the beginning of a row. The lasette arch and the bow will always be directed towards the next row, where the pattern begins.
- The nose of the pattern is presented in the form of a single crochet, and it is located between the loops. If present, it may mean that the pattern begins with the previous row.
- If the whole pattern starts with loops in one direction, then the pattern needs to be knitted from one row to the end, and then start the second row and knit to the end.
- In the case where the product needs to be started from the center, the pattern should indicate how exactly to start knitting the ring. The number of loops should also be indicated.
If the specified number of loops results in a crooked, larger or smaller product, you should take into account the type of threads used for filet knitting.
| Yarn thickness | Like the quality of the yarn, the thickness of the threads is determined by the functional component of the item. The pattern is dictated by the purpose of the future product. Rugs, bedspreads, warm loose sweaters, grabs and jackets can be knitted from medium-thickness threads that contain wool or semi-wool. |
| Yarn composition | Most often, the composition is varied for thin yarn. Cotton threads, viscose threads and silk yarn are suitable for creating thin napkins and other elegant products. |
| Worsted | Summer clothes such as T-shirts, blouses, dresses can be knitted from garus. The yarn is suitable for thin and durable products. |
| Crochet | This yarn is better suited for curtains, thick napkins and tablecloths. |
| Iris | Ideal for loose-fitting clothes. |
You can choose any yarn by color; it is permissible to knit the entire pattern with different threads. Experienced craftswomen also use acrylic and linen threads in their work. With their help, beautiful and dense patterns will be obtained. In typical works, you can use white yarn or the usual iris.
If desired, you can select sewing threads #10 and larger, as well as a hook from 0.5 mm and larger. Thin threads are combined with a hook #1, but as the thickness increases, the hook size should be increased.
Patterns for filet crochet can be knitted already having knowledge of how to knit air loops and double crochets. This is enough to create a simple pattern for a small piece of fabric or a complex pattern for a blouse or sweater.
It is also important to choose a small hook, learn to insert the tool behind the middle of the bottom column, and not behind the half loop. If the pattern and knitting technique are violated, the error can lead to an incorrectly knitted pattern.
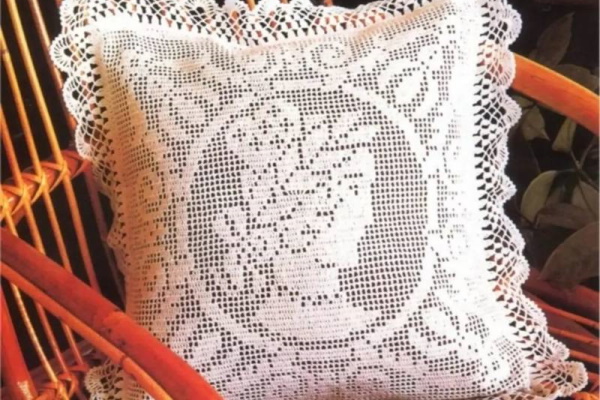
With the right yarn, you get a clear and beautiful pattern. You can knit Greek patterns, floral motifs and fruit figures. The easiest way to learn filet knitting is with a square or rectangular pattern. Small patterns are much more difficult to do without experience.
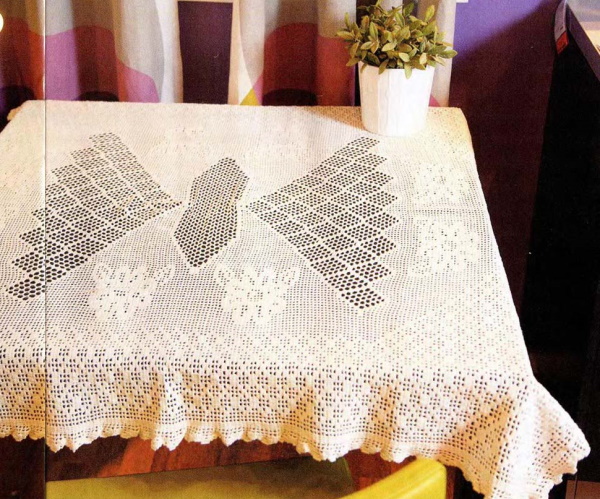
Large geometric patterns can be learned to make on wide patterns:
- tablecloths;
- curtains;
- curtains;
- pillowcases;
- napkins.
Some models allow you to make a pattern from a scalloped edge. This is a great decoration for typical crocheted jewelry. If desired, you can use natural yarn at first, choosing only high-quality materials such as Turkish mercerized cotton.
Basics of knitting filet patterns
Several types of techniques are practiced in the basis of filet knitting. As a rule, the pattern can contain only two types of loops - simple air loops and double crochets.
Also, some patterns include rapport samples, which contain information about the type of knitting:
| Initial chain | For many patterns, the initial chain stitch is a set of loops, the number of which must be calculated by multiplying the required number of squares by 3. If the square contains the required number of loops and is empty, then 5 VP must be added. If the square remains closed, then 3 VP must be added. This is considered the most common basis for calculating the required number of loops for a simple rapport. |
| Tulle weave | A V-shaped stitch pattern can be made to fill empty cells. If a rapport pattern needs to be made from double crochets, it is acceptable to use the tulle weave technique. Long chains of VP should be knitted from cells that are formed by chains of VP. |
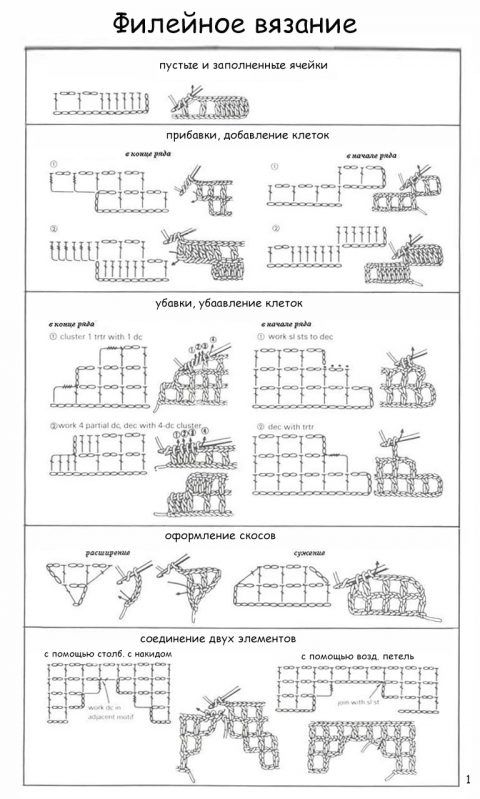
| Increases and decreases | Increases should be made by adding whole cells, not just air loops. If an increase needs to be made at the beginning of a row and a decrease at the end, this can be done by subtracting and adding the total number of cells from the VP. But when you need to make an increase at the end of a row and a decrease at its beginning, you need to use patterns. They are described below. |
An atypical increase in loops and cells at the end of a row and a decrease in the same at the beginning of a row will require more complex manipulations with the product.
To begin with, it is necessary to separate all possible schemes so that the action plan in individual rapports is clear to everyone:
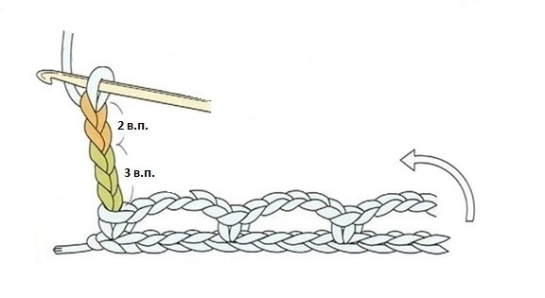
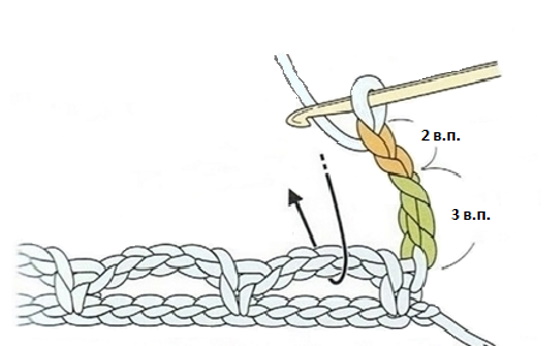
- Increase an empty cell at the end of a row — to do this, you need to knit 2 VP and separately knit a column with 3 yarns into the loop from which the previous column with a yarn was already knitted. The column with 3 yarns helps to form an additional cell with added edges.
- Adding a filled cell at the end of a row — to do this, you need to knit a double crochet and knit it into the same VP into which the previous double crochet was knitted.
Then you need to knit a double crochet stitch twice into the bottom of the previous double crochet stitch.
- Decreasing the cell at the beginning of the row - you must first turn the product and then tie a connecting post at the top of the last row.
After this, you need to knit the formed column with a yarn over so that the subsequent VP each of the following of the previous 2 VP were knitted with a column with a yarn over. If the previous loop is not empty, then you can knit a DC through the top of the VP.
The decrease of cells at the beginning of the row is carried out according to the same pattern, regardless of the type of cell (empty or filled) that needs to be knitted. Patterns for filet crochet can be combined by increasing and decreasing several cells.
The expansion or contraction of the fillet knitting fabric is based on working with whole cells, so it is often necessary to memorize the patterns of decreasing and increasing by 1 or several empty or filled cells.
In the filet knitting technique, methods are not used where decreases or increases occur due to 1-2 VP.
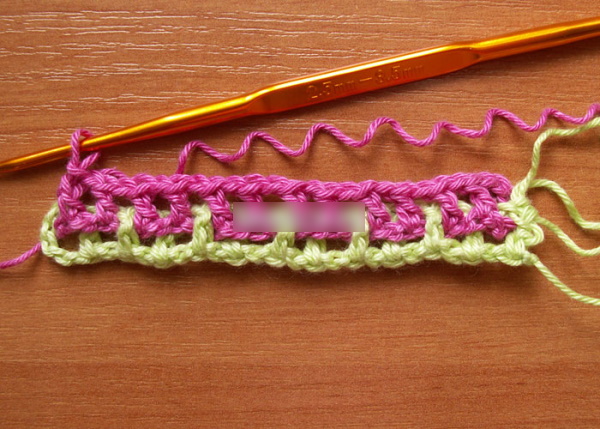
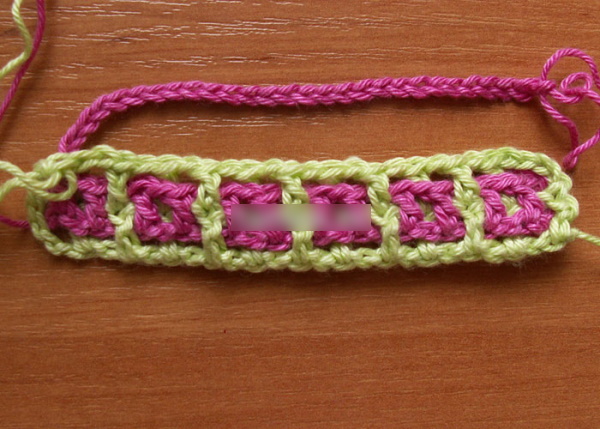
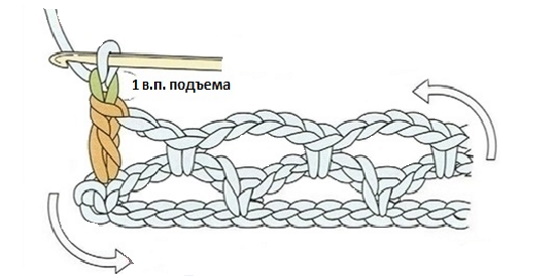
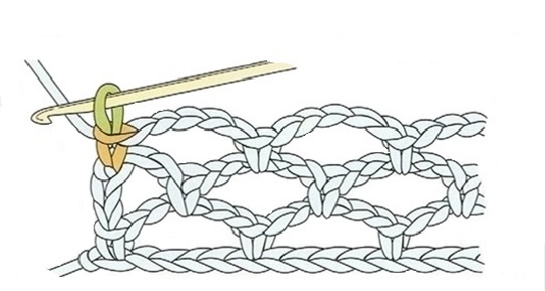
Formation of cells
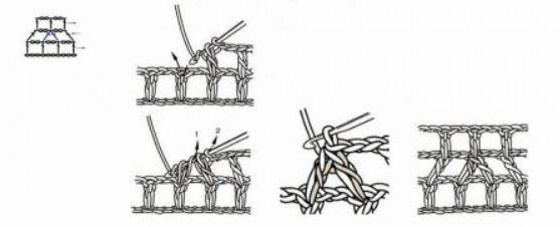
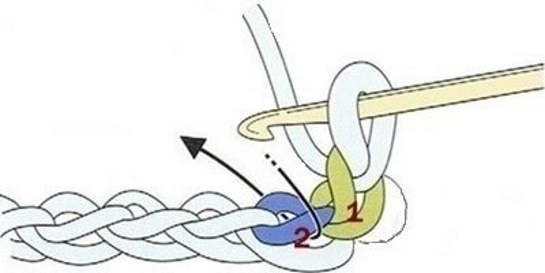
To form a new cell from an empty cell at the beginning of filet knitting, you need to:
- The work should be turned away from you.
- Next you need to make a chain of air loops.
- For each subsequent row, steps #1-2 are repeated, after which it is necessary to knit the lifting loops.
- Loops for creating spaces between posts should be cast on separately.
- Loops for gaps and rises are needed to maintain the evenness of the edges of the product.
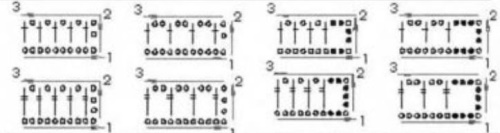
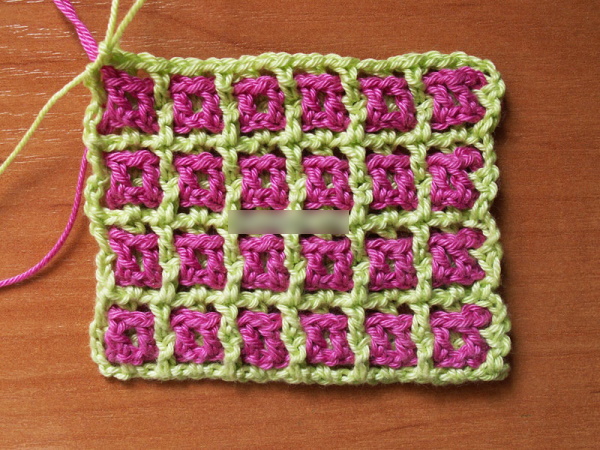
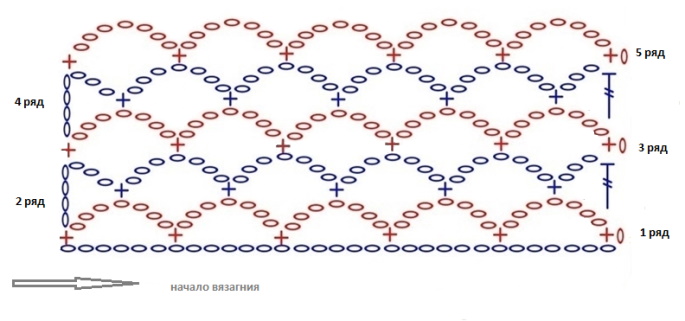
The diagram shows the process of creating cells.
Increase at the beginning of the row
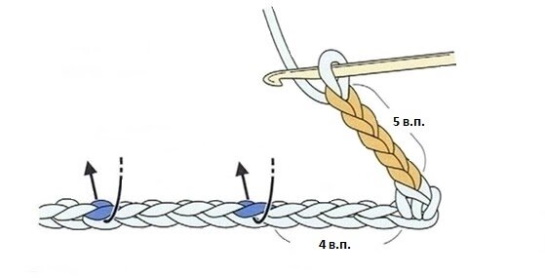
To make an increase at the very beginning of a row, you need to:
- To work, you need to dial a chain of air loops. For example, for the main rapport you will need 8-11 VP.
- Next, you need to calculate the number of air loops required to create a fillet pattern. The minimum number can be 1-2 VP.
- The number of yarn overs in the stitches affects the number of chain stitches collected.
- The number of double crochets and the number of loops will determine which loop you need to insert the hook into to fill the empty cell.
- The added cell can be filled with double crochets from the middle or the beginning of the cell.
Depending on the number of loops that need to be added at the beginning of the row, the number of initial VP for the set of the chain will depend.
Adding a few cells at the beginning of a row
To increase the fillet knitting fabric at the beginning of the row, you need to:
- The entire canvas must consist of empty and filled cells.
- To make an increase, you need to increase the number of loops in the entire chain by 3-4 VP.
- For each added cell, if there is more than 1, you need to make 4 VP increases for each of them.
- When calculating, it is necessary to take into account the number of squares and the number of loops for increases.

When calculating for a large canvas, the number of air loops is easier to count by empty and filled cells.
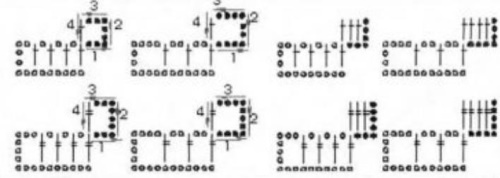
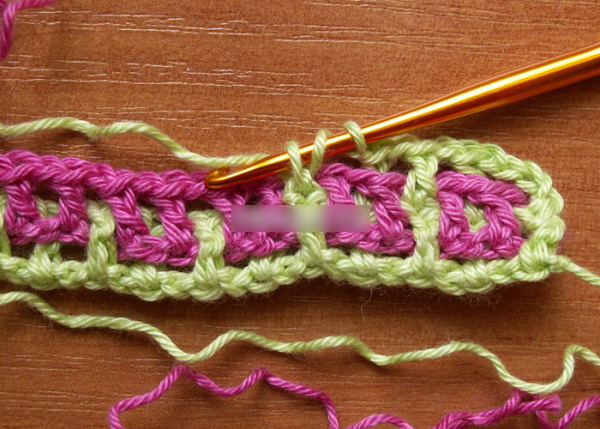
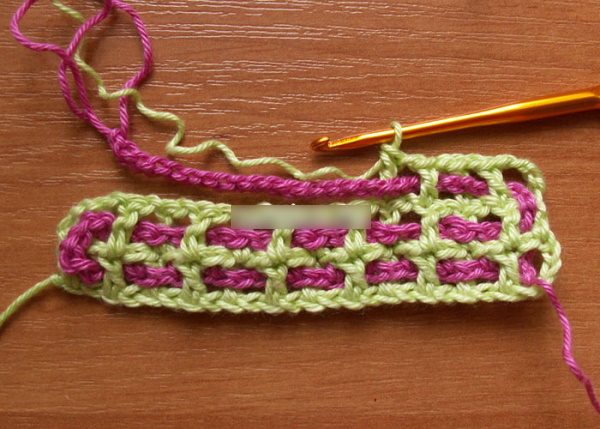
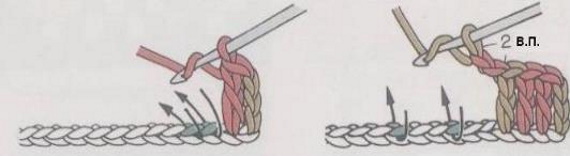
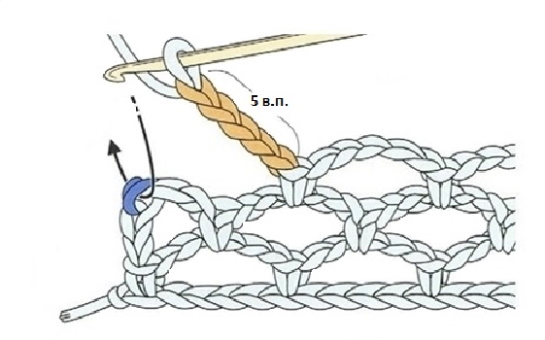
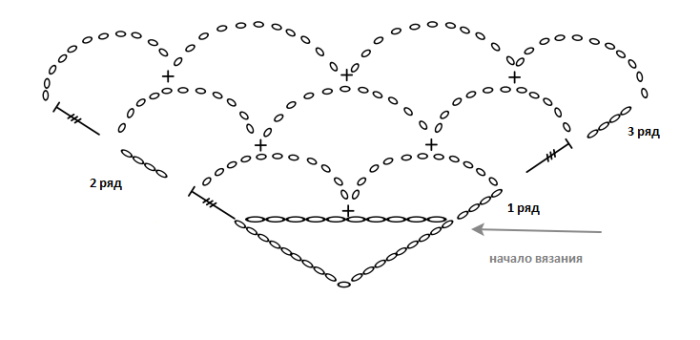
Increase at the end of the row
To add a cell at the end of a row, you need to:
- First, you need to knit an added column with several yarns. Their number depends on the number of the row in which you need to knit additional cells.
- Yarn overs should be knitted after knitting 1-3 VP.
- The hook should be inserted into the base of the previous stitch in the current row each time you need to make an increase.
- To ensure that the pattern is not shifted and that the design is neat and even, all lines of the row must be tied with additional loops.
- The double crochets along the diagonal and vertical lines can have different lengths. Therefore, sometimes you need to knit an additional yarn if you plan to increase the length with an additional crochet.

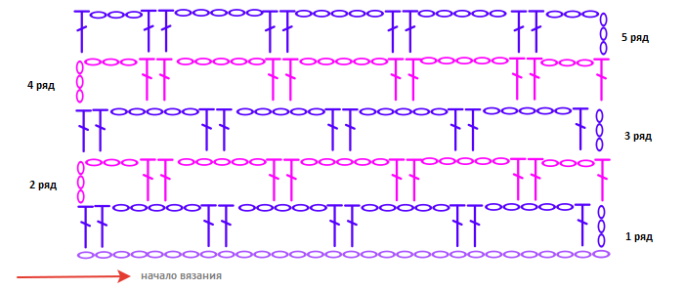
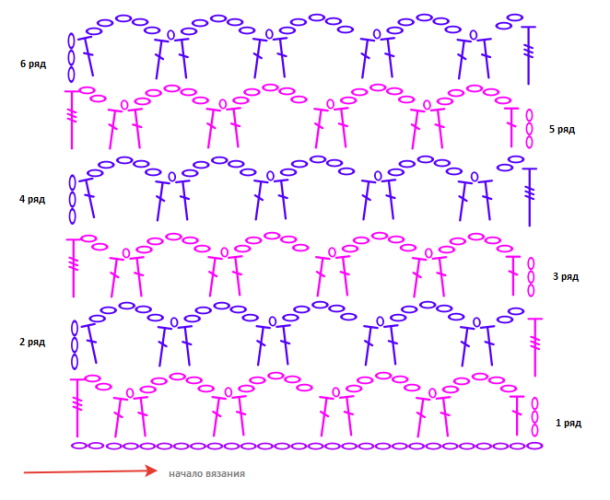
The diagram shows increases for several columns.
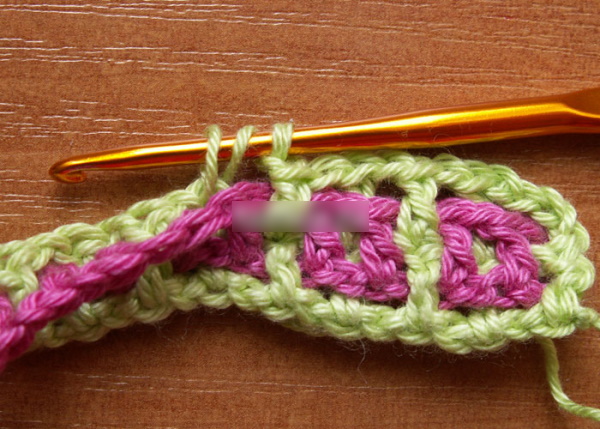
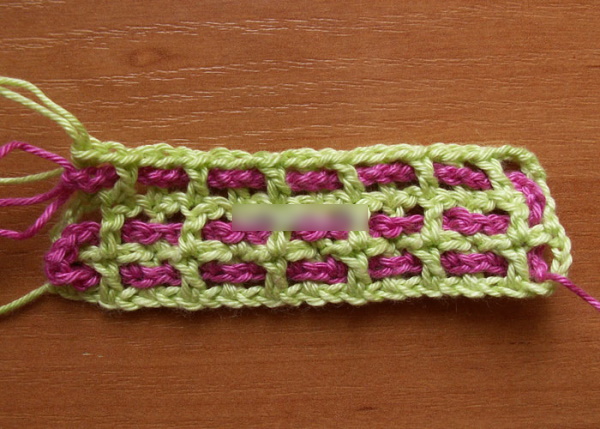
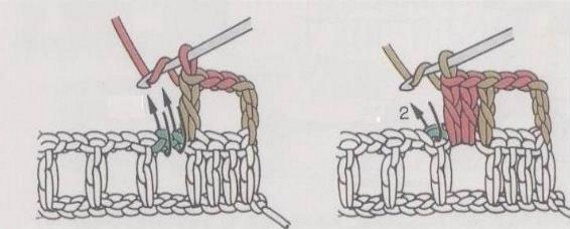
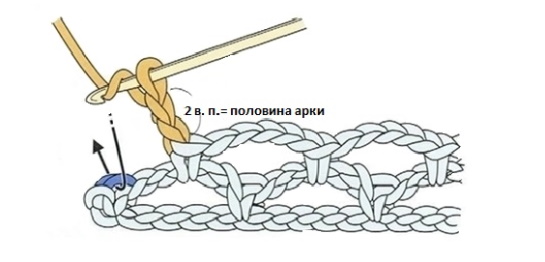
Adding a filled cell at the end of a row
To add a filled cell at the end of a row, you need to:
- 3 to 5 double crochets should be worked at the end of the row.
- New stitches should be knitted into the leg of the last stitch of the current row.
- The number of yarn overs in a column should be increased as the number of empty cells increases.
- If there are columns with 1 yarn over, then the added columns along the edges of the rows must be made with 1-2 additional yarn overs.

In the edge columns, 2 yarn overs are made to increase the row. In order to knit additional columns later, you need to calculate the number of additional cells in advance.
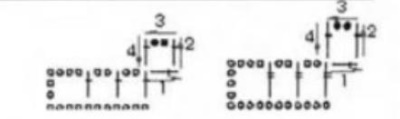
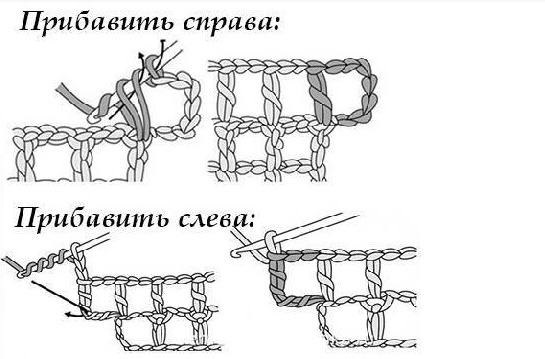
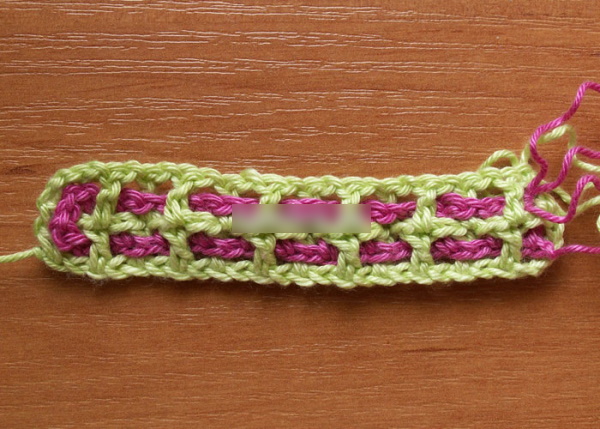
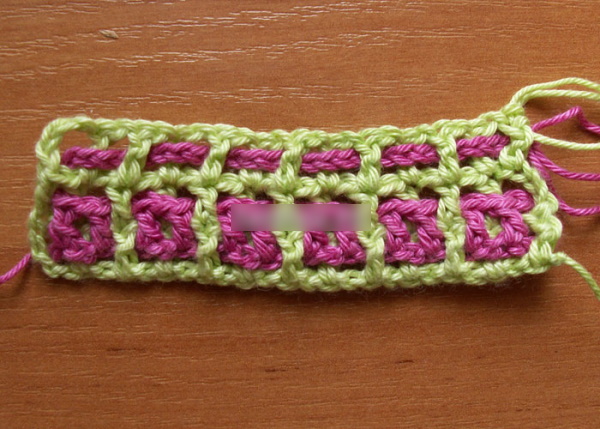
Adding empty cells to the right and left
To add empty cells to the right or left of the pattern, follow these steps:
- Unlike cell increases, empty cells serve as an extension of the fabric according to the knitting pattern or scheme.
- To add 2 empty cells on the right, you need to dial the total number of air loops for 2 cells.
- Then you need to knit a double crochet in the middle of the total number of loops in the chain, dividing the length into 2 parts.
- Having retreated the same number of loops, you need to knit a double crochet into the leg of the previous column of the bottom row.
- The left one is a little more complicated: you need to cast on the same number of loops for 2 cells, knit one cell into the leg of the column of the previous row so that the thread comes out to the side of the pattern.
- The thread must be passed through the loop along the vertical position of the added cell, after which the same number of VP must be dialed for the second cell, knitting a single crochet.
The filet knitting pattern cannot be done without increases and decreases of loops. They are needed for the correct display of the pattern according to the scheme. With the help of an additional hook, you can knit complex patterns, multi-level patterns and multi-colored drawings.
You can't do without decreases not only along the edges of the pattern, but also in the middle of the fabric. Without these skills, knitting something complex and large will be extremely difficult.
Decreases within the pattern
Any increases or decreases will be clearly visible inside the fabric, so accuracy in work and precision in calculating loops should be a top priority.
Step by step:
- First, you need to determine where exactly in the pattern the decrease should be.
- To decrease the pattern by 1 cell, you need to knit the VP together with the base loop of the next hook entry. Thus, the vertical single crochet will have a slope.
- To decrease by 2 cells or more, you need to knit a VP together with the base loop of the next hook entry, adding a yarn over. Then from the yarn over, you need to knit a single crochet, inserting the hook into the base of the next cell.
- This will result in two single crochet stitches coming together and having a common top.
- If you need to decrease by 3 cells, you should decrease for 2 together, and then knit 1 cell according to the pattern for an even row. Odd rows imply a pattern when you first knit 1 empty cell, and then two cells together, leaving the slope where it should be according to the rapport.
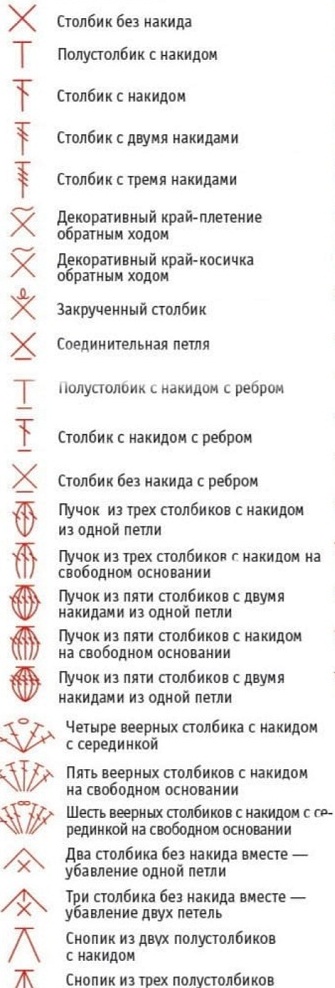
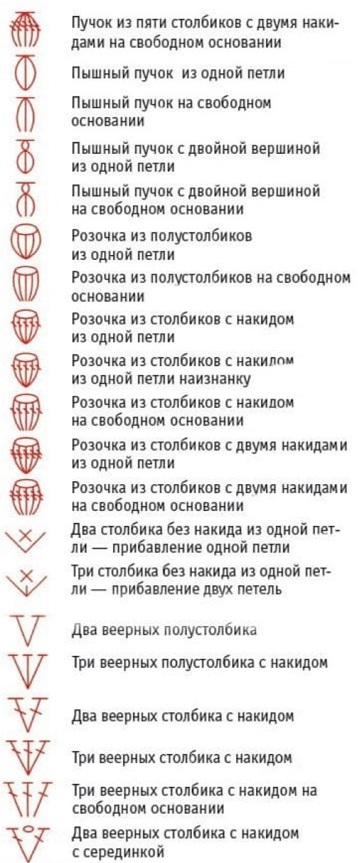
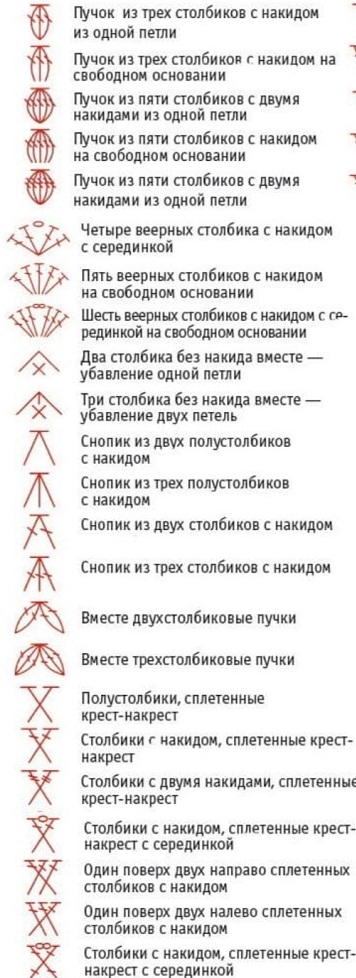
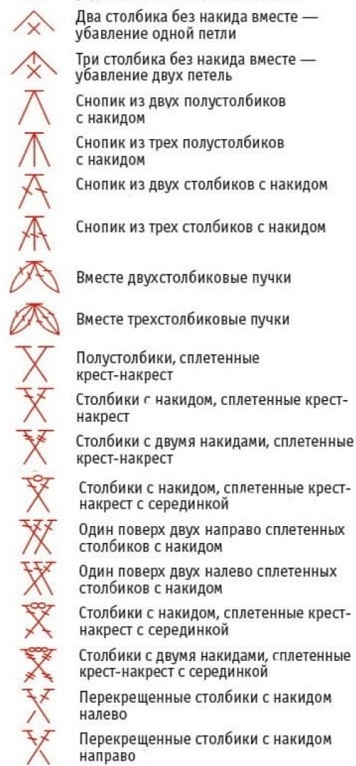
You can navigate the pattern faster if you know the symbols and techniques for performing all the nuances of filet crochet.
Filet weave
This knitting technique is used where it is necessary to knit not jerseys, but knitted patterns.
Fillet interlacing involves:
- The posts that stand next to each other should not be connected to each other.
- There are voids between the columns.
- The whole product looks like embroidery due to the alternation of empty spaces and filled cells.
- Braided fillets are considered universal for many women's openwork patterns, outfits and the creation of ethnic Ossetian images.

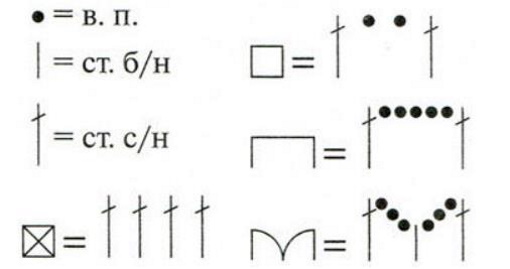
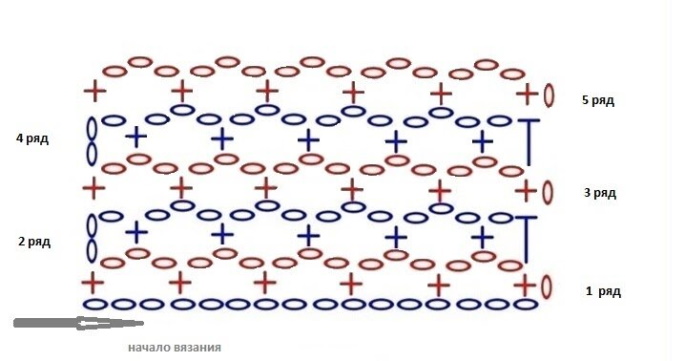
It is also important to learn how to read patterns, regardless of the type of fillet weaving. These are the basic symbols that are most often found in works.
To read correctly, it is enough to learn 3-4 conventional drawings, by which you can navigate the patterns:
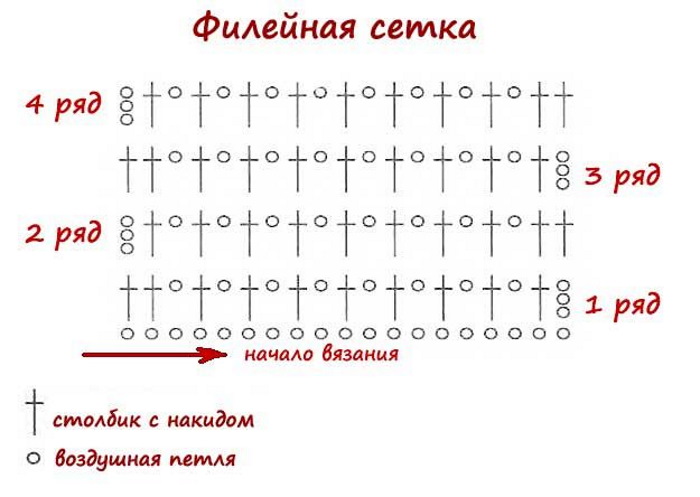
- Ordinal numbers in all diagrams are designated by a number.
- At the beginning of each row there is an arrow that shows the direction of reading the diagram and in which direction the pattern is directed.
- Empty cells are marked with light, dark ones are filled. They can also be found with crosses inside the voids. In this case, it means that you need to knit 3 double crochets.
- Empty cells indicate knitting 1 column and 3 VP.
- All rows will be marked in opposite directions, and if one row ends, the fabric must be turned over to begin the next row. Therefore, it is generally accepted that filet knitting is a double-sided fabric with a different pattern.
- When a rapport is repeated in a single pattern, it is customary to delimit it with vertical red lines. Their number is also determined by the size of the product. You can independently reduce or increase their number.
If the patterns take into account other types of loops and columns, this is always indicated in the description of the rapport. The additional columns used are also reflected schematically in the description of the work.
In addition to the filet weave based on the main types of columns and loops, there are some varieties of knitting. All of them consist of the basic principles of weaving, but with different alternation of elements, which allows you to create one or another type of pattern according to the rapport.
| Monochrome | Filet knitting, like monochrome embroidery, involves the use of a limited set of yarn shades - no more than 2-3 colors. The canvases on the panel can contain only shades of one color, and this is great for portraits, images of animals or other subjects. |
| Volumetric | By means of oblique weaves and connections, you can create a volume effect. In this case, filled cells are knitted, and the hook is inserted into the space after the 3rd double crochet. They should all be tied with 3 inclined loops, and the hook should be inside the loops. At the end, a double crochet is knitted according to the pattern, after which 5 VP are formed on the hook. They need to be knitted together to get a volume cell. |
| Embossed | It is achieved by knitting several voluminous loops in a row. This form of filet knitting is suitable for creating a relief composition for decorating bags or children's appliques. |
| Filet patchwork | Patchwork is very easy to repeat once you have mastered filet knitting. The technique allows beginners to knit patterns with easy, similar patterns to combine them into a single patchwork fabric. Separately knitted squares (cells) can be knitted together to create a stole, blanket, bedspread, and more. The most popular works in this style remain tunics by V. Dyachenko. |
Patterns for filet crochet can be found in master classes, as well as in creative magazines. To enlarge the patterns, you can print the drawing on several A4 sheets.
As you master the skill, you can learn to knit a border to decorate bed linen, napkins as decoration, linen and towels for various celebrations. In addition, raglans, tops and blouses with sleeves, which consist of a front and a back, are now popular.
Crochet fillet patterns
If it is still difficult to read the pattern, but you want to knit a sample piece, you can use the knitting pattern on a fillet mesh.
It is a prototype of a canvas for embroidery, but differs in some features:
- According to the finished pattern, the fillet can be knitted with a plain stitch or replaced with a basting stitch.
- Cotton or floss threads are suitable.
- Guipure patterns are made with a lace stitch (figure 8 or web).
- The stretched threads serve to form branches and leaves.
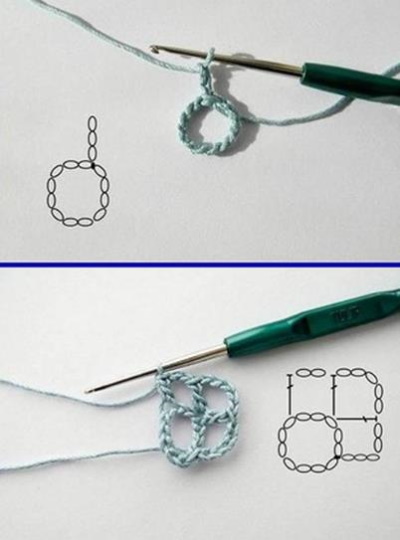
If there are no ready-made patterns, you can use basic knowledge by typing the grid-forming row yourself:
- Each piece should start with a chain VP, 3 sts for lifting (=1 dc), 1 yarn over.
- Afterwards, you need to insert the hook into the 1st loop at the end of the row.
- Next, tie 2 dc + 2 dc together.
- After filling the cell, you should dial 2 VP (= empty cell) and another 4 CH.
- Then in the current 2nd row you need to knit an empty cell - dial 3 VP + 1 for lifting (= 1 dc) at the top of the cell, and then knit a yarn over. The hook should be inserted into the VP above the 4th dc.
- The resulting 2 CHs should be filled, but first they need to be knitted around the VP arches from the 2nd row from the bottom.
- In the 2nd filled cell, the 2nd SN needs to be knitted under the half loop inside the row from under the SN.
The pattern may also be circular, and the knitting technique may differ.
 | 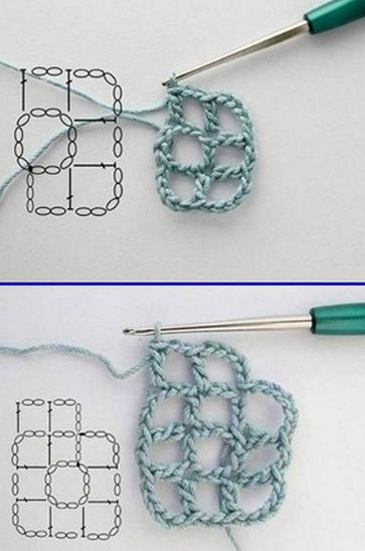 |
A mesh grid like canvas can also be used in fillet knitting patterns. However, its density and purpose should be taken into account. The possibilities are much fewer than those of independently composing a schematic grid.
It is most often used when a rigid base is needed to create a complex design. After finishing the work, the canvas is removed.
Master classes
In these works we will use hook No. 1 and openwork cotton yarn (can be replaced with folk thread). The patterns contain only empty and filled cells, the principle of formation of which is indicated in the previous sections.
Lace front blouse
To knit the back, you can use the same pattern, or replace all the cells with empty cells.

To knit the front you will need:
- First, you need to prepare the materials for knitting, and if you have a pattern, start reading the rapport from the red line.
- Next, you need to knit an empty cell (1 CH, 2 VP), then skip 2 columns or VP from the bottom row (when knitting a new rapport to repeat the pattern).
- Then you need to knit each row from empty and/or filled cells, which at the end is knitted with 1 CH into the base of another CH of the previous row.
- After breaking the thread, you should knit all the edging for the bottom edge of the product along all 3 teeth.
- To finish, you need to connect the two parts of the blouse and make the edging by casting on stitches according to the pattern.
- According to the pattern: 5 sc, 1 picot (repeat to the end of the row).
- To process the neckline, you should knit SC in 2 rows, and an additional row according to the pattern: 5 SC, triple picot (1*), repeating to the end.
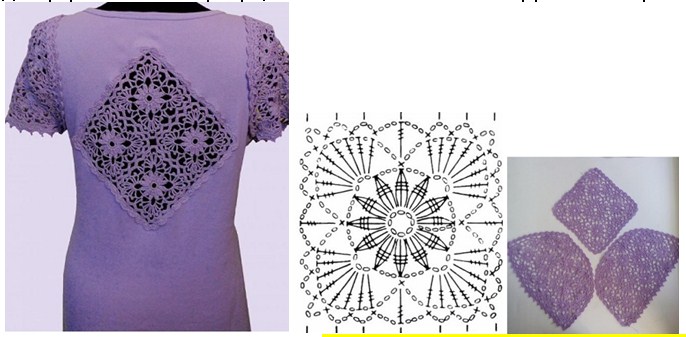
You can also use the pattern for knitting a rapport on rectangles. They can be sewn together to make a boho-style tunic. Based on 4 parts, you can knit a cape, a mesh veil and a summer scarf.
It is also acceptable to knit only a border or an insert into a finished product. Lace edging patterns transform old things and fill a wardrobe with something unusual. The edging is knitted according to the pattern from the bottom up so that the pattern is located sideways - on one side is the top of the pattern, on the other - the base.
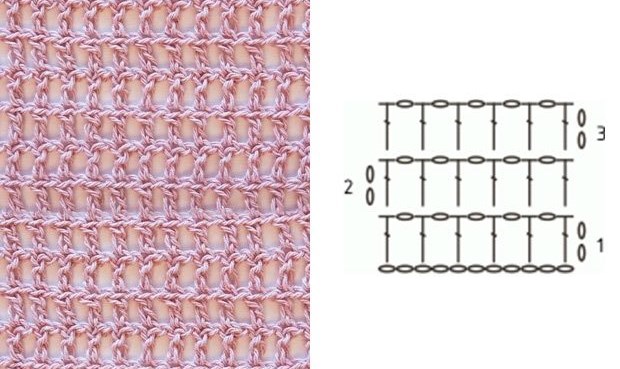
French grid
This model is distinguished by the arrangement of the fillet squares and can be used to decorate the patterns on the canvas.
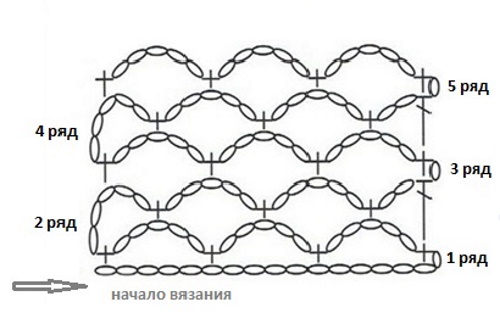

To add variety to the classic fillet, you can add a rapport to the middle of the product:
- First you need to dial a multiple of 4.
- In the 1st row you need to knit 1 PP, 5 VP, 1 SNB in the 10th VP from the hook.
- Next, you need to repeat the pattern *5 VP, skip 3 VP, 1 SC* as many times as necessary until the end of the row.
- Then for the 2nd and subsequent rows you need to dial 1 VP at the beginning, and repeat the pattern *5 VP, 1 SC in the loop of the VP from the previous row* until the end.
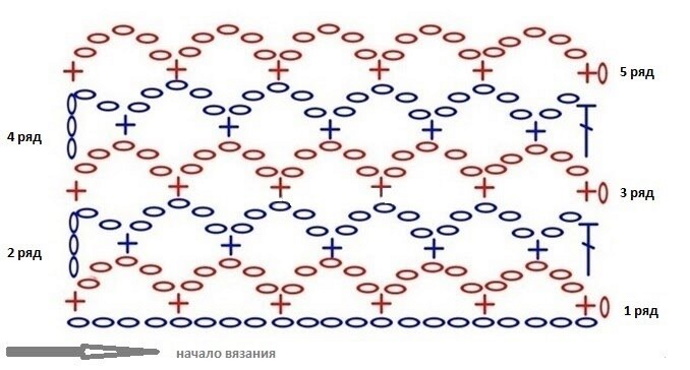

To place the French mesh pattern inside the fillet weave fabric, you need to additionally knit 1 PP between the knitting techniques. Fillet knitting patterns are considered the most primitive in terms of the number of symbols, and the most complex in terms of execution technique.
Since there are 3-4 types of loops in crochet patterns, the rapport is quite easy to remember, which simplifies the knitting process due to the same type of actions.
Moreover, with the help of filet knitting you can not only create a beautiful wardrobe, but also update it with the help of elements in this technique.
Video about knitting
Filet crochet patterns: