Drawing a titmouse will help a child to expand their knowledge about this type of bird. To get started, you need to prepare all the necessary tools, review several step-by-step master classes and choose a picture to copy.
What you need for drawing
You can draw a titmouse together with your children using different techniques. The table lists all the necessary drawing tools and their purposes.
| Simple hard pencil | Used to create a sketch. |
| Soft pencil | With its help, you can depict shadows in the drawing and perform the final outline. |
| Hard-soft pencil | It is needed for drawing details. |
| Eraser | To remove excess pencil lines |
| Compass | Helps you draw even circles when creating a sketch |
| Cotton swabs and pads | With their help you can carefully blend graphite or artistic pastel on paper. |
| Art brushes | It is advisable to prepare brushes of different hardness and thickness so that the picture painted with paints turns out beautiful. |
For color drawings you will need paints, pencils or markers in natural shades.
What colors are needed to color the drawn titmouse:
- black;
- yellow;
- green;
- grey;
- brown;
- blue;
- blue.
To paint with paints, you need to choose thick paper that will not deform from moisture. In craft stores, you can buy special sheets for watercolors. They have a rough surface that absorbs paint well and does not allow it to spread.
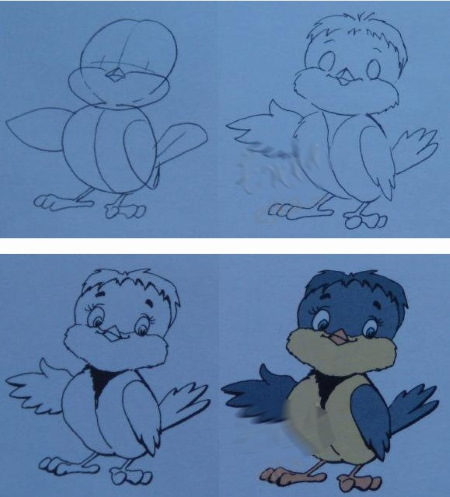
Step-by-step instructions for drawing a titmouse with a pencil
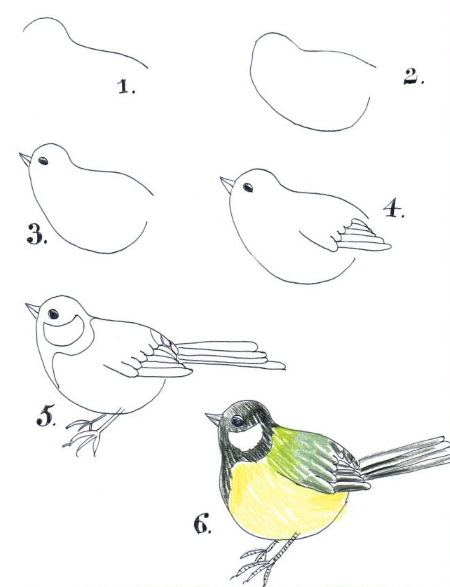
A titmouse (a drawing for children over 10 years old should be more detailed than for primary school and preschool students), drawn with a pencil, despite the lack of color, can look beautiful and realistic. Before work, you should sharpen the pencils well so that the lines are thin and neat.
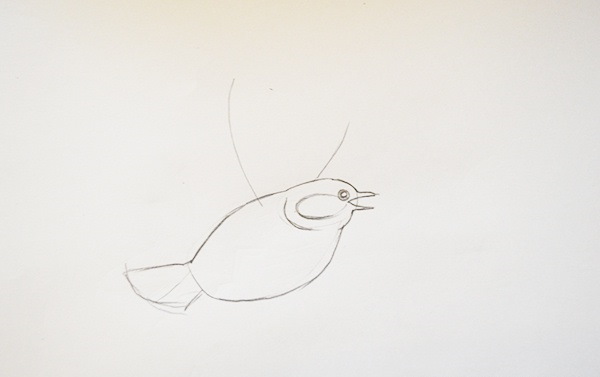
Contours
A sketch needs to be made with a hard pencil.
Procedure:
- Draw a small circle in the center of the sheet. You can use a compass.
- Draw a large oval under the circle. This will be the bird's body. The figure should be positioned at an angle. Its top should intersect the previously drawn circle closer to its center.
- The titmouse in the drawing will be turned sideways. All large details should be drawn in accordance with this position.
- From the top of the oval, slightly extending beyond its opposite side, draw the wing of the bird.
- On the small circle, mark the location of the beak. Draw it in the form of a triangle.
- Add a tail. Tits have large wings, so they will hide the base of the tail.
- Draw a round eye and outline the shape of the white "cheeks".
- Use arched lines to depict the shape of the feathers on the wing.
- Draw feathers on the tail.
- Draw the legs. They should be curved. Birds' knees start high and bend backwards.
- Draw the shape of the neck and abdomen.
Use an eraser to erase all unnecessary lines.
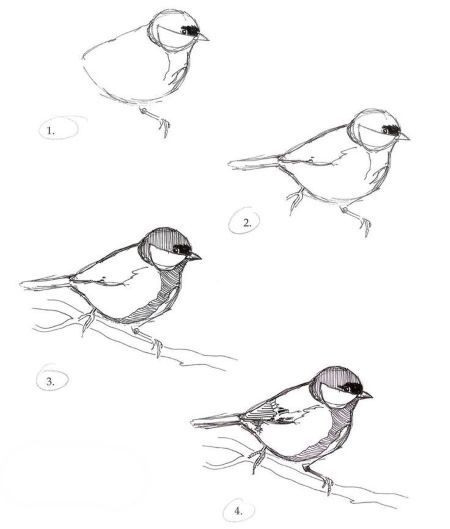
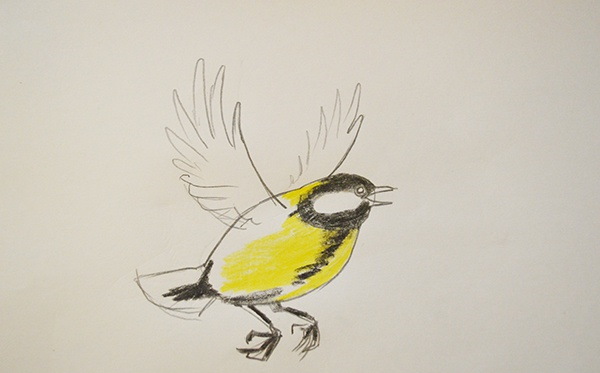
Detailing
Next, you should detail the drawing using a hard-soft pencil.
Procedure:
- Shape the feathers on the wing.
- Draw wrinkles and stripes on the paws.
- Use a zigzag line to outline the bird's cone.
- Draw fluff sticking out on the chest.
- Draw sharp claws on the fingers.
- Draw a branch under the paws on which a titmouse sits.
- Draw the bark on the branch, buds and small leaves with veins.
- Mark the nostrils on the beak.
- Draw 1 small circle inside the eye. This will be a highlight.
Erase any extra strokes with an eraser.
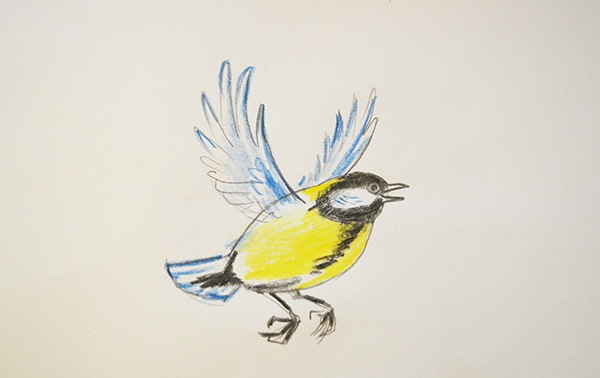
Shadows and dark areas
Shadows are applied using a soft pencil.
Procedure:
- Color the bird's head with short vertical strokes.
- Shade the feathers on the wing. Leave a gap of about 2 mm between each feather so that they do not visually merge into one solid color.
- Paint the feathers on the tail.
- Without pressing on the pencil, shade the lower part of the branch.
- Mark the shadow on the leaves.
- Shade the tit's legs and the lower part of the abdomen.
- Blend the strokes on the branch, leaves and abdomen with your finger or a cotton swab.
Use an eraser to remove any extra strokes and outline the picture with a soft pencil.
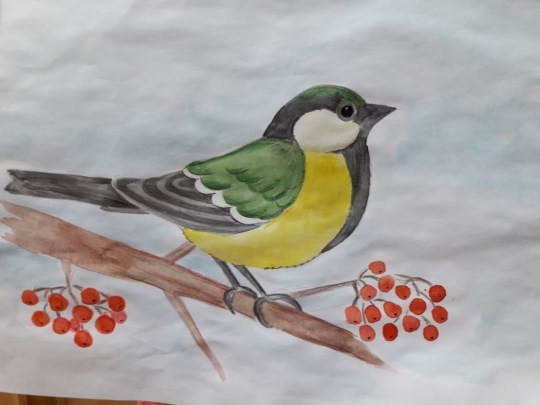
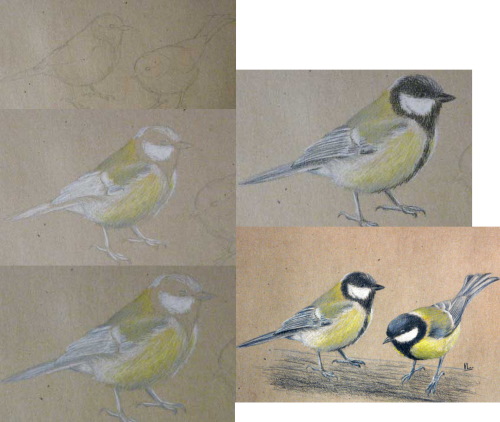
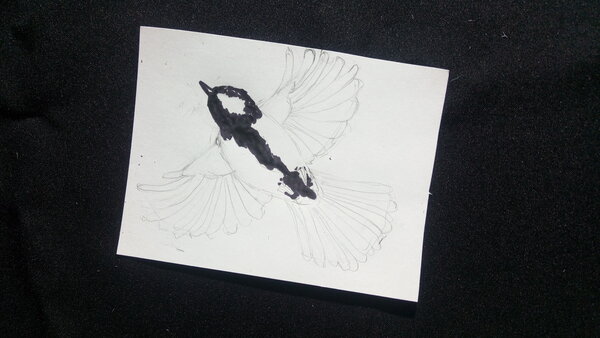
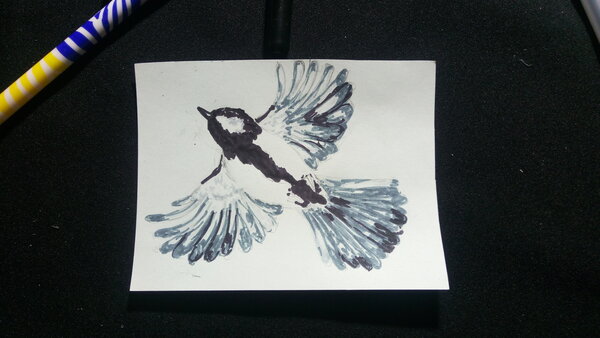
Step-by-step instructions for drawing a tit with paints
The titmouse (a drawing for children in elementary grades, should be easy to do, without small details) in the picture will turn out bright if you paint it with acrylic paints. When using other materials, you should take into account their features.
For example, gouache fades by 1-2 tones after drying, so when painting, you will need to apply 2 layers of paint. Watercolor is a translucent paint and the shades will be pastel, unsaturated.
This master class describes step by step the process of painting a bird with watercolors.
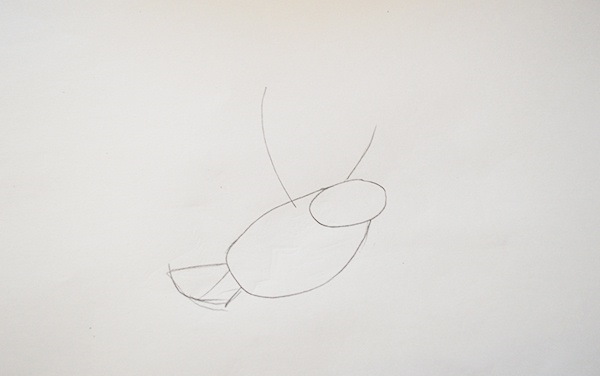
Sketch
Using a hard pencil, make a schematic sketch.
Procedure:
- Draw a small circle in the center of the sheet.
- Draw an oval at the bottom, the top of which will intersect the circle in the center.
- Mark the tail and wings of the bird.
- Draw thin legs and fingers.
- Add eyes and a sharp, triangular beak.
- Draw a tree branch with a titmouse sitting on it.
Use an eraser to remove all unnecessary lines.
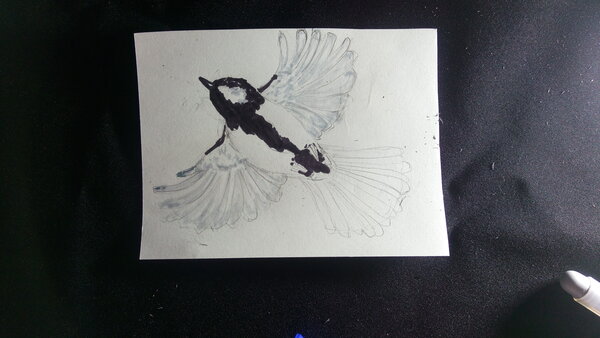
Coloring
Before coloring, the sheet of paper needs to be made wet. To do this, wet a wide brush in water, squeeze it on the edge of the jar and go over the drawing, slightly going beyond the contours of the sketch.
After 1 minute, when the water has slightly soaked into the paper, you can start coloring:
- Using a medium-thick brush, pick up some yellow paint and paint the bird’s belly and the upper part of its wings.
- Wash the brush, fill it with blue watercolor and paint the head and tail using dabbing movements.
- The paint will spread slightly. This is how it should be. Small streaks along the contour of the head and tail will imitate small feathers. The excess can be blotted with a cotton swab or disk.
- Add some blue to the wings. You need to paint over the yellow before it dries completely. As a result, the watercolor will mix and you will get a greenish tint.
- Wait until all paints are completely dry.
When painting with acrylic or gouache, there is no need to wet the sheet of paper.
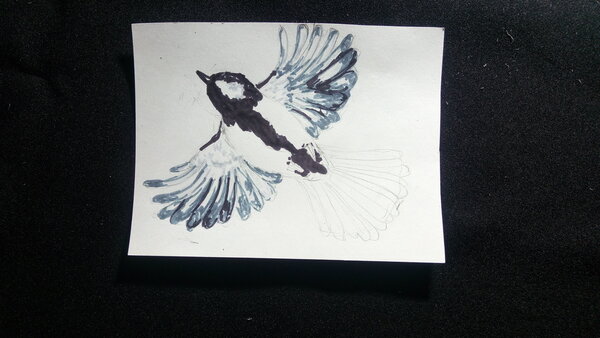
Detailing
You need to draw the details with a thin brush with soft bristles.
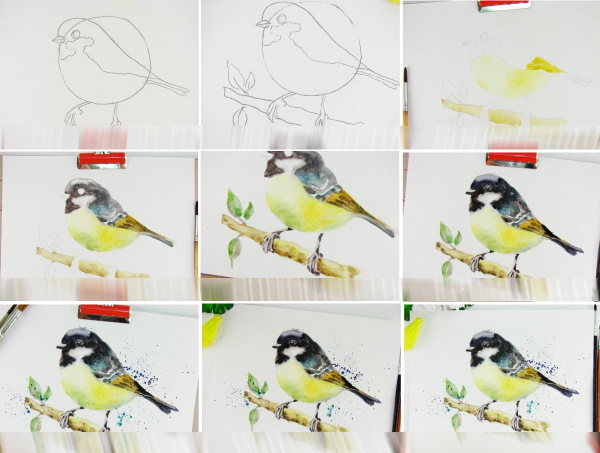
Step by step:
- Take black paint and dilute it with water on the palette in a 2:1 ratio. You should get a dark gray, translucent color.
- Dip the brush in the resulting paint and draw the feathers on the wings and tail.
- Color the top of the head, outline the "cheeks".
- Draw the beak, color the eye.
- Dry the drawing. Use white paint to draw the feathers on the wings and to mark the glare in the tit's eye.
- Paint the legs with brown paint. Without washing the paint off the brush, lightly moisten it with water and paint the branch.
Wait until the paints are completely dry. If desired, the drawing can be outlined using black paint and a thin brush or a black ballpoint pen.
Pattern variations
The drawing technique should be appropriate for the child's age.
As a rule, pencil drawings are more detailed. Using this style of drawing, you need to follow the direction of the strokes, adjust the pressure on the pencil and be able to combine different colors so that they look harmonious. For preschoolers, such a drawing will be difficult, so it is better to use wide brushes and paints.
Pencils and markers can be used for classes with children who study in elementary grades. This technique will help them train their hand and learn writing skills more easily. Further in the article, you can consider several master classes on drawing a titmouse in different techniques, suitable for children of certain ages.
Finger painting
Children from 1.5 to 3 years old can be offered to draw a tit on paper with their fingers. For this, it is advisable to purchase special paints that are easy to wash off the skin and do not cause allergies. You can wash the pigment off your hands during the drawing process with wet wipes.
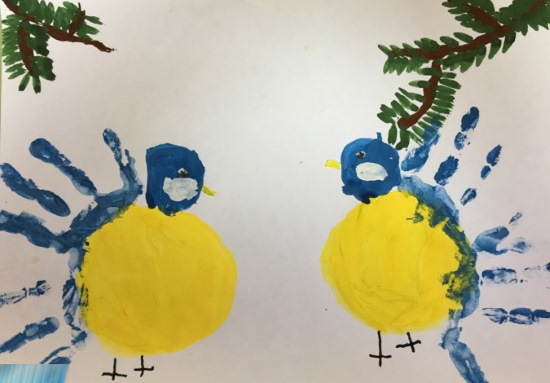
How to draw:
- It is difficult for small children to draw small details, so for this lesson you need to take A3 paper. Let all the elements of the drawing be large.
- Apply yellow paint to the child's fingers and smear it on the sheet in the form of a circle. This will be the bird's body. Parents should guide the child's hand.
- Take blue paint and draw a small circle on top. This will be the head.
- Paint 3 of the child's fingers blue and place them on the back of the future bird. The imprint of each finger will imitate the feathers on the wings.
- Draw the tail in a similar manner.
- Take white paint and paint "cheeks".
- Dip the tip of your little finger in yellow and stamp it on the beak.
- Also, use your little finger to draw a white dot in the area of the bird’s eye.
- Take black paint and make a smaller dot inside this white spot.
When the picture dries, use a black marker to draw the titmouse's legs.
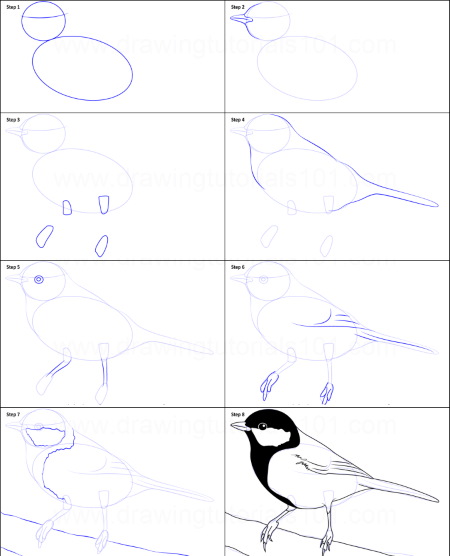
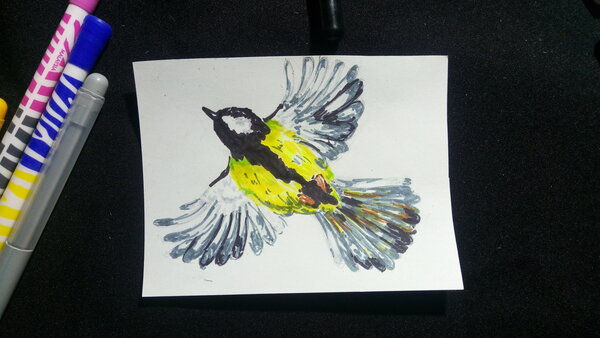
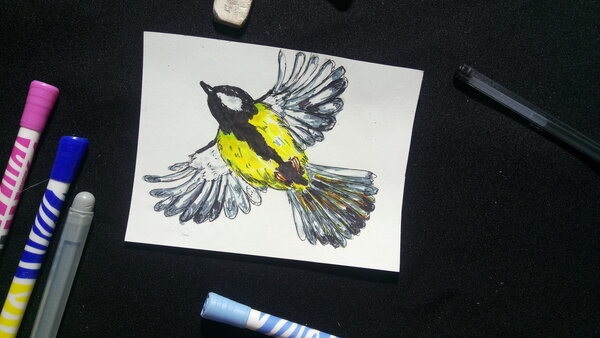
How to Draw a Titmouse with Colored Pencils
The titmouse (a drawing for children can be simplified if you draw the bird from the side) in the picture can be drawn with regular or acrylic colored pencils. In the latter version, the drawing will be brighter and more colorful. This style of drawing is suitable for children from 9 to 12 years old.

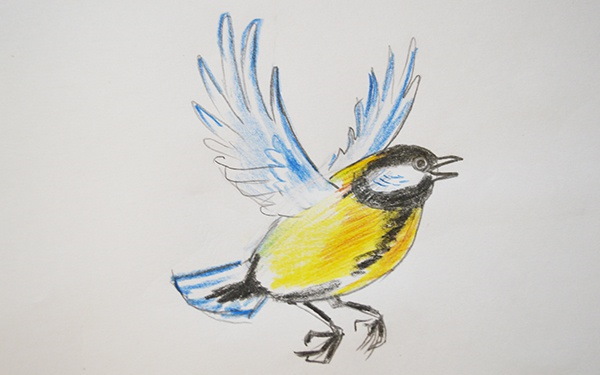
How to draw:
- Make a sketch with a simple hard pencil. Draw a small circle and a large oval under it. It will be the basis for the body. The figure should be positioned at an angle.
- Draw a bird's wing.
- Mark the location of the beak.
- Draw the tail.
- Draw the eye and outline the shape of the "cheeks".
- Outline the shape of the feathers on the wing and tail.
- Add thin legs.
- Work on the tit's body cones with smooth lines. Draw the shape of the neck and abdomen.
- Use an eraser to erase all unnecessary lines.
- Give the feathers on the wing and tail a rounded shape.
- Draw wrinkles and claws on the paws.
- Depict the fluff sticking out on the chest.
- Finish drawing the branch on which the titmouse sits.
- Mark the nostrils on the beak.
- Draw 1 small highlight inside the eye.
- Erase any extra strokes with an eraser.
- Use a yellow pencil to shade the bird's belly.
- Paint the back green.
- Use a brown pencil to outline the legs and shade the branch.
- Paint the head and wings black.
- Use a blue pencil to color the feathers on the tail and add a few strokes to the wing.
Make the final outline using a black marker.
Master class on drawing a tit with artistic pastels
A titmouse (a drawing for children can be done without using a simple pencil), drawn with pastel, will be bright, and the colors in the picture will smoothly transition from one to another. This drawing technique is suitable for children from 4 to 7 years old.
How to draw:
- Make a sketch with a light chalk. Draw the head and outline of the body.
- Use yellow pastel to make a few strokes on the abdomen and on the upper part of the wing. Blend the strokes with your fingers.
- Use light blue and blue chalk to color the feathers on the wings and tail. Blend the strokes so that the colors blend together.
- Paint the upper part of the wing with green and blend.
- Spray the design with hairspray and leave to dry.
- Use black chalk to outline the bird, color the top of the head, add stripes on the wings, and outline the “cheeks.”
- Use a cotton swab to blend all the dark areas.
- Use the edge of the chalk to draw 1 eye and color the beak.
- Cover the drawing with varnish again.
- Use white chalk to draw feathers on the tail and wings.
- Add a highlight inside the eye and on the top of the beak.
- Use brown chalk to draw a branch under the bird. Blend the strokes in the center of the branch's cone.
- Draw the legs with black pastel.
- Use grey chalk to make a few strokes on the “cheek” and blend them with a cotton swab.
- Spray the design with varnish.
Varnish is needed to fix the loose texture of pastel on paper. Thanks to the varnish layer, light shades applied to the surfaces of dark ones remain bright. The final coating fixes the drawing so that it does not smear or stain your hands.
How to draw a titmouse with markers
For drawing with felt-tip pens, you should choose thick paper so that the coloring pigment does not soak into it and does not protrude from the back of the sheet. The technique of drawing with felt-tip pens is suitable for children from 7 to 12 years old.
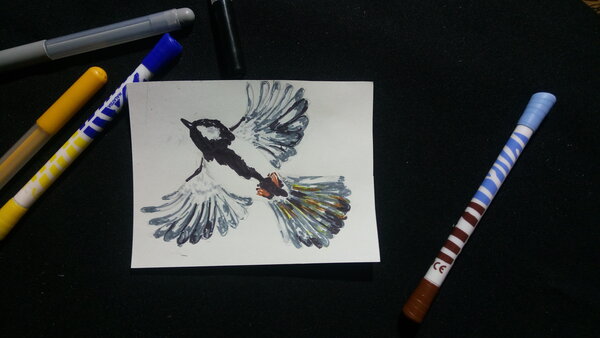
Procedure:
- Using a simple hard pencil, draw a circle and an oval underneath it.
- Draw a wing and outline a triangular beak.
- Draw the tail and eye. Mark the shape of the "cheeks".
- Draw feathers on the wing and tail.
- Add thin legs.
- Draw the shape of the neck, back and chest.
- Use an eraser to erase all unnecessary lines.
- Finish drawing the branch on which the titmouse sits.
- Draw 1 small highlight inside the eye.
- Use a yellow marker to shade the bird's belly.
- Paint the top of the wing green.
- Use a brown marker to outline the legs and color the branch.
- Paint the head black.
- Use a blue marker to color the feathers on the tail and wings.
- Outline all the feathers on the tail and wings in dark blue around the conch.
- Use a black marker to outline the drawing and color the eye and beak.
When coloring pictures with felt-tip pens, you need to divide them into different sections. All strokes should be applied in 1 direction, placing them close together so that there are no gaps between the lines. You cannot paint 1 section in more than 2 layers, otherwise the paper will roll up.
Examples of images for copying, tips for beginners
To make the drawing beautiful, you need to follow some recommendations.
Tips for Beginners:
- When drawing a realistic tit, you should copy the shape of its body from real photographs.
- Preschool children can be interested in drawing by asking them to draw a titmouse in a cartoon style.
- It is not necessary to draw small feathers. It is enough to depict their general outlines.
- When coloring a picture with felt-tip pens, you should start with light shades so as not to accidentally stain the tip of a light felt-tip pen with dark pigment.
- Drawing techniques can be combined. For example, paint the tit with colored pencils and draw small details with felt-tip pens.
- Strokes made with pastel chalks can be made brighter by first wetting the sheet of paper.
- Blending with cotton swabs gives a translucent effect. You can smear the graphite on the paper more strongly with your fingers.
- The highlights in the bird's eyes can be painted with white corrector.
- To quickly draw several birds on 1 sheet, you can use a template. Draw the body shape of a tit on cardboard, cut it out and trace it on paper, then detail each drawing separately.
- The thickness of the lines drawn with a brush can be adjusted by the pressure applied. You can also draw with felt-tip pens.
Drawing a titmouse will help children to study the bird's body structure in more detail, as well as to consider the features of this species. Parents, in order to maintain the child's interest, should comment on the progress of the work during the drawing process.
Small children need to be explained what part of the bird's body they are drawing, what color. Older children should be told about the way of life of tits. The picture for copying can be chosen from the options presented in the article.
Video about drawing
Titmouse drawing for children in gouache: