Knitted bells are considered an excellent decoration for the home. This decor can be used as a New Year's toy, and also hung above a window or front door. A crocheted bell can be a detail when decorating school classrooms during the last bells. Below you can see detailed patterns and descriptions on how to knit toys.
Necessary materials and tools
The crochet bell (the diagram and description are provided for informational purposes) will look original if you use cotton yarn for knitting, the thickness of which will be the same as the “Iris” threads, 50 g contains 320 m.

The hook should correspond to numbers from 0.9 to 1.15. At the same time, the diameter should match the thickness of the knitting threads. Beginners are recommended to choose a tool made of one material. Thanks to this, you can control the degree of tension of the yarn and adjust it in a timely manner.
Features of crocheting toys:
| What is required | Nuances of work |
| Amount of yarn | To knit one toy, it is enough to stock up on a small amount of thread, so you can use various remnants that are left over from previous products. In this case, they can be of different colors. A bell looks unusual and original if some rows contain gold yarn. It is also permissible to do colored embroidery on a finished part. |
| Giving rigidity | To add rigidity, you need to prepare a starch solution. You will need to dip the knitted part into the mixture for about 5 minutes, then squeeze it out. To create the solution, dissolve 38 g of starch in a small amount of cool water. The mixture should be gradually poured into the boiling liquid and stirred constantly. When the mixture becomes thick, the solution can be removed from the stove and cooled to a warm state. The total volume of liquid should be about 500 ml. You can use potato or corn starch. The choice of product does not affect the degree of rigidity of the knitted toy. |
| Maintaining the required shape | To maintain a certain shape, the product must be stretched over a ball of yarn of the appropriate size or a balloon. It is also acceptable to use any object that has a round top. It is necessary to fix the head of the toy by straightening the skirt of the bell. The product should remain in this form until it is completely dry. |
| Using additional decor | Once the bell has taken the desired shape, it can be decorated with beads, pompoms, braid or a bow. |
Bellflower with leaves
A crochet bell (the diagram and description will tell beginning needlewomen how to crochet the toy correctly) can be made from red yarn, additionally decorated with leaves and curls.
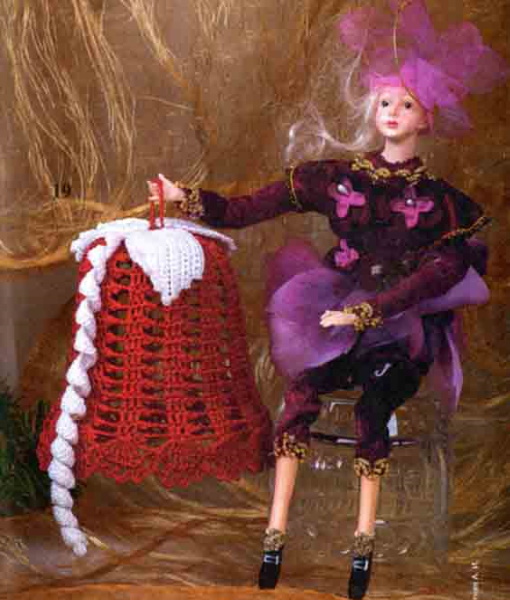
As a result, the knitted toy will be elegant and beautiful. The height of the product will be 11.5 cm, the diameter - 10.5 cm. For knitting, you will need to take a hook No. 0.85, as well as "Iris" threads, 6 g white and 30 g red. The yarn should be 100% cotton.
Work execution scheme:
- Using a hook with red thread, make a chain of 8 air elements, closing them into a circle with a connecting column.
- For the hole, make a chain of 15 air elements, attaching them to the ring with a connecting post.
- To form the first row, make a lifting chain stitch and 20 single crochet stitches into the resulting ring. Finish the row with a connecting stitch.
- To knit the 2nd row, make 3 lifting chain stitches, knitting a double crochet into the first lifting chain stitch. Make 19 double crochets into the next single crochet from the tool of the previous row. There should be 21 times in total. Finish the row with a slip stitch.

- Perform similar manipulations, forming 19 rows. All rows should end with a connecting column.
- To create 3 leaves, use white threads to make a chain of 14 air elements. 13 air holes should be the base and 1 – an additional air element.
- To complete the first row, thread a single crochet into the third air hole in the chain from the tool.
- 10 single crochet stitches are made into the next 10 chain stitches of the base chain.
- Thread 4 single crochet stitches through the new air holes in the base of the chain from the tool.
- Pass 10 single crochet stitches through the next 10 air holes of the base of the chain, but from the opposite side.
- The work should be continued in forward and reverse rows until row 7 is created.
- To create a curl, use white threads to make a chain of 63 air elements. 60 should be the base, 3 – additional.
- For row 1, make 4 double crochet stitches into the fourth chain stitch from the tool. Make 58 double crochet stitches into the next chain stitch from the tool.
- When you are finished, starch the toy well, put it on a mold and leave it until it dries completely.
- Sew a curl with leaves onto the product.
New Year's bell for the tree
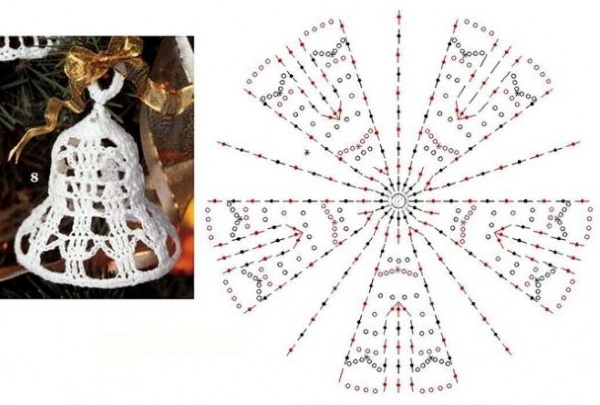
A crochet bell (the diagram and description are quite simple and easy to make) can be hung on a Christmas tree as a beautiful decorative toy. The height of the finished product will be 17 cm, the diameter is 19 cm.

For knitting it is recommended to use the following tools and materials:
- 20 g of “Iris” threads made of 100% cotton;
- nylon bow for decoration;
- hook No. 0.9.
Step-by-step description of the work:
- Create a chain from 6 air elements, closing the ring with a connecting column. From 15 air holes, knit a braid, connecting from the back side of the circle.
- To create the first row, make a lifting air element, 11 single crochets in a circle, finishing the row with a connecting column.
- To make the second row, make 1 chain stitch, a single crochet into the first chain stitch and 2 single crochets into the 2 single crochets of the previous row.
- Make 2 single crochets twice into the new single crochet of the previous row. There should be 4 times in total. Finish the row with a connecting column.
- To make the third row, make a lifting chain stitch, a single crochet into the first lifting chain stitch and 3 single crochets into the new 3 single crochets of the previous row.
- 2 single crochet stitches into a new single crochet stitch of the previous row. Do the same steps twice. Finish the row with a connecting stitch.
- Continue knitting until you have 16 rows. Each row should end with a slip stitch.
The second bell must be knitted similarly to the above-described pattern. After the toy, it must be starched, dried and connected together, decorated with a bow.
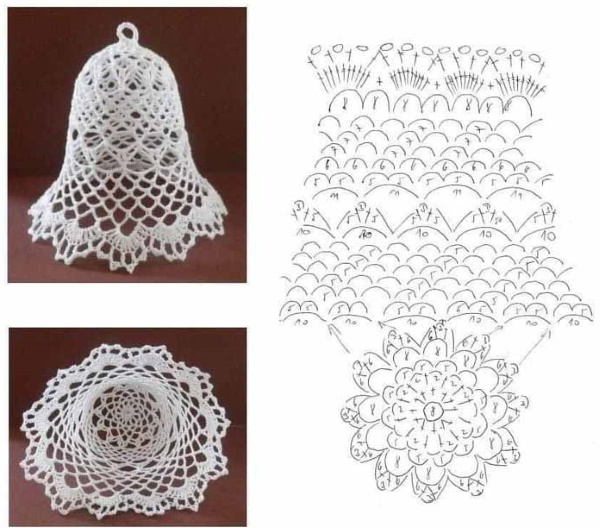
Big toy
The crocheted bell can be made large, so that the height varies within 10 cm. If you use thick yarn for work, the parameters of the toy will be much larger. If you use thin threads, the size of the product will decrease. The diagram and description of the work are quite simple, so novice craftswomen can master them. For knitting, it is recommended to take a hook No. 1.75, as well as cotton threads, 50 g per 220 m.
Step-by-step description of the scheme:
- Start the rows with 3 air loops of lifting, knitted instead of the first column. Finish the row with a connecting column.
- Make a chain of 5 air loops, closing it into a circle.
- To form 1 row into a circle, close 12 double crochets.
- To create 2 rows, increase 12 times.
- To make row 3, make 2 double crochets and 1 increase. Repeat similar manipulations for the entire row.
- To create the 4th row, make 1 double crochet, 1 chain stitch, 1 double crochet and 3 chain stitches. Repeat these steps until the end of the row. When knitting a column, skip 1 loop.
- To make the 5th row, make 1 double crochet, an air hole, a double crochet, an air element, a single crochet under the arch of 3 air holes, and also an air loop. Perform the listed actions until the end of the row.
- To knit the 6th row, perform the following sequence: 1 double crochet, air element, double crochet and 4 air holes.
- To design the 7th row, from the beginning to the end, make a double crochet, an air hole, a double crochet, 2 air holes, a single crochet under the arch of 4 air pieces, and also 2 air elements.
- Row 8 consists of 1 double crochet, 1 chain stitch, 1 double crochet and 5 chain stitches.
- The entire 9th row consists of 1 double crochet, 1 chain stitch, 1 double crochet under 1 chain stitch, 1 chain stitch, 1 double crochet, 2 chain stitches, 1 single crochet under the arch of 5 chain stitches and 2 chain stitches.
- Row 10 consists of a double crochet, an air element. In 1 hole make a double crochet, 2 air elements and a double crochet. Also make an air loop, a double crochet and 3 air elements.
- To make row 11, make a double crochet and an air element twice. Then knit a double crochet under the air hole and an air loop. Make a double crochet and an air element twice, then a single crochet and an air element.
- To create row 12, perform the following sequence from start to finish: 1 double crochet, chain stitch, double crochet, 2 chain stitches, 3 double crochets in 1 hole, 2 chain stitches, double crochet, chain stitch, and double crochet.
- To make row 13, initially knit 2 connecting columns. Then from the beginning to the end of the row, make a column with a yarn over, 3 air holes, a column with a yarn over, an air element, a column with a yarn over with 4 air elements, a column with a yarn over in one loop, an air hole, a column with a yarn over, 3 air loops and a column with a yarn over.
- At the beginning of row 14, make 4 connecting columns. The further knitting sequence is: 1 column with a yarn over, air hole, column with a yarn over, 2 air elements under the fourth air loop, 4 columns with a yarn over, 2 air elements, column with a yarn over, air detail, column with a yarn over and 3 air loops.
- For row 15, make a double crochet, an air hole, a double crochet, 2 air elements. Then, in the next 4 columns, knit a double crochet, 2 increases and a double crochet. At the end, knit 2 air holes, a double crochet, an air element and a double crochet. Perform the listed actions from the beginning to the end of the row.
- For row 16, make a double crochet, 2 air holes and 2 double crochets with one top. Make 3 air elements 4 times, 2 double crochets with one top. Knit 2 air loops and a double crochet. Repeat the above manipulations from start to finish.
- To make a hanging hole, knit a braid of 40 air loops. At the end, cut the thread and secure. Hide the end of the yarn inside the detail.
The finished product must be dipped in a starch solution for 1 min. To do this, you will need to stir 38 g of dry matter in 400 ml of liquid. After that, the toy must be slightly squeezed out and pulled onto any form, evenly distributing the pattern with elements.
School bell
A crochet bell (the diagram and description will explain which tool and material are best to choose) is suitable for decorating a school classroom. The height of the product will be approximately 7 cm. For work, you will need a hook No. 1.5, as well as cotton threads, 75 g per 320 m. Each row must begin and end with a connecting column.

Step-by-step description of the knitting pattern:
- Collect 6 air elements, closing them into a ring.
- For row 1, perform the following sequence: 2 air holes, 11 double crochets in a circle, knitting 1 air element between them.
- For the 2nd row, make 5 air holes and 11 double crochets, knitting 2 air elements between them.
- For the 3rd row, make 2 air parts, knitting 1 half-column with a yarn over in each hole.
- For rows 4 and 5, initially perform 3 air elements of lifting. Then repeat the following sequence: 2 air holes, skip a loop, knit a column with a yarn over into the second element.
- For the 6th row, knit a double crochet into 3 air holes and make 2 air elements. Repeat 2 columns with the main top and 2 air elements.
- For the 7th row, crochet a double crochet into 3 air holes and make 3 air elements. Do the following sequence: 2 double crochets with the same top and 3 air loops.
- For rows 8 and 9, make 3 chain stitches, 3 chain stitches and a double crochet. Do the following sequence: 3 chain stitches with a double crochet.
- For rows 10 and 11, crochet a double crochet into 3 air holes and make 4 air loops. Do the following sequence: 2 double crochets with the same top and 4 air loops.
- For rows 12 and 13, knit a column with 2 yarns into 4 air holes. Move to a new base of the common loop of two columns of the previous row and knit into one element. Repeat the following sequence: 1 column with 2 yarns, air hole, column with 2 yarns and 4 air elements. Then make 2 columns with 2 yarns.
- Finish the work by cutting the yarn and securing it.
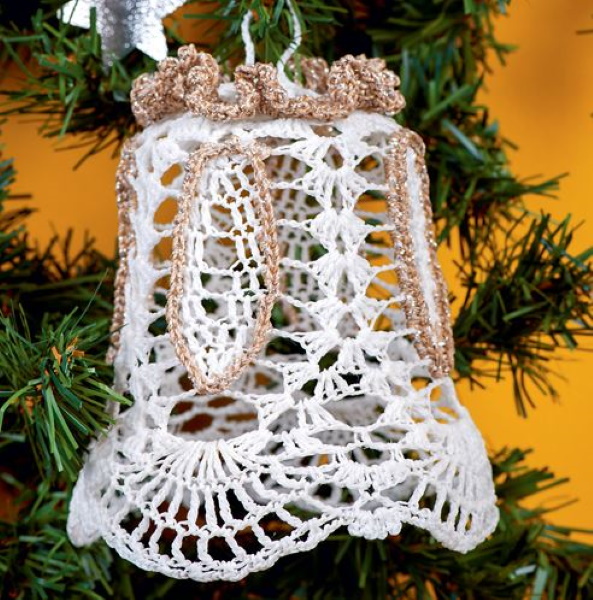
With a frill
The bell can be crocheted together with the frill. The height of the product will reach 11 cm, the diameter – 11.5 cm.
Necessary materials and tools:
- white threads “Iris”, made of 100% cotton – 13 g;
- golden threads “Iris”, made of 100% metanite – 6 g;
- hook No. 0.85.
Step by step instructions:
- Using white yarn, make a braid from 8 air holes, closing it into a ring with a connecting column. For the pendant, make a chain from 15 air elements, connecting them to the circle with a connecting column.
- For row 1, make 3 air holes for lifting, 15 columns with a yarn over in the ring and a connecting column.
- For the 2nd row, make 3 chain stitches and 5 lifting chain stitches. Repeat the following sequence 6 times: a double crochet into the second double crochet of the previous row and 5 chain stitches. Finish the row with a slip stitch.
- For the 3rd row, make 3 lifting chain stitches and 6 air holes. Repeat the sequence 6 times: a double crochet into a new double crochet of the previous row and 6 air holes. Finish the row with a connecting column.
- Knit the work in the same way up to the 17th row, finishing each one with a connecting column.
- To create a frill, attach the golden threads to the arch of the second row of the toy.
- To make 1 row, knit 4 chain stitches, picot, 5 columns with 2 yarns in the arch of 5 chain stitches of the second row of the toy. Between the columns with 2 yarns make 2 picots.
- Repeat the sequence 6 times: 6 columns with 2 yarns in the next arch of 5 air loops of the second row of the product, between the columns with 2 yarns make 2 picots. Finish the row with a connecting column.
- For piping, attach the gold yarn to the double crochet of the 5th row of the toy and perform the following sequence in a circle: 1 single crochet and 3 air loops. Repeat the actions for the entire row. Finish with a connecting column.
Dip the toy into a starch solution and dry it on a suitable form. A crocheted bell is considered an original toy that can be used to decorate a Christmas tree, an entrance door, or a school classroom. The patterns with descriptions of the work are quite simple, so even beginner craftswomen can handle them.
Video on how to crochet a bell
How to crochet a bell: