Beading originated in Ancient Egypt long before our era, shortly after the advent of glass. For beginners, this art of working with small details looks complicated, but in fact, even a child can make beaded bracelets with their own hands.
Materials for weaving beaded bracelets
The weaving process requires concentration, so it is better to prepare everything you might need right away:
- beads of the required shapes, colors and sizes;
- small containers for each type of beads;
- thin fishing line or strong thread;
- threading needle;
- scissors;
- flat-nose pliers or round-nose pliers (if very hard fishing line is used or a clasp is planned);
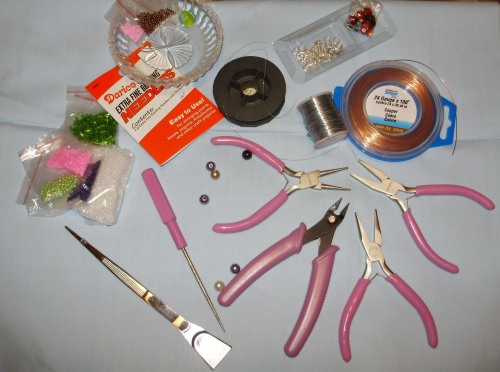
- additional decorations and a lock if desired;
- for voluminous bundles - a crochet hook.
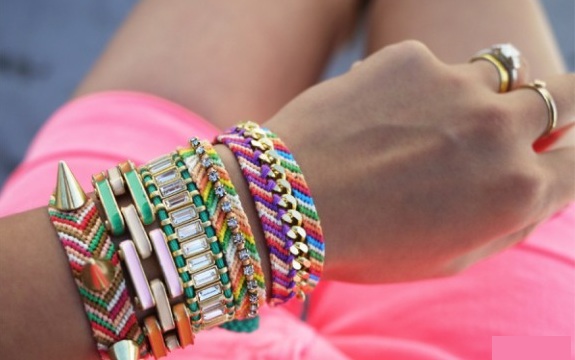
Types of bracelets
There are a huge number of types of beaded bracelets - they are limited only by the imagination of the master.
You can create your own individual design and weaving for any occasion.
But it would be wise for beginners to consider the easy options:
- Simple bracelet - single-color, two-color or with pins. The best option to start weaving jewelry; will be an easy addition to everyday clothes.
- Personalized bracelet — beads are folded into letters of the name. The work will be a little more complicated, since you will have to take a long fishing line, otherwise there are no special subtleties.
- Bracelet "Flowers" — the finished product will consist of a series of beaded flowers.
- Bracelet-harness. Traditionally, this is a full, wide, hollow beaded cord, which, with the right experience, can be decorated or given an unusual shape.
- Braided bracelet - a very simple execution similar to braiding hair. But in advance you will have to prepare fishing lines or threads, stringing beads or beads on them.
- Bracelets on memory wiresAll that is required is to string beads and make a clasp.
If you already have some skills in working with beads, you can try to weave complex models:
- Openwork with beads and other decorations. The main thing in openwork bracelets is a repeating pattern, made loosely so that the hand shines through. This creates the effect of bright lace around the wrist.
- Volumetric bracelets (including multi-layered ones) - the most difficult thing in beading. Such decorations look more massive and expensive, but they also require more work.
Simple DIY Bracelet for Beginners and Kids
The most basic thing in beading and what is best to start with for people who have picked up this material for the first time:
- Cut a strong thread of the length required for the size of the bracelet.
- Thread the needle.
- Thread beads of the chosen color onto the end of the needle, then move them down so that they are on the working thread. You can string without a needle, but it will take longer, especially if you use a thread rather than a fishing line. Alternating beads and seed beads will help diversify your work.
- To secure, pass the thread through the very first (bottom) bead. Remove excess thread ends.
How to weave a bracelet with a name
Another simple DIY beaded bracelet. For beginners, it is suggested to draw a work scheme, where the background beads will be dots/cells of one color, and the beads included in the letter will be dots of a different color. Such a sketch will allow you to weave a product with any word.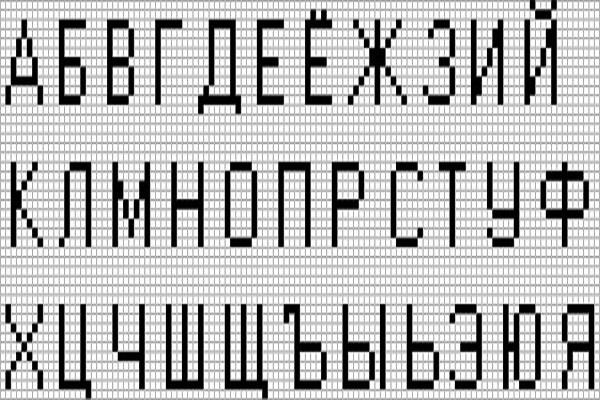
After this, you can start beading:
- Cut a fishing line about a meter long.
- String three beads of the background color onto one end. Pass the opposite end through the two outer ones, as if to meet the first end, then tighten the knot.
- String three beads, thread the other end through them, tighten. Do the same for 4, 5 or more beads until the bracelet reaches the desired width.
- Start weaving letters according to the prepared pattern. The technique remains the same, only now you need to carefully monitor how many beads to take and what color to get a letter.
- When the weaving of the name is finished, the bracelet should narrow back - for each subsequent row you need to take one less bead until there is one left.
- Pass the ends of the fishing line through the very first bead from which the weaving began, and secure with a knot.
Openwork bracelet made of beads and beads
What you need when you want to move from the beginner level to the intermediate level. You will need beads of 2 colors and beads.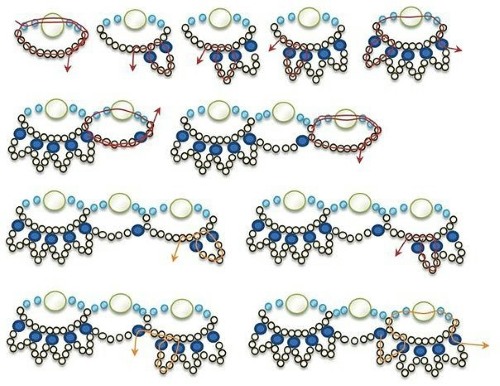
Weaving:
- Cut a 2 m long line.
- String three beads of the first color and three beads, alternating them with each other. For convenience, you can use a needle.
- Move the strung elements so that they are at a distance of 20 cm from the left edge of the fishing line.
- Tie a knot so that the elements form a ring.
- String 3 beads of color 2, one of color 1 and 3 more of color 2 onto the long end of the fishing line.
- At this stage, the fishing line comes out of the bead in the ring. Thread it through another bead, which is also in the ring, but behind the neighboring bead. Thus, a row (bridge) of beads of color 2 with a top of color 1 will be thrown over the bead.
- Repeat step 6 with the remaining two beads.
- Thread a bead onto the fishing line and pull the fishing line through the top of the first bridge of beads. Repeat with the two remaining tops.
- "Enter" the first bead-top again. You will have a ring with three new, "stripped" beads. You need to repeat steps 5-7 with them so that each one is wrapped in a row of beads.
- Continue weaving the bracelet until it reaches the required length - wrist length minus 2-3 cm for the clasp.
- Attach the clasp. This can be a ready-made one bought in advance or consist of a tailor's pin bent into a loop with pliers/round nose pliers.
Volumetric Wrist Jewelry
The most difficult type of beaded bracelet weaving, which only experienced needlewomen can do. If you don't have any, you can buy large beaded elements (flowers, figures, etc.) separately and connect them into a bracelet with your own hands.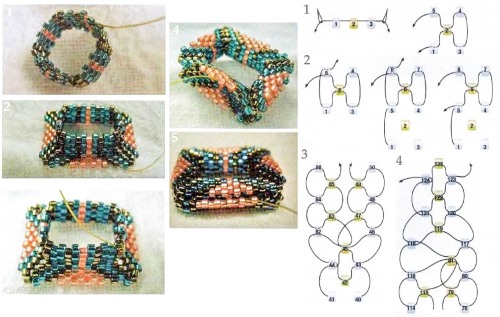
An option for connecting parts into a volumetric bracelet for beginners:
- Cut 2-3 pieces of fishing line the length of your wrist + a few cm for extra.
- Thread the first piece through several small beads or one large bead of one of the prepared pieces.
- String on a few beads of a suitable color so that the transition between the parts is not colorless.
- Connect to the tops of the remaining pieces.
- Do the same from below and, if you made very massive ones and the gaps between them are too noticeable, then in the middle.
- Attach a store-bought or homemade clasp.
Volumetric jewelry also includes the already described openwork weaving and cord bracelets, which will be discussed later.
Lesson on weaving with beads and floss
Mouline threads are often used to make baubles, but they can also be used as the basis for a beaded bracelet, simply replacing the fishing line with these threads. This method is only suitable for simple weaving, since the threads, unlike the fishing line, do not hold their shape.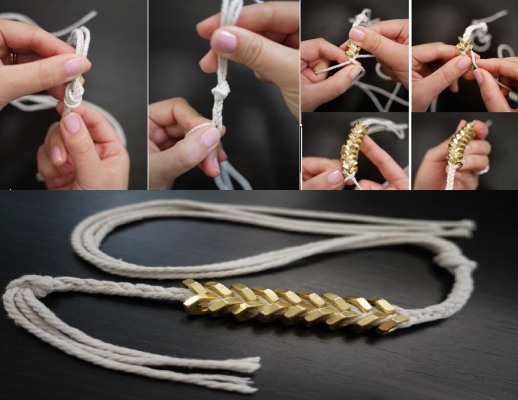
But no one has cancelled beaded baubles:
- Detach 3 strands of floss and separate them between each other, leaving the ends fastened. The length is 10-15 cm longer than the required length of the bracelet.
- String beads onto each thread using a needle, alternating shapes and colors if desired. The size should be the same so that individual beads do not interfere with weaving the parts into a single product later. It will also be quite original to replace the middle thread with a ribbon or several connected threads without beads.
- Weave the bracelet, alternating the threads according to the braid principle: the outer threads go to the middle in turn. To get a dense weave, you should tighten the threads each time.
- Tie the ends together in a knot and connect to the beginning of the bracelet.
- Remove excess length.
How to make a bracelet from beads and fishing line
Two-color crosses, ideal for gaining experience:
- Take a fishing line of the optimal length - you can get tangled in a long one. It is important that it does not end in the middle of the work.
- Fold the fishing line in half.
- String the first bead from any side and lower it to the bend.
- On each side of it, string a bead of a different color and lower it down to the first one.
- From any side, thread a bead of the same color as the first one, but do not attach it to the others, but push the other end of the fishing line through it, towards the first one.
- Tighten the knot. You should get a two-color cross.
- Then repeat steps 4-6 until the bracelet reaches the desired length.
- Thread one end of the fishing line through the outer beads of the opposite end of the bracelet - this will connect the product.
- Secure the line. Done!
DIY cord bracelet
Cord bracelets are considered to be voluminous jewelry. At the same time, making simple single-color items is within the power of inexperienced craftswomen, especially if they are familiar with the basics of knitting, because here you will need a crochet hook.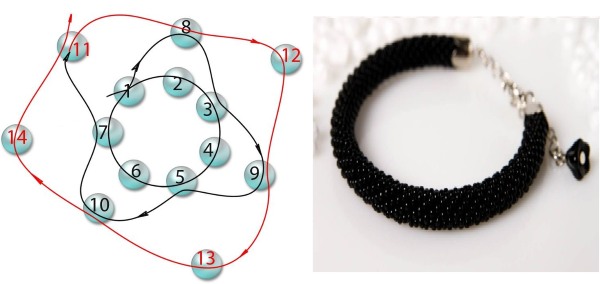
Step by step weaving:
- On a thick, dense thread (mouline or for knitting) 1.5 m long, string beads of the chosen color. Leave the end about 30 cm long.
- Start casting on stitches. You need to hold the thread correctly: take the end in your left hand, press it between your thumb and index finger. Bring the thread behind your index finger, as if bending it, and bring it out between your index and middle fingers. Make a loop around your middle finger counterclockwise, and clamp it with your little finger.
- Pass the crochet hook under the thread on your index finger, turn it - you will get a twisted tail-loop. Pick up the thread above the loop and pull it through it.
- In the same way, stretch as many air loops as there are planned beads in the circumference of the cord (for the specified length - 6).
- Insert the hook into the first chain stitch, pick up the thread and pull it through two stitches, thus closing the circle of chain stitches. This is the "frame" of the cord.
- Knit 2 more empty rings so that you have something to hold the work with.
- Before the next circle of air loops, move 6 beads to the fingers and the next time you need to pull the thread through the twisted tail-loop, grab it behind the nearest bead. Thus, the element will be pulled into the ring. Similarly with the remaining 5 beads.
- Continue weaving rings and threading beads into them until the bracelet reaches the desired length.
- Make 3 empty rows as at the beginning.
- Fasten the edges.
How to weave a wide bracelet on a loom
Craftswomen who have been engaged in bead weaving for a long time often purchase special machines that significantly facilitate the production of certain types of products, including wide bracelets.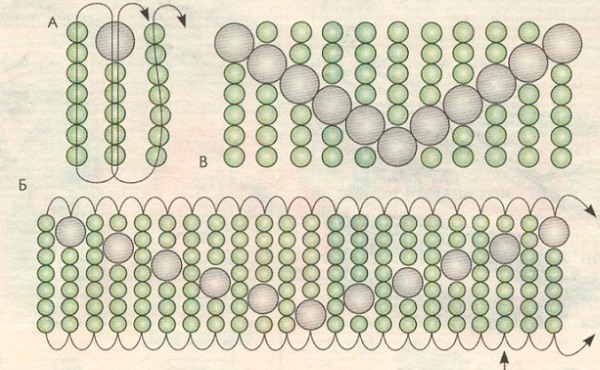
Its weaving on the loom is very simple:
- Attach the required number of threads to the machine and tighten them using the nuts located on the sides of the device.
- Cut another thread (it will be the transverse one in the weaving). Thread one end through a beading needle, and tie the other end with a small strong knot to the left extreme thread of the loom.
- Thread beads onto the cross thread using a needle, one less than the number of threads secured on the machine.
- Bring the transverse thread under the longitudinal one, distribute each bead between them. Hold the elements with your hand until the end of the next step.
- Bring the needle out above the longitudinal threads and use it to thread the transverse thread through the beads. These will be sewn to the longitudinal threads. The first row is ready!
- Repeat steps 3 through 5. You can add new colors, create patterns or letters.
Bracelet made of memory wire and beads
Memory wire is a convenient bracelet blank because it already has the shape of a ring and does not change without strong influence. It is not difficult to work with her.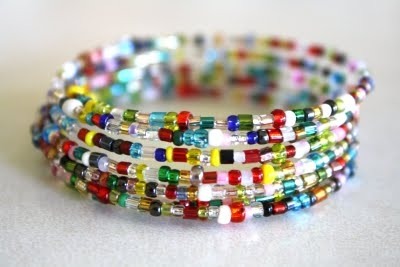
Step by step weaving:
- Use nippers to cut the wire ring. If it is too big, shorten it.
- String beads and beads according to the idea, leaving 2 cm on each edge for the lock. Small pendants or metal arches can add a highlight.
- Use round nose pliers to bend the remaining edges into a hook and loop shape so that the bracelet can be fastened.
- If desired, you can connect several rings at once to get a voluminous bracelet.
Simple bracelet made of beads and pins
Easy to make and original decoration:
- String beads onto regular safety pins.
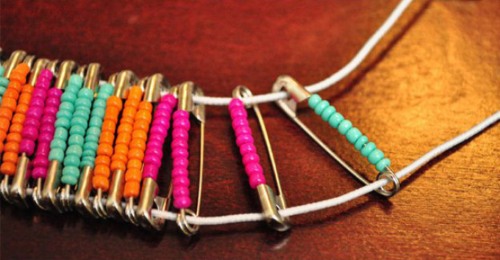
DIY beaded bracelets for beginners can be woven with various additional materials. - Connect the pins at the top and bottom with fishing line, elastic band or thread.
- Decorate with a ribbon or pendant.
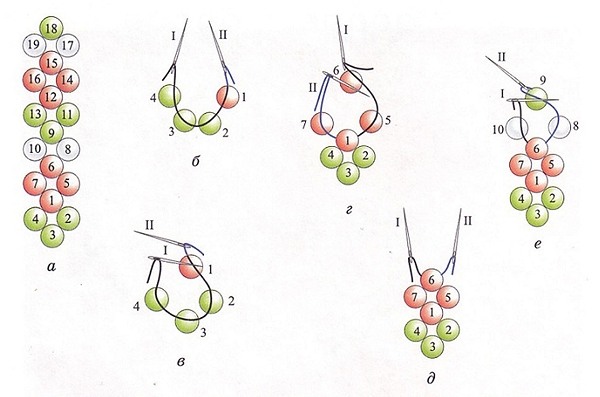
Patterns for weaving bracelets with pictures
In stores, most beaded bracelets are decorated with drawings and patterns. You can also create them yourself, at home.
For beginners, two simple designs are suitable (weaving technique is the same as in the case of name bracelets):
- Flowers on a plain background. 2 rows of 5 beads of the background color; a row where 1 bead of the pattern color is surrounded on both sides by pairs of beads of the background color; row 1-3-1 and again row 2-1-2. Then the pattern is repeated.

- Hourglass. It starts with a row of the color that the triangles of the watch should be. Then the number of beads of this color decreases by one on each side, and instead of them, background beads appear. The triangle seems to narrow until there is one bead left, after which the pattern expands again.
Weaving a bracelet from beads with two holes
This type of beads will come in handy if you want to create something unusual.
One of the options:
- String 5-6 beads onto the fishing line and secure the ring with a knot.
- Pass the fishing line through the second hole of the first bead in the direction.
- String 1-2 ordinary beads.
- Pass the next bead through the second hole, and so on, until the entire ring has been passed through.
- Repeat the pattern.
Master class on weaving a seven-layer bracelet
The technique of multi-layer weaving consists of weaving arcs of smaller beads around the main element of the ornament, which creates the effect of volume and multi-layering.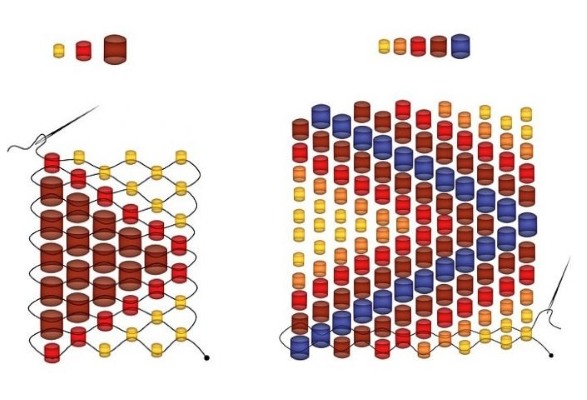
Execution option:
- String 6 large beads onto the fishing line and secure them into a ring.
- String 3-5 beads, pass the needle through the bead that is located immediately behind the nearest one. The beads will be thrown over the nearest bead. In this process, it is very similar to openwork weaving.
- Do the same with the remaining beads.
- Make another arch through each bead, now using larger beads.
- Thread the fishing line through the top of one of these arches, string an odd number of beads (with one large bead/bead in the center) and connect it to the adjacent top. Do the same with the remaining tops.
- At this stage the piece already looks three-dimensional, but if desired, you can continue the work by making layers of beads also around the large beads/seed beads that were placed in the middle of the bridges in step 5.
- Having made several of these parts, you need to connect them into one bracelet. For more information, see above (voluminous wrist jewelry).
Combinations of colors and materials in bracelets
There are no limits to the color range of bracelets: they can be either single-color or brightly rainbow-colored - it all depends on personal preference.
The most common combinations are:
- blue, silver, white;
- red, gold, black;
- black, any color;
- orange, yellow.
As for additional elements, beads, both matte and glass, pendants, ribbons and metal arches go well with beads. You just need to not overload the bracelet with them.
Tips from the pros: how to choose quality weaving material
The highest quality beads are imported from Asia, especially Japanese materials are valued by craftsmen. When buying, they recommend carefully reading about the country of origin, as well as inspecting the packaging for integrity. It is best to buy goods in transparent bags, as this allows you to make sure that the beads have the declared characteristics.
Beading masters advise beginners to buy beads of large or medium diameter to make it easier to string them.
Hand-made jewelry instills pride and saves money. Beaded bracelets are no exception, as there are many simple weaves suitable for beginners. And from there it is not far to truly unusual things.
Video: DIY Beaded Bracelets for Beginners
Simple DIY beaded bracelets, watch the video:
Master class on beading: