Paper surprises are small drawings, which can be used as decoration for cards and gift wrapping, as well as collected in a notebook or diary. Examples of images and step-by-step drawing instructions will help novice artists find fresh ideas for creativity.
What do you need for drawing?
The list of tools and materials needed to create paper surprises can be seen in the table:
| Tool | For what |
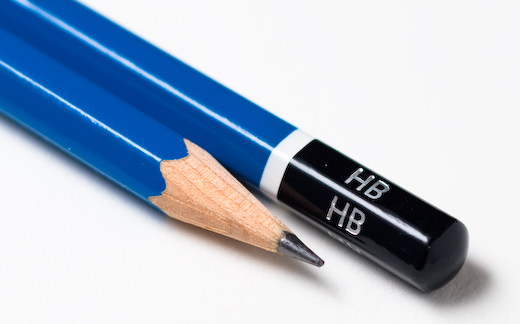
| Simple pencil | For creating sketches. |
| Eraser | Will help to correct sketch inaccuracies. |
| Paper | It is advisable to use thick white paper. Album sheets or printer paper will do. |
| Art brushes | You need thin and medium-thick brushes with soft bristles. |
| Container with water | For washing brushes. |
| Double-sided tape or glue stick | Needed to create an adhesive layer so that the designs can be used as stickers. |
| Scissors | For cutting out pictures. |
You can color paper surprises using any materials. Paints, colored pencils, markers and colored pens will do. You can color the picture using several tools at the same time. The main artistic style of such pictures is cartoonish. Therefore, each picture should be outlined. The outline can be done with a marker or a black gel pen.
People who are fond of drawing paper surprises often combine drawings into collections, arrange them in homemade paper envelopes, sign them and use them when necessary. Further in the article you can consider the image of small collections of pictures, as well as master classes on drawing.
Eskimo in the form of animals
Drawings for paper surprises in the form of popsicles with animal faces look cute and funny. This master class describes drawing #2. You will need markers for coloring.
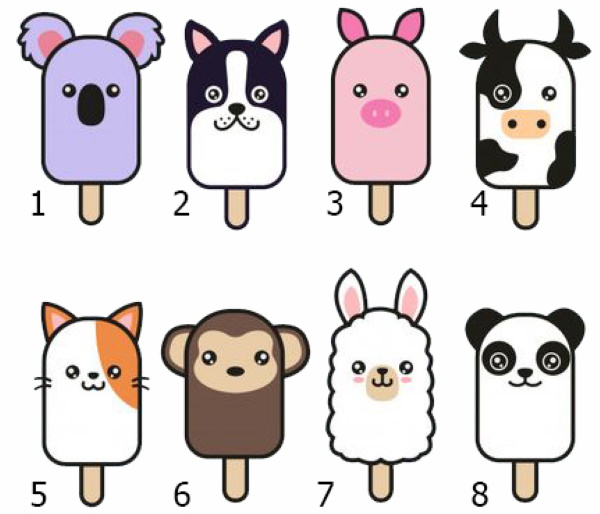
How to draw:
- Draw the shape of the popsicle using a pencil.
- Add a wooden stick at the bottom.
- Draw pointed ears on top.
- Highlight the inner parts of the ears.
- Draw the border between the white and black colors of the dog's coat.
- Draw two small round eyes. Draw pupils, highlight 2 round highlights in each of them.
- Draw an oval-shaped nose. Make its lower edge slightly longer.
- Draw the cheeks with smooth lines.
- Use a light pink marker to color the inside of the ears.
- Use a dark blue or black marker to color the ears and the top of the popsicle.
- Paint over the pupils of the eyes without touching the highlights.
- Color the nose.
- Outline the cheeks. Draw dots on the cheeks as shown in the picture.
- Trace the outline of the drawing with a black marker.
Sketches for the remaining drawings from this collection can be drawn by repeating the steps described in points 1 and 2. Next, you should select the shape of the ears, nose and eyes, and also choose the appropriate colors for coloring the picture.
Chubby Kitty
To create paper surprises, you can use drawings of cute, plump cats. This master class describes drawing #1. You will need colored pencils for coloring.
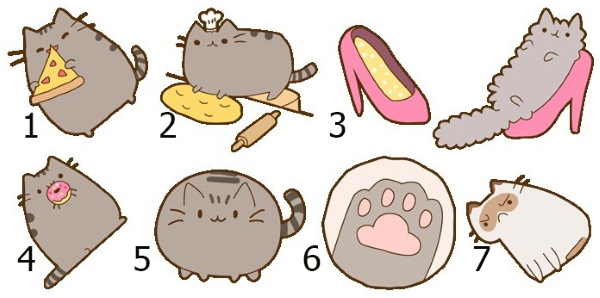
How to draw:
- Use a simple pencil to draw the cat's egg-shaped body. It should be positioned at an angle.
- Draw pointed ears on the narrow part of the figure.
- Remove excess lines with plastic.
- Draw small hind and front paws for the cat.
- Add a short tail.
- Draw the eyes as 2 small, short, thick arcs.
- Between the front paws, depict a triangular piece of pizza. Depict a thick crust at the bottom, and draw several small triangles in the center. They will imitate pieces of sausage.
- Draw an open cat mouth at the top corner of the pizza.
- Add whiskers (2 on each side).
- Shade the cat's body and tail with a light gray pencil.
- Using a dark grey pencil, draw three small stripes on the top of the head.
- Add 2 thicker but shorter strips on the right side.
- Draw stripes on the tail.
- Use a red pencil to shade the mouth and pieces of sausage on the pizza.
- Color the crust with a light brown pencil.
- Use a yellow pencil to color the base of the piece.
- Use a black gel pen to outline the cat's front paws, the pizza slice along the outline (including the pieces of sausage), and the animal's mouth.
- Use a black marker to outline the drawing.
The rest of the drawings from this collection must be drawn by analogy, following all the steps:
- creating a sketch;
- coloring;
- outlining details with a gel pen;
- final outline with black marker.
The color of the cat's coat can be changed.
Puppies
It is not difficult to draw cute little puppies with your own hands. This master class describes drawing #5. You will need colored pencils for coloring.
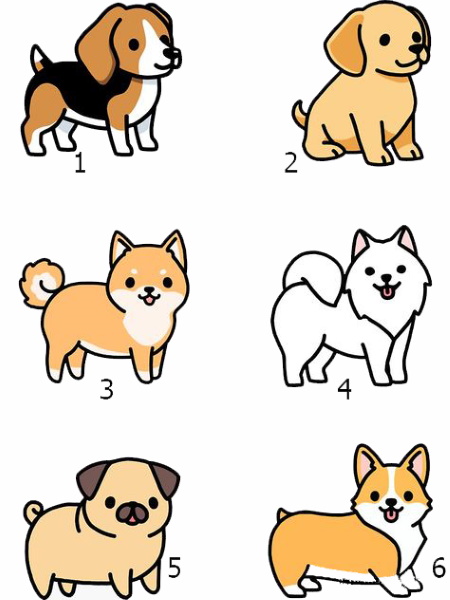
How to draw:
- Use a simple pencil to draw a round head.
- Finish drawing the oval body. The figures should slightly intersect with each other.
- Connect both shapes with a smooth line.
- Use plastic to erase the intersection of the circle and oval.
- Draw short, thick paws without fingers on the pug.
- Draw hanging ears in the form of inverted triangles.
- Highlight full cheeks.
- Draw a fold on the neck as shown in the picture.
- Draw a small, curved tail.
- Draw 2 small oval eyes.
- Draw the nose as a large dot.
- Draw the muzzle in the form of 2 small ovals, the tops of which will touch at the place where the nose is drawn.
- Draw a mouth between the lower parts of the ovals.
- Use an eraser to remove excess lines.
- Use a beige pencil to shade the dog's body, head, paws and tail.
- Use a dark brown pencil to color the ears and muzzle.
- Paint the mouth pink.
- Use a black marker to outline the drawing, highlighting the eyes and nose.
Puppies of other breeds can be drawn by analogy. The main thing is to consider the shapes of their heads and bodies, the length of their paws, as well as the size of their eyes and noses.
Cheerful panda
Drawings for paper surprises can depict some actions from everyday human life. To make the picture look cute, the image of a person can be replaced with a cartoon image of an animal, for example, a panda. This master class describes drawing #2. You will need markers for coloring.
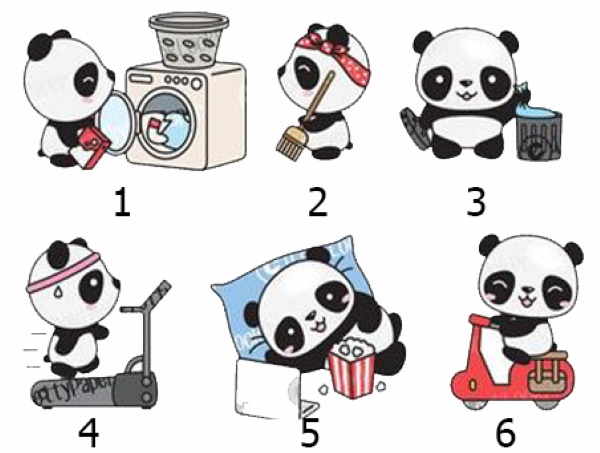
How to draw:
- Using a simple pencil, draw a round panda head.
- Slightly stretch her muzzle on the left side.
- Draw a small oval body.
- Add the front legs.
- Draw the legs short.
- Finish drawing a small tail.
- Draw a broom in the panda's front paws.
- Use an eraser to erase extra lines.
- Draw ears on the panda.
- Draw a bandage on the head. Draw a bow under the ear.
- Draw the eye as an arc. Highlight the spot around the eye.
- Draw a blush under the spot.
- Draw a nose.
- Draw small peas on the bandage.
- Use a red marker to color the bandage without touching the pea.
- Use a pink marker to highlight the blush.
- Paint the broom light brown.
- Use a black marker to color the panda's paws and tail.
- Paint over the ears, nose and the spot around the eye. First, outline the eye so as not to paint it over accidentally.
Trace the outline of the drawing.
Shark on vacation
This master class describes drawing #1. You will need gouache, a palette and art brushes for the work.
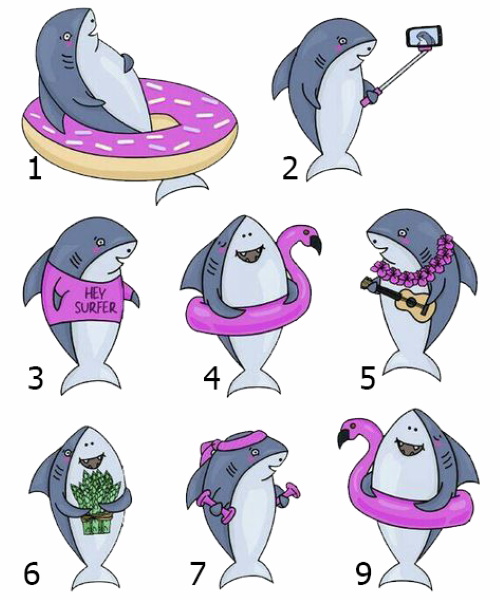
How to draw:
- Draw a circle with a simple pencil. This will be the base of the inflatable ring in which the shark lies.
- Draw an oval shark head, add a large oval body.
- Finish drawing the mouth.
- Add fins.
- Use an eraser to erase extra lines.
- Divide the circle into 2 parts with a smooth line.
- Draw a shark tail at the bottom.
- Highlight the light part of the shark's body with a smooth line.
- Draw a small eye. Mark the location of the pupil.
- Finish drawing a small eyebrow.
- Use 3 short stripes to depict the gills.
- Draw short stripes on the top of the circle. Since the circle is shaped like a donut, these stripes will imitate sweet sprinkles.
- Draw the middle of the circle.
- Mix blue gouache with white in a ratio of 1:3. Paint the light part of the shark's body and tail.
- Mix gray with blue in equal parts. Paint the dark part of the shark's body.
- Mix brown paint with white paint in equal parts. Paint the bottom of the donut, as well as its middle.
- Paint the top of the donut pink, leaving out the stripes that imitate the sweet sprinkles.
- Mix gray paint with white in equal parts. Use a thin brush to highlight the highlights on the shark's belly.
- Add a few drops of white to the shade used to color the dark part of the body. Highlight the highlights on the shark's head.
- Dilute the brown paint slightly with water. Highlight the shadows on the bottom of the donut.
- Using a very thin brush with short bristles, outline the drawing with black gouache. You can use a black felt-tip pen for outlining.
- Place a pink dot near the shark's eye.
The donut topping can be colored in any color using pencils or paint diluted with water.
Om-Nyam
Drawings for paper surprises can be done inspired by cartoons. Om-Nom is a funny cartoon character for younger children. This master class describes drawing #2. For coloring, you will need gouache and thin brushes.
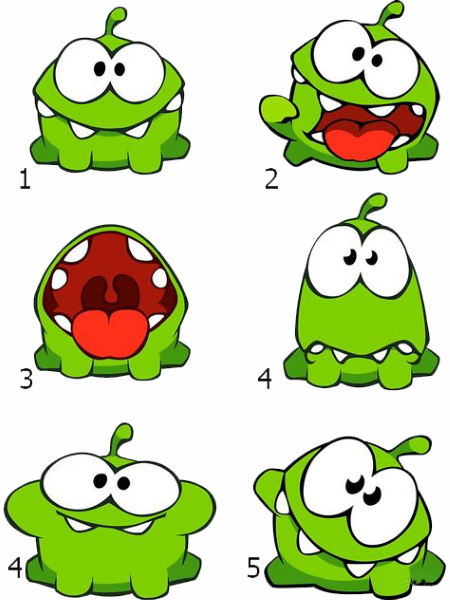
How to draw:
- Draw a circle with a simple pencil.
- Draw the shape of the character's mouth.
- Give the top of the head an angular shape.
- Finish drawing Om Nom's paws.
- Use an eraser to remove excess lines.
- Draw 2 large eyes. They should be slightly different in size. This will make the character look more interesting.
- Draw the pupils.
- Draw a tuft of hair on the top of the character's head.
- Draw a large tongue at the bottom of the mouth.
- Add wide, sharp teeth.
- Use an eraser to remove excess lines.
- Paint Om Nom's body light green.
- Use dark green to highlight the shadows on the lower part of the character's body. Paint over the gray hair on the top of the head.
- Paint the tip of the tongue with red gouache.
- Mix red paint with a drop of brown. Paint the inside of the mouth and the root of the tongue.
When the paint is dry, using black gouache and a thin brush, outline the drawing and paint over the pupils.
Fairytale Unicorns
You can draw a paper surprise with a unicorn using felt-tip pens. This master class describes drawing #1.
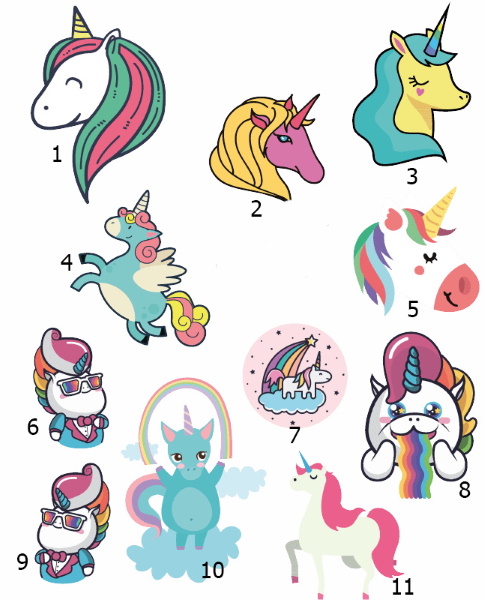
How to draw:
- Using a simple pencil, draw an oval horse head.
- Narrow the left side of the muzzle.
- Use an eraser to remove excess lines.
- Draw an ear on the unicorn.
- Add a smile.
- Draw eyes in the form of an arc.
- Place a large dot in place of the nostril.
- Draw 2 strands from the crown to the forehead.
- From the ear, downwards, draw 3 more large strands.
- Divide all the strands of the mane into smaller ones, drawing smooth lines and dotted lines.
- On the top of the head, depict a horn in the shape of a triangle.
- Divide the horn into 3 parts with smooth lines.
- Use a yellow marker to color the horn.
- Paint the strands of the mane pink and green, alternating shades.
Trace the outline of the drawing with a black marker and draw all the small details.
Cat App Icons
Drawings for paper surprises can look like icons of your favorite mobile applications. This master class describes the YouTube service icon (picture #2). For coloring, you will need gouache and thin brushes.
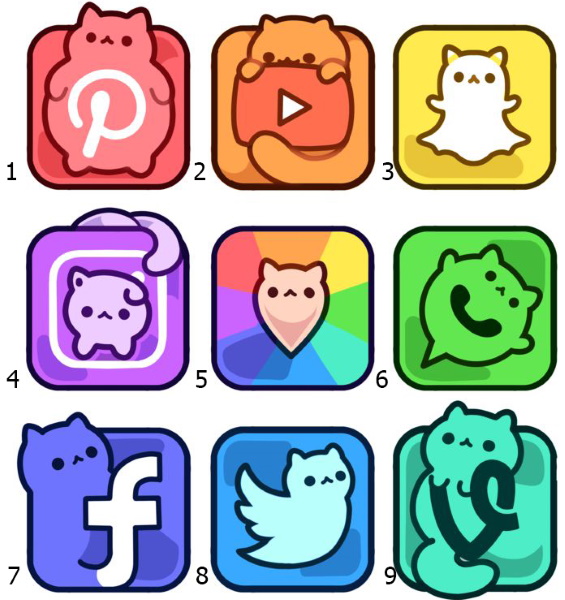
How to draw:
- Draw a square with a simple pencil.
- Make the corners rounded.
- Erase extra lines with an eraser.
- Draw a rectangle in the center of the square. Similarly, make the corners more rounded.
- Draw a triangle inside the rectangle, like the YouTube logo.
- Above the YouTube icon, draw an oval cat head.
- Finish drawing the pointed ears, 2 eyes and a muzzle.
- Draw the paws holding the icon at the top.
- Draw the tail below.
- Use an eraser to remove excess lines.
- Color the YouTube icon red.
- Paint all the remaining parts of the drawing with orange paint.
- Wait until the paint is completely dry.
- Mix orange with a drop of brown. Select the shadow behind the cat's head, as well as at the bottom of the icon, as shown in the picture.
Using black gouache and a thin brush or felt-tip pen, outline the picture and draw all the small details.
New Year characters
It is not difficult to draw New Year's paper surprises. It is enough to think about the type of character that will be dressed in a New Year's cap. This master class describes drawing No. 9. You will need colored pencils for coloring.
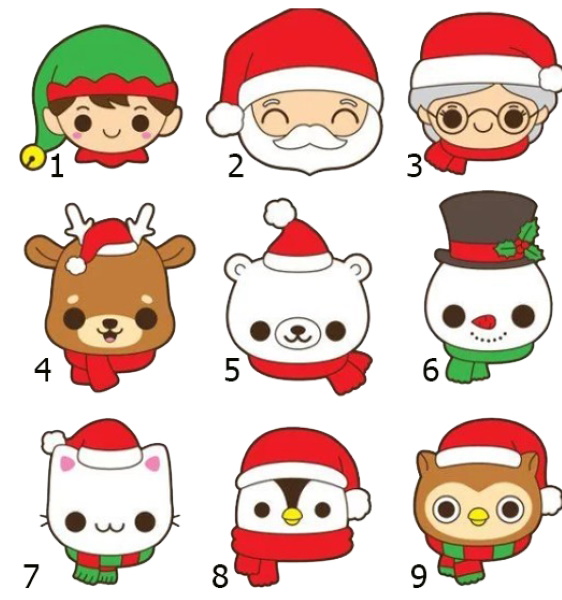
How to draw:
- Using a simple pencil, draw an oval head of an owl.
- Draw a scarf at the bottom.
- Add the ends of the scarf sticking out. Draw stripes.
- Draw the owl's ears.
- Use an eraser to remove excess lines.
- Between the ears, depict a white, furry part of the cap.
- Use an eraser to erase extra lines.
- Finish drawing the hanging part of the cap. Draw a round pompom at the tip.
- Highlight the light part of the owl's face.
- Draw 2 large, round eyes. Add large pupils.
- The beak should be depicted as 2 semicircles. The upper part should be larger than the lower one.
- Use a light brown pencil to color the muzzle.
- Shade the head and ears with dark brown.
- Color the beak with a yellow pencil.
- Shade the cap with a red pencil.
- Paint the scarf green and red, alternating shades of color.
Trace the outline of the drawing with a black marker and color in the pupils.
Avocado Yoga
Drawings for paper surprises will be funny if you use humanized objects, such as fruits or vegetables, as a character. This master class describes drawing #3. You will need colored pencils to color the picture.
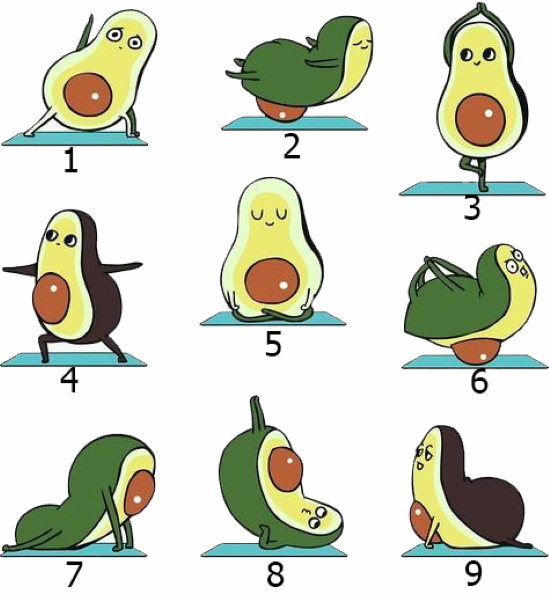
How to draw:
- Draw 2 circles. The larger figure should be located under the smaller one.
- Connect both circles with smooth lines. The shape of half an avocado is obtained. The lines located inside the contour need to be erased.
- Finish drawing the avocado's legs and arms.
- Without pressing on the pencil, select the part of the pulp that is located closer to the peel.
- Draw a large, round pit at the bottom of the avocado. Highlight the highlight.
- Draw small eyes for the avocado, highlight the pupils, and add a mouth.
- Draw a rug at the bottom with an avocado on it.
- Color the rug with a blue pencil.
- Color the avocado's arms and legs with a dark green pencil.
- Highlight the edges of the pulp with a light yellow color.
- Use a dark yellow pencil to shade the rest of the avocado flesh.
- Use a brown pencil to color the bone without touching the highlight.
- Use a black pencil to darken the right side of the avocado skin.
Use a black marker to draw the eyes and mouth. Trace the outline of the drawing.
Fast food
The theme of tasty but unhealthy food is very popular in creating paper surprises. This master class describes a drawing of a hamburger (No. 1). For coloring you will need felt-tip pens.
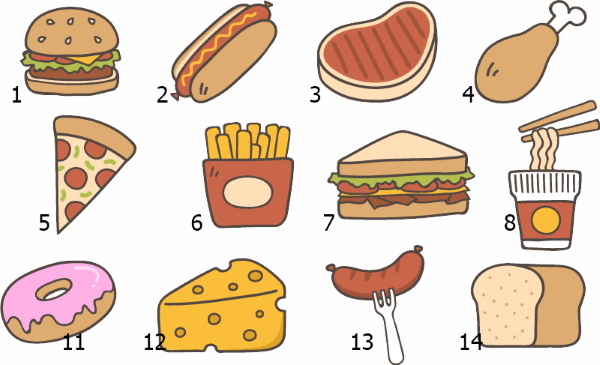
How to draw:
- Using a simple pencil, draw the top semicircular bun.
- Draw protruding tomato circles and 1 triangular slice of cheese under the bun.
- Draw a lettuce leaf using a wavy line.
- Finish drawing the thick cutlet.
- Draw a thin line to indicate the edge of the bottom bun.
- Finish drawing the bottom bun completely.
- Draw sesame seeds on the top bun.
- Color the hamburger buns with a light brown pencil.
- Paint the tomatoes red and the cheese yellow.
- Color the lettuce leaf with a green pencil.
- Shade the cutlet with dark brown color.
Trace the outline of the drawing using a black felt-tip pen. Learning how to draw pictures for paper surprises is not difficult. The main thing is to choose the theme of the drawing, as well as select the appropriate tools and materials for creativity.
Video on how to make designs for paper surprises
Different ideas for paper surprises: