Paper products in various techniques are created not only by children, but also by adults. Working with this material does not require special skills and abilities. At the same time, you can make a cute greeting card, an interesting toy, and a unique interior item with your own hands.
Materials and tools for paper crafts
DIY paper crafts are created using simple materials and tools, most of which can be found in any home.
Paper
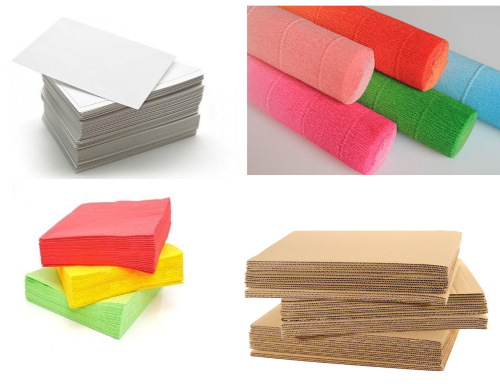
The most popular types of paper raw materials are:
- White or colored office paper — the main material for making paper crafts. It can be used to create appliques, origami, and quilling crafts.
- Corrugated, tissue and crepe paper suitable for making delicate volumetric flowers, balls, and appliqués using the end-grain technique.
- Napkins used in tear-off applique, end-graining, decoupage.
- Magazine and newspaper sheets used in creating collages, crafts using the iris folding and papier-mâché techniques.
- Cardboard — a dense base and background for various paper products.
Masters of paper crafts also use various waste materials, paper ribbons, openwork napkins, sets of colored paper for children's creativity, wallpaper scraps, and Whatman paper.
Glue
The correct choice of adhesive affects the final quality of the paper product.
To select an adhesive, you should consider the following factors:
- texture and size of the surfaces to be glued;
- purpose of the product;
- age of the master.
The most popular adhesives are:
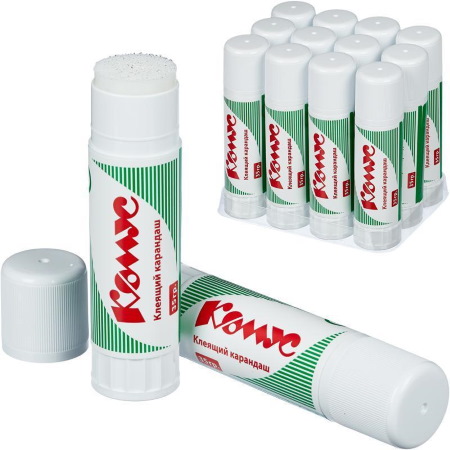
- Glue stick, which is used to work with small parts. It is suitable for use by children of early preschool age, as convenient packaging and consistency prevent strong contamination of the work surface. The disadvantages of glue in the form of a pencil include fairly rapid drying, which makes it impossible to adjust the craft.
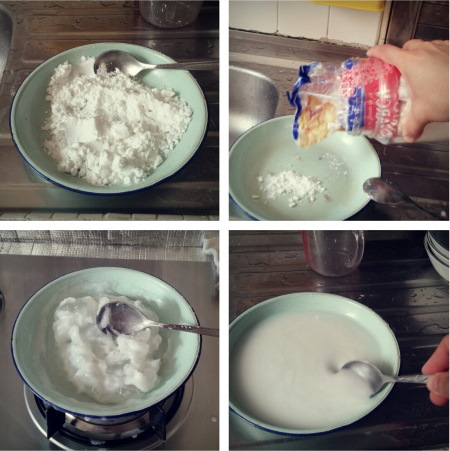
- Starch (flour) paste — a natural, safe adhesive substance. It can be easily made at home by mixing 100 g of dry substance and 1 liter of water. First, the water is heated over low heat, pouring about 100 g into a separate container. This liquid is used to prepare a thick, homogeneous solution, which is slowly added to boiling water and thoroughly mixed.
Important! The glue should not boil, so it must be stirred constantly, bringing it to a thick consistency.
Paste can be used in children's paper crafts, without necessarily using a brush to apply it, in the production of papier mache and paper figurines.
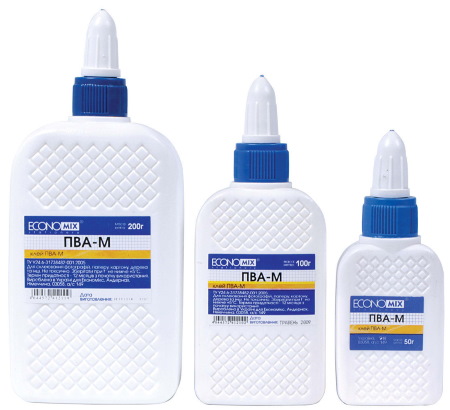
- PVA glue — universal glue, widely used in handicrafts. It reliably glues different types of paper together and with other materials. But at the same time, working with it requires accuracy.
Scissors
A must-have tool for paper crafts is scissors. Beautiful paper crafts can be created with just 2 types, but paper craftsmen use a variety of different cutting tools.
These include:
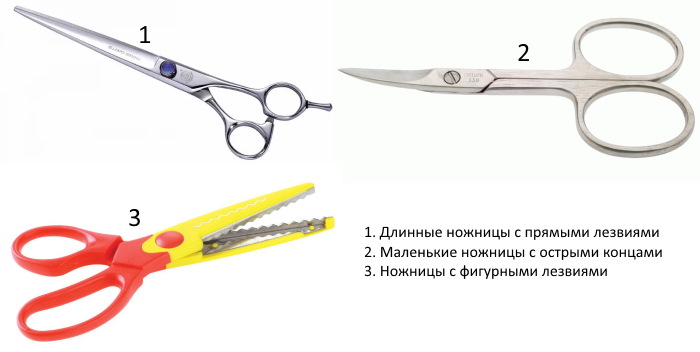
- Long scissors with straight blades, the shape of the ends of which depends on the age of the master. For safety reasons, young children should use a tool with a rounded cutting part, the length of which is no more than 10-12 cm. Straight blades are suitable for cutting paper and cutting out large figures.
- Small scissors with sharp ends are used to make small patterns on paper. They are especially in demand when creating cutouts and three-dimensional pictures.
- Scissors with curly blades (zigzag, wave) are used to create decorative edges on paper parts.
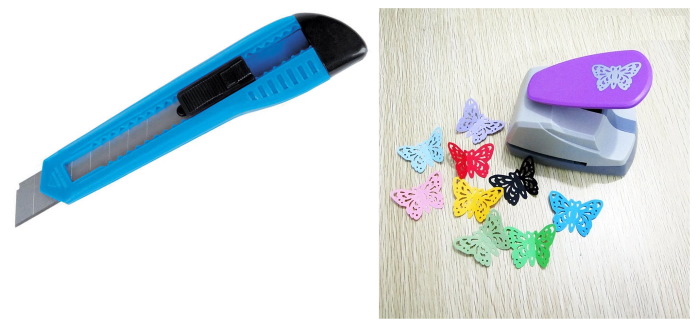
- Stationery knife used to cut paper into strips or to cut out stencils. When using it, it is important to remember safety precautions and the need to work on a solid base (wood, plastic or glass board of suitable size).
- Figured hole punch quickly and easily makes a large number of identical decorative pieces that are used to decorate paper products.
Additional elements
In addition to the basic materials and tools, paper crafts use additional elements., which make work easier and improve its results:
- simple and colored pencils;
- brushes;
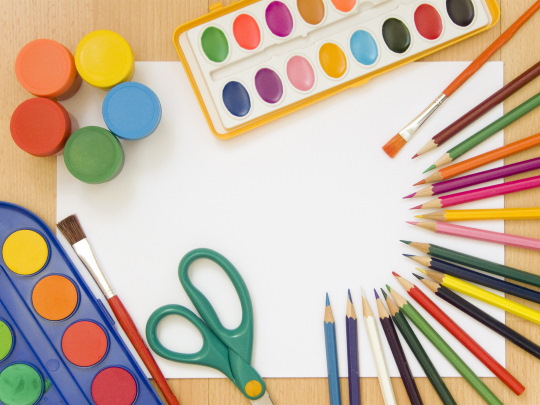
- handles;
- paints;
- rulers;
- stencils;
- decorative elements (toy eyes, buttons, glitter, pieces of fabric, beads);
- threads and needles.
DIY Paper Crafts for Kids. Schemes, Templates, Instructions
Children of any age can make paper crafts with their own hands.
Fishes
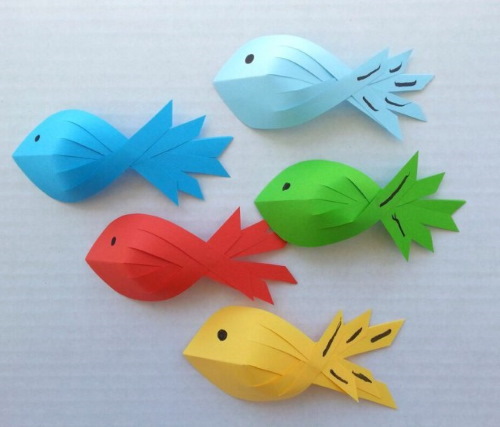
Paper allows a child to develop creative skills, imagination and study the world around them. With children aged 3-4, you can make three-dimensional figures of fish, which are then placed in the general application "Aquarium".
To create the fish you will need the following materials:
- double-sided colored paper;
- scissors;
- ruler;
- simple pencil;
- glue.
There are several ways to make a paper pond inhabitant, but the simplest is the following:
- A rectangular sheet of paper is folded in half along the long side.
- At one end of the resulting part, a rounding is made. The opposite edge is cut at an acute angle.
- Two cuts are made on the sharp side so that half of the part is divided into three equal parts. The workpiece is cut to the same length along the central fold line.
- The central strips are crossed and secured at the intersection with glue.
- In a similar manner, the remaining symmetrical elements are fixed at the resulting central point.
- An eye is drawn on the concave part, and the tail is decorated with small dotted lines.

Using the described technique, you can make crafts of various sizes.
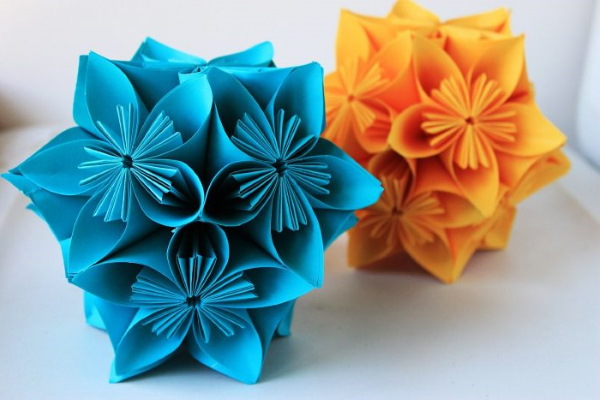
Kusudama balls
Three-dimensional crafts made using the modular origami technique are an original and popular detail in festive and everyday interiors. Beginner craftsmen should start making them with simple patterns.
Materials and tools:
- 60 squares 7*7 cm of double-sided colored paper;
- PVA glue.
The ball consists of 12 colors, each of which consists of 5 basic modules.
The process of its production consists of the following steps:
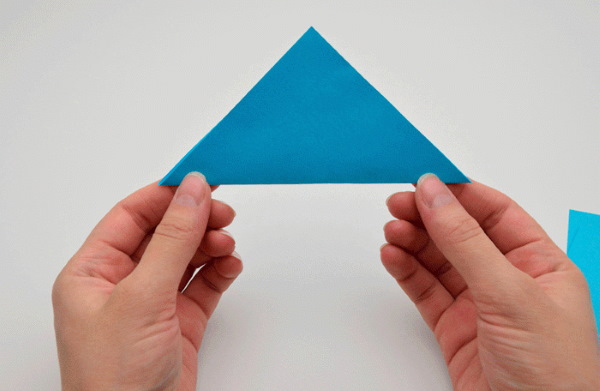
- The square blank is folded in half to form a triangle.
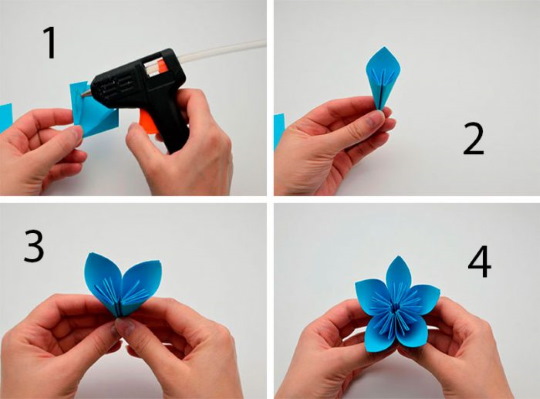
- The side sharp angles are connected to the top point to form a rhombus.
- The folded sides are folded back to the middle. The result should be a lily-shaped figure.
- The side petals are opened and smoothed.
- The tops of the side petals are folded towards the working side along the edge line of the main piece.
- The side pieces are folded in half towards the work surface, returning the piece to a diamond shape.
- The triangles formed on the working side are covered with glue and connected together.
- In a similar manner, 4 more petals are folded and connected together to form a flower.
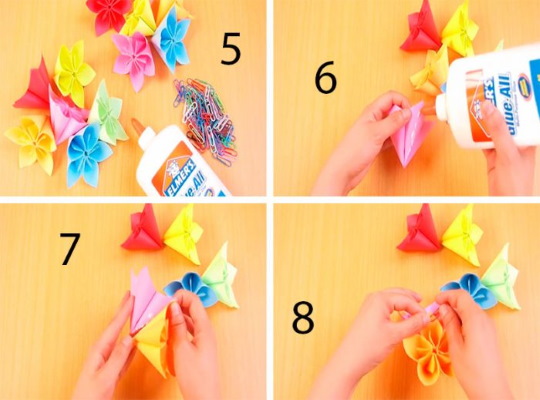
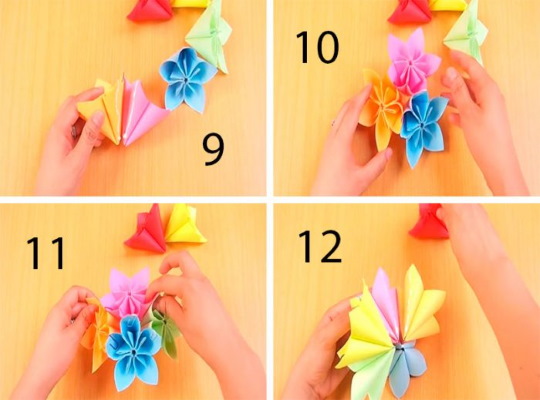
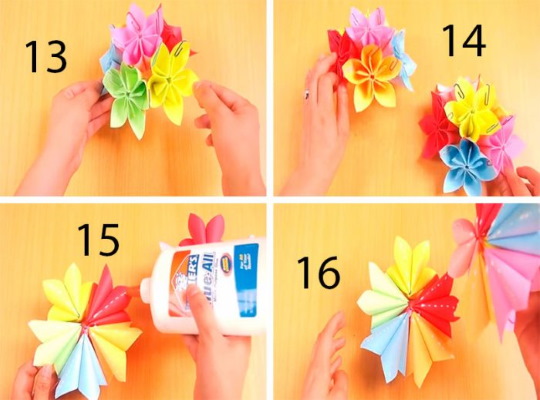
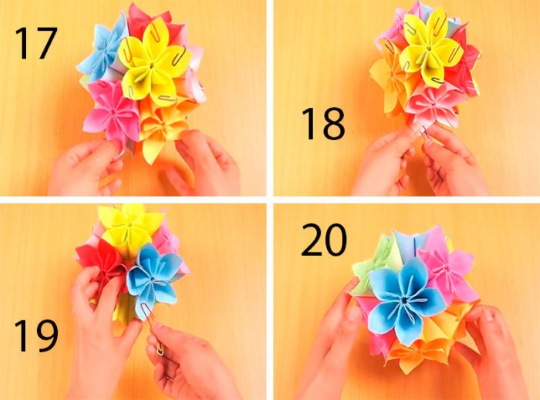
The order of formation of the ball is as follows:
- Hemispheres are formed from 6 flowers. For this, 5 similar elements are attached to the central flower. Glue is applied to the middle part of each petal of the central element.
- While the blanks are drying, a fastening is made from a thin ribbon and a large bead. The ends of the ribbon are threaded through the bead and secured with knots on both sides.
- The resulting loop is glued to the center line of one of the blanks.
- Then the second part of the ball is attached. For a more reliable connection, the workpiece is fixed with paper clips, which are removed after the craft has completely dried.
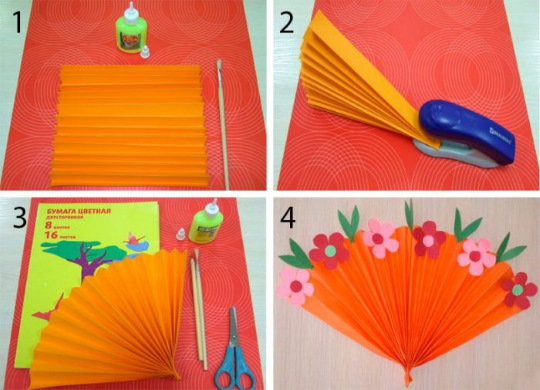
Flowers
Hand-made paper crafts are the most relevant children's gift for any holiday or celebration. Among paper crafts, flowers occupy a special place, which can be made as an independent product or a decorative element for decoration.
Option 1: crocuses
For a bouquet of 3 flowers you will need the following tools and materials:
- corrugated paper of white, yellow and green colors;
- cotton wool;
- glue;
- wooden skewers:
- semolina;
- thin wire.
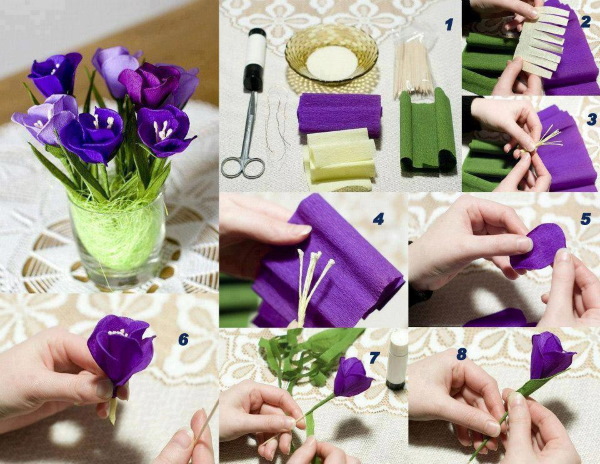
Progress of work:
- From white paper, cut 15 strips measuring 20*4 cm. The long side of the pieces should be parallel to the corrugation.
- Each strip is twisted twice in the middle and the blanks are given a convex shape by carefully stretching the upper part of the petal.
- The inner part is cut off by 0.5 cm on both sides, and the outer part at the bottom is folded by 0.5 cm towards the center.
- A yellow square 3*4 cm is cut with a fringe 2 mm wide and 25 mm high. Important! The fringe is cut along the corrugations.
- Each strip curls into the shape of a stamen.
- The workpiece is wrapped around the tip of a wooden skewer coated with glue.
- The stamens are coated with glue and dipped in semolina.
- Five petals are successively attached around the stem with stamens, securing each of them with wire.
- The base of the flower is coated with glue, onto which a thin green strip is attached.
- Long, sharp leaves are cut out from rectangles measuring 10*1.5 cm, the ends of which are curled.
- The finished leaves are fixed to the stems. Its lower part is once again wrapped with a strip of paper.
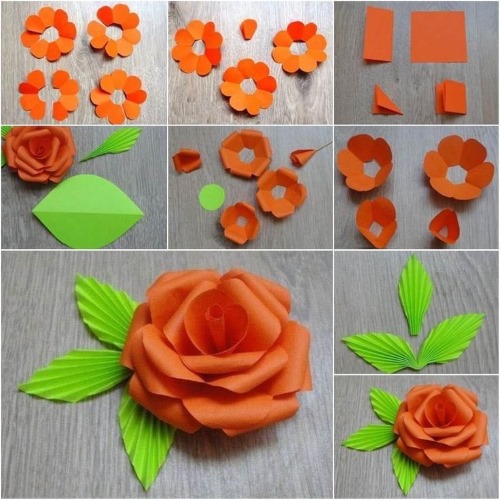
Option 2: Rose
Rose is one of the favorite flowers of paper craftsmen. It can be made using various techniques. The simplest option is to twist a bud from a paper spiral.
To make it you will need:
- colored office paper;
- scissors;
- glue;
- thin wire in green winding;
- large beads;
- toothpick.
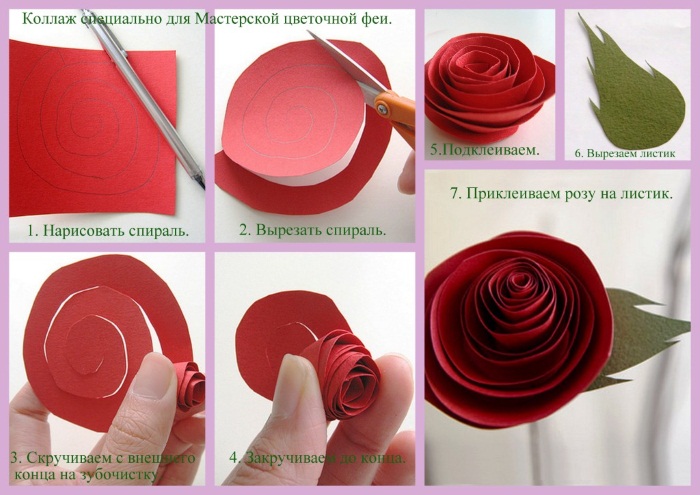
Progress of work:
- Colored paper is cut into circles with a diameter of 10 cm.
- Draw a spiral with a simple pencil.
- The workpiece is cut along the obtained line. In the work, you can use scissors with both straight and wavy blades.
- The tip of the toothpick is carefully split. The outer end of the workpiece is inserted into it and the paper spiral is twisted into the shape of a bud.
- Glue is dripped onto the central part and the twisted part is secured to it.
- A bead is fixed in the center of each bud. For this, strong synthetic glue is used.
- The wire is cut into 20 cm long pieces and a loop is made at one end, bending it into a horizontal position.
- The base of the flower is covered with strong glue and attached to the bud.
- The craft is dried in a vertical position, with the stem facing up.
The finished flowers can be collected into a bouquet, tied with a bright ribbon or wrapped in beautiful paper.
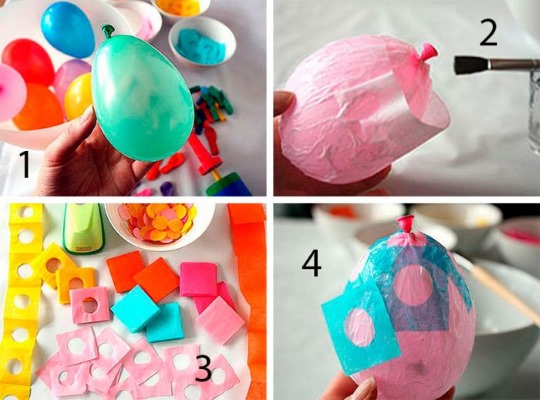
Papier-mache egg
Paper products made with your own hands can become an original gift for a child. Such a present is designed in the form of a chocolate egg.
Materials and tools:
- newsprint;
- paper towels;
- flour paste;
- wide soft brush;
- large balloon;
- stationery knife;
- paper tape;
- paints.
Progress of work:
- Tear the newspapers into small pieces.
- Inflate a large balloon and cover it with a thin layer of baby cream.
- Pieces of paper are dipped into a bowl of warm water and used to cover the entire surface of the ball.
- The paper layer is covered with paste using a soft brush. In a similar way, 2 more layers of paper are applied and the workpiece is left to dry.
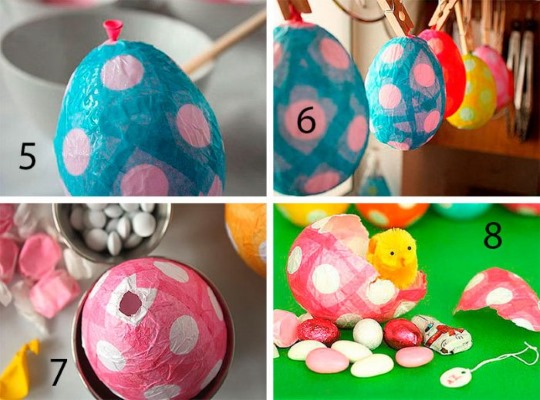
- The described sequence is repeated three more times. The last three layers are made from a paper towel. After applying the last layer, the product is left to dry, which lasts 20-24 hours.
- The egg is painted in the shape of one of the popular brands of sweets, dried and the balloon is carefully deflated.
- The top of the egg is cut off with a stationery knife and filled with sweets and toys.
- The cut off part is fixed in place with paper tape and the cut is masked with a layer of paper, which is covered and, if necessary, painted with the chosen color.
Dove of Peace for May 9
For Victory Day, you can make an applique in the form of a flag with children aged 3-4 years.
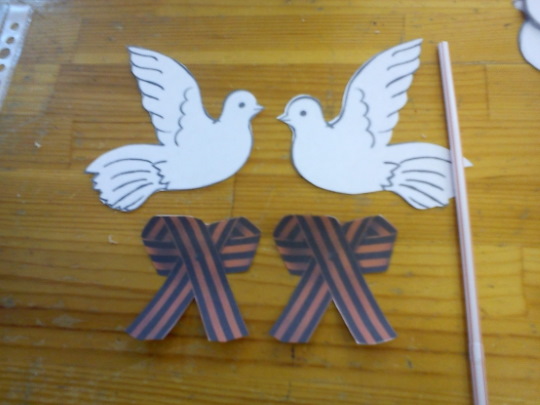
Materials and tools:
- orange, black and white paper;
- dove figure template;
- glue stick;
- wooden skewer;
- black marker pen.
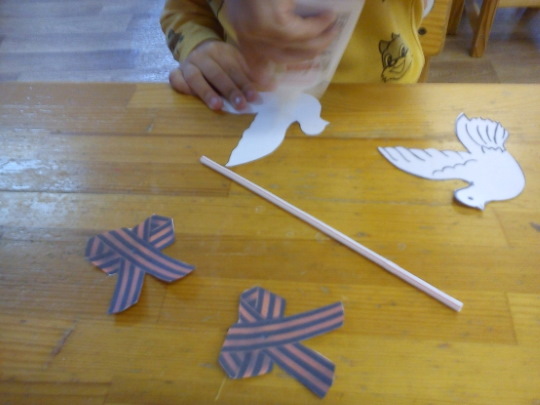
Progress of work:
- Cut orange and black paper into strips measuring 3*21 cm.
- To simplify the work, a 5 mm wide line is drawn from one strip, which is covered with glue and the next part of the tape is applied.
- The resulting two-color fabric is dried. On the narrow side of the flag, a 1 cm wide strip is covered with glue.
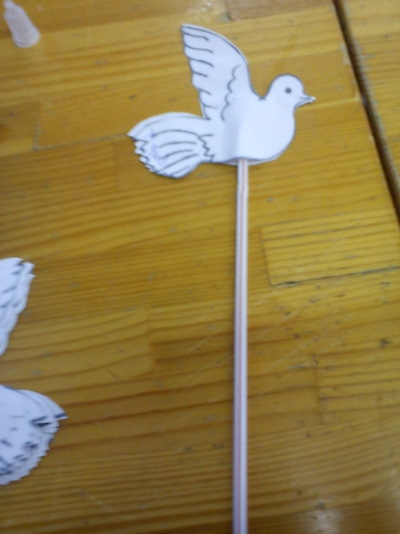
- A wooden skewer is placed on the edge and twisted into paper covered with glue.
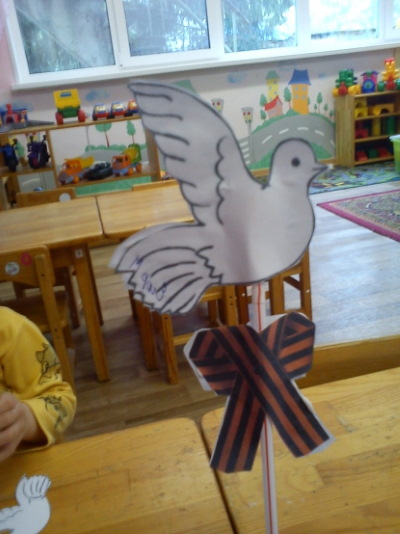
- Using the template, cut out the shape of a dove and glue it to the center of the flag.
- A sheet of A4 paper is folded in half. Children independently trace and cut out the silhouette of their palms.
- One element is glued to the bird's back, and the rest are used to form a fluffy tail.
- Use a felt-tip pen to draw the dove's eye and beak.
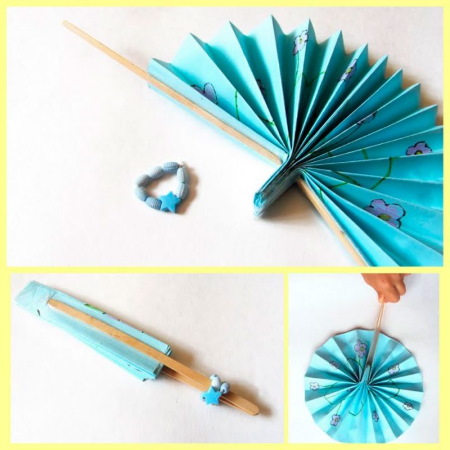
Fan
In the summer heat, you can make a simple paper fan with your children.
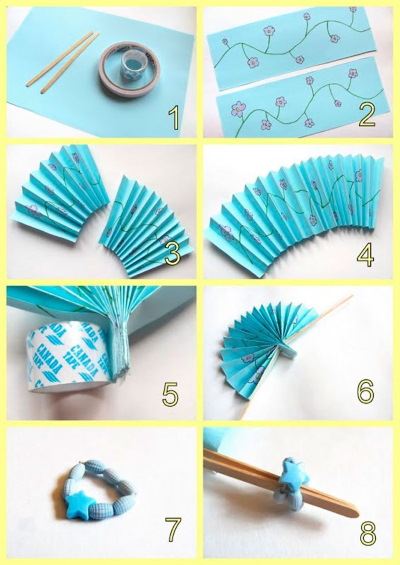
To complete this you will need the following tools and materials:
- A4 sheet of paper;
- felt-tip pens;
- glue;
- scotch;
- scissors;
- sushi sticks;
- thick hair elastic.
The workflow is as follows:
- Fold a sheet of paper in half along the long side and cut along the fold line.
- Apply a pattern or design to each strip of paper.
- Fold the strips like an accordion, keeping a step of 2 cm.
- The parts of the fan are glued together.
- Stepping back 2 cm from the edge, fix the base with tape.
- The sticks are covered with glue and attached to the fan on both sides of the base.
- An elastic band is glued to the side of one of the sticks, which will hold the product in place when closed or open.
If desired, the fan's canvas and handle can be decorated with additional elements (beads, ribbons, lace).
Paper gifts for March 8
The first spring holiday is a joyful event that brings many smiles and gives a good mood. On this day, children can present paper gifts to their loved ones.
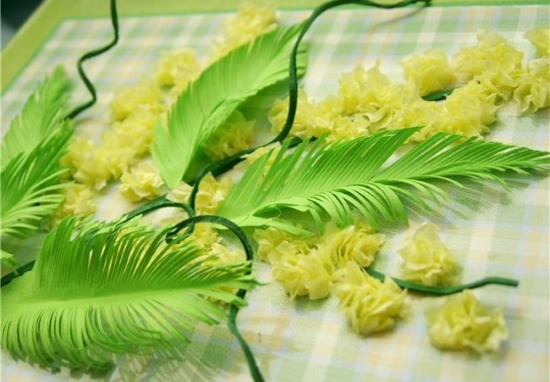
Postcard "A Sprig of Mimosa"
Even the smallest child can make a cute postcard for a woman of any age with the help of an adult.
To create it you will need the following materials:
- A4 paper;
- green paper;
- yellow paper napkins;
- felt-tip pens;
- thin paper tape;
- scissors;
- glue.
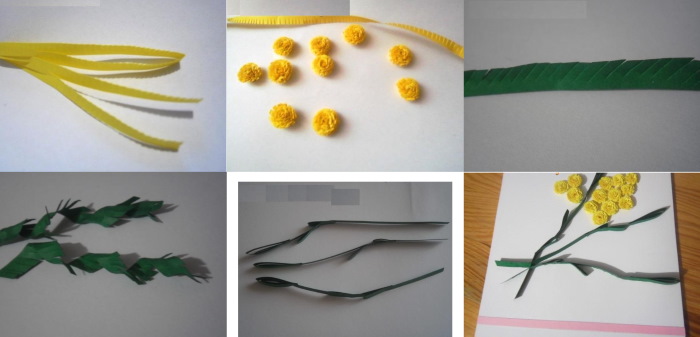
Progress of work:
- A sheet of A4 paper is folded into the shape of a postcard.
- On the front side, use a green marker to draw three stems and an elongated oval silhouette for the inflorescences.
- The napkins are torn into large pieces, from which balls are formed.
- The ovals are coated with glue and filled with balls.
- Three sheets of green paper are cut out in the shape of a pointed oval. Their edges are cut into a thin fringe.
- A leaf with a slightly fluffy fringe is glued to each stem.
- The ribbons are tied into a bow and glued under the leaves.
If desired, the finished card can be decorated with glitter.
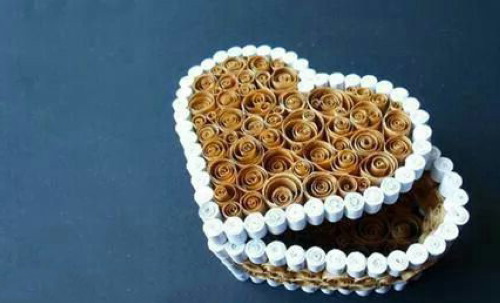
Box for small items
You can make a box-shaped product out of paper with your own hands using the quilling technique.
Materials and tools:
- strips of white and pink paper 0.5*20 cm;
- quilling tool;
- PVA glue;
- stencil with circles;
- round template with a diameter of 10 cm.
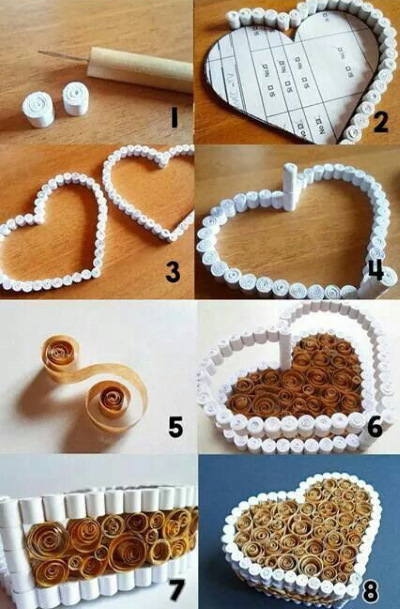
Instructions:
- Twist the strips into loose rolls with a diameter of 1 cm. To make a small craft, you need to make 50 pieces of pink and white.
- Fill the circle template with rows of white pieces, starting from the center. All the pieces are glued together.
- A strip of glue is applied to the outer row, onto which white and pink circles are attached, placing them in a checkerboard pattern relative to the lower elements and alternating with each other.
- Lay out another 11 rows in the described manner and leave the bottom of the box to dry.
- The lid for the craft is made in the same way as the bottom. The second row of elements is placed on the second circle from the edge of the part.
The craft is dried and decorated according to the author’s wishes, using beads, paper flowers, and rhinestones.
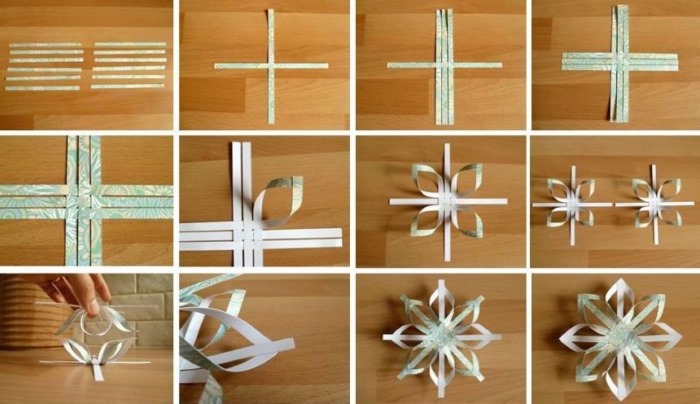
Volumetric snowflakes
The main element of decorating rooms for the New Year holiday is a snowflake. From paper you can make not only flat silhouettes, but also openwork volumetric crafts.
Materials:
- white paper;
- rhinestones;
- scissors;
- glue;
- simple pencil.
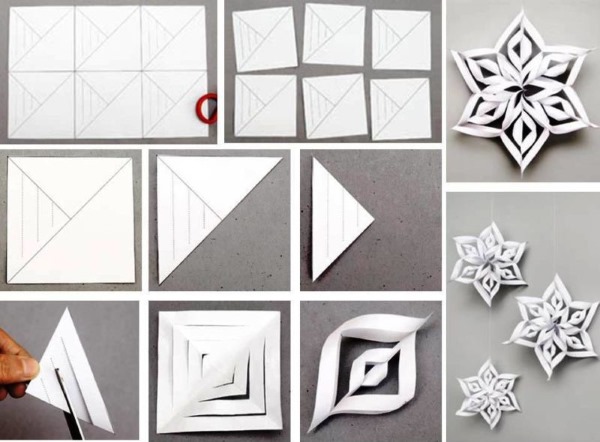
Execution:
- Fold a 20*20 cm square diagonally. Fold the resulting triangle in half twice along the long side.
- Draw 3 arcs on the fold lines.
- The figure is cut out and the marked lines are cut, not reaching 1.2-2 cm to the center. Several figured cuts are made on the central part.
- The workpiece is carefully unfolded.
- The middle part of all the petals is folded towards the middle and fixed in the center with glue.
- The second volumetric part is made in a similar manner.
- The parts of the craft are connected with flat sides, shifting the rays by 45°.
- A large rhinestone is glued to the center of each piece.
Jumping frog
A fascinating paper toy can be made using the origami technique. To make it, you will need a sheet of green double-sided paper and black markers.
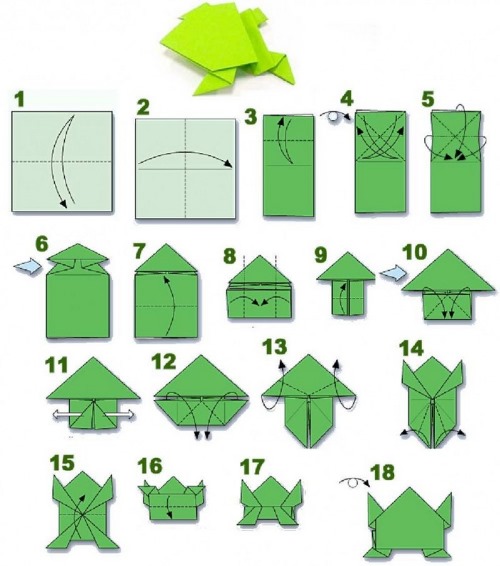
Assembly diagram:
- Fold the square along two diagonals. Then turn it over and fold in half first one side and then the other.
- Unfold the sheet and turn it over to the other side.
- Form a pyramid from the blank, bending the opposite middle sides inward.
- The short sides of the upper triangle are connected to its middle line.
- To form the legs, the resulting sharp triangles are divided in half and the inner side of both parts is folded outward.
- The workpiece is turned over and the side corners are connected to the top.
- The lower sides of the resulting rhombus are connected to the central line.
- The workpiece is turned over with the muzzle facing you.
- Connect the side edges of both small triangles to form an isosceles triangle and lift the resulting pieces up.
- To make the toy jump, it is necessary to form a zigzag fold. Bend the workpiece in a ratio of 1 to 2. Then bend half of the bent lower part in the opposite direction. Important! All folds must be carefully ironed to increase the jumping ability of the toy.
Butterfly
A paper butterfly is a popular interior decoration. You can make such a craft using various techniques. One of the most popular options is an accordion butterfly, which is made from two identical squares of paper and decorative wire.
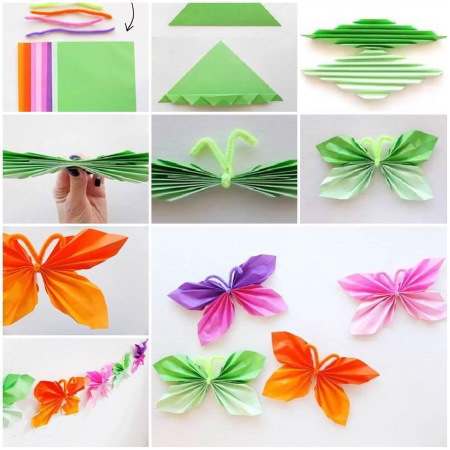
Step by step:
- One of the squares is folded like an accordion along the straight side.
- The second piece is corrugated diagonally, starting from the bottom corner.
- Then the tip of the diagonal piece is glued to the middle of the square.
- The workpiece is clamped in the middle and tied with wire, the ends of which are twisted into spirals.
The finished white butterfly can be painted with paint, slowly moving the color from a rich to a lighter shade.
The boat
There are many options for creating a paper boat. A classic paper boat is folded from a sheet of paper using the origami technique.
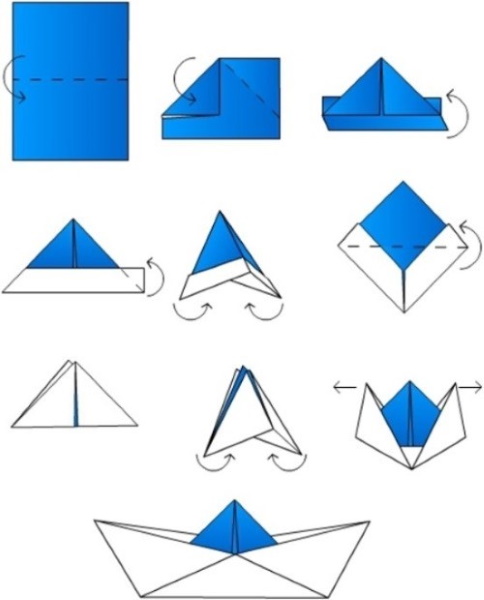
The assembly diagram consists of the following stages:
- A rectangular sheet of paper is folded in half along the long side.
- In the resulting figure, mark the middle line, to which the upper corners are folded, forming a triangle.
- The lower parts are folded upwards on both sides of the workpiece.
- The small side corners are folded successively behind the large triangle.
- The workpiece is straightened, giving it the shape of a diamond.
- The lower free corners are combined with the upper right angle, first on one side and then on the other.
- The triangle is straightened out again into a diamond shape.
- Carefully stretch the upper corners of the workpiece in different directions until a boat model is formed.
- The bottom and sides of the craft are leveled.
The product can be supplemented with a mast made from a wooden skewer, gluing it with PVA glue. A flag cut out of colored paper is attached to the mast.
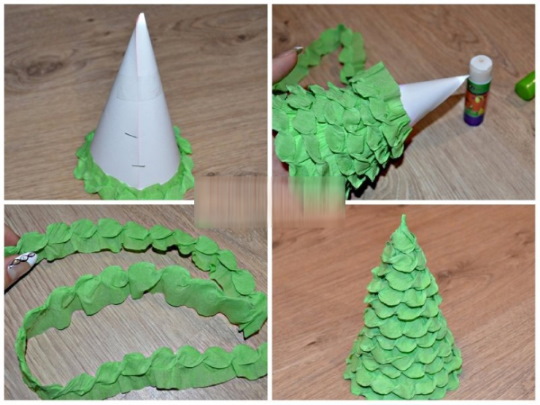
Christmas tree
A beautiful fluffy Christmas tree can be made from corrugated paper and thin wire.
In addition to the basic materials, you will need the following items:
- scissors;
- glue;
- thin cardboard cylinder;
- gouache.
Progress of work:
- Rolls of 3 to 5 cm in width are cut from a roll of corrugated paper.
- Without unrolling the rolls, use sharp scissors to make several cuts, creating a fringe 0.5 cm wide.
- Each strip of fringe is twisted by hand into a thin needle.
- The wire is cut into pieces, each of which is twisted into a loop.
- The paper tape is attached to a wire frame and wrapped in a spiral, securing it at several points with glue.
- The required number of branches is made in a similar way. Their number depends on the size of the base and the desired fluffiness of the green beauty.
- The cardboard cylinder is painted green.
- The branches are secured to a cardboard base using wire.
- The finished tree is decorated with bows made of paper ribbon and beads, which are glued on with strong glue.
Crown
A paper product can be not only a beautiful interior detail, but also a stylish accessory.
A crown for a New Year's costume can be made using the quilling technique. To create it, you will need strips of white and silver paper 0.5 cm wide, glue and a quilling tool.
To make a beautiful openwork crown, you need to prepare the following parts:
- tight roll;
- free spiral:
- drop;
- eye.
From the free spirals, assemble a round base with a diameter equal to the size of the child's head circumference. The height of the rim is equal to 2-3 rows of parts. The elements of each row are staggered relative to each other.
While the headband is drying, snowflakes are collected, which make up the main part of the crown. The element consists of a tight roll, around which 6 rays are located in the form of an eye detail. Tight rolls are located between the rays.
The required number of identical elements can be made according to a pre-drawn diagram. The second prefabricated element of the crown - the peak - consists of two free spirals and an eye placed between them.
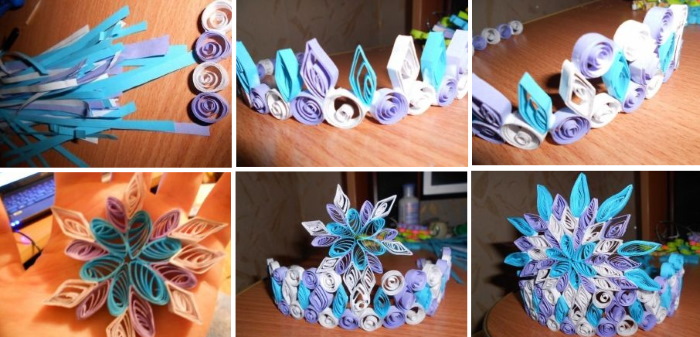
Having made the required number of blanks, proceed to assembling the product. To assemble one segment, it is necessary to glue two drops between two elements of the third row of the rim, placing them in the shape of the letter V. A snowflake is glued above them, which is crowned with a peak.
The required number of identical ones are placed along the diameter of the base. Two eyes are glued to the junction of the segments, placing them on both sides of the point of contact. The finished crown is covered with glitter varnish. It is secured to the head with small invisible pins.
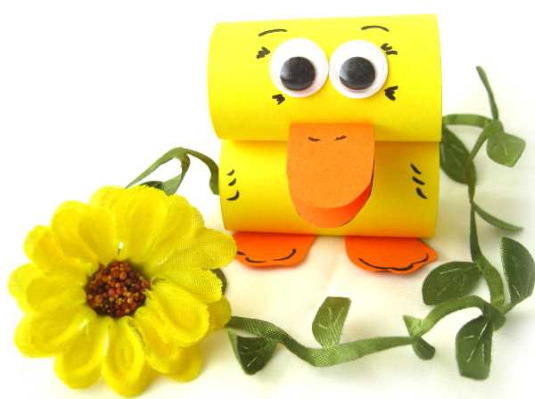
Rocking duck
A funny toy in the form of a duckling can be made by children aged 3-4 years.
For this, an adult must prepare the following items:
- a sheet of yellow office paper;
- white and red paper scraps;
- glue;
- simple pencil;
- scissors;
- circle template with a diameter of 20 cm;
- ruler;
- felt-tip pen.
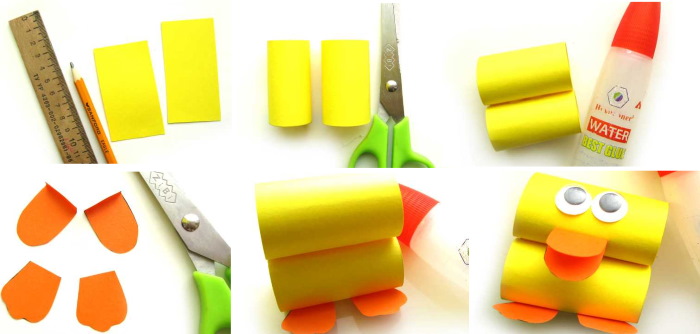
Sequence of actions:
- Using the template, trace the circle and cut it out.
- Cut a 7 cm wide strip from the remaining part of the sheet.
- Make two side folds, leaving a central part that is 7 cm wide.
- Form a cylinder from the strip and secure it with glue. This will be the duckling's head.
- Glue white eyes with drawn pupils and a red beak, which is a narrow strip folded in half, to the head.
- On one side of the round blank, along the line of the side folds, make two cuts, the depth of which is equal to 5 cm.
- Bend the middle part upwards and glue the side parts to it, forming the bird's breast.
- Cut the opposite side into fine fringe.
- From the remains of the yellow leaf, cut out two wings and glue them to the body.
- Cut out two elongated trapezoids from red paper, adjust the narrow part a little and glue them to the side of the body in the form of paws.
- At the end of the work, connect the body and head.
3D mushroom
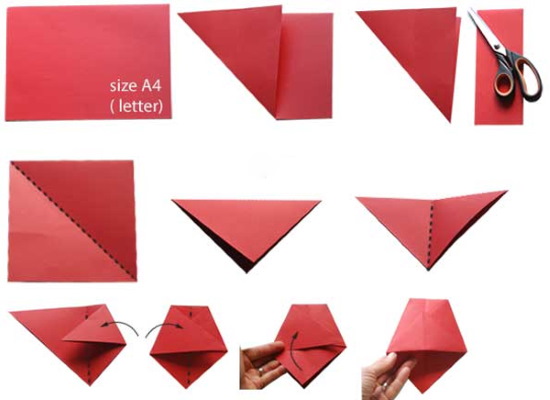
The volumetric mushroom is made from colored paper and white cardboard tubes. In addition to these materials, you will need glue, scissors and a compass. Using a compass, draw a circle. Cut it out and remove a small segment.
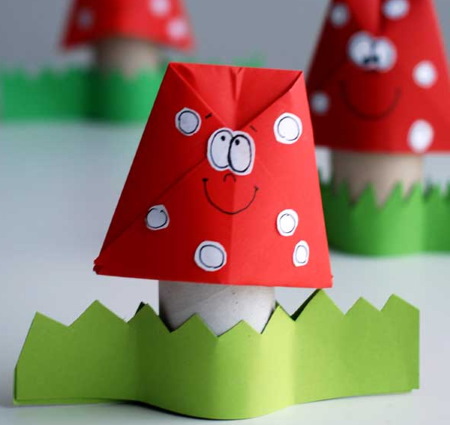
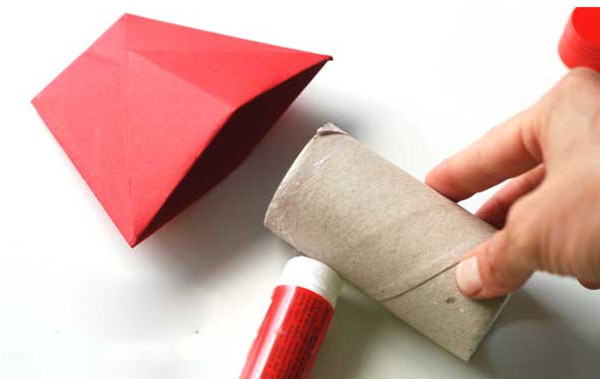
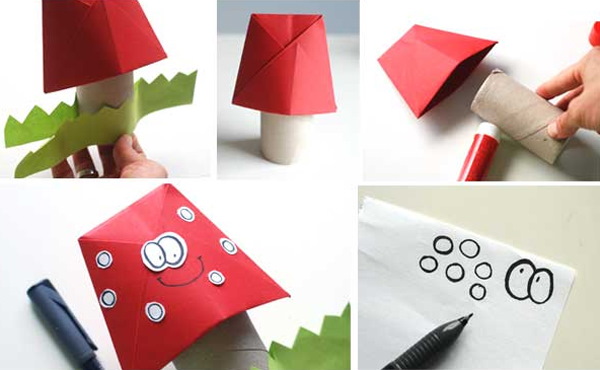
The free ends are connected and fixed with glue. Several white circles are cut out of white paper and glued to the surface of the mushroom cap. A rectangle 2.5 cm wide and the length equal to the diameter of the cylinder is cut from a white sheet. The strip is cut into a fringe, not reaching the edge by 1 cm.
The top of the cylinder is cut into 1 cm high teeth, which are slightly bent inwards. Paper fringe is glued to the middle of the sleeve. The teeth are covered with glue and the cap is attached to them.
Shooting pistol
An original toy for boys aged 5-6 can be made from several sheets of paper.
The manufacturing sequence is as follows:
- Using a ballpoint pen, roll an A4 sheet of paper into a tight tube and secure the end with tape. Trim the ends of the tube evenly.
- Remove the rod from the pen. Cut the sheet of paper into a square shape. Roll the square into a thin tube that easily passes through the first piece.
- One end of a thin tube is folded into a loop. Two thin rubber bands are inserted into it and folded again. The loop is tightly fixed with several turns of adhesive tape.
- The tube with the loop is inserted into the thick workpiece and cut so that its length is 2 cm less than the outer part.
- Fold the sheet of paper along the long side into 8 layers. Then fold the piece in half twice. Secure the resulting handle-shaped bracket around the barrel with tape. Make sure that the handle does not deform the barrel.
- A 2-3 cm long paper roll is attached to the edge of the barrel. It serves as a front sight and a retainer for the rubber band.
- Bullets from the g fall off from the grooves of a thin tube.
Shooting:
- The bullet is placed into the barrel.
- The piston is pulled towards oneself.
- When the piston is suddenly lowered, a shot occurs.
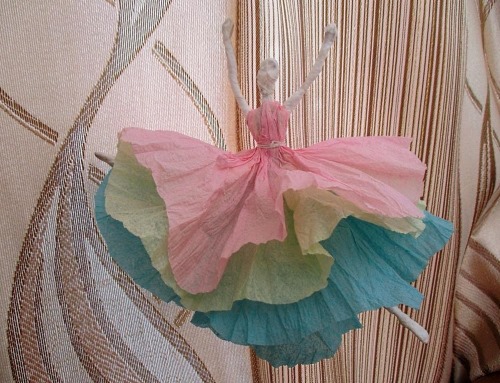
Dolls
A ballerina doll-shaped decoration for a girl's bedroom is made from wire and napkins. In addition, you will need paste, scissors and threads.
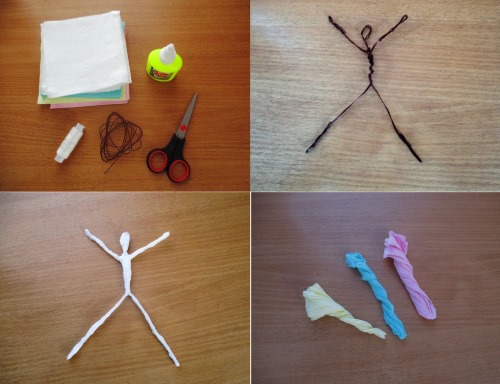
Instructions:
- The doll's frame is twisted from wire, making thickenings in the area of the head, chest, palms and feet.
- A white single-layer napkin is cut into strips 1.5 cm wide.
- The frame is wrapped with paper strips, which are soaked in glue. The figure dries completely in 10-12 hours.
- To create a beautiful dress, take 2 pink and 1 white napkin. They are folded into a sharp triangle, the lower part of which is rounded. All the blanks are twisted in a spiral, forming beautiful folds.
- Cut off the tip of one pink napkin and place it on the waist of the figurine, securing it with a thread.
- The white and second pink napkin are put on the head, making holes in them for the hands. The upper layers are secured with threads, which can be masked with a thin satin ribbon.
Both children and adults can make paper products with their own hands. With simple skills in working with various types of material, craftsmen create unique examples of paper handicrafts.
Author: Anna Rudneva
Article formatting:Natalie Podolskaya
Video about making paper products
DIY paper crafts: