The Karambit is a melee weapon that became popular among boys and teenagers after the release of Call of Duty: Black Ops, and also became famous thanks to characters from Asian action films. This knife model can be used for role-playing games.
To learn how to make a karambit from cardboard, you need to look at a detailed master class, and also learn more about the varieties of such weapons.
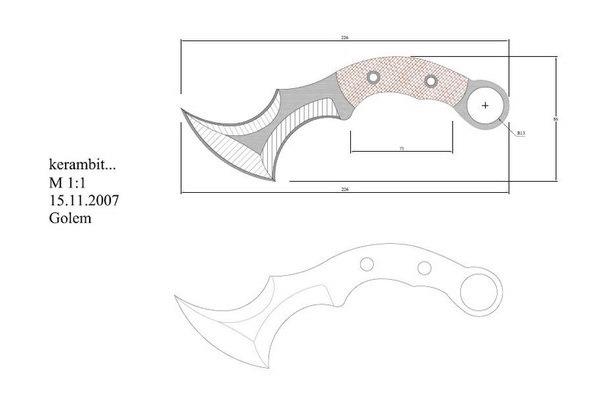
What does a karambit knife look like, what details convey its features
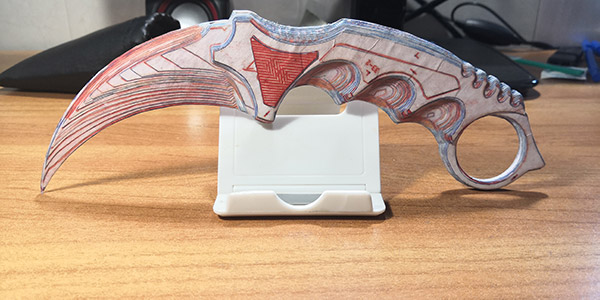
A karambit is a cold weapon in the form of a short, curved (sickle-shaped) blade. The blade is designed for defense during close combat. It is used in many types of Asian martial arts. People call such a knife an assassin's blade.
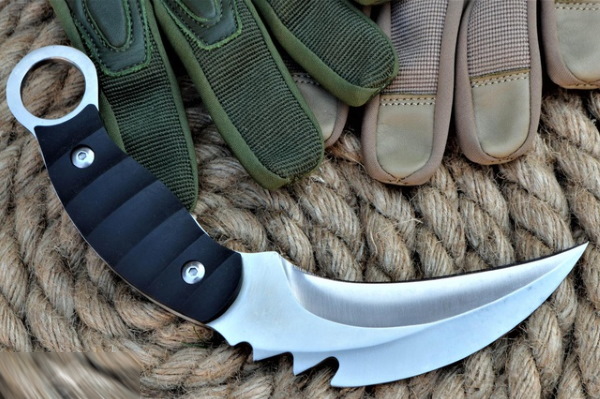
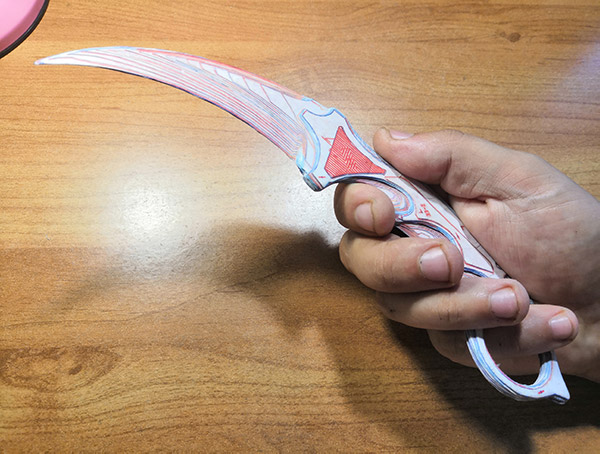
The knife handle is straight and short. It is made of wood, strong plastic or metal. The handle has special grooves for the fingers. Thanks to them, the knife fits comfortably in the hand. To prevent the weapon from slipping out of the palm, there is a round hole at the tip of the handle, resembling a ring. The middle finger is inserted into it.
The blade is sharpened from the bottom. It is designed to deliver sharp blows that rip the skin, damage the muscles, or tendons of the enemy's arms and legs. It is difficult to kill an enemy with such a knife. Previously, for this purpose, the blade was lubricated with deadly poisons obtained from the gums of poisonous snakes, reptiles, and from the stings of insects before the fight.
The karambit blade is small in size (from 4 to 12 cm). Thanks to this feature, the knife can be easily hidden in the sleeve, and strike at the most unexpected moment for the enemy. There are larger models, the length of their blades is about 30 cm. To use such knives, you need good experience in martial arts.
A karambit made of cardboard cannot be used in a real fight, but it can be used as a prop for filming, or as a toy weapon for children's entertainment.
Materials and tools for making a knife from cardboard
The list of materials and tools required for the work can be found in the table.
| Thick paper | Needed to create drawings and templates. |
| Simple pencil | A tool with a hard-soft lead will do. |
| Eraser | To correct inaccuracies when drawing up a drawing. |
| Scissors | To cut out blanks from paper. |
| Cardboard | It is advisable to purchase double-sided cardboard in black, silver, gold or dark blue. This material will make a realistic knife. You can use any other thin cardboard for children's creativity, if the product will ultimately be painted. You will also need a sheet of colored cardboard to detail the knife handle. |
| PVA glue | For gluing sheets of cardboard. |
| Moment glue | For fixing decorative details. |
| Stationery knife | It will help you to carefully cut out parts from glued sheets of cardboard. |
| Sandpaper | Needed for sanding. It is advisable to have paper of different grain sizes on hand. |
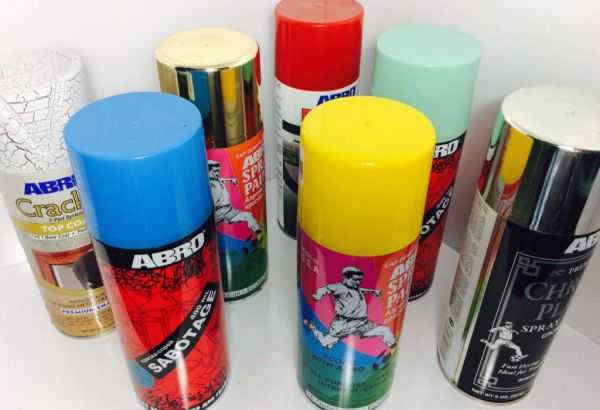
| Dye | To paint the entire piece, you can use aerosol acrylic paint with a matte effect. To paint only small areas, gouache is suitable. |
| Impregnation | To make the product strong, you can use moisture-protective impregnations for wood. It is important that the composition is transparent. |
| Brush | Needed for applying impregnation. A medium-sized artist's brush with soft bristles will do. |
The finished, painted product can be covered with a thin layer of transparent acrylic varnish. The coating will protect the paint layer from scratches and make the product more dense. It is more convenient to use varnish in an aerosol can than liquid that needs to be applied with a brush.
The article below provides a detailed tutorial on making a crembit from black and orange double-sided cardboard.
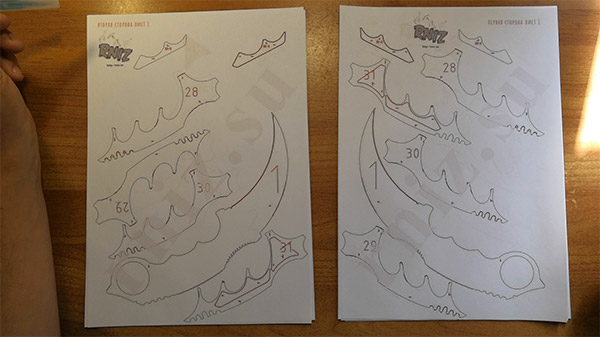
Drawing
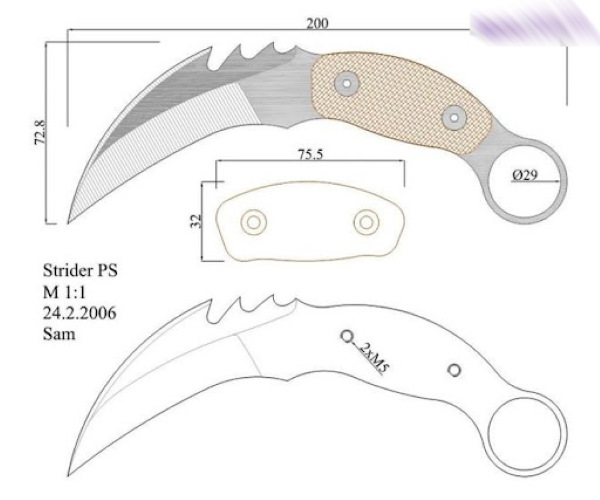
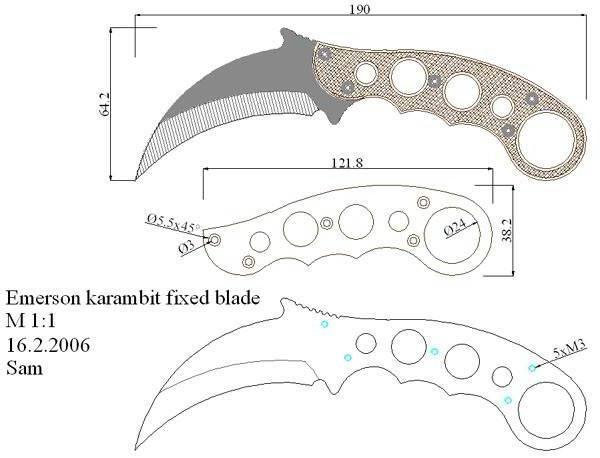
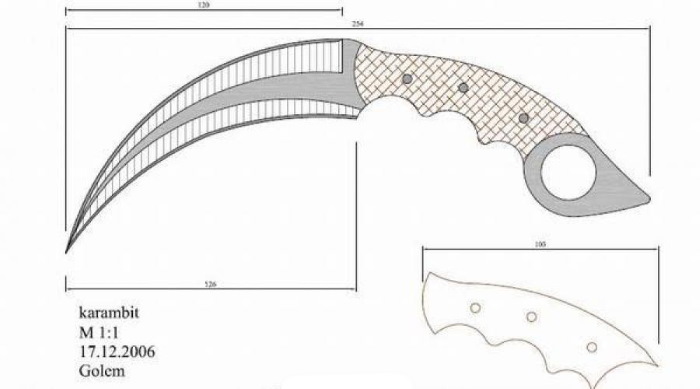
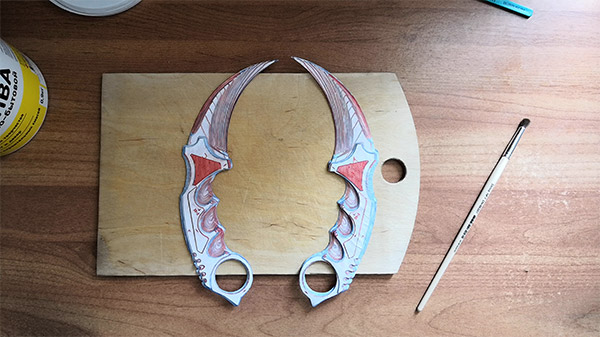
Cardboard karambit (you can make a drawing using a computer program, then print the templates on a printer using thick paper) consists of 5 parts:
- warp;
- 2 bulges on the blade;
- 2 handle parts.
First, you need to draw the shape of the knife along with the handle on paper:
- Draw the upper arc of the blade.
- Add the bottom part. The angle of the knife should be narrow and sharp. Closer to the handle, the blade widens.
- Finish drawing the rectangular handle.
- Mark out the finger grooves.
- Measure the circumference of the middle finger with a measuring tape. Draw a ring of the corresponding size on the tip of the handle. For convenience, you can use a compass.
- Use an eraser to erase extra lines.
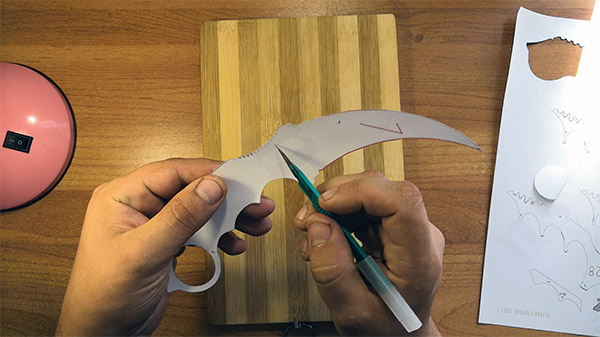
Cut out the blank with scissors.
Lever
How to draw the handle parts:
- Place the base on a clean sheet of paper.
- Trace around the handle only. Remove the template.
- Deepen the finger holes.
- Shorten the tip of the handle and narrow it.
- Use an eraser to erase extra lines.
Cut out the 2nd piece. Then, turn it over to the other side, trace it on paper, and cut out the 2nd piece.
Blade
On the remains of the paper draw 2 details of the convexity on the blade. They should repeat the shape of the sharp part of the knife, but be a little narrower and shorter. It is important to remember that these overlays will be glued on 2 sides. The details should be rolled in different directions.
Gluing
Before transferring the contours onto the cardboard, it is necessary to prepare the material by gluing it.
Step by step:
- Glue 5 sheets of black cardboard together using PVA glue.
- The glue should be applied carefully. It should evenly cover the entire surface of the cardboard being glued. The sheets should be placed on top of each other alternately.
- Place 5 glued sheets under a press. You can use a stack of books. The pressure will prevent the cardboard from deforming due to moisture.
- By analogy, you need to glue together 3 more sheets of black cardboard of A4 format. Also put them under the press.
Wait until the glue dries completely. The process will take about 6 hours.

Next steps:
- Transfer the drawing of the knife base onto 5 glued sheets.
- Using a utility knife, cut out the piece.
- 3 sheets of cardboard, glued together, divided into 2 equal parts.
- Transfer the template of the blade bulges to 1 of the parts.
- Transfer the handle details to another piece of cardboard.
- Cut out all elements with a stationery knife.
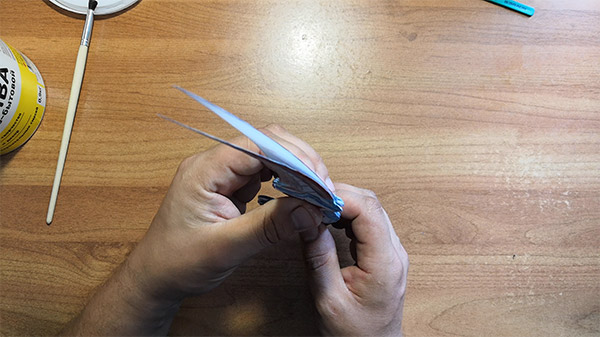
- Using Moment glue, glue the blade bulges. Their base should match the base of the large blade. The upper parts of the parts and the base of the knife should match.
- Glue the handle pieces on both sides. All the recesses should match.
Place the knife under a small press. The cardboard should stick tightly. If the glue leaks outside the pads, it should be carefully removed with a cotton swab.
Grinding
To make a cardboard karambit realistic, sand it with sandpaper.
Procedure:
- Use coarse sandpaper to sharpen the blades on the inside. Sand the paper in 1 direction.
If you rub the cardboard with a pump in different directions, burrs will form, which will spoil the surface of the product. The blade must be ground so that a "cutting edge" is formed, which will reach the glued bulge.
- Carefully round off the top of the blade.
- Process the sharp edges of the bulges. They should be smooth and slightly rounded.
- Repeating the steps 1 through 3, sand the blade with fine-grain sandpaper.
- The coarse sandpaper should be used to shape the depressions on the handle. To do this, press the sandpaper with your finger and carefully scrape off the cardboard, touching the glued parts of the handle. The depressions should become smooth. The transition from the base to the glued parts should become barely noticeable.

- Treat the upper part of the handle.
- Round off the edges of the pen tip.
- Treat the hole for the finger.
- Repeat steps 5 through 8 using fine-grit sandpaper.
- Use a brush to brush away any debris and dust from the product.
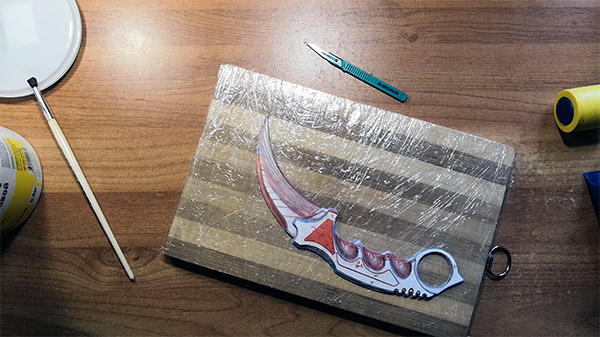
Cut out decorative details from orange cardboard. These can be stripes or triangles. Decorate the knife handle with these elements, fixing the cardboard with Moment glue.
Impregnation
Impregnation will help make a cardboard karambit durable. Any transparent mixture designed to protect wood from moisture is suitable for this purpose. The composition must be diluted with water in a ratio of 5:1. Apply the impregnation to the product with a soft brush.
It is important to impregnate all cuts and joints of parts. First, apply the impregnation to one side of the knife, wait for the composition to dry completely. Then impregnate the other side of the product with the composition. You can apply the impregnation in 2 layers.
Painting
When sanding, the painted part of the cardboard may be erased. The gray paper color will appear. These parts can be painted with black gouache using a thin brush. If the product was made of an unknown cardboard, it can be painted from a spray can.
How to do it:
- Cover the work surface with film or a thick layer of paper.
- Place the knife down and spray it with paint, applying 1 thin layer.
- Wait for the paint to dry.
- Turn the knife over. Paint the unpainted side. Wait for it to dry again.
- Apply another coat of paint in the same manner.
It is not necessary to varnish a product painted with acrylic paint, but the gouache layer must be fixed, otherwise it will crumble and stain your hands.
How to paint a karambit knife
There are over 1000 coloring options for the knife. You can color both the handle and the blade. Single-color or monochrome coloring looks laconic, but brutal. Bright details look good on a dark background, examples: a black knife with red inserts on the handle, a purple knife with bright pink inserts, a dark green handle and an acid-yellow blade.
You can make colored karambits. The "Fade" coloring from the computer game Counter-Strike: Global Offensive is popular. The blade of such a knife is painted in orange, red and purple. The shades have smooth transitions (gradient) from light to dark.
The blade can be painted with Ta-Dai. You will need neon nail polishes, a toothpick, and a cardboard knife, previously soaked and painted black.
Procedure:
- Prepare a container with cold water. The depth of the container should be equal to the length of the knife blade.
- The varnishes need to be dripped into the water one by one. Each new color is added so that the new drop falls into the center of the previous one.
- Use a toothpick to carefully blur the color spot. The colors should not mix.
- Slowly dip the knife blade into the center of the colored spot.
- Carefully remove the product from the water.
- You should get an unusual colored pattern.
Hang the knife on a hook by the ring until the varnish dries completely. When the coating dries, you need to fix the result with transparent acrylic varnish. By analogy, you can paint the knife using varnishes or acrylic paints with luminescent. Then the blade of the ceramite will glow in the dark.
Knife options
Karambit knives differ not only in color, but also in the shape of the handle and blade. The shape of the ring also plays a big role. It can be flat or with angles that allow the knife handle to be used as a knuckle duster. Some knife models do not have a ring at all.
Tiger's Tooth
Distinctive features of such a knife:
- The dimples on the handle are smaller. There are fewer of them – 2. In the classic model there are 4 dimples.
- At the base of the blade there are 3 holes of different sizes.
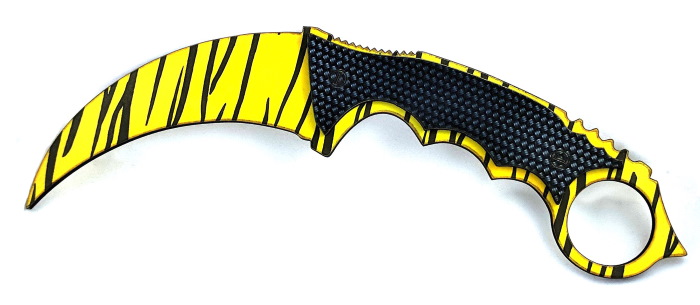
- The top of the blade has sharp teeth that can cause deep cuts.
- The ring on the handle is missing.
- The blade sharpening angle is smaller than that of the standard model.
The main feature of such a blade is the tiger color. The blade is painted dark yellow with black stripes, like on a tiger's skin.
Bowie Knife (Bowie)
Distinctive features of the knife:
- Straight blade, narrow at the base, wide towards the end. Angle – acute. Blade length from 7 to 15 cm.
- The presence of teeth on the top of the blade, as well as on the tip.
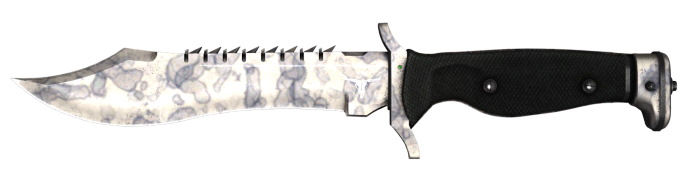
- The ring on the handle is missing.
- Stoppers on the handle (front and back) that prevent the knife from slipping in your hand.
- 1 index finger recess located closer to the base of the handle.
- Small sharpening angle.
This knife can be used to inflict cutting and stabbing wounds. The spikes on the top of the blade tear the wound when a person tries to remove the knife. The knife can be any color. Matte black and shiny metallic colors look beautiful.
Bloody Web
Distinctive features of the knife:
- Small blade (5-7 cm).
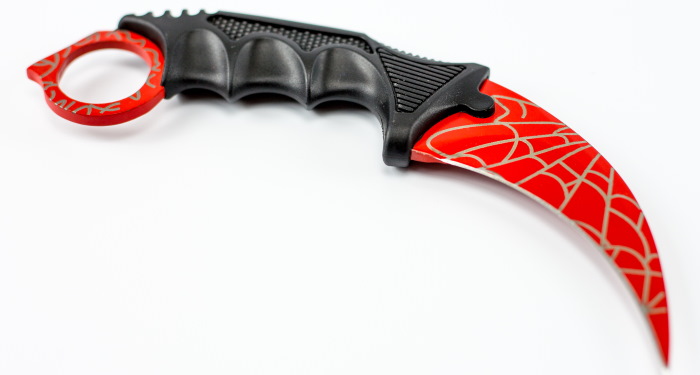
- Small sharpening angle.
- Massive handle with spikes at the end.
- A ring with 1 sharp spike. It allows the knife handle to be used as a knuckle duster.
- 3 deep finger grooves. This knife is comfortable to hold in your hand.
The main feature is the coloring. The handle of such a knife is black, and the blade is red. A thin web of white or black color can be applied over the red color. In some versions, the web is replaced by chaotic black strokes.
It is not difficult to make a cardboard creambit with your own hands. The main thing is to think about the shape and size of the knife in advance so that it is convenient to use for its intended purpose. You also need to prepare all the necessary materials and tools, as well as choose the type of painting for the product.
Video about the product
Cardboard karambit: