The process of creating something new can not only captivate a child, but also develop his intellect and abilities. Therefore, it is important to teach a child to make crafts with his own hands from a very young age. The main thing is to choose inexpensive and safe material. For example, boards.
Hanger
Any boy who has reached the age of 10 can make such a product. The process should be carried out under the supervision of an adult. It is quite easy to make a hanger, and it will not only decorate the hallway for a long time, but also be useful.
To create a fake, you need to prepare:
- 3 boards 10*70 cm;
- 2 boards 15*40 cm;
- 2 metal corners;
- 3 hooks;
- screwdriver;
- self-tapping screws;
- paint or varnish.
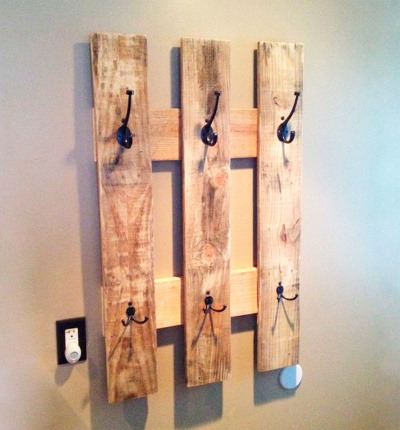
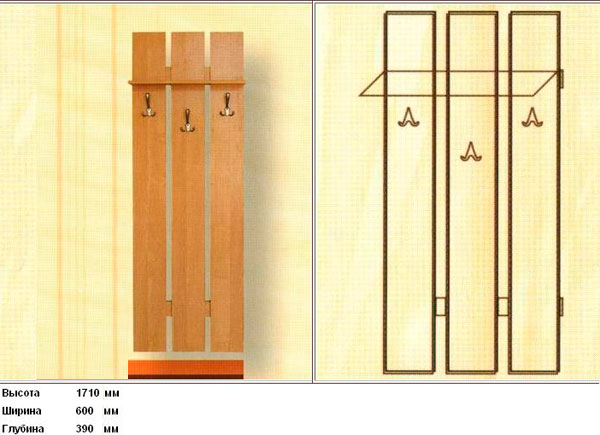

The algorithm for performing a hanger is the following sequence of actions:
- Carefully paint or varnish the boards on all sides.
- Take 3 boards, lay them out on a flat surface so that there is a gap of 5 cm between them. Put one of the boards measuring 15*40 cm on top of them. Secure the structure with a screwdriver and self-tapping screws.
- Screw metal corners to the sides of the horizontally placed board. Secure the free board to them.
- Use a screwdriver to screw 3 hooks under the top of the hanger.
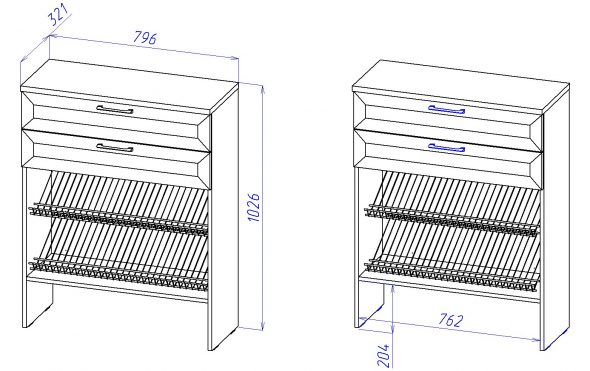
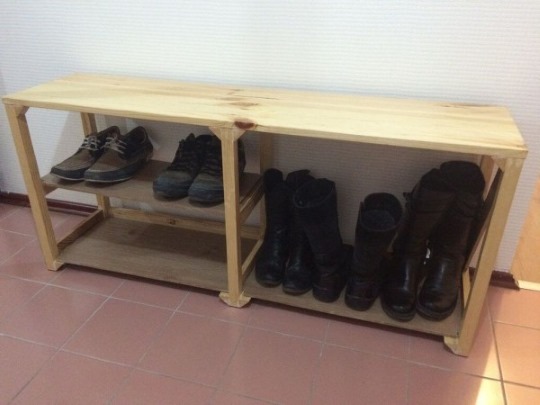
Shoe Organizer
Often in the hallway a large number of shoes accumulate, standing on the floor. This situation spoils the entire Internet. You can solve this problem if you make an organizer from ordinary boards.
To make a shoe rack, you need to use the following materials and tools:
- 6 boards 15*90 cm;
- 4 boards 5*45 cm;
- 8 boards 15*50 cm;
- 8 metal corners:
- hammer;
- nails;
- paint or varnish.
Once everything is prepared, you can start working.
The process is the following algorithm of actions:
- Take 8 identical boards, arrange them in pairs. Attach them perpendicular to each other, additionally fasten with metal corners.
- Set the corners vertically. Make a mark on each of them, located in the middle.
- Connect 3 boards 15*90 cm together. To do this, you need to nail a board 5*45 on each edge. Install this structure at the level of the wooden corner marks.
- Nail 2 5*45 cm boards to the sides of the upper part of the future organizer. Secure the remaining boards to them.
- Lay out a sheet of polyethylene film and place a shoe stand on it. Cover the item with varnish or paint.
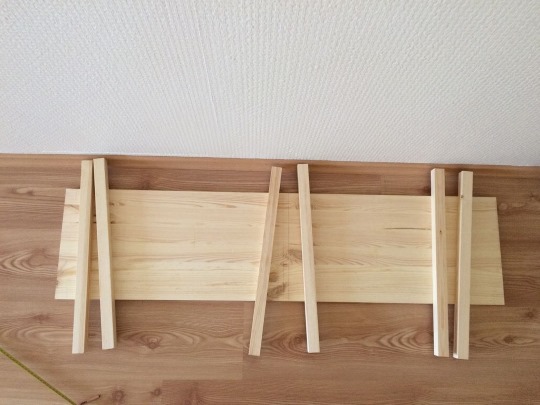
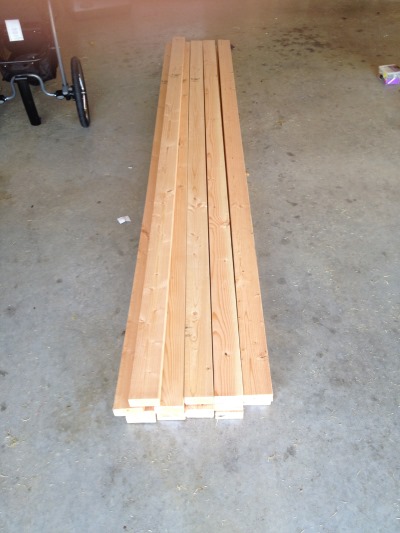
Rack
DIY crafts from boards can bring real benefits. For example, most families face the problem of lack of storage space for various household items.
You can solve the problem and at the same time captivate your child with a useful activity if you make a rack yourself. At the same time, it can easily fit into any interior, having previously chosen the right paint color.
Before you begin work, you should prepare the following tools and materials:
- 6 wooden blocks 5*5*160 cm;
- 4 boards 25*60 cm;
- 8 wooden blocks 3*3*25 cm;
- self-tapping screws;
- screwdriver;
- dye.
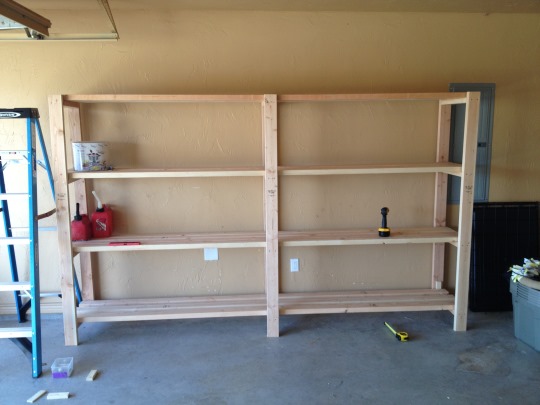
To make a rack, you need to follow the instructions:
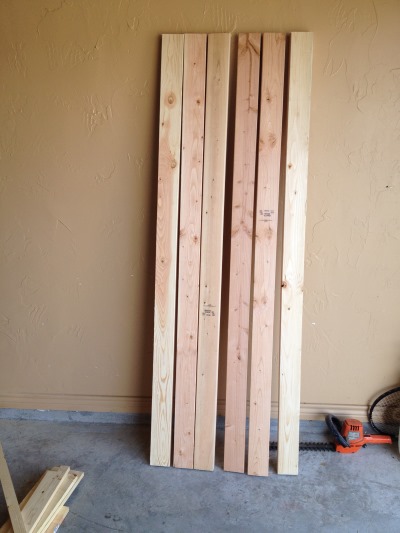
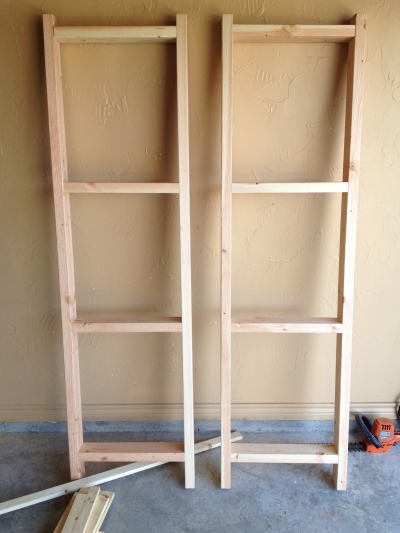
- Make 4 marks on all long bars. The distance between them should be 40 cm.
- Take 3 bars. Place them on a flat surface, keeping a gap of 5 cm between them. Connect the structure with small bars. Fixation should be performed according to the marks.
- Repeat the previous step with the remaining wooden blocks.
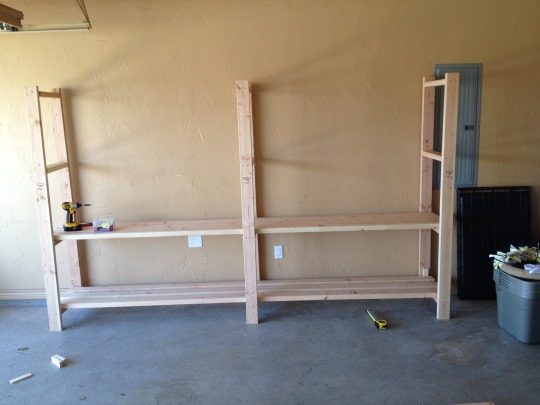
- Connect the two sides of the rack by installing boards on top of the small bars. Secure the result securely using a screwdriver and screws.
- Paint the piece, paying particular attention to small details and corners.
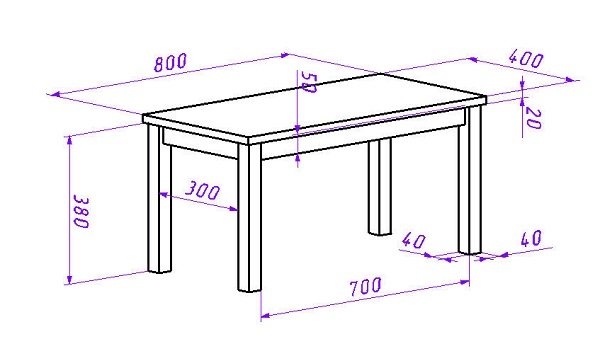
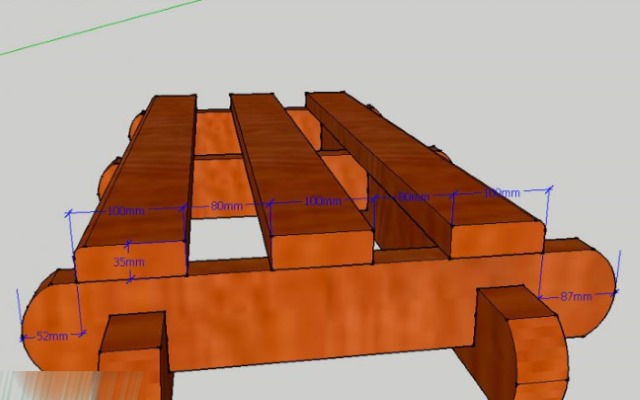
Table
A great idea for creating a craft from boards is a coffee table. It will decorate any room and can be useful. For example, such furniture is convenient for having get-togethers with friends. The table can also serve as an additional storage space. The product itself looks very aesthetically pleasing, so it will easily fit into any interior.

 To do this, you need to stock up on the following set of tools and materials:
- 4 wooden blocks 5*5*60 cm;
- 1 wooden block 5*5*60 cm;
- 2 boards 10*100 cm;
- 2 boards 10*60 cm;
- 4 boards 15*100 cm;
- 4 wide metal corners;
- self-tapping screws;
- screwdriver;
- varnish.
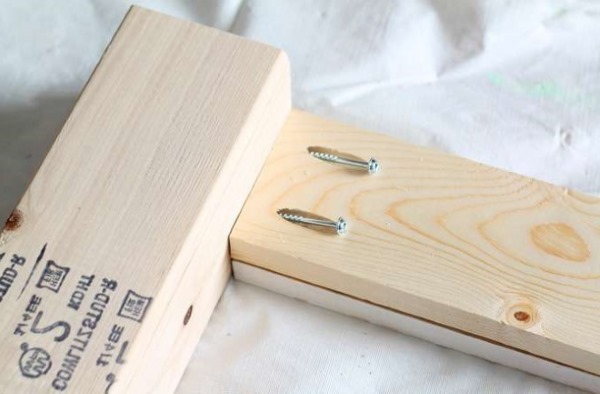
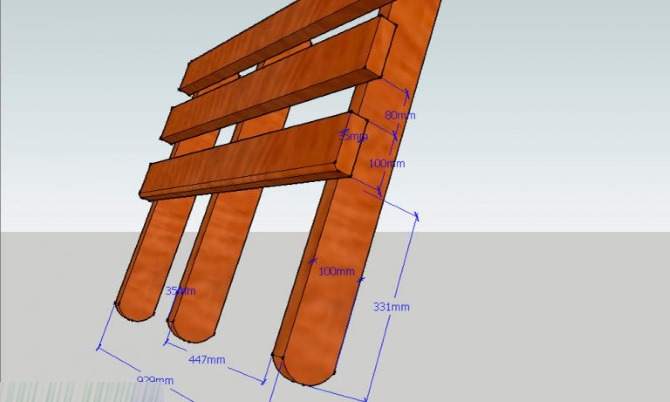
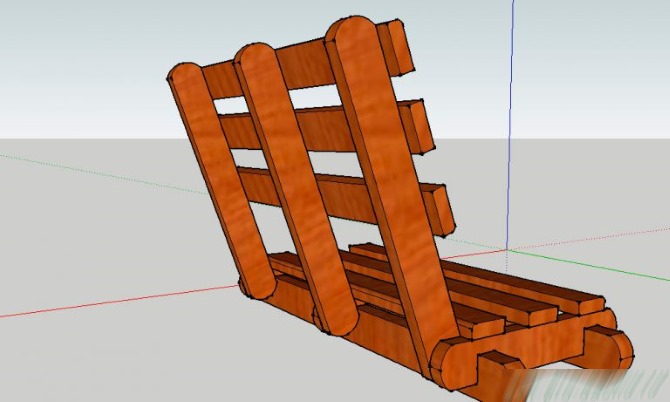
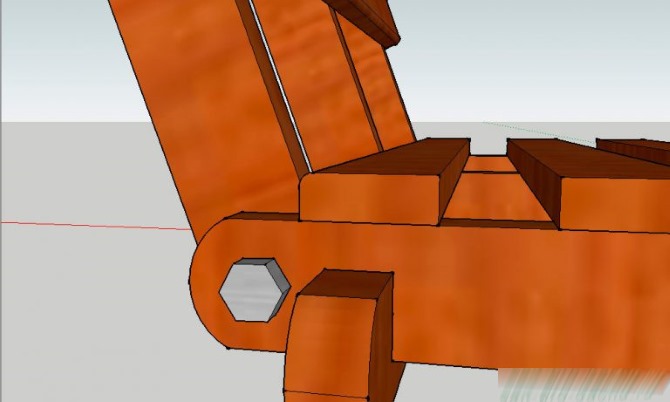
The algorithm for creating a table is the following sequence of steps:
- Make a rectangular structure. To do this, take boards with dimensions of 10*100 cm and 10*60 cm. Connect them using metal corners.
- Attach 4 wooden blocks vertically to the inner part of the resulting rectangle. This should create the base of the table with legs.
- Using a screwdriver and screws, install the remaining wooden block perpendicular to the 10*100 cm boards.
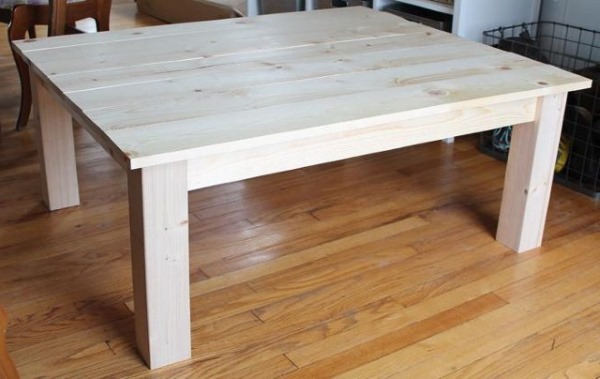
- Make a tabletop. To do this, you need to secure 15*100 cm boards on top of the table base. During work, you need to make sure that the material fits tightly together.
- Cover the table with varnish. If desired, you can replace the varnish with paint of a color that matches the interior.
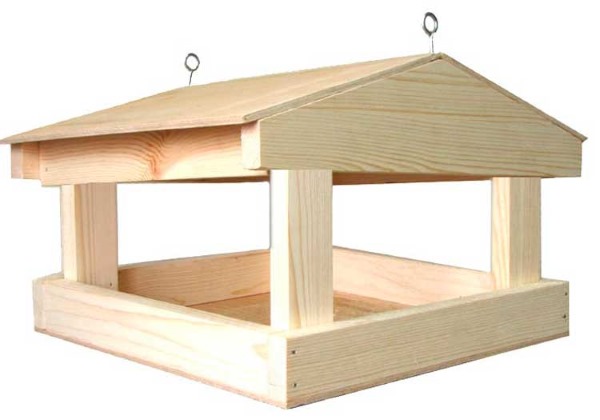
Feeder
DIY crafts from boards can be simpler than the options described above. The product will be no less useful, will teach children to take care of animals and will give them the opportunity to acquire new skills.
The feeder will help to captivate the child not only at the time of creating the craft, but also for a long time it will be possible to regularly bring food and water for the birds.
Before you start working, you should stock up on the following set of tools and materials:
- 4 boards 10*25 cm;
- 4 boards 3*20 cm;
- 4 boards 5*20 cm;
- 4 boards 5*25 cm;
- 4 wooden blocks 2*2*20 cm;
- 8 narrow metal corners;
- screwdriver;
- self-tapping screws.
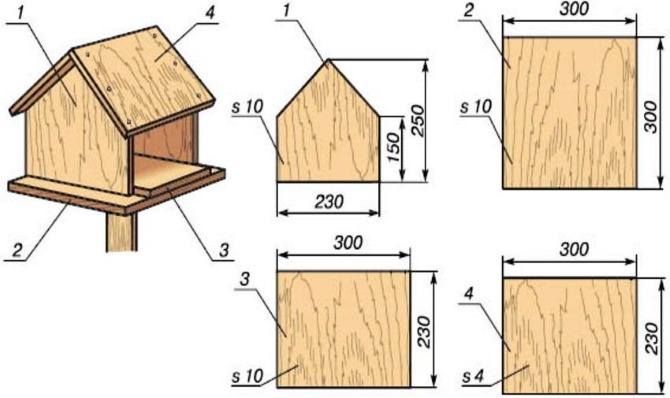
To make a bird feeder, you need to follow the instructions:
- Fasten together 2 boards 10*25 cm. To do this, you need to use screws and two boards 3*20. This will create the bottom of the product.
- Make the sides. Fasten 2 boards 5*25 cm along the length of the bottom, and 5*20 cm along the width. Additionally fasten them together using metal corners.
- Make the roof of the feeder. To do this, repeat the 2 previous steps.
- Connect the bottom of the product to the roof with wooden blocks.
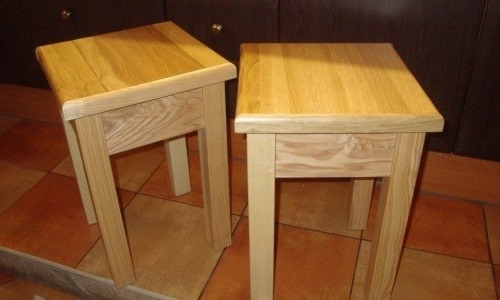
Stool
Another version of a wooden craft that is easy to do with a child. You can make several stools at once, add pillows to them, which you can also sew yourself, and get comfortable furniture.
Before starting work, you should prepare the following tools and materials:
- 2 boards 250*25 cm;
- Chipboard 25*30 cm;
- board 9*20 cm;
- edge for pasting;
- iron;
- screwdriver;
- 4 confirmats;
- hammer;
- knife;
- 5 chopsticks;
- glue.
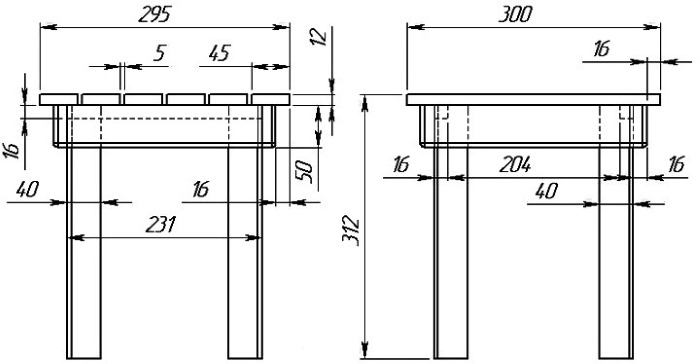
The work process is presented by the following algorithm of actions:
- Cover all the materials for the stool with edging. To do this, heat the iron as much as possible and run it over the surface. Then press the edge down a little with a cloth. Cut off all the excess, turn the board or chipboard over and cover the other side again.
- Screw the first leg to the crossbar, which will be a 9*20cm board. To do this, use 2 confirmats and a screwdriver. Repeat the same steps on the other side.
- Make 5 countersunk holes in the chipboard and in the base of the stool. Add a drop of glue inside and connect the seat to the legs.
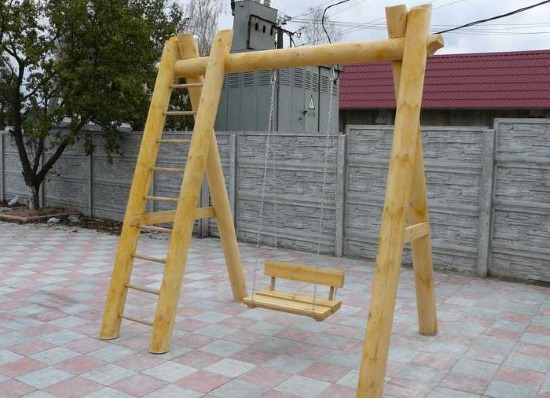
Swing
DIY crafts from boards can be very simple to make, but at the same time bring great benefits. One of such options is a swing. In this case, a simple model is offered, which is easy to make yourself. It can be attached to any tree or special supports. If there is a small child in the house, then you should hang hooks above the doorway.


Before you begin the work process, you need to stock up on the following materials and tools:
- 2 boards 15*30 cm;
- 2 boards 3*20 cm;
- electric jigsaw;
- screwdriver;
- 4 self-tapping screws;
- 2 ropes.
The creation algorithm is the following sequence of actions:
- On each of the 15*30 cm boards make 2 cuts. One in the center of the short edge, the second closer to the edge on the long side.
- Make the seat by joining the material from the previous step. Secure the result with 3*20 cm boards, screwing them with screws.
- Pull the ropes through the slots.
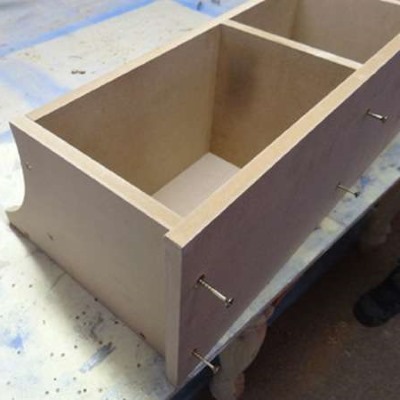
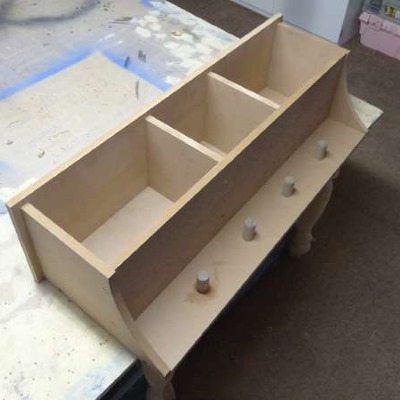
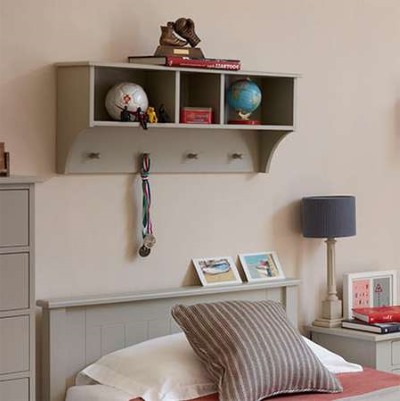
Bookshelf
A very functional and practical use of boards. After all, every home needs a hanging shelf for storing books.
Materials and tools required during the work process:
- 2 boards 10*50 cm;
- 4 boards 15*70 cm;
- dye;
- brush;
- 4 metal corners;
- screwdriver;
- self-tapping screws.
The process of creating a bookshelf is as follows:
- Paint all material and let dry.
- Place 10*50 cm boards parallel to each other. Connect them at the top and bottom with two 15*70 cm boards.
- Attach metal corners. Install shelves on them and connect them with screws.
Original ideas for wood decor
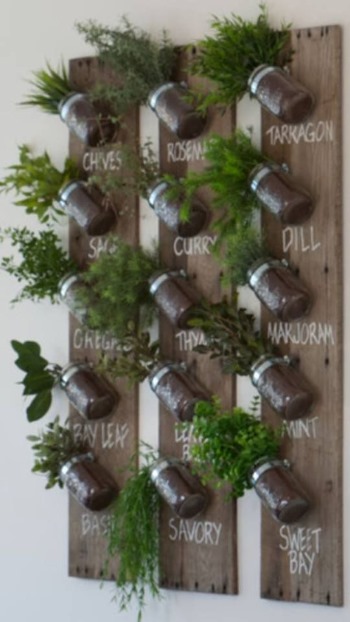
Wood always looks good in the interior. Therefore, you can use boards to create crafts for the home. Wall stands for vases with flowers will look interesting.
In this case you will need minimum amount of materials:
- 4 boards 20*20 cm;
- 4 rings made of any material that can hold the vases in place;
- 4 cans;
- screwdriver;
- 8 self-tapping screws.
The process of creating crafts is the following algorithm of actions:
- Place the first board in a diamond shape.
- Using a screwdriver and screws, attach the ring to the diamond. Pass the can through the ring.
- Repeat the previous steps with the remaining boards.
Afterwards, you can attach the crafts to the wall. It is better to arrange them in the form of a rhombus. Any flowers can be placed in such vases.
Another interesting idea for decor is a special panel for photographs. Such a fake will help to decorate any living space and will look very original. At the same time, it will take a minimum amount of time to create a wooden panel. To make the look more stylish, it is better to use black and white photographs.
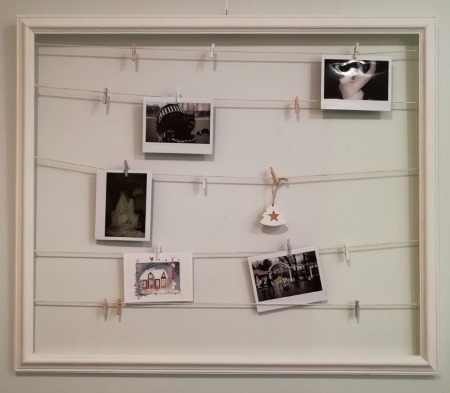
Before you begin work, you should prepare the following materials and tools:
- 2 identical long boards of any width;
- varnish;
- 2 metal strings;
- 4 self-tapping screws;
- screwdriver;
- wooden clothespins;
- photos.
Afterwards, you need to complete the following steps:
- Carefully coat the boards with varnish on all sides. Let them dry.
- Step back 3 cm from the edge of the boards and screw in the screws. Do not completely immerse them in the material.
- Pull the string over the screws. The remaining ends do not need to be hidden.
- Hang the photographs on the strings, securing them with clothespins.
Another option for storing photos is an eco-style frame. All materials used to create the craft are harmoniously combined with each other. Several such photo frames placed on any roughly finished wooden surface will look interesting in the interior. The creation process is quite simple, so even a little girl can be involved in it.
In this case, it is necessary for an adult to take on some of the actions or control them. This is especially true for the use of hot glue and a screwdriver.
Before work, you need to prepare the following set of tools:
- 2 boards 10*15 cm;
- 2 boards 2*20 cm;
- 4 self-tapping screws;
- screwdriver;
- dye;
- brush;
- clothespin;
- sackcloth;
- twine;
- hot gun;
- scissors;
- lighter.
Algorithm for creating a photo frame from boards in eco-style:
- Connect 2 boards 10*15 cm, pulling them together with the remaining boards. It is better to use small screws so that the fastening is not noticeable.
- Cover the photo frame with paint. Let it dry.
- Cut a rectangle out of burlap. Treat the edges of the material with a lighter so that they do not fray later.
- Fold the burlap into a bow. Tie the center with twine.
- Glue the bow and clothespin to the photo frame.
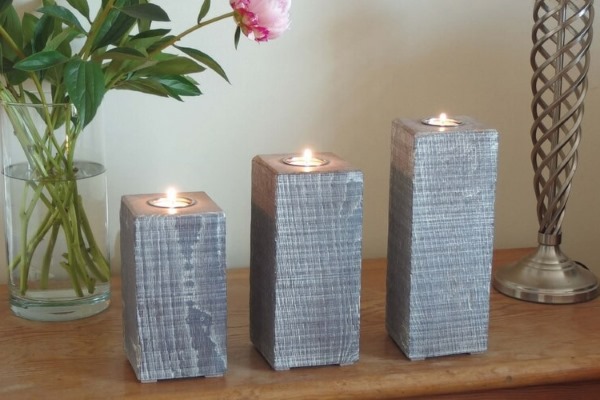
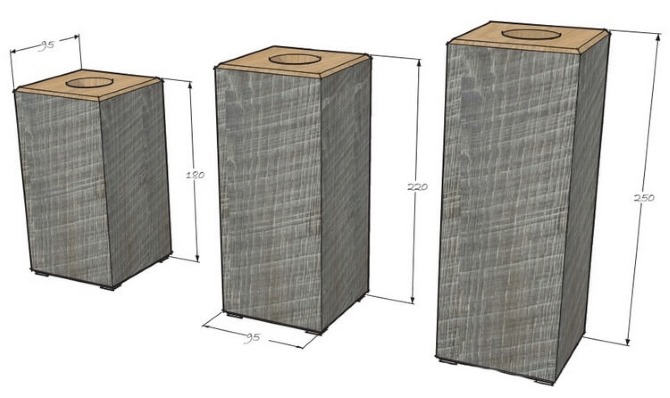
Crafts made from boards with your own hands can be very unusual. For example, a fashionable eco-style in the interior can be emphasized with the help of wooden candlesticks. For such work, you should choose old boards.
On the one hand, they should not have a straight cut, but be slightly broken. The older the material looks, the more interesting and original the candlesticks will be. For these purposes, you can intentionally make the board older by breaking it.
Before starting work, you need to prepare the following tools and materials:
- 3 boards of any size;
- 3 boards 10*10 cm;
- 6 metal corners;
- jigsaw;
- screwdriver;
- self-tapping screws;
- 3 candles.
Next, you need to follow the instructions:
- Cut off one end of the long boards so that one edge has a straight cut.
- Screw 2 metal corners to each of the boards. Use them to attach the shelves.
- Place candles.
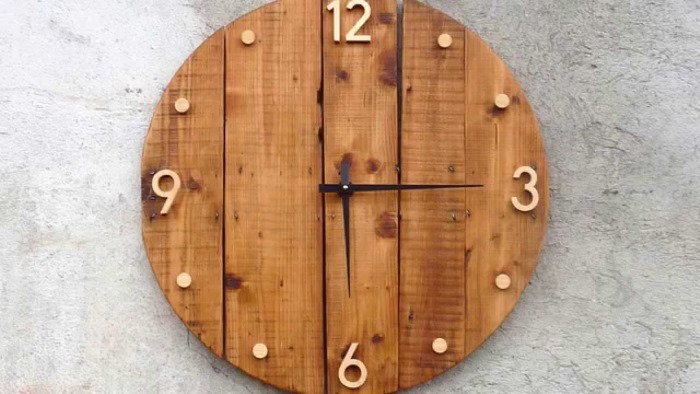
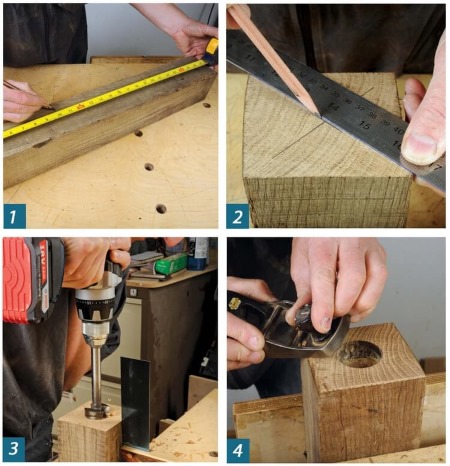
Another extraordinary design solution is an eco-style clock. It is very easy to make, so any child under the supervision of an adult can cope with this task.
For work you will need the following tools and materials:
- 3 boards 15*5 cm;
- 2 bars 2*2*15 cm;
- clock mechanism with hands;
- battery;
- hot gun;
- stencil with numbers;
- pencil;
- burner;
- drill;
- screwdriver;
- self-tapping screws.
The work process is presented as a sequence of actions:
- Press the boards evenly against each other to form a square. Secure the structure with bars. The screws should not be visible from the back.
- Make a mark in the center of the square. Drill a hole for the arrows in this place.
- Using a stencil and a pencil, draw the numbers 3, 6, 9 and 12. Burn them.
- Install the clock mechanism using a hot gun.
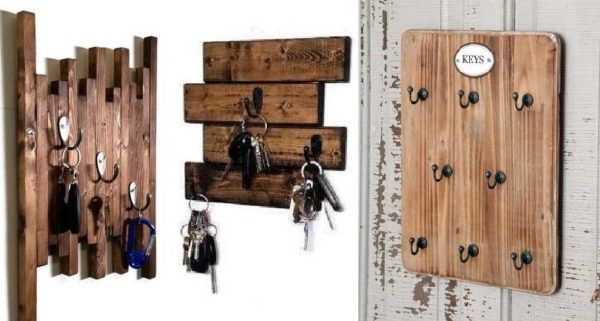
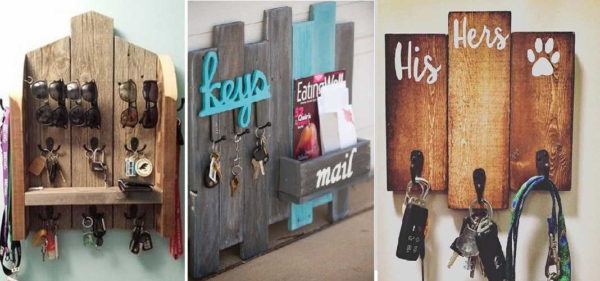
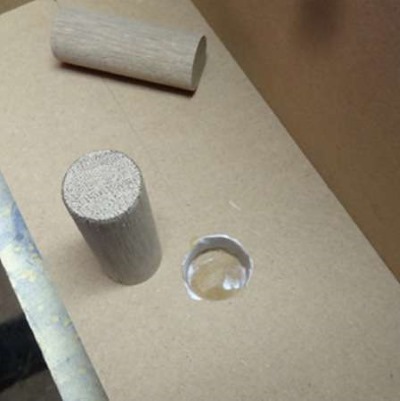
A wooden key holder can be useful and a home decor element at the same time. Such a thing is irreplaceable in the house, because it is much more convenient when all the keys are stored in one place.
To create the craft, you should stock up on the following set of tools:
- board 10*25 cm;
- small wooden chopsticks;
- wood glue;
- hammer;
- drill;
- pencil;
- burner.
After preparation, you can proceed to the following steps:
- Place the board horizontally. Make marks for the dowels closer to the bottom edge. There should be as many of them as there are keys in the house.
- Drill blind holes. Add a drop of wood glue to each and hammer in the dowels.
- Use a pencil to mark the future inscription. It can be in the form of the word "Home" or the phrase "Welcome", recently the family name is often used.
- Use a wood burner to process the inscription.
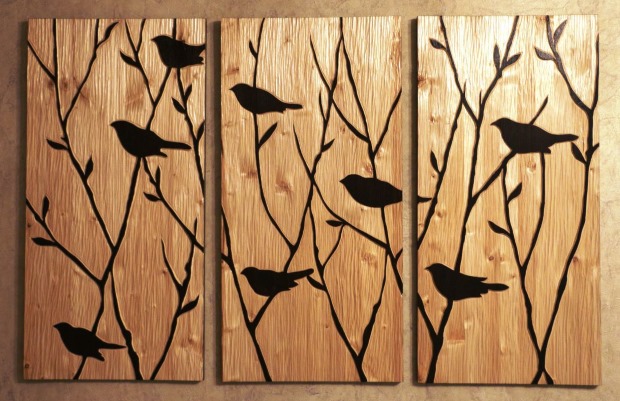
Crafts from boards, which can be done together with children with their own hands, can resemble real masterpieces. For example, you can make a wooden picture-panel. The work is creative.
Therefore, the child can be involved in the process either fully or partially. The execution of the panel requires a stencil. You can use different images. A bicycle or a running horse will look interesting.
To create the product, you need to use the following tools and materials:
- 4 boards 12*70 cm;
- 2 wooden blocks 3*3*40 cm;
- 4 different colored paints;
- white paint;
- brush;
- scotch;
- stencil;
- sandpaper;
- screwdriver;
- self-tapping screws.
The work process involves the following algorithm of actions:
- Paint each board in a separate color. Dry. Then carefully process the boards with sandpaper. At the same time, do not worry about the fact that the abrasions are not distributed evenly over the material.
- Lay the boards on a flat surface so that there are no gaps between them. Connect them using wooden blocks. The screws should not go through. The fastening points should not be visible from the front side.
- Secure the stencil with tape. Fill the image with white paint. Dry.
Kitchen utensils
There are many crafts that can be made for the kitchen. The most functional of them is a cutting board.
To create it you will need the following tools and materials:
- board;
- sandpaper;
- electric jigsaw;
- pencil;
- burner.
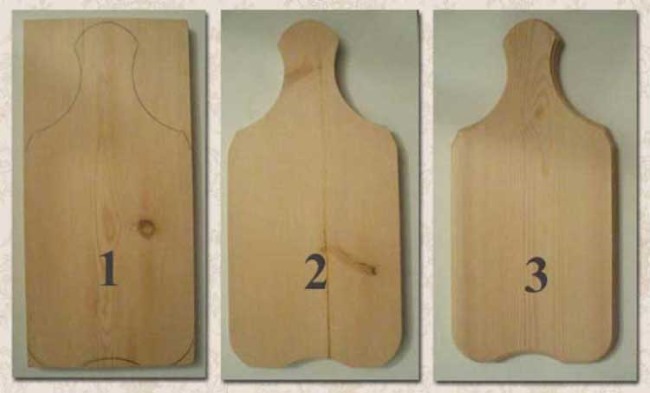
Next, you need to perform the following algorithm of actions:
- Use a jigsaw to cut the board to the required size. Carefully sand all edges with sandpaper.
- Use a pencil to mark the future drawing. If necessary, you can use a stencil.
- Process the design with a wood burner.
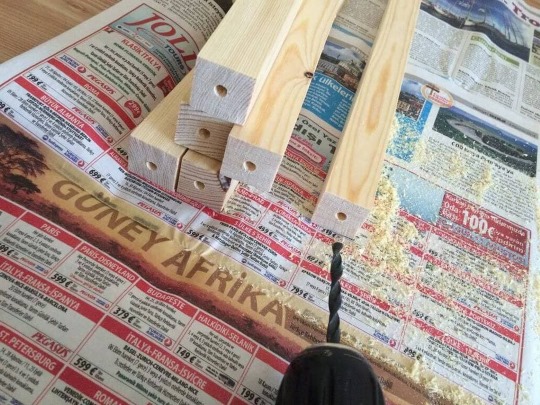
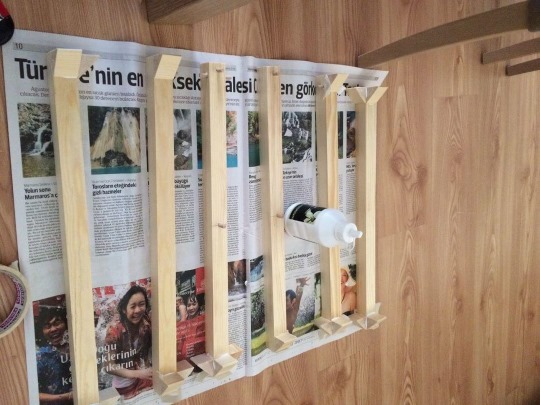
A stand for various small items will look unusual in the kitchen interior. Such a product will add a touch of eco-style or emphasize it.
Before starting work, you need to prepare a set of tools and materials:
- lots of small boards that should be about the same size;
- bottle;
- hot gun;
- twine;
- lighter;
- big button.
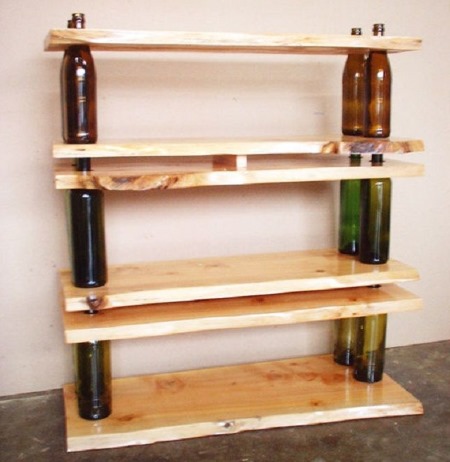
The process of creating an eco-style stand is a sequence of actions:
- Place the bottle on a flat surface. Press small boards vertically against it, gluing them together with a hot gun. The result should be a glass made of boards. Dry.
- Wrap the stand with twine. For better adhesion, you can add a small amount of glue. Treat the ends of the rope with a lighter.
- Glue the button to the string.
In any kitchen there are many tools that need to be hung. To solve this problem, you can make a special organizer.
To do this, you need to prepare the following set of materials and tools:
- board 5*25 cm;
- metal hooks;
- dye;
- pencil;
- brush;
- self-tapping screws;
- screwdriver.
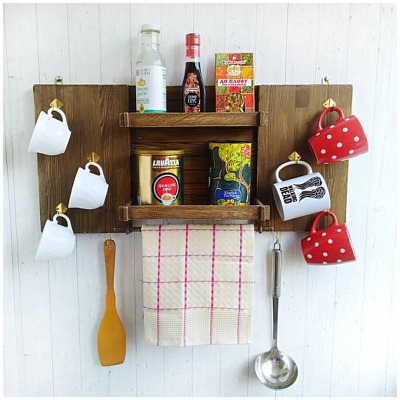
The work process can be represented as the following algorithm of actions:
- Paint the board. Dry.
- Make markings with a pencil.
- Screw on the metal hooks using self-tapping screws.
Boards of any size are a universal ecological material. They can be used to make many useful things, from small organizers to furniture. Children should definitely be involved in the process so that they learn to make various crafts with their own hands from an early age.
Article formatting:Natalie Podolskaya
Video about making crafts from boards
DIY crafts from boards: