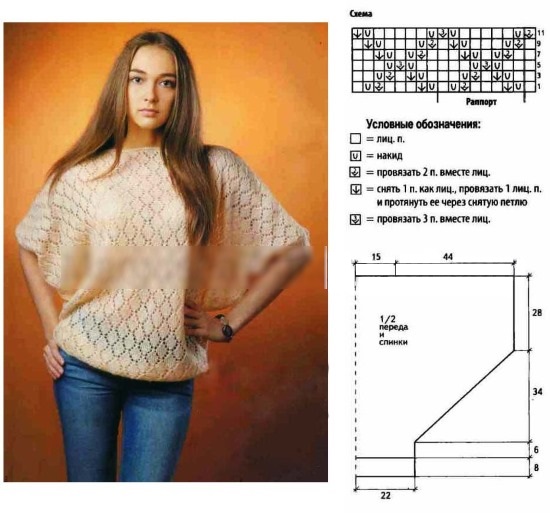
The style of the sleeve determines the appearance of the model and the order of its knitting, therefore, before starting to work with knitting needles, novice craftsmen need to decide on the pattern and model of the sleeve.
Types of sleeves
The sleeves have different shapes and ways of attaching to the main part of the garment, and accordingly, their knitting patterns vary.
The most popular are:
- set-in sleeve;
- without a cap line;
- with a small armhole;
- with shoulder strap;
- raglan;
- bat;
- flashlight;
- kimono.
Tools and materials
To knit all the parts of the product, in particular the sleeves, you will need the following materials:
- Yarn
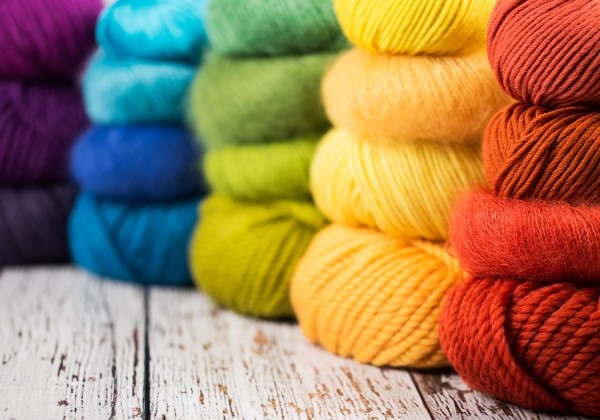
It is best for beginners to choose acrylic or wool yarn. Mixed acrylic-wool thread is easy to work with. Experienced craftsmen can use cotton, mohair or other fancy threads, as they are more difficult to work with.
When learning to knit, it is best to use light-colored material, as this will make the eyes less tired and the pattern will be more expressive. A thread with a thickness of 200-300 m in 100 g is ideal for beginners.
- Spokes

The main criterion for selecting knitting needles is their compliance with the selected yarn. The labels of modern threads usually indicate the recommended thickness of the needles in mm. If the label is lost, you can use the universal rule: the width of the working needles should not exceed the thickness of the thread in 2 folds.
For knitting sleeves of children's clothing, you can use short knitting needles. When working on large items, long straight or circular knitting needles will come in handy.
To determine the optimal knitting needle thickness for the intended item, you can knit trial pieces using different tool sizes.
The knitting will be looser when knitting with thick needles and tighter when using thin ones. For knitting complex patterns, such as braids, you will need additional rounded needles. The bend prevents the loops from slipping while working.
- Knitting needle tips
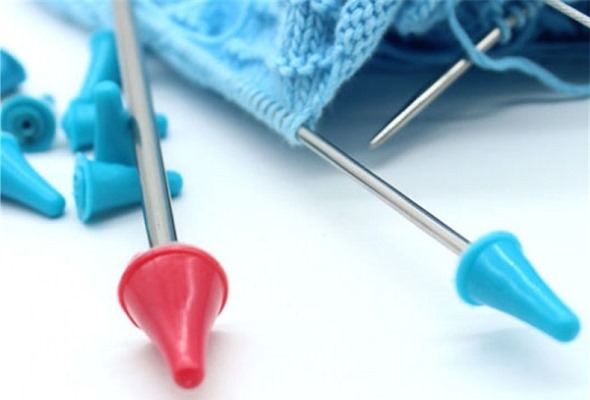
When choosing straight double-pointed knitting needles, it is worth taking care of the tips. This is especially important for beginners, since loops can be lost from the opposite ends that do not participate in knitting. Tips will also be useful for experienced craftswomen for a safe break in work. The knitted fabric will be fixed on the knitting needle on both sides without the possibility of slipping.
- Knitting needle
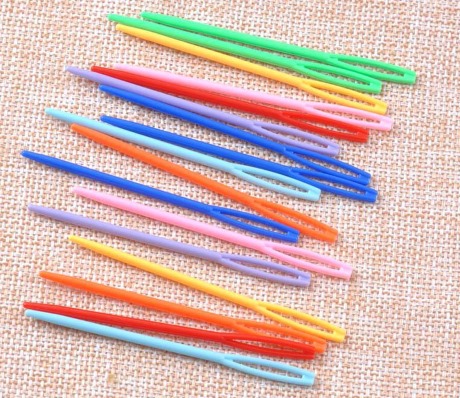
The distinctive feature of a knitting needle from a regular one is its rounded tip. It does not damage the structure of the threads when working. The tool will come in handy for sewing the parts of the sleeve together and, depending on the chosen model of the product, with the main part of the garment.
General description of the job
There are general principles for knitting sleeves that apply to most items:
- Before starting work, all loop calculations are carried out, experimental samples are made and the knitting density is calculated;
- the data obtained during the calculation must be saved so as not to repeat the procedure again;
- First, knit the back and the front. You should start knitting the sleeves after the armholes have been formed;
- To ensure that both sleeves are absolutely identical, beginning craftsmen are advised to knit them at the same time (on long knitting needles or tools connected with fishing line from different skeins of thread);
- If there is a pattern on the sleeves, the extra loops should become part of it;
- When forming a bevel, increases are made after the 1st edge of the loop and immediately before the last loop. In this case, when assembling the product, you will get a neat seam.
To correctly calculate the required decreases on large pieces before you start knitting the sleeves, Beginning masters should take into account:
- Calculations are made for a sleeve folded in half. The second part is knitted in mirror image.
- From the total number of loops, the links for the shoulders and neckline must be subtracted;
- Decreases start from the 1st row by three links. Subsequent decreases occur through the row by 2 links.
- Decreases and closings are made gradually, up to the amount obtained in the calculations;
Knitting a classic sleeve
The sleeve is called classic because it is used more often than others when sewing clothes of strict styles. Classic sleeves can be of different lengths, widened or narrowed, just regular straight, with cuffs or lapels, and they can also be given various original shapes. Any sleeve can be knitted.
The most common way to knit a sleeve on knitting needles is to knit from the wrist to the shoulder. You can work starting from the sleeve seam, which will result in a sleeve knitted transversely, but this is inconvenient.
The following is an example of how to make a tapered sleeve:
- First, you need to calculate a sufficient number of loops. It is better to do this for half of the knitted element. The number of loops in the most spacious part and in the narrowest part is calculated.
- Then the difference between them is determined. The distance from the base of the extension to the base of the armhole is measured and divided by the difference in loops obtained after the previous calculation. The resulting number indicates the distance in centimeters between the increases.
- The increase is performed using yarn overs after the first loop and before the last loop at the end of the row. The increase is performed until there are enough loops in the work. In order not to get confused in the count, it is better to mark the row from which the increase of loops began with a thread of a different color or a pin. This will help when knitting the second sleeve.
- Now the sleeve cap is knitted. First, you need to calculate the loops, it is also better to do the calculation for the half sleeve. The number of loops is divided by 3. Then the loops of the first third are divided into twos and threes. The loops of the second third are distributed one by one. The loops of the third third are divided into threes.
- Next, you need to put the results on the pattern and get to work. When working on the first third, at the beginning of each row, secure the calculated number of loops (two or three).
- Having brought the work to the second third, the number of its loops is first divided by 3. When working with the loops of the first part, they are decreased in the front rows: one at the beginning of the row and one at the end of the row. The loops of the second part are decreased by one loop every 2 rows. The loops of the remaining third part are decreased according to the example of decreasing the loops of the first part. When the work reaches the third third, its loops are closed according to the example of decreasing the loops in the first part. Continue to fasten the loops until there are six loops left in the work, fasten them in a row.
Small equal parts, such as sleeves, are best done synchronously. Then the parts will be equally dense. But it is worth mentioning that with this method of execution, it is inconvenient to check the pattern, and if an error occurs, both sleeves must be unraveled. It is important to monitor the knitting density during work. Before making the armhole, it is recommended to baste and try on the unfinished sleeve. If the work is done correctly, you can continue knitting the sleeve.
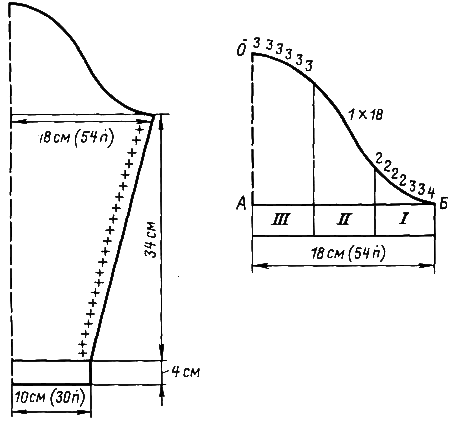
How to knit a sleeve cap with knitting needles
Before starting to work on the kat, the sleeve is tried on the arm. If the length is not enough, the additional part is knitted according to the pattern, without increases or decreases.
To perform the okat, additional calculations will be required:
- The height of the armhole is measured and converted into the number of rows.
- The loops of the widest part of the sleeve are counted and divided in half.
- There should be a straight line at the top of the armhole. Its length is usually 5-6 cm, but you can deviate from this value.
Based on these values, the frequency of decreasing loops is calculated.
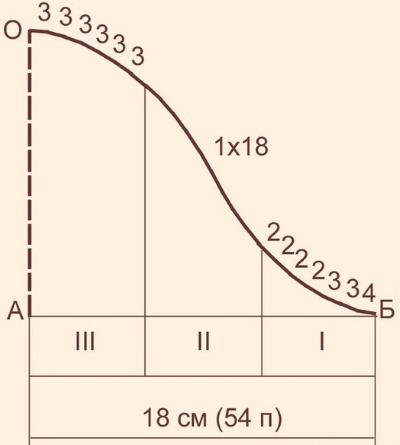
The widest part of the sleeve must be divided into 3 equal groups. If the number of loops is not a multiple of 3, the extra loops are added to the 1st part from the edge.
In the resulting groups You also need to sort:
- in the outer loop they are combined into 2 equal groups.
The first is divided into threes, the remainder is added to the first digit, the second is divided into twos, the remainder is also added to the beginning;
- in the second the links are divided by 1;
- in the third they are sorted by 3, the remainder of the loops after division are assigned to the last group.
In order not to get confused, all the data obtained is applied to the pattern. In groups 1 and 3, the closure of the links is done in each purl/front row.
In the second part, the closing should happen like this:
- the first third of the loops is closed through a row;
- the second third – after 3 rows;
- remaining loops - again through the row.
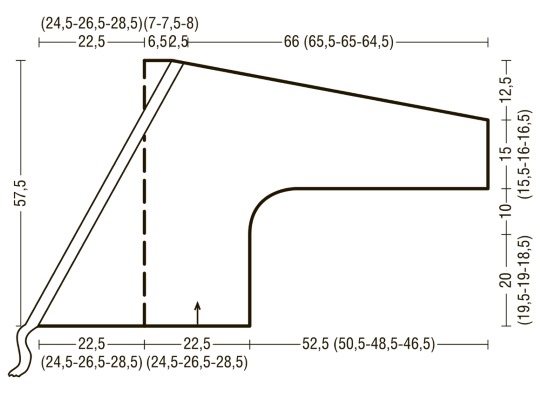
Set-in sleeve
How to knit sleeves with knitting needles (diagram for beginners): the easiest way is to start with an elastic band, the width of which is regulated only by the preferences of the craftswoman.
The number of additional loops or decreases is calculated based on the size of the sleeve at the cuff (usually the narrowest part) and the maximum width of the sleeve. The distance between these parts is converted into the number of rows.
By dividing the length of the segment by the difference in loops between the measured parts, the interval of decreases or increases is determined to form a uniform bevel. Decreases/increases, depending on the direction of knitting the sleeve (from the cuff/from the armhole), are knitted symmetrically from both edges.
The increase is knitted in two ways:
- at the place of the increase, a thread is thrown onto the knitting needle, and the row is finished according to the pattern. In the next row, the yarn is knitted in accordance with the pattern with a purl or face link;
- at the place of the increase from the previous, already knitted row, a loop is raised.
An additional loop can also be knitted behind the edge of the corresponding loop in the previous row, without returning it to the knitting needle.
Increases are calculated individually in each case, but there is a general pattern for knitting them:
- for long and thin arms, increases are made in every 6-8 rows;
- the standard arm shape involves increases in every 6th row;
- for plump arms, shorter than standard, the sleeve width increases in every 4th row.
Without a cap line
How to knit sleeves with knitting needles (the pattern for beginners is simpler than the previous model):
- When shaping the armhole, there is no need to knit a rounding. Instead, large parts of the product are knitted straight, and some of the loops are transferred to an auxiliary tool.
- When the back and shelves are finished, you just need to pick up the required number of loops (usually 10-20). The links are picked up symmetrically relative to the shoulder seam.
- The number of additional links is selected taking into account the thickness of the yarn. The density of knitting plays an important role, so a trial fragment is always performed.
- After completing one row, the knitting is turned, the links are knitted in the reverse order, capturing each time the edge loop. The action is repeated until all the edge loops are knitted and the work reaches the previously removed loops.
- Next, you should continue working, performing the necessary decreases evenly.
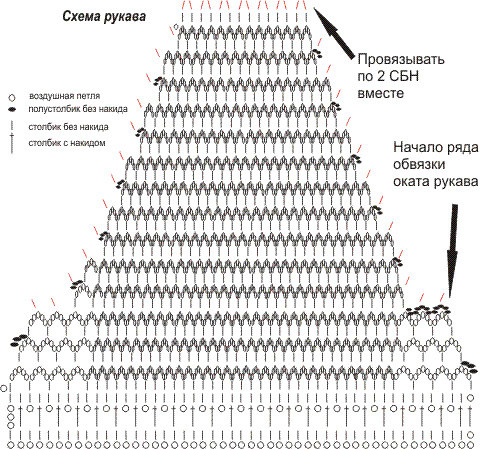
This style of sleeves is used in knitting machines and crochet.
With a small armhole
It is very easy to figure out how to knit sleeves with knitting needles (diagram for beginners) for a product with a small armhole. The main difference of the style is the significantly narrowed armhole line and, accordingly, the sleeve cap. To knit the main part, a standard calculation scheme is used, and the number of loops for the armhole is subtracted from the number of loops for the narrowing.
With shoulder strap
This method is used for items with abundant ornamentation. The technique completes the image and adds zest. The style is easy to make, since the strip of the pattern located on the shoulder is knitted separately and is part of the back and front.
To knit the sleeve, follow the standard pattern for a sleeve with an overlay. The width of the "shoulder strap" is not regulated by rules or standards and depends only on the preference of the master and the width of the selected ornament. Often, shoulder straps are decorated with beads, rhinestones, and seed beads.
Raglan
Knitting this model allows 2 directions of work: both from top to bottom and from bottom to top. Beginner knitters start working on the sleeve from the bottom, then the knitting pattern will be similar to a set-in sleeve. When the desired length is ready, in each 2nd row, loops are lowered by knitting two links at a time. This is done near the edge loops.
If the work is planned from the upper part of the sleeve, it is worth stocking up on circular knitting needles of the same diameter with which the entire product is knitted. If the knitting needles are different, the knitting density will change. In this case, new test samples and repeat calculations will be required.
Knitting pattern for raglan sleeves from the shoulder:
- If the finished product includes a collar, it should be the beginning of knitting. If the collar is not provided, the raglan increases are made immediately.
- Start working with a number of loops that is divisible by 6 without a remainder.
- The loops are distributed onto double-pointed needles (4 + working needle) or circular needles.
- When distributing the loops, only the 6th part is allocated to the sleeves. If an error is made in the initial set of loops, the remainder of the links when dividing by 6 are distributed between the back and the front.
- The addition of loops should occur simultaneously for all parts of the product.
The simplest raglan report for beginners looks like this:
- Purl stitch, 2 knit stitches, yarn over, purl stitch.
- In this case, the yarn over and the last purl stitch of the pattern refer to the front or back section of the garment, while the remaining stitches are part of the sleeve.
When the armhole knitting is finished, knitting continues according to the pattern. At this point, the addition of loops stops. You can finish the work with a knitted elastic band, or, having continued the pattern to the desired length, close the loops.
Bat
Sleeves of this style can be made in 2 different ways:
- from the lower back and the front. The back and chest of the garment are knitted in the same way, with straight fabrics with the selected pattern; Changes in loops begin only at the armhole level;
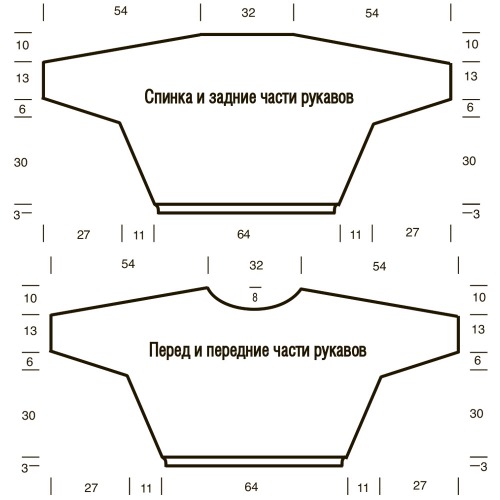
- You can add stitches at once, but there is no need for this. It is more convenient to divide the increases into 2-3 rows;
- It is possible to knit a batwing sleeve with an elastic band, but such work is done extremely rarely, since it is more labor-intensive. When knitting sleeves in this way, the work is similar to a stitched sleeve, at the required length, links are obtained for large parts.
The loops are necessarily closed in the order in which they were cast on. All parts are made in mirror symmetry, which is considered a feature of the model.
Flashlight
How to knit sleeves with knitting needles (diagram for beginners) of the flashlight model is not difficult to understand. This style differs from other models by its structural feature in the form of a dense cuff. This structure provides volume to the flashlight.
Before you start working, you need to take a responsible approach to choosing yarn; soft yarn and loose knitting will not hold the required shape.
To perform calculations, a prototype is knitted with the same increase pattern as planned for the product. The lantern is knitted by uniformly increasing the number of loops as you knit. In the widest part, the number of links should exceed the initial set by at least 3 times. A more lush shape will be obtained if you multiply the volume of links by 4 times.
The top part can be knitted in two ways:
- After completing a series of decreases, in order to adjust the sleeve size to the armhole size;
- The sleeve can be sewn to the main parts with folds at the top.
Tips for comfortable work:
- if during the work you mark each increase on the lantern with colored thread, a marker or a pin, this will help to knit the second piece absolutely identically;
- To make the armhole as accurately as possible, it is worth using a pattern. This way, the probability of errors and miscalculations is reduced to a minimum, and the sleeve takes the correct shape.
The armhole should also be rounded with convex or concave curves. The height of the armhole should correspond to the height of the armhole cap. Convex shapes are formed by successive increases. Concave lines are formed after decreasing loops and closing them in the reverse order of the set.
As a continuation of the lantern, an additional part of the sleeve is often knitted to the full length or to 2/3 of the arm. To perform the part below the lantern, it is worth using the standard pattern.
Kimono
The main feature of kimono sleeves is that they are knitted simultaneously with the main large sections of the back and front.
Features of working on the kimono style:
- It is important to ensure that the increases on the sleeves are uniform and that the product is symmetrical;
- the back and front of the product differ only in the neckline. On the back it is straight, and on the shelf it is V-shaped;
- the armhole is usually knitted semicircular;
- when knitting the main parts, shoulder slopes are modeled;
- at the beginning of knitting the sleeves (usually in the middle of the side seam) 1-2 increases are knitted in. This is necessary for a smooth rounding of the seam when moving into the armhole;
- additional loops for sleeves are added several times, 5 links at a time. The number of loops can be increased if the sleeve is knitted for long arms;
- after the necessary increases, knit a flat piece of fabric to the desired sleeve width. In order for the product to look harmonious, all decreases must be performed in the same way as increases;
- It is best to model the neckline using a pattern.
When making a pattern, it is best to use graph paper, where each cell will correspond to a loop and a row in width and height, respectively. The model should be made in full size and checked against the workpiece as often as possible.
Increases along the edge of the work are knitted by re-knitting the loop before or after the edge loop. More than 2 loops are added by yarning over and then knitting it.
Sleeves have a much greater variety of shapes. A beginner or experienced craftsman makes adjustments to each basic model, getting a unique thing. But before you start knitting, you should responsibly approach the choice of materials and the construction of the pattern, so that the preliminary scheme turns into a neat and proportional thing.
Article formatting:Natalie Podolskaya
Video about knitting sleeves
Video on how to knit sleeves with knitting needles (diagram):
Thanks for the article! Everything you need to knit any sleeve in one place, compactly.