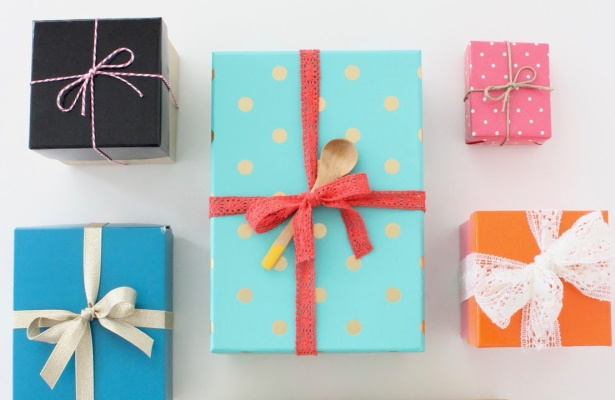
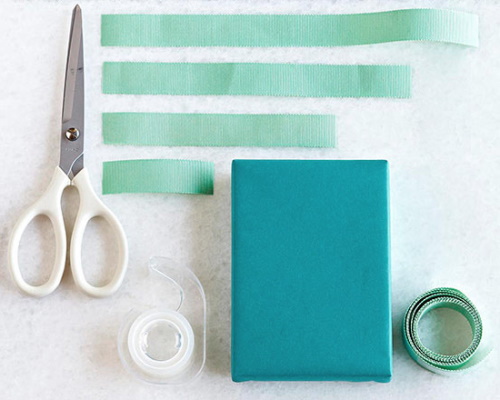
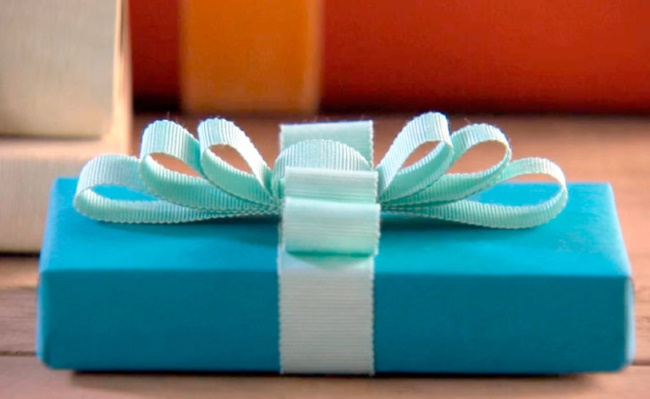
Gift boxes, beautifully tied with ribbons and decorated with lush bows, are pleasant to receive and unpack. Therefore, those who are going to give a surprise to a loved one need to consider several ways to tie a box with a ribbon, and also learn how to make beautiful bows with your own hands.
To do this, you need to look at several step-by-step master classes and choose the appropriate way to decorate a gift box.
Calculating the length of the tape
It is impossible to calculate the exact length of the ribbon, since there are more than 50 ways to tie a gift box. Much depends on the dimensions of the box: the height of the walls, the width and length of the bottom. The shape of the packaging plays a significant role, because it can be round, square, rectangular or even have non-standard outlines.
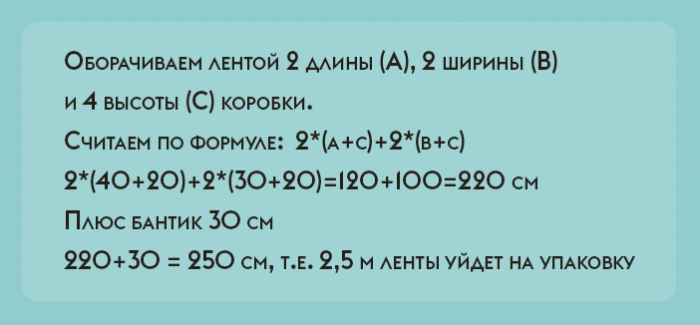
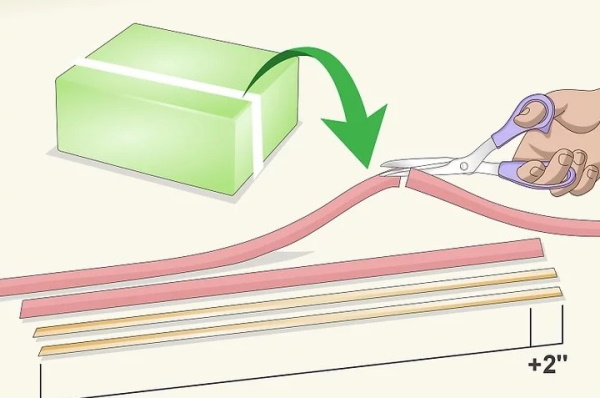
Gift wrapping experts recommend calculating the length of the ribbon using the following formula: (length of the box in cm + height in cm) x 6. The result is the approximate length of the ribbon. You need to buy the material with a reserve, adding 50-100 cm.
How to tie a package with tape the easy way
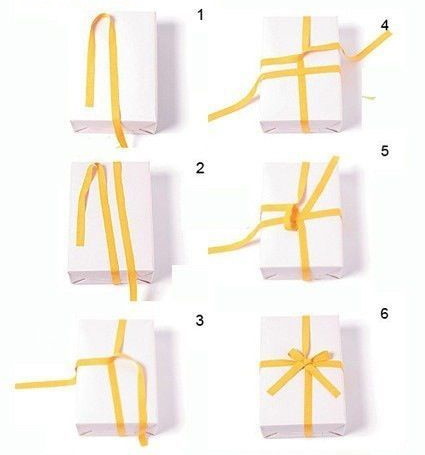
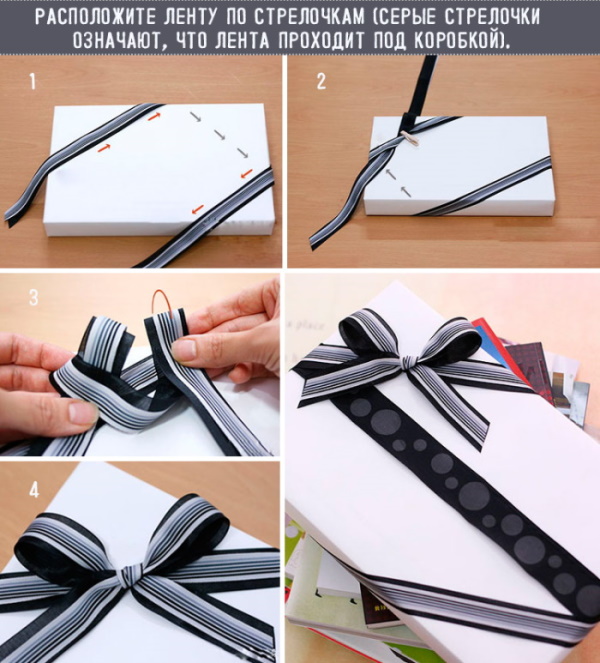
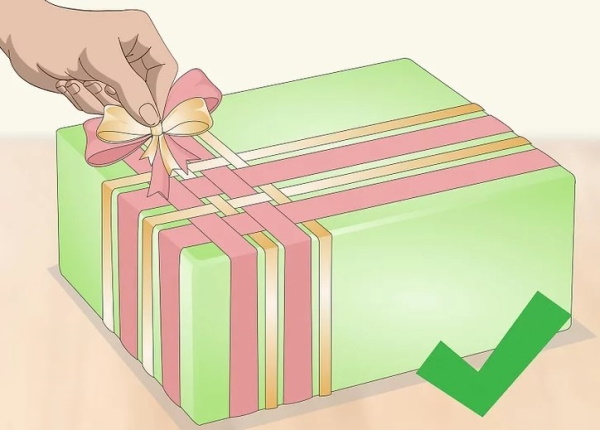
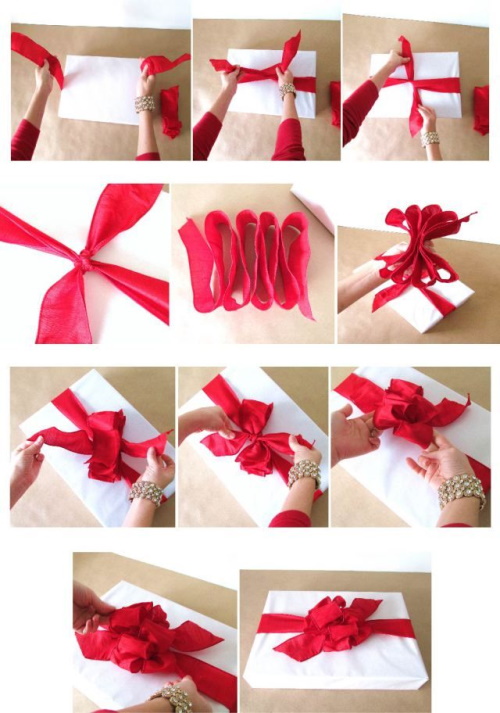
You can tie the package with a ribbon using the simplest method, which is called "Criss-cross". This is an easy-to-make decoration that will look good on a square-shaped box.
Algorithm of actions:
- Wrap the top of the box horizontally with tape.
- 1 edge of the tape, 15 cm long, should hang freely on the side. At this stage, there is no need to cut off the excess tape. Professionals believe that it is better to have a long edge than a very short one. The excess can always be cut off later.
- Place the tape under the bottom of the package, bring it out to the side of the lid. Do not change the position of the package, because the tape may slide off. You can put the package down only when the tape is on the opposite side.
- Move the tape to the middle of the lid. Attach the long edge to the short one. Cross the tapes, arrange them vertically.
- Throw the tape over the back wall of the package. Pull it out to the front.
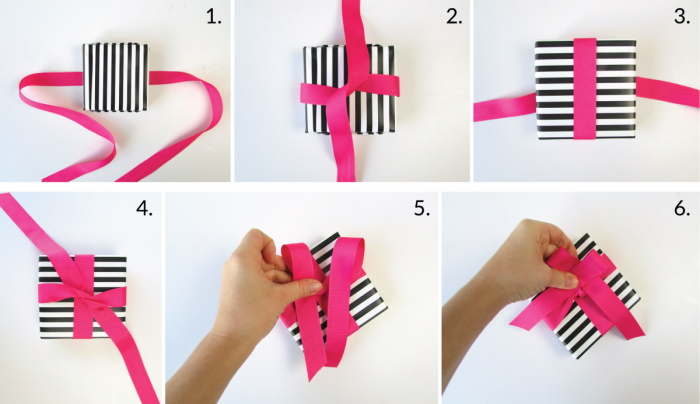
- Lift the package, pass the larger edge of the tape under the bottom of the box. Pull it out from the opposite side.
- Move the tape to the middle of the lid.
- Trim the ends so they are the same length.
- In front of the crossed part, draw the tape diagonally.
- Hook it under the twisted ribbons and pull it out from the point where it was threaded before.
- Tie a knot.
- Form loops from both ends of the ribbon.
- Pass the loop on the left side through the right. A new loop should form in the center.
- Pass the left loop through the new one and tighten.
- Use your fingers to straighten the resulting bow, slightly pulling the loops and ends of the ribbon upward.
Use scissors to trim the corners of the hanging ends diagonally.
How to tie a thin ribbon on a box
You can tie the package with a ribbon without a bow. This tying will look laconic and neat.
Algorithm of actions:
- Cut the ribbon into 2 equal parts.
- Place the scraps on the table, crosswise.
- Place the packaging on top. Its corners should be located between the tapes.
- Pick up the ends of 1 of the ribbons and tie them in a double knot on the lid of the box.
- Also tie another ribbon.
The ends of the ribbons can be curled into "curly curls". To do this, you need to slightly stretch the ribbon and run the blade of the scissors across it, placing them across. With moderate tension, the ribbon will curl into an elastic "curl". In the same way, you need to curl the remaining 3 ends.
How to tie a ribbon on a box, on the corners
This type of binding is suitable for boxes with transparent “windows” through which you can see the contents of the gift.
Algorithm of actions:
- Find the middle of the tape.
- Place it on the top of the box, throwing it over 1 corner. The shiny side of the ribbon should be the front side.
- Pass the hanging ends under the box.
- Bring both ends to the top corner of the box, located diagonally to the one already tied with ribbon.
Tie a classic bow, holding the center with your thumb. The ribbon should be slightly taut.
Diagonally
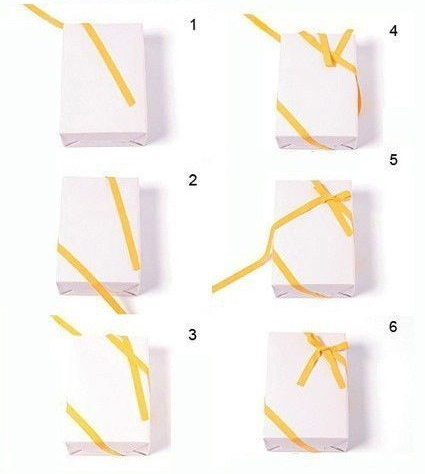
You can tie the package with tape diagonally. This type of tying is suitable for square and rectangular packages with high walls.
Algorithm of actions:
- Throw the ribbon over the top left corner of the box.
- On the left side, leave a freely hanging edge 15 cm long.
- The free part of the tape should be left at the opposite corner of the box.
- Move the ribbon from the left side to the upper right corner of the box.
- Pass the remaining edge behind the upper right corner of the box, bring it to the lower right corner. To prevent the tape from slipping, hold it with your hand.
- Wrap the tape around the bottom corner of the package on the right side. Pass it under the bottom corner of the package on the left side.
- The resulting loops should fit tightly around the corners of the box.
- Pull the ribbon to the top corner on the left side.
- Pull the edges of the tape to the middle of the upper corner of the package, on the left side. Trim the ends so that they are the same length.
- Cross the ends and tie them into a knot. The left end needs to be thrown over the right one, and then passed under it. Pull the ribbons in different directions.
- Tie a classic bow.
- Cut off excess tape.
For beauty, you can cut the corners of the ends at an angle using decorative scissors.
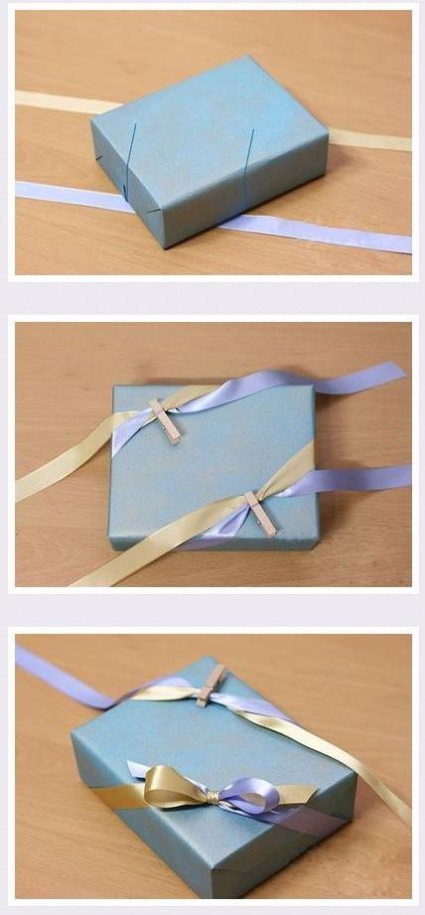
Intertwined ribbons
Boxes tied with ribbon according to this principle will look original and unusual. For work you will need 8 pieces of wide ribbon, 4 of which will be equal to the length of the box, and the other 4 - its width (+ 5 cm in reserve). You will also need 8 narrow ribbons of the same length.
It is not recommended to use material with wire. A good option would be satin ribbons or those used to decorate bunches of balloons.

Algorithm of actions:
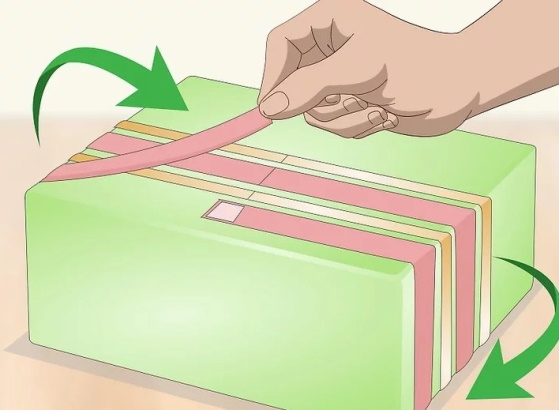
- Take 2 long wide ribbons and 2 narrow ones, lay them out on the table alternating. Their ends should be on the same level. The distance between all the ribbons is 0.5 cm.
- Turn the package over and place it on the tapes. You can place the package in the center or slightly move it to the side.
- Wrap the ribbons around the box and secure their ends with double-sided tape. The ribbons should fit tightly around the package. There is no need to glue them to the package, just connect the ends together.
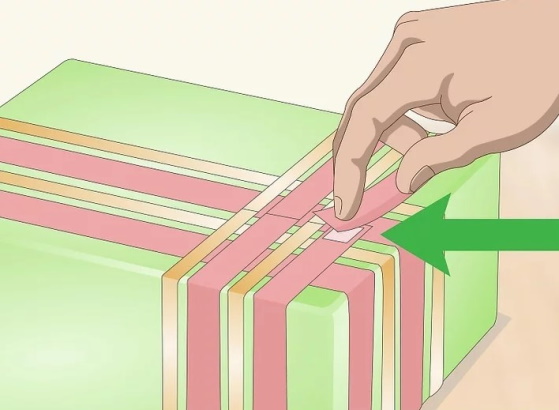
- Turn the packaging over.
- Place the 2nd set of ribbons on the box lid. Pass them between the already fixed ribbons in a checkerboard pattern.
- Straighten the tapes. They should be perpendicular to each other. The distance between these tapes should be the same (0.5 cm).
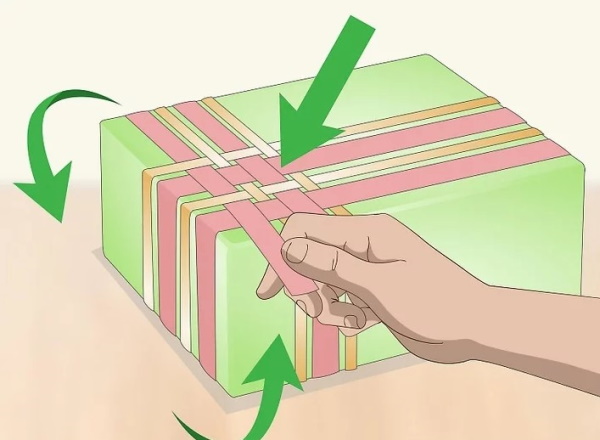
- Turn the packaging over.
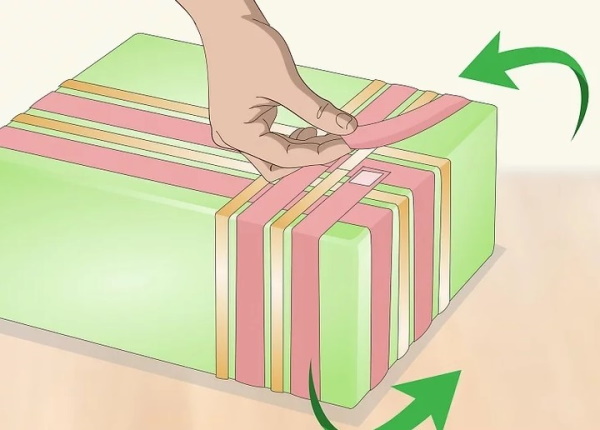
- Wrap the ribbons around the box, fix their edges with double-sided tape. To make the binding look neater, you can intertwine the ends of these ribbons on the bottom of the box as well as on the lid.
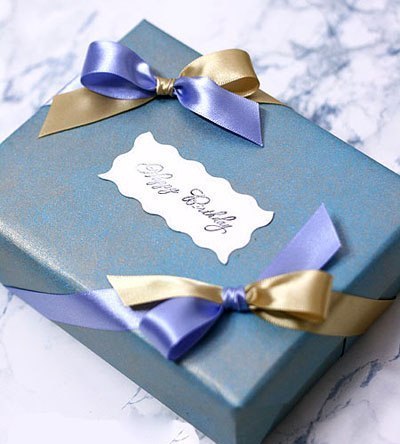
If the decoration seems too laconic, it can be complemented with a lush bow. The bow should be fixed on the side of the box so as not to cover the interlacing of the ribbons.
How to tie a bow
You can tie the package with a ribbon in any way, but the main decoration of the gift remains the bow. You should choose a bow to decorate the present based on the theme of the holiday.
| Types of bows | What gifts is it suitable for? |
| Classic, double | Birthday, anniversary |
| Multicolored, lush, multilayered | Wedding, birth of a child, Valentine's Day |
| "Snowflake" | New Year, Christmas, February 23, birthday |
To give bows an unusual shape, experts often use a stapler, double-sided tape, or glue stick.
Satin, satin and paper ribbons are suitable for decorating a gift box. You can also use formal ribbons with a wire insert or cut them yourself from shiny wrapping paper. Further in the article, you can consider master classes on tying various bows.
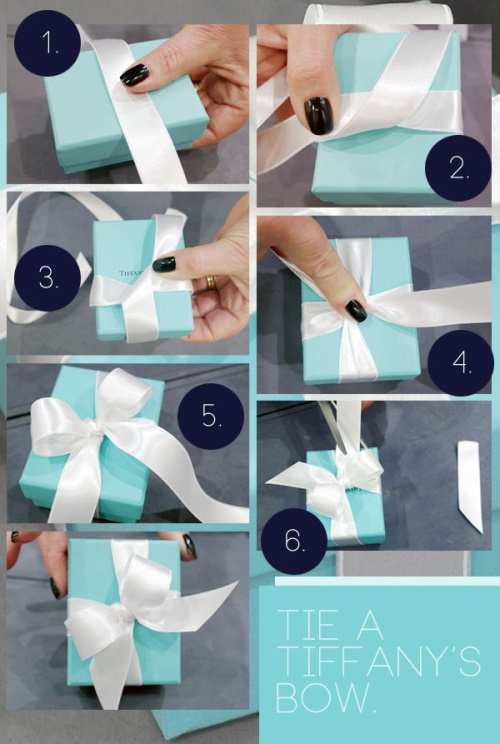
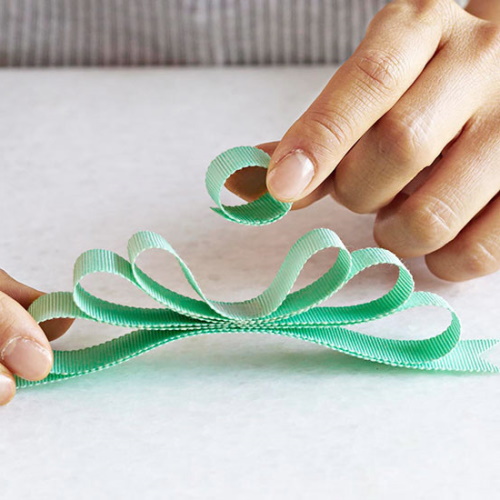
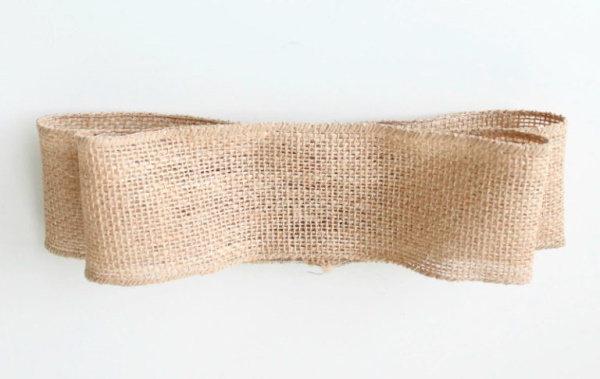
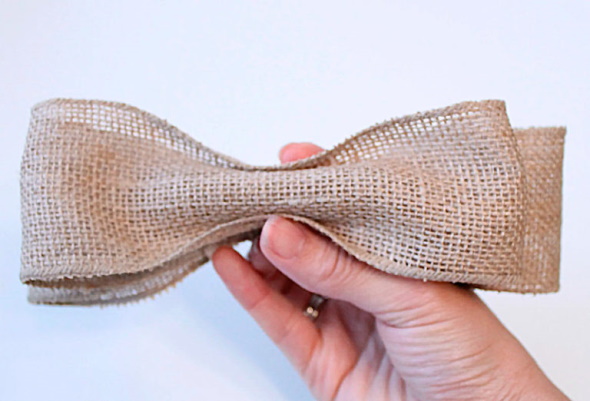
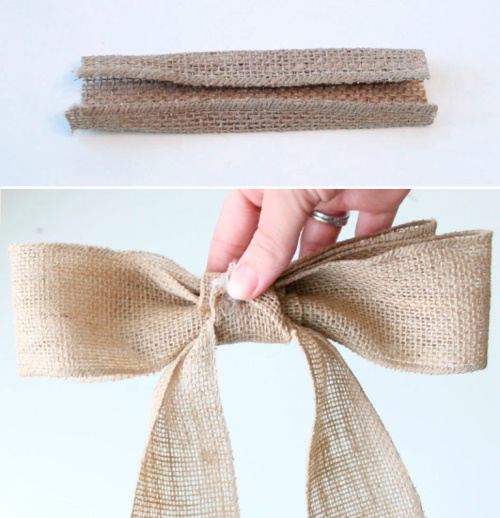
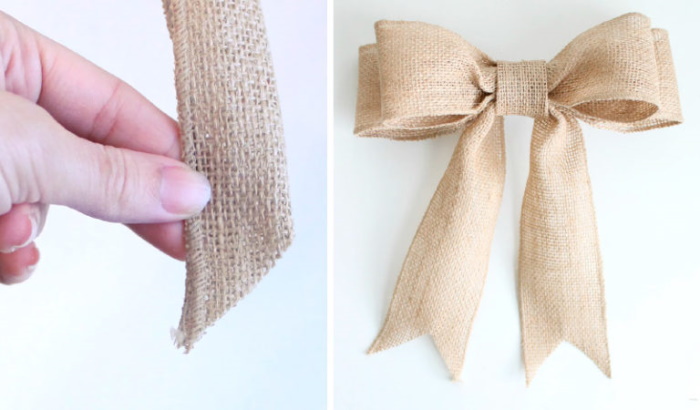
Classic bow
How to tie a simple classic bow:
- Find the center of the tape.
- Fold the left edge to form a loop.
- Fold the right edge in the same way.
- Place the left loop over the right one.
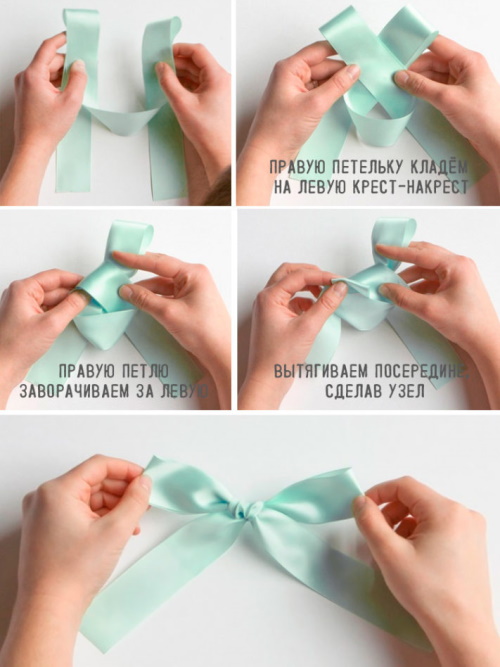
- There is a hole between the loops at the bottom, into which you need to pass the lower loop, throwing it over the upper one.
- Pull the tops of the loops. A knot should form.
- Turn the bow so that the loops are on top and the loose ends are on the bottom.
- Reduce the size of the left loop by pulling the right edge of the ribbon. To prevent the knot from untying, hold it carefully with your fingers.
- To equalize the sizes of the loops, you need to slightly stretch the right edge.
- Tighten the knot tighter.
- Straighten the loops with your fingers.
Fold the hanging edges of the ribbon lengthwise. Cut off the excess, holding the scissors with the blades facing up.
Double bow
This option is similar to the classic one. The difference is that the classic bow has 2 loops, while the double one has 4.
Algorithm of actions:
- Spread the index and middle fingers of your left hand. Wrap them with tape.
- The hanging ends should be of different lengths. The long edge should be wrapped around the fingers one more time.
- Pass the long edge of the tape between your fingers, under the resulting loops.
- Throw the ribbon over the top and pull it out from the bottom.
- Pass the edge through the loop that has formed at the bottom.
- Tighten the knot. You should get 2 bows. They need to be carefully tightened.
- Remove the bow from your hand and turn it so that the shiny side is facing you.
- Straighten the loops.
Trim the hanging ends at an angle.
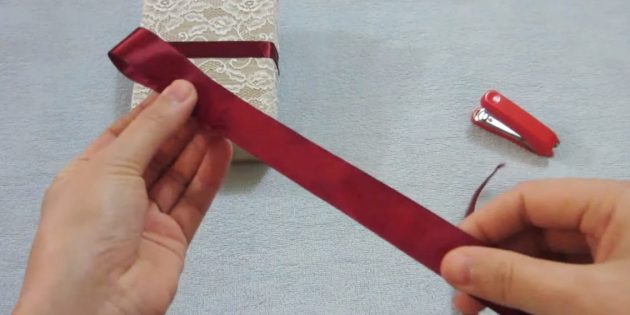
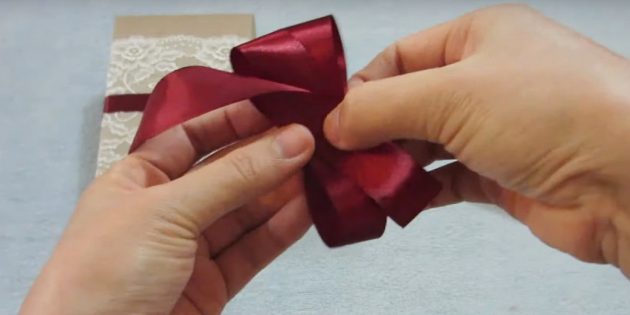
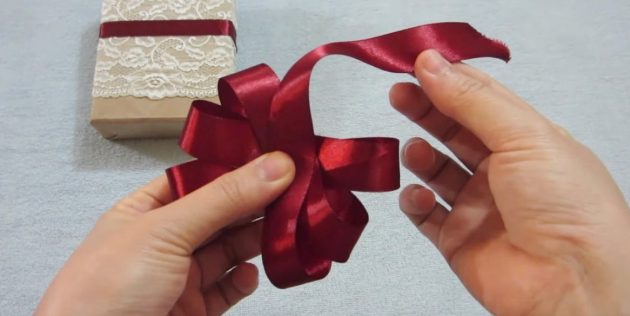
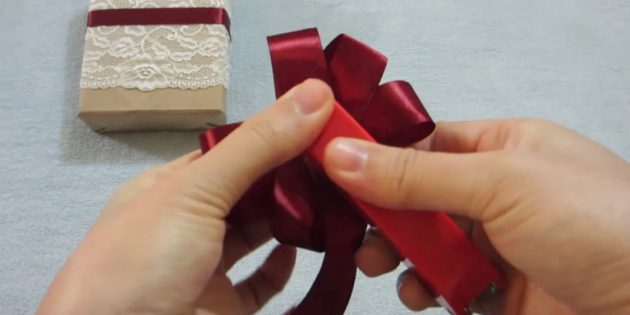
Multicolored bow
This type of bow is called "Dior". Sometimes it is called a fan bow. For work you will need 3 wide satin ribbons of different colors. Each ribbon should be 2 times longer than the previous one.

Step by step:
- The pieces need to be sewn or glued into rings. The seams (or glued parts) should be on the inside.
- Fold the rings in half, crosswise.
- Place them on top of each other so that their central parts match.
- Use a stapler to connect the rings together, inserting a staple in the center.
- Cut 1 strip 3 cm long from a ribbon of any color.
- Close the bracket with it.
- Glue the ends of the short ribbon together.
- Pass the nylon thread through the small ring that covers the bracket. Pull one of the ends outward, capturing all the other elements.
- Pull both ends of the thread so that all the loops of the bow are raised.
- Tie the thread with a double knot.
- Trim off excess thread.
The more rings you glue together from colored ribbons, the more voluminous the bow will be.
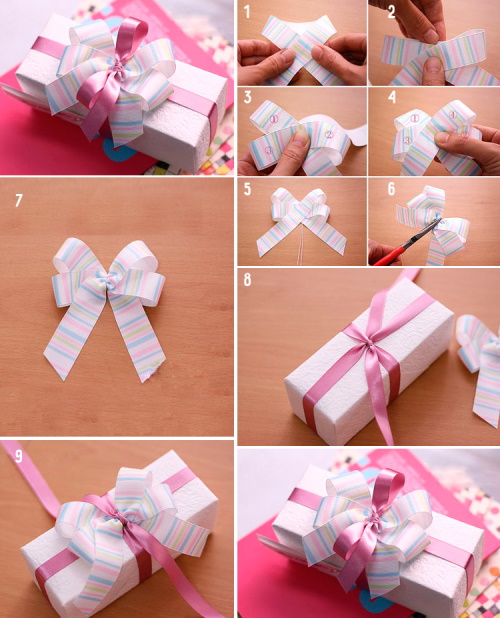
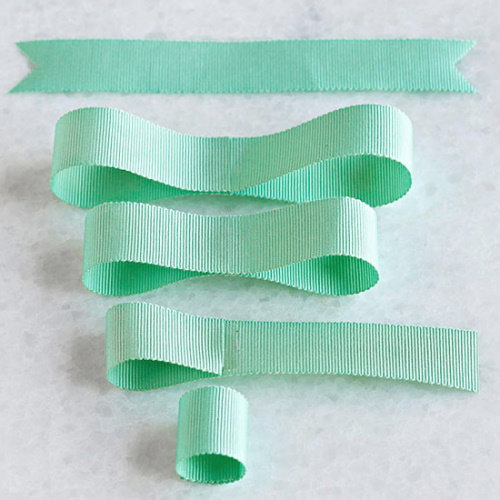
Fluffy bow
For such a bow you need a wide and narrow ribbon.

How to tie a fluffy bow:
- Fold the edge of the wide ribbon to form a loop.
- Holding the end of the ribbon with your fingers, turn it so that the edge is not in the center, but on the top edge.
- Wrap the resulting loop around the ribbon 7 more times. If you make more turns, the bow will be larger.
- Cut off excess tape.
- Fold the tape in half, make a cut along the edges, where the fold line is located.
- Thread a narrow ribbon through the slits of the wide one and tie it with a double knot.
- Using your fingers, hold the ribbon in the middle and pull the loop out from the inside. Twist it in the opposite direction, away from you.
- In the same way, pull out the next loop and twist it in the opposite direction.
- Pull out all remaining loops.
- Turn the bow over to the other side and straighten the loops.
This bow can be attached to the gift with double-sided tape. You can tie it with a thin ribbon, wrapping it and passing it under the main ribbons that the box is tied with.
Multilayer bow made of thin ribbon
This bow looks light and delicate.
How to tie a multi-layer bow correctly:
- Take a long strip and glue its ends together to form a ring.
- Fold the ring in half. The gluing points should be opposite the fold.
- Apply glue to the fold line.
- Connect the seam and the bend. Wait for the glue to dry. You should get a figure eight-shaped piece.
- Cut a few more (10-12 pieces) long strips. Make the same “eights” from them, repeating points 1 through 4.
- Glue 2 pieces on top of 1, perpendicularly.
- Glue part 3 on top of part 2.
- Glue all the remaining parts so that the new loops are between the previous ones.
- Cut 4 new strips, 2 times shorter than the long ones.
- Make "eights" out of them. Glue them one by one onto the bow.
Cut a new strip that is 2 times shorter than the previous ones. Glue the ends of this strip into a ring. Glue the ring with the seam down to the center of the bow.
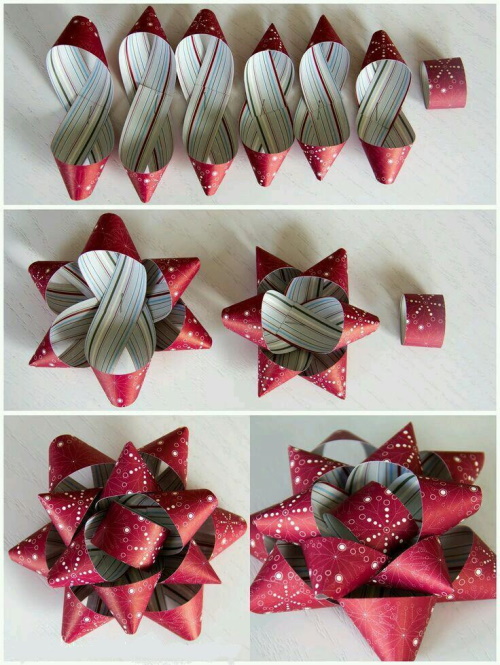
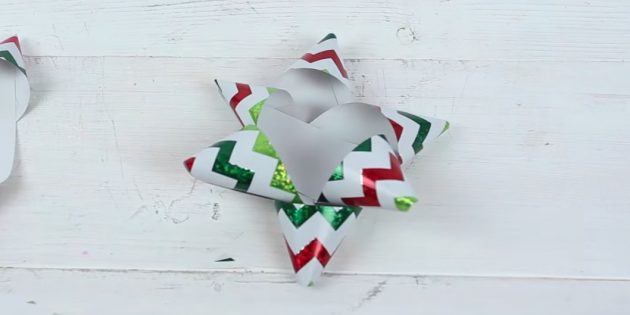
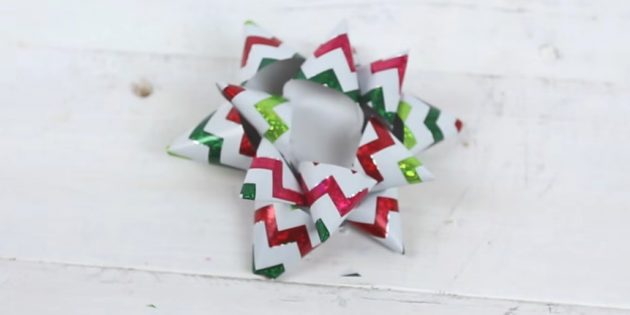
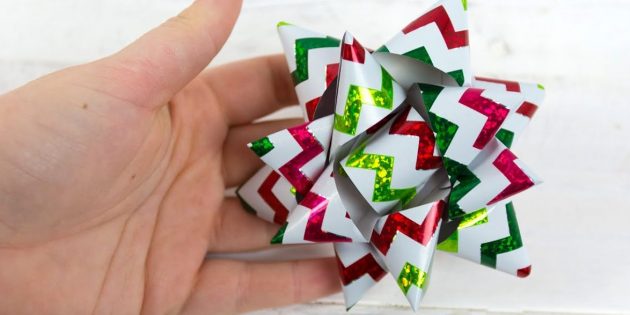
Snowflake Bow
This is a bow with pointed loops that looks like a snowflake. You will need 3 ribbons 20 cm long, 3 more ribbons 15 cm long and 1 piece 8 cm long. The width of the ribbons should be no more than 2 cm. You can use wider or narrower ribbons, but in this case you will have to maintain the proportions of the lengths of the pieces. If you do not take this fact into account, you will not be able to make a snowflake bow.
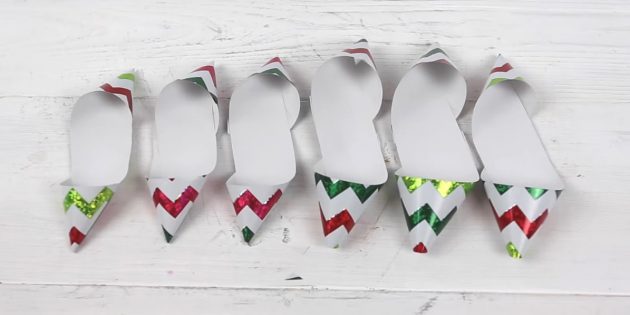
Procedure:
- Glue a small piece of tape to the edge of 1 of the large strips, on the reverse side.
- Fold this edge over. Glue it to the front side of the tape. It should form a cone-like shape.
- Design the next side of the strip in the same way.
- Glue the remaining 5 parts in the same way. The shortest strip will be needed later.
- Glue the large pieces together so that the twisted corners point in different directions.
- Fasten the remaining pieces over the larger corners. The corners of the new strips should be between the corners of the lower, larger pieces.
- Connect the edges of the small strip together to form a ring.
Glue this ring into the middle of the bow.
Using a stapler
This is a quick way to create a beautiful bow. The width of the ribbons should be at least 1.5 cm.


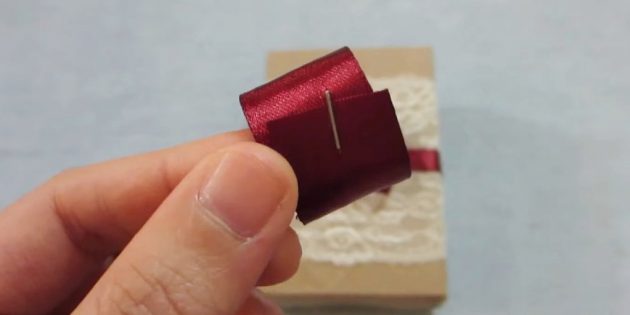
Algorithm of actions:
- Bend one end of the ribbon towards you, moving it slightly to the side.
- Fold the ribbon upwards and pull it to the middle of the folded part.
- Holding the ribbon with your fingers, lift it up and turn it inside out to form a loop.
- From the hanging end of the ribbon form another loop, from the bottom. To do this, you need to pass the ribbon through the bottom to the top, holding the bow with your fingers.
- In the same way, form several more loops on different sides.
- Straighten all the loops with your fingers.
- Use a stapler to secure the bow in the middle.
- Cut off excess tape, fold over the hanging corners, and secure them with a stapler from below.
You can hide the staple in the middle of the bow by gluing a button or a large bead there.
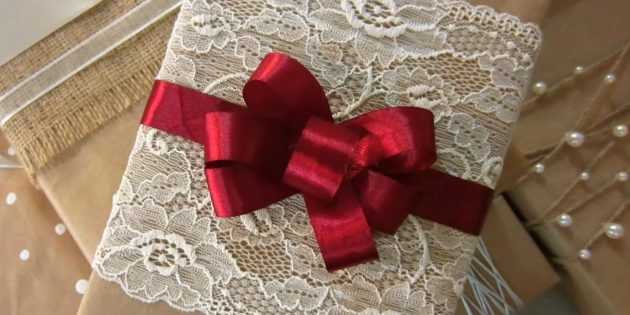
How to tie a box for a man's gift
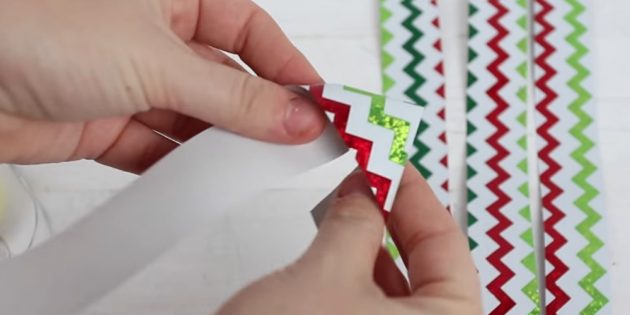
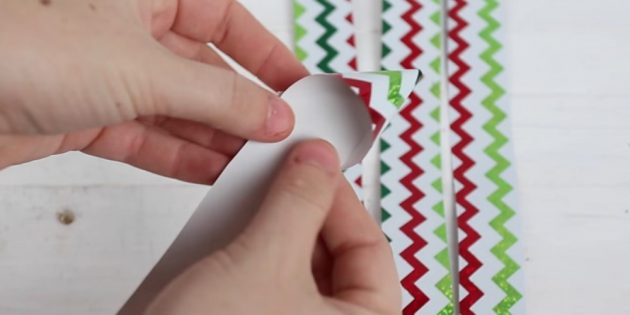
Pink or multi-colored bows are not suitable for decorating men's gifts. It is better to choose single-color ribbons of dark colors, or use materials such as kraft paper or burlap. You can cut ribbons from scrapbooking sheets with minimalist designs or with a text print.
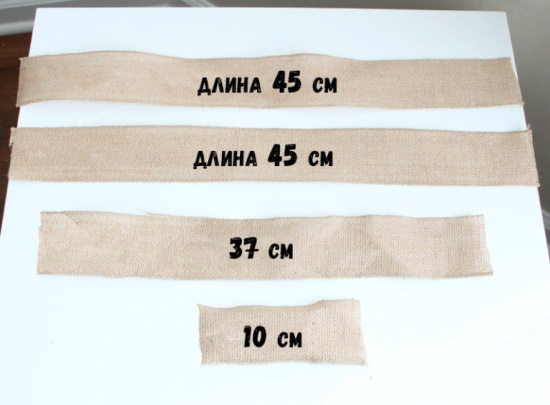
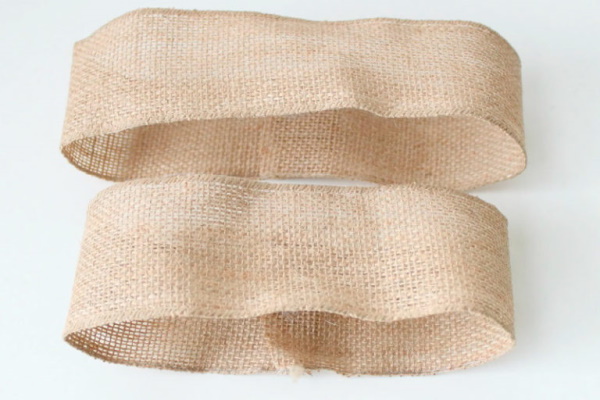
How to make a bow from burlap:
- Cut 2 pieces of fabric 45 cm long, another piece 37 cm long, and a piece 10 cm long. The width of the ribbons is 2 cm.
- Glue 1 long strip and 1 medium strip into 2 separate rings using hot glue.
- Fold the rings across, glue them together, placing them perpendicular to each other.
- Press the rings slightly lengthwise to form folds.
- Straighten the loops with your fingers.
- Fold the edges of the short piece in such a way as to hide the cut and make the bow more beautiful.
- Place a new long ribbon on the bow blank, align the ends so that they are the same length.
- Fasten these parts together using a short strip, fixing the ends with glue.
- Fold the loose ends lengthwise, cut off the excess fabric diagonally.
- Use your fingers to straighten the loops of the bow.
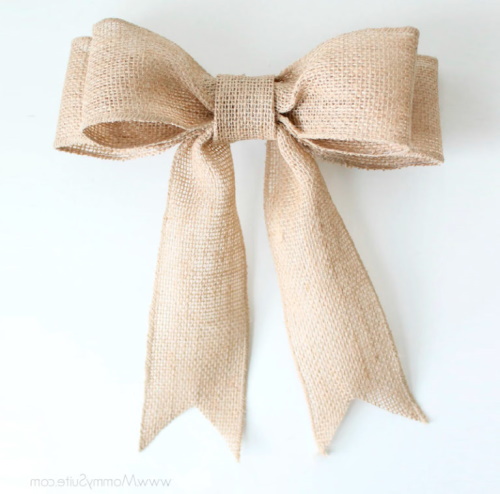
Attach the bow to the gift using double-sided tape.
A bow option made from double-sided scrapbooking paper:
- Cut the sheet of paper into strips 27 cm long and 2 cm wide. You will need about 6 strips.
- Glue the ends of all the strips together to form circles.
- Fold the rings lengthwise.
- The strips need to be glued perpendicular to each other, applying glue in the center.
- Cut out 6 more strips of paper of the same width, 23 cm long.
- Repeat steps 1 through 4. This time the other side of the paper will be the front side.
- Glue both parts together.
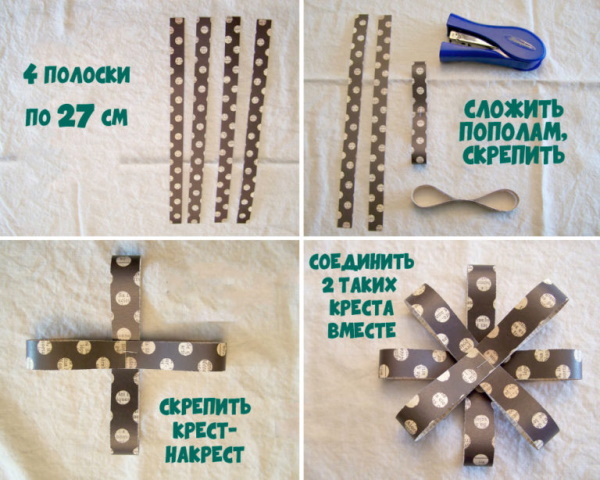
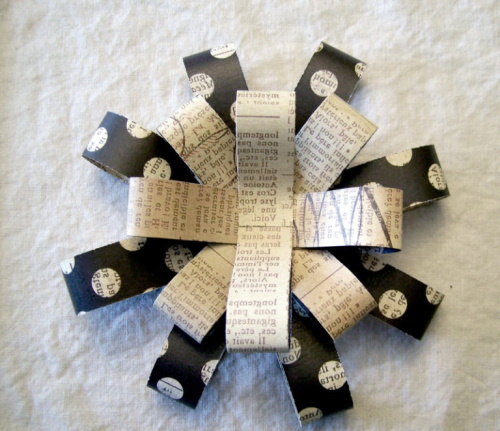
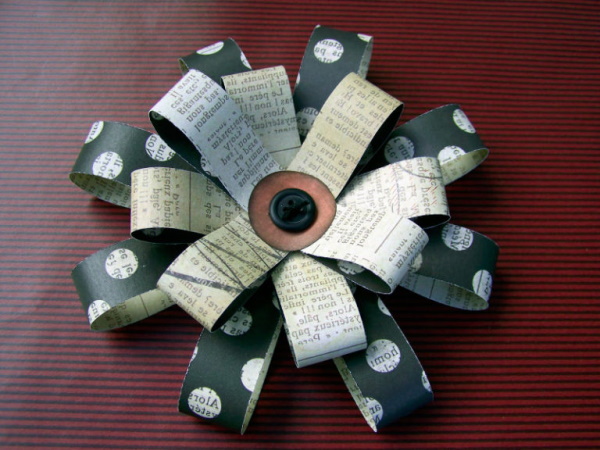
The center of the bow can be decorated with a bead or a button.
Learning how to tie gift boxes with ribbon is not difficult. The main thing is to think through the design in advance and buy ribbons that match the color of the wrapping paper or box. Bows can be attached to the gift separately. In this case, the color of the decorations can differ from the main shades of the packaging.
Author: Frolova Ekaterina
Video about gift wrapping
How to tie a box with ribbon: