To easily draw a cat step by step, you can use ready-made master classes on drawing for the little ones or for those who have drawing skills. Step-by-step lessons help to understand the principle of drawing and then repeat it without a base, or use this skill to draw other figures.
Who draws how?
Examples of drawings designed for preschool children look like simple drawings of several familiar figures that are easy to repeat. Such a drawing does not take much time, so that the child does not get tired and does not lose interest in the creative process.
Master classes for a more advanced level involve repeating complex lines and curves, applying hatching to create a shadow effect, as well as drawing an auxiliary figure and creating a general outline based on it.
The main drawing in all variants is done with a pencil. The finished drawing can be colored with colored pencils, or using paints, markers, crayons, etc., if desired.
Drawing tools
To easily draw a cat step by step, use paper and a pencil to create the base. All other tools can be used at your discretion.
List of necessary tools for creating a drawing.
| What you will need | For what |
| Paper | A4 sheet or a simple album sheet. For those who have drawing experience, any sheets are suitable and can be chosen at their own discretion. For beginners, it is recommended to choose thicker paper to make the drawing process easier. Thicker paper is also easier to use when coloring the drawing, so that the sheet does not become wavy. |
| Simple pencil | Beginners are advised to use hard or hard-soft pencils, as they leave a thinner and clearer mark, without smudging the lead.
More experienced artists also use soft pencils in the drawing process or to apply light and shadow. |
| Eraser | Helps to remove sketches, auxiliary lines and unsuccessful fragments. |
| Liner | They outline the finished contour and can be used for light shading in places where shadows are applied. |
| Markers, paints, colored pencils, crayons, etc. | Choose the tool at your discretion to give the finished drawing a natural color, as well as to create the effect of shadows using darker tones. |
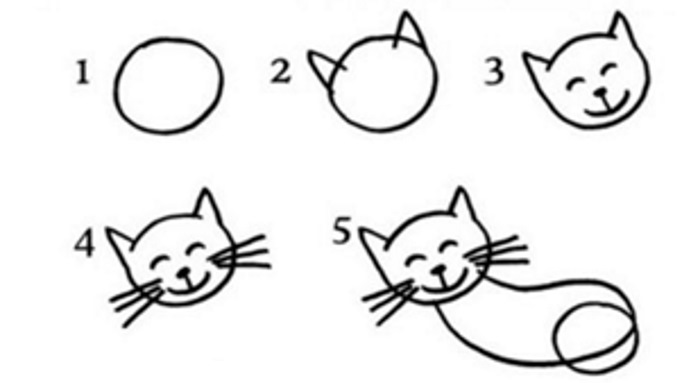
For the little ones
Even beginners can easily draw a cat step by step if they use the simplest shapes and lines. The step-by-step method of repeating the drawing is especially helpful, where it gradually becomes clear that a complex figure consists of several small ones. Cat drawing for children with pencil step by step quite simple.
Tools
This lesson is suitable for preschoolers or beginners.
The following tools will be required for this process:
- paper;
- pencil, semi-hard or hard;
- eraser;
- liner, felt-tip pen or black pen for outlining the outline;
- materials for coloring the drawing (colored pencils, paints, markers, etc.).
Step by step process
The process of creating a drawing occurs in the following stages.
- Place the sheet horizontally, find the schematic center of the sheet. For convenience, you can mark the center with a dot. Use a pencil to draw a circle slightly to the left of the center.
- Triangles mark the ears on the cat's head.
- The cat's eyes and muzzle are marked with semicircular lines, as shown in the example.
- Several straight lines indicate the mustache.
- Draw a curved oval directed to the right side of the head, indicating the body of the animal. The circle at the end of this oval indicates the beginning of the hind leg.
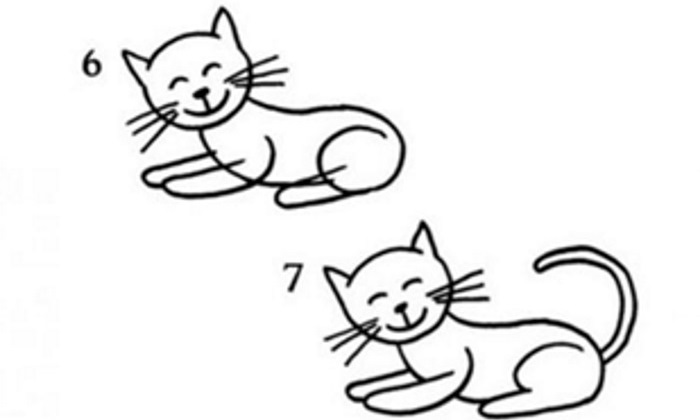
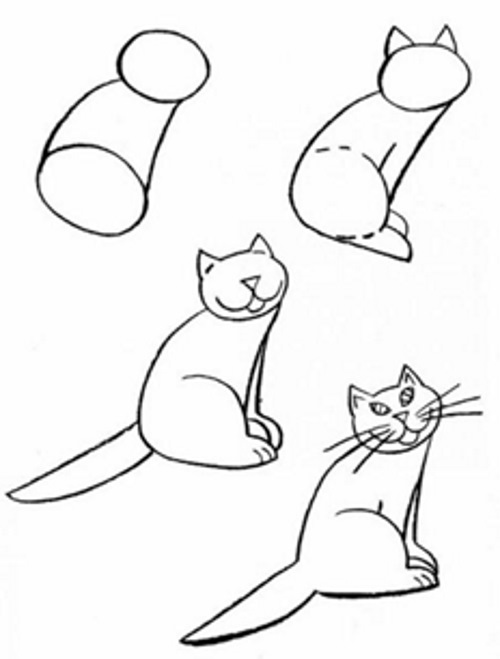
How to draw a cat, kitten with a pencil step by step - The front and back paws are drawn with narrow ovals. The back far paw is not drawn, since it is not visible to the viewer due to the cat's position.
- Add a curved long tail. If desired, the tail can be depicted sticking up or lying next to the hind leg.
- Erase all unsuccessful and auxiliary lines. Trace the finished outline with a black pen and color the finished drawing in any convenient way.
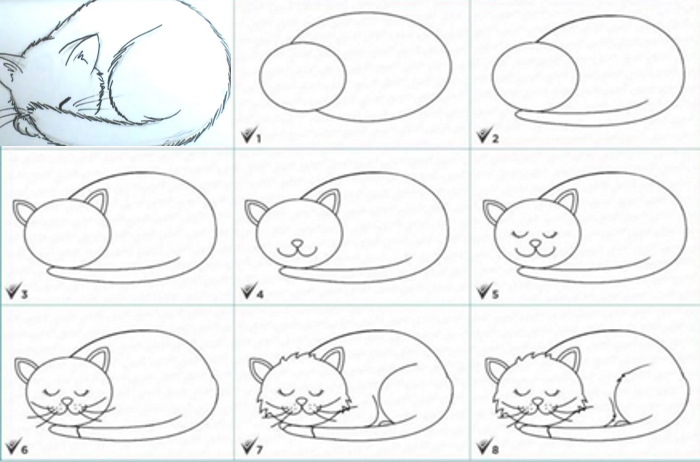
Sleeping cat
A simple way to draw a sleeping cat is suitable for beginners or preschoolers. The process begins with drawing the head and body position, gradually adding details.
Draw a cat step by step.
- The sheet is placed horizontally and the center of the sheet is schematically indicated with a dot. A little to the left, the cat's head is indicated with a circle. To the right of the head, a large oval is drawn, showing the position of the body.
- Add a long, narrow, curved oval below the body to represent the cat's tail.
- The ears are drawn with rounded triangles. Inside them, lines are repeated to show the auricle.
- The cat's face is shown with two semicircles and a circle.
- Just above the muzzle, the cat's closed eyes are shown in semicircles.
- On the face, next to the nose, draw whiskers with many dots and long lines.
- The fur on the head is shown with zigzag lines of different sizes. The front and back legs on the cat's body are drawn with semicircles.
- The fur on the cat's body, especially on the front and back legs, is shown in the same way.
- Erase all auxiliary lines, outline the finished outline with a liner and color the drawing with pencils or paints.
The cat is sitting
It is easy to draw a cat step by step in any pose, starting with simple designations of simple figures. The lesson is suitable for beginners or for preschool children, since the drawing process does not take much time and does not include the depiction of complex lines.
The following steps are followed in the process:
- The sheet is placed vertically, the center of the sheet is indicated by a schematic dot. The cat's head is indicated by a circle slightly above the center. The beginning of the hind leg is indicated by a horizontal oval slightly below the center. These figures are connected by two straight lines.
- The triangles show the ears on the head. The straight line separates the front paw and two short ovals show the standing paws. The extra auxiliary line in the lower part of the cat's body is erased.
- Show the long tail. Short lines add the cat's muzzle, toes and ear.
- They finish drawing the eyes and mustache.
- Erase unsuccessful or auxiliary lines. Trace the finished outline with a liner, felt-tip pen or black pen and color the drawing in any convenient way.
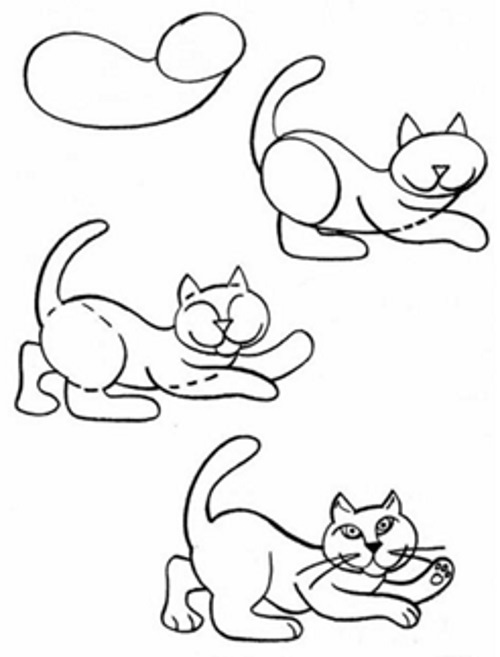
Cat in motion: in cartoon style
This simple drawing option allows beginners or children aged 5-7 to depict a cat in motion. If desired, children can add new elements to the drawing, such as stripes, bows or other characters in the image.
The drawing process is as follows:
- The sheet is placed horizontally, the center of the sheet is marked with a dot. The cat's head is shown in a circle slightly to the right of the center. A curved oval is drawn from the head to the left side, indicating the body.
- Curved lines add details to the drawing: tail, front and back paws, muzzle. Triangles show ears.
- Add the other hind and front paws. Draw 2 upward curved lines from the nose, marking the location of the eyes.
- They finish drawing small details: eyes, whiskers, ears, toes.
- Erase the failed and other auxiliary lines, outline the outline with a liner. Color the finished drawing with pencils or paints.
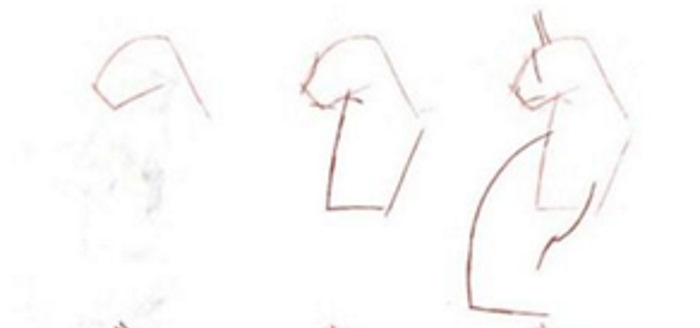
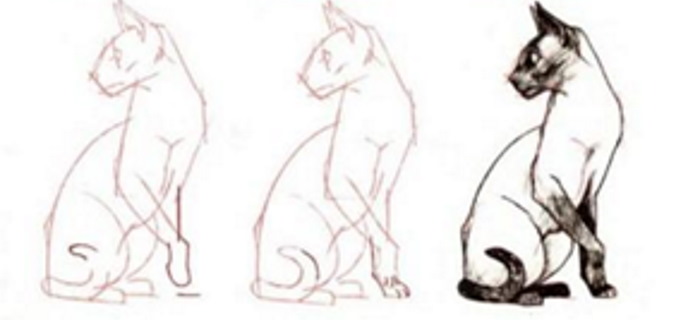
Cat sitting with head turned: realistic drawing
It is easy to draw a cat step by step in a realistic way if you try to repeat all the lines in each step. This version of the drawing is suitable for those who have drawing experience, since it includes drawing many complex shapes, small details and takes more time than the previous lessons.
The drawing process includes the following stages:
- The sheet is placed vertically, the center of the sheet is marked schematically with a dot or a cross. They begin to draw the cat's head in the central part, with an indent upwards from the mark. They draw schematically with straight lines that can overlap each other. At this stage, all the lines can be angular, later they are rounded and all the imperfections are erased with an eraser.
- Below the head, the cat's chest is marked with a figure resembling a trapezoid.
- Straight lines indicate the position of the ears. Down and to the left of the sternum, a rounded line indicates the back of a sitting cat. On the other side, a line is drawn for the beginning of the front legs, starting from the sternum.
Cat sitting with head turned: realistic drawing - Short rounded lines are used to draw the ears, which flow into the head, neck, and bent hind legs.
- Draw the depression on the chest, the front legs, the eyes and the depression on the head.
- Short straight lines show the front legs. They can both be straightened or one of the legs can be depicted raised and bent. At the same time, they try to make sure that the bent leg does not seem shorter or longer than the straight one.
- A long curved tail is drawn next to the hind legs.
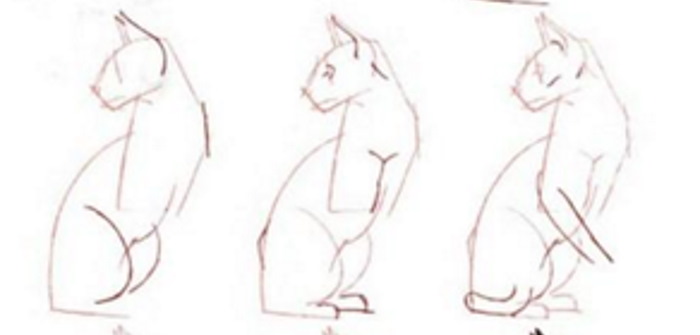
Cat sitting with head turned: realistic drawing - Erase all auxiliary lines, outline the finished outline with a pencil or liner. Shading with a simple or black pencil shows the dark color at the end of the paws, tail and muzzle.
Cat sitting with head turned: realistic drawing
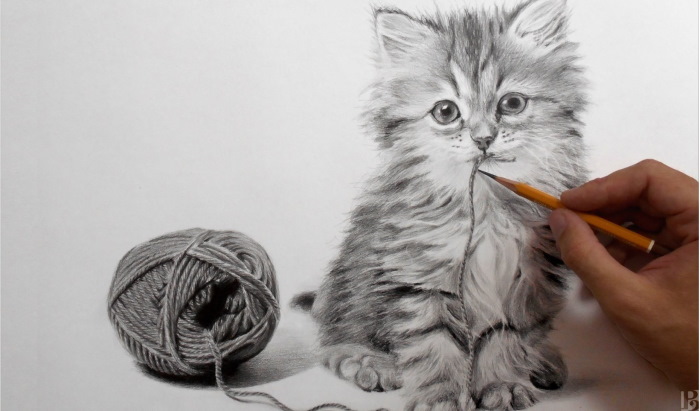
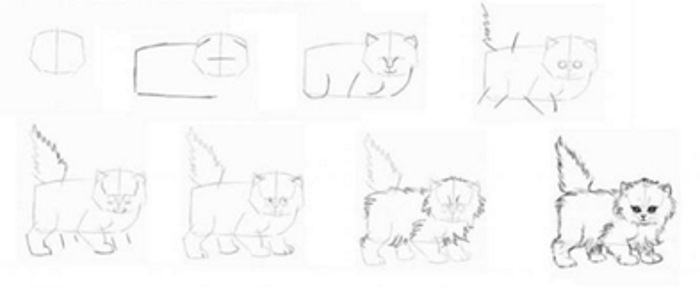
Fluffy Kitten: Realistic Drawing
A kitten can be depicted realistically using a step-by-step method. This method is suitable for those who have drawing skills, since the process will require depicting many small details and complex shapes.
The drawing process is as follows.
- The sheet is placed horizontally, the middle of the sheet is schematically marked. The kitten's head is marked with a circle to the right of the center.
- The body is shown as a rectangle, drawn to the left of the head. The head level should be slightly higher than the body level. The head is schematically divided by a cross, so that later the muzzle can be symmetrically depicted.
- Short curved lines mark the ears on the head, the beginning of the front and back legs. Mark the position of the eyes, nose and muzzle.
- Short straight lines draw the direction of the paws. Zigzag lines outline the tail sticking up. Small circles show the eyes.
- Draw the tail, pointed at the top. Draw the ends of the paws with rounded lines. Add lines for the paws that are far from the viewer.
- Zigzag lines show the kitten's fur on the chest, head, body and paws.
- Erase auxiliary lines, outline the contour. Use light shading to add places where shadows fall on the fur and add additional short lines to depict the fluffy texture of the fur.
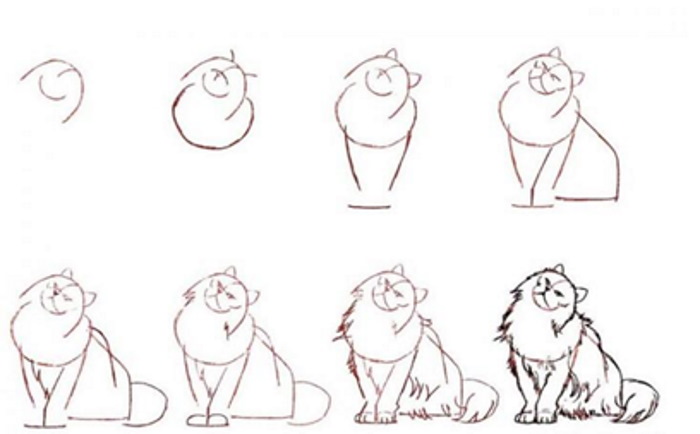
Fluffy Cat: Realistic Drawing
It is easy to draw a cat step by step of different breeds, this lesson allows you to depict a sitting fluffy cat. Depending on what color you paint the finished drawing, you can get different breeds of cats - Persian, British, Siberian and others.
The drawing includes the following steps:
- The sheet is placed vertically and the center is schematically marked. The head is drawn with rounded lines with a small indent upwards from the center. The line of the head, muzzle and the central part for symmetrical drawing of the muzzle details are shown.
- A large semicircle under the head marks the fluffy collar. Small triangles mark the ears.
- The boundaries of the front legs are marked with straight lines.
- On the right side, from the sternum to the paws, draw the back of the cat's body.
- Add details for schematic designation - tail, curve of the back, eyes, nose and mouth.
- Short zigzag lines show the fluffy fur on the collar, back, sides, tail and chest.
- All elements are drawn in more detail.
- Erase the auxiliary lines and outline the finished outline with a liner. Color the drawing in any convenient way.
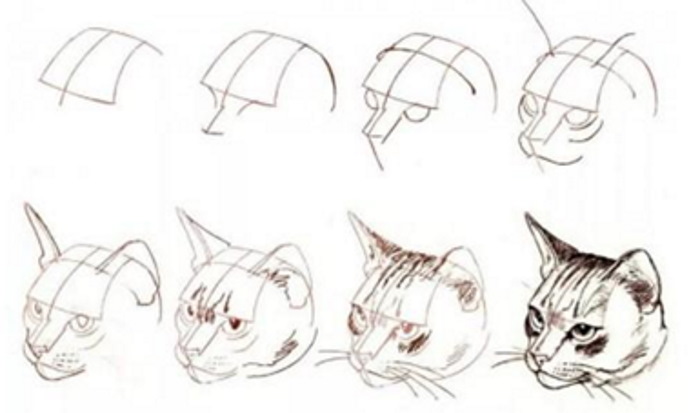
Cat's head
This method shows how to draw only a cat's head step by step. If you have enough drawing experience, you can draw any breed of cat based on this lesson, including long-haired cats.
The stages of drawing are as follows:
- In the center of the sheet, the middle of the muzzle is schematically indicated with a curved cross. The upper part of the cross is longer and shows the curve of the cat's forehead. The upper line of the head is shown with a rounded line and connected on both sides with the borders of the cross.
- On the right side, the occipital part of the head is shown with a rounded line. At the level of the horizontal line of the cross, the curve of the eyes is outlined. A little lower, the nose is outlined.
- Draw the lower line of the eyes, from which the width of the nose begins. Mark the line of the muzzle. At the top of the head, draw a curved line across the vertical midline to mark the beginning of the ears. This line is closer to the top of the head.
- Short curved lines mark the ear lines. The muzzle and cheekbones under the eyes are marked below the nose. The part farthest from the viewer is smaller in size than the near one.
- Finish the schematic drawing of the ears by bringing them to the sides of the head. The ear farthest from the viewer is narrow. Draw the cat's lower jaw, whiskers and pupils.
- Using short zigzag shading, apply shadows and hair growth lines on the ears, on the side of the lower jaw and on the eyebrows.
- Add a shading overlay to add realism to the drawing.
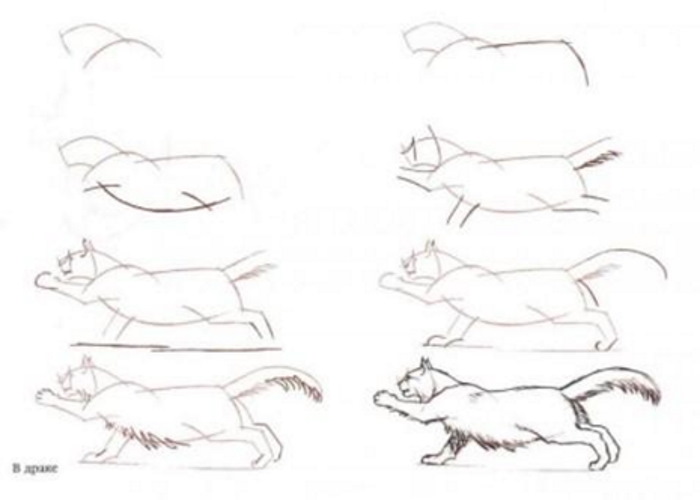
The cat stretches out
This lesson is suitable for those who have drawing skills or for children aged 10 years and older. The process involves depicting a cat, curved in motion. It will require the depiction of complex lines, small details and more time than for simple drawings from the lessons above.
The drawing process is as follows:
- The sheet is placed horizontally, its center is schematically marked. With a small indentation to the left of the center, the figure of the head and shoulder is outlined.
- A semicircular line from the shoulder to the right shows the curve of the cat's back.
- Draw a semicircle, curved downwards under the line of the back, thus indicating the belly. Short lines outline the front and back legs.
- Draw the direction of the front and back legs with short lines, add the tail and mark the level of the muzzle and ear growth on the head.
- The ears, eyes, muzzle and mouth are shown as a concave triangle. The front paw, extended forward, is finished with a rounded figure.
- Finish all the paws, finish drawing the tail line. Draw the lower part of the tail with hatching, depicting the fur.
- Using light shading, draw the whiskers and the direction of hair growth on the chest and stomach.
- Erase all auxiliary lines, outline the finished outline with a pencil, liner or black pen. If necessary, color the drawing with colored pencils, paints or shade with a simple pencil.
Useful tips
To draw a cat, follow some simple tips from experienced artists:
- Sheet arrangement. Think in advance what the drawing will be, mark the center of the drawing in the middle of the sheet. The sheet is placed vertically or horizontally so that the finished drawing does not turn out to be shifted from the center.
- Planning the composition. If you plan to depict other objects in the drawing, except for the main character, their figures are schematically indicated in relation to the main figure on the sheet. At the initial stage, this can be done in the form of circles, ovals or other figures. After drawing the main character, they move on to creating an accurate outline of the other characters.
- Drawing order. The drawing begins with a schematic designation of key figures - the head, body, arms or paws, etc. This designation can be in the form of elongated ovals and circles, or in the form of lines. Gradually draw each key detail, erase the auxiliary lines. To make both parts symmetrical, use a ruler.
- Light and shadow effect. To make a character in a drawing more voluminous and realistic, mentally imagine the light source and the side from which it comes. All areas of the character's body closer to this source should be lighter - they can be shown with light paints or pencils, or an eraser can be used to create highlights. All places far from the light source are dark - they are shown with dark paints or pencils, or light shading is applied with a simple pencil, liner, etc.
- You can redraw the drawing not only using a step-by-step master class, but also using carbon paper or a cell. Carbon paper allows you to repeat the outline on another sheet. If you need to repeat the outline on a larger scale, then use the cell method, which is applied to the example. On a clean sheet, also draw a cell on a larger scale and transfer the outline, repeating each cell.
- When drawing a cat, it is recommended to first use a simple pencil so that you can immediately correct unsuccessful moments with an eraser. When a light outline is ready, it is outlined with a marker or liner.
Video on how to draw a cat
Step by step instructions on how to draw a cat.