You can draw many interesting images with pencils. Beginners are recommended to use ready-made ones. ideas for sketching, which will allow you to practice your artistic skills faster.
Selection of pencils and colored pencils
Pencil drawing ideas for children should be chosen according to age. The creative process for a little artist should not only be exciting, but also convenient. During drawing, the main tool is a simple pencil, with which the initial sketches and drawings are made.
Typically, the body of simple pencils has the following shape:
- hexagon (the most common);
- triangle shape;
- with a round body (less often – oval drawing tools);
- Flexible pencils: have a non-standard appearance, but are not very convenient to draw with.
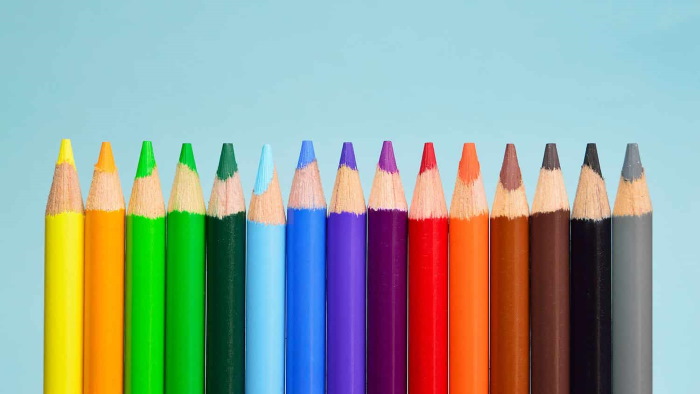
Quality pencils can be purchased either as a set or individually. A good drawing tool is made of high-quality wood. It excludes the appearance of chips and significant fibers. The material for pencils should have a solid appearance and a smooth texture, and also have a light beige shade.
When choosing colored art supplies, you should pay attention to the following features:
| Name of the characteristic | Brief description |
| Rod thickness | The lead should be about 2.5-5 mm thick. The thicker it is, the less likely it is to break. Such a lead can fill large parts of a still life, but the pencil will have to be sharpened repeatedly. |
| Pencil body | The creative tool can be round, hexagonal or triangular. A soft triangular pencil will be a great helper for children who are making their first strokes in drawing. Hexagonal pencils can be confidently bought for a child who has already learned to hold drawing tools in his hands. |
| Softness of the instrument | High quality colored pencils should have a softness level of B (soft), HB (hard-soft), or 2B (softest). |
| Type of lead | The rod comes in the following types:
|
| Number of shades in the set | Sets with 12 pencils are common. But you can also find packages that contain 6-12 shades. |
Selecting paper
Ideas for illustrations are usually transferred to paper. Some experienced artists work with canvas, which is not designed for pencil drawings. Office paper is often used in the work, less often - wrapping paper, writing paper or newspaper sheets.
The main qualities of paper that you should study before you start buying:
- Density. Low-density paper is very flabby, changes shape when in contact with an eraser. High-density paper retains its original appearance when erased, and does not get wet even from a large amount of paint. Simple office paper has a density of 80 g / m². Newspaper type - 40-60 g / m². The most convenient for creativity is paper with a density of 90-110 g / m².
- Using an eraser. High-quality sheets should not be deformed by the eraser. Its main task is to remove pencil marks without much effort. It is recommended not to use paper (especially thicker ones), on which it is difficult to erase a sketch.
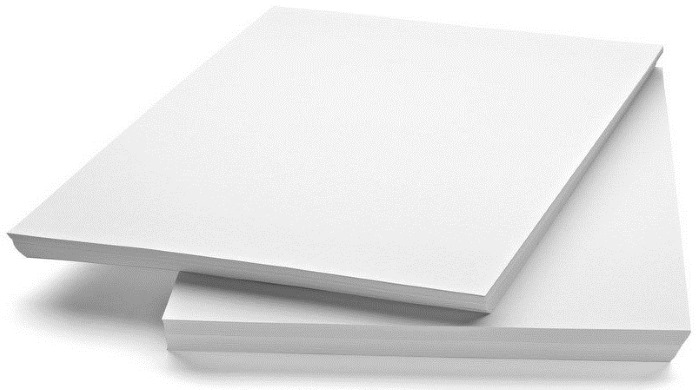
- White leaf color. This feature is important when scanning illustrations. Even if the snow-white paper is not of high quality, the scanned drawings are clear and expressive.
- The presence or absence of roughness (graininess). This paper is smooth and even. The increased level of graininess makes the picture three-dimensional and picturesque. However, these sheets are more suitable for technical sketches, the lines are even and clear.
Auxiliary means
Pencil drawing ideas are chosen before purchasing drawing supplies.
Depending on the style and type of drawing, the following accessories may be needed:
- Eraser for erasing lines. It must meet two main criteria: it must not have a colored surface (paint can remain on the sheet), and it must also be soft.
- Stationery knife. It is ideal for sharpening a pencil. Simple knives have too thick blades, so it is better not to use them. The sharpener can damage the pencil lead, and the sharpening level is significantly inferior to a stationery knife.

- Paper clip folders. They come in different sizes, but the most commonly used are A4 size tablets.
- Soft fittings (charcoal, chalk, sauce, sepia, sanguine). They are used in drawing spot sketches. Pictures in which chalk and charcoal are combined on pastel sheets look aesthetically pleasing.
- Pencil extender. Used when there is a smaller portion of the writing medium remaining. They should be distinguished from charcoal extenders, into which regular pencils cannot be inserted.
- Kneaded eraser: removes dirty spots from paper. This item is also used to lighten and correct minor imperfections in charcoal and pastel paintings.
- Long brushto get rid of eraser marks.
The above are the basic tools used when drawing with pencils. In addition, the room should be well lit.
In addition to the main source of electricity, it is recommended to use a table lamp.
This will make small details of the painting more visible. This point is especially important for artists with poor eyesight.
Basic drawing techniques with simple and colored pencils
People who are not familiar with the basics of drawing should pay attention to the following techniques:
- Spot toning. A preliminary sketch is applied to the paper with a colored pencil, and smooth transitions between tones are formed. Shades are applied either in small portions or in large spots.
- Single layer tinting: used to fill a large area of an illustration. But this technique is used in extreme cases, since the color scheme can turn out to be very straightforward, saturated and uninteresting. This is especially true in cases where the pencil set contains a small number of shades.
- Toning in 2 or more layers. It is used to create the required color, weaken or strengthen the brightness of a specific part of a still life.
- Combination of tones. The desired colors are not superimposed on each other, but are located close to each other.
- Grisaille – a method of drawing characterized by monochrome images. All areas of the illustration are painted with only one shade. Transitions are made only with the help of tone.
- Copying by cells. This technique is done on squared paper. You can also put squares on any drawing and then carefully transfer them to a clean sheet. This method is very easy to perform. You just need to have a sample for copying and reproduce the drawing using the counting method.
Easy and Beautiful Drawing Ideas for Beginners
Pencil drawing ideas help you master the art of drawing quickly.
Not only will children enjoy being creative, but parents will also be interested in the activity, choosing one of the many interesting techniques.
Floristics
To draw a maple leaf with a simple pencil, you should follow these steps:
- To form the outline, you should apply a vertical stroke to the paper. Then you need to draw a horizontal line intersecting the 1st line. Through the point of contact, you need to apply 2 diagonal strokes in different directions.
- Next, many small "branches" are drawn, coming from the long lines. They should be of different sizes, so that the picture looks natural.
- After this, the correct edging is drawn. The branches must be drawn with slanted broken strokes.
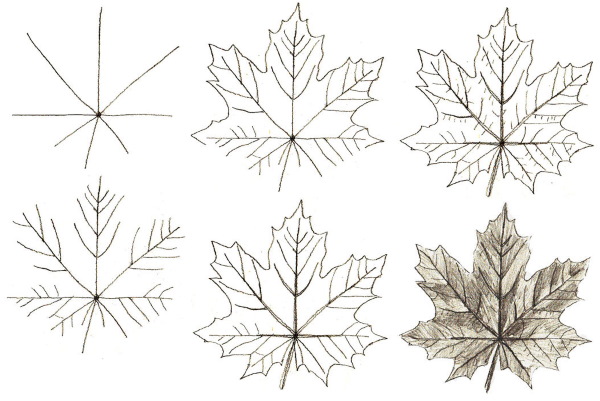
- The outline of the maple leaf is recreated with precise lines. These strokes should be thicker than the auxiliary branches. They widen at the bottom and narrow at the top.
- Now you should apply small veins to the auxiliary branches using short lines, and then correctly place the shadow and light on the maple leaf.
- The final step is to shade the sheet. This is done to make the drawing look realistic.
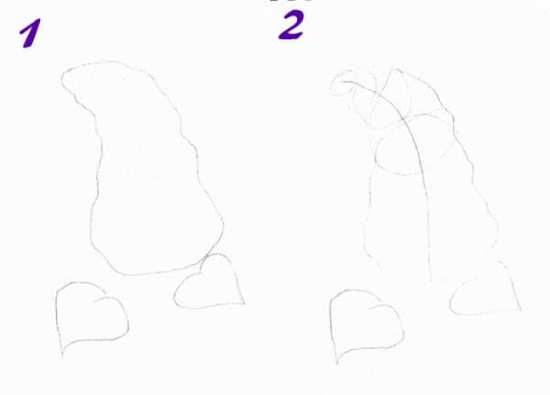
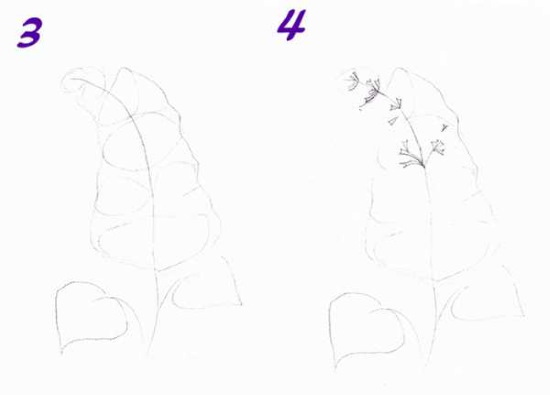
A multi-colored lilac design can be created as follows:
- First, you need to determine the height and width of the basket. To connect its edging, even strokes are made. The lower and upper sides should be slightly curved downwards.
- Then you need to vertically divide the basket into several parts and draw bunches of lilacs.
- After this, you should draw round leaves. They should be placed inside the flowers and inside the bouquet.
- On each part of the basket you need to draw half-curved horizontal lines, and also add large and small flowers.
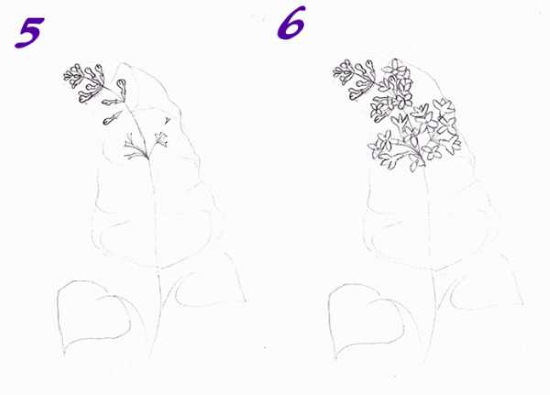

- Now you need to outline the lilac border with a black gel pen.
- Next, the basket is drawn with dark and light brown pencils so that the transition between light and shadow is visible.
- Inside the flowers you need to add blue and purple shades.
- After these manipulations, you should paint the leaves green and light green, and also add a shadow under the basket.
Step by step guide to drawing a lily in monochrome technique:
- It is necessary to draw an even circle on a sheet of paper, after which you need to draw the stamens of the flower from its central point.
- Now you need to add 3 petals in the foreground and background using curved lines.
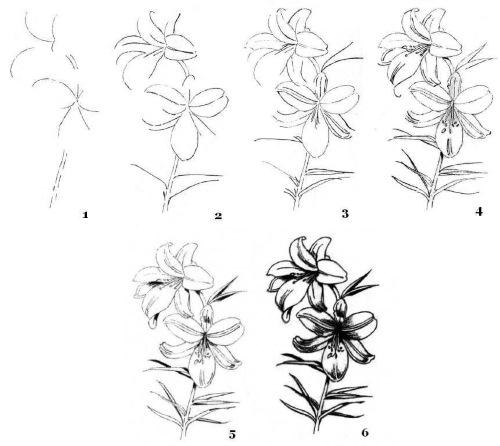
- Next, lines are applied to all the flower petals and the edging strokes are erased.
- Using pencils of one tone (for example, purple and lilac shades), you need to color the flower, giving the picture a monochrome look.
Seasons of the year
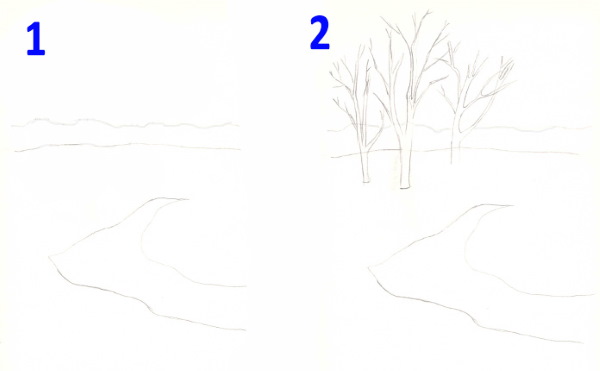
Detailed process of drawing spring with a simple pencil:
- The first thing to do is to draw the horizon on paper.
- A little below the horizon, you need to draw a piece of a reservoir.
- Next, trees are drawn on the horizon line.
- A little higher up you should capture the clouds and the outline of the sky.
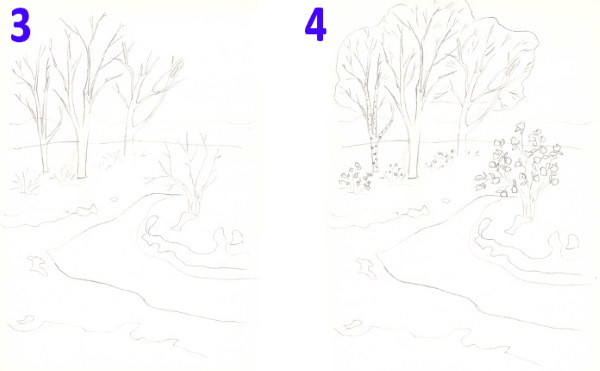
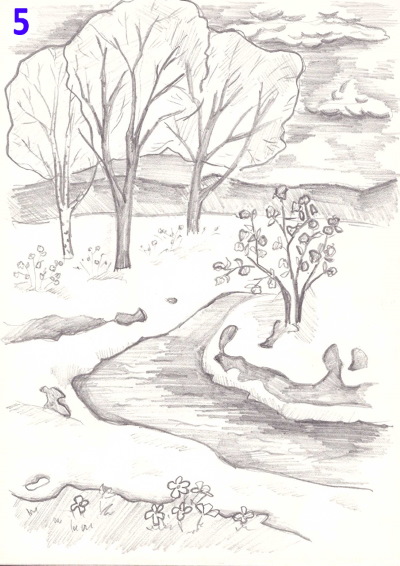
- At the top of the reservoir, the reflection of clouds on the water surface is drawn.
- On the left, you need to add a large tree with some foliage.
- On the right side of the drawing you need to depict a flowering bush.
- The final stage is drawing the clouds.
Step-by-step lesson of winter landscape with colored pencils:
- First, you should draw a large pile of snow with soft lines. After that, you should capture the edging of the oak trunk with branches.
- You need to draw a snowman near the tree, carefully working out the individual details.
- A bird feeder is drawn on one of the oak branches.
- There will be a fir tree near the snowman, so you need to draw a triangle. Then you need to draw the fir branches and erase the outline of the triangle with an eraser.

- After this, you should color the needles with a green pencil and the snow with a blue pencil.
- The next step is to erase the pencil lines and paint the oak with different shades of brown pencil. The tree bark is outlined with curved lines in a dark brown shade.
- The dark blue color should be used to fill the sky area, deepening the shadows on the snow woman and snowdrifts.
Ideas for pencil drawings depicting winter landscapes can be embodied in homemade New Year cards.
You can create a monochrome autumn drawing by following these rules:
- First, you need to capture the bench on the canvas. Then you need to apply perspective lines (the bench will be drawn at a slight angle). The lines of the umbrella are displayed on it. The oval may not be perfect, because the strokes will be erased later with an eraser.
- On the umbrella, you should draw a rod to hold it and a frame made of metal wires. After that, add legs to the bench.
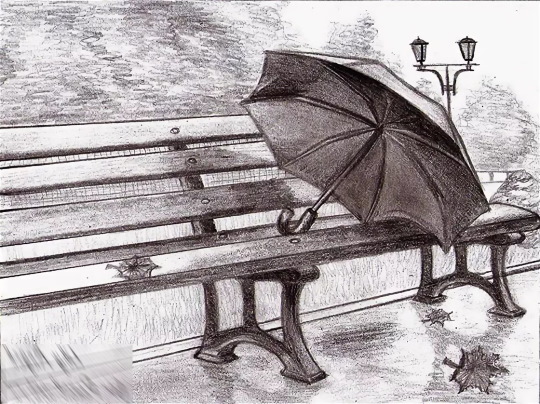
- On the knitting needles you need to draw a waterproof material with a pencil, which will serve as protection from the rain.
- Next, trees and a street lamp are drawn, and on the road – puddles and fallen leaves.
- In the air, it is worth capturing the rain with straight hatching, and on the asphalt with diagonal hatching.
- Now we need to show the depth of the painting using different tones of yellow pencil.
Animals
You can easily draw an elephant with a simple pencil:
- You need to start by drawing the shape of the animal's body on the sheet.
- Then, using soft lines, the trunk is connected to the head, and fangs and ears are added.
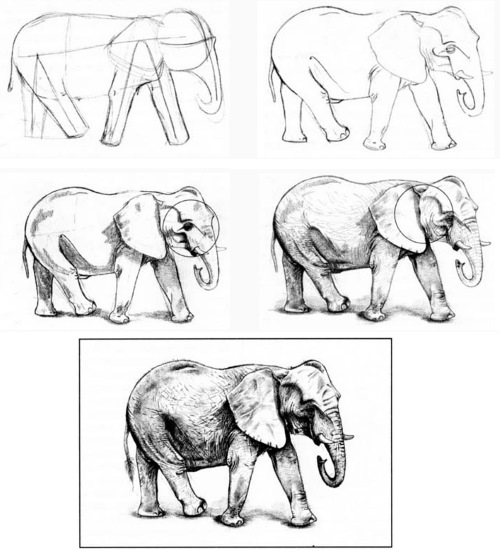
- Now the front and back legs of the animal, as well as the tail, are drawn.
- Particular attention should be paid to the folds of the elephant's skin and nails.
- It is necessary to erase the contour lines with an eraser.
Simple Drawing of a Puppy with Colored Pencils:
- First, a sketch of the dog is drawn with a simple pencil.
- Next, you need to shade the eyes, draw the fur around them and add a nose.
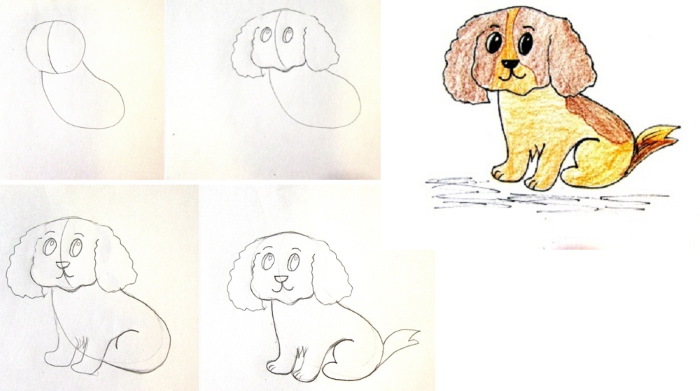
- The dog's head is colored with colored pencils. In the dark areas, brown and blue shades are used, and in the light areas - blue with yellow or red.
- Now you need to fill in the background using colored pencils. It is best to draw the strokes in different directions so that the drawing looks more realistic.
Monochrome image of a wolf using colored pencils:
- First, the body of the animal is schematically drawn. The head is divided into 4 parts.
- Next, you need to depict the ears, and also draw the fur around the entire head.
- Now you need to add the eyes, placing them on the horizontal additional line. The ears and cheekbones are also drawn.
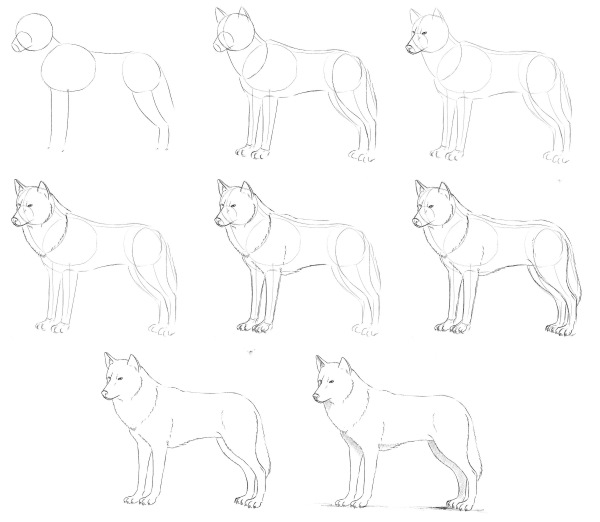
- It is necessary to draw fur over the entire surface of the chest using hatching.
- The next step is to carefully draw both front paws, then add the back paw in the background and the wolf's tail.
- After this, the earth's surface is depicted.
- At the final stage, you need to erase the outline of the body with an eraser and use gray pencils of various tones to convey the play of light.
Birds
The process of drawing a nightingale with a simple pencil:
- At the beginning of the work, the base of the body, head and wings of the bird are drawn.
- From the beak to the bottom of the body, you need to make a soft transition with a rounded line.
- The feathers on the wings should be drawn using hatching, after which the tail is added.
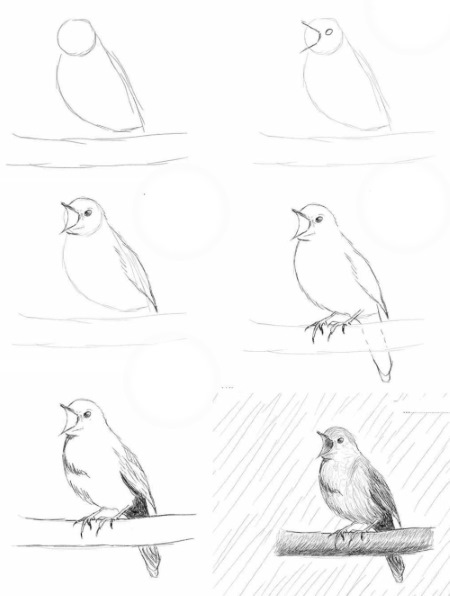
- Now you need to put a bold dot where the nightingale's eye should be, capture the beak and add plumage on the chest. After that, draw a pair of half-bent legs.
- The last step is to erase the outlines and draw a branch at the bird's feet.
Bullfinch in colored pencils:
- First, you need to draw a circle and an oval, which will be the outline of the bird's body. After that, you need to finish drawing the wing.
- Now you need to finish drawing the branch under the bullfinch.
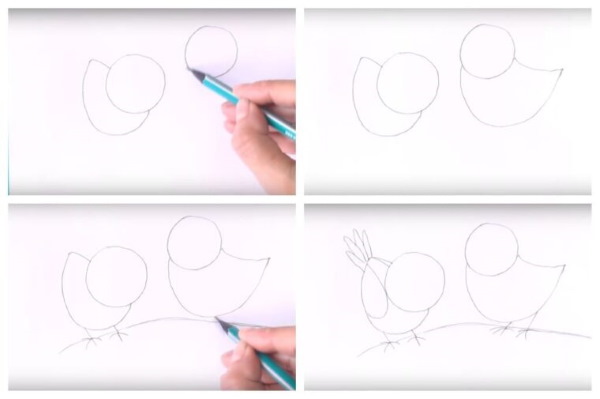
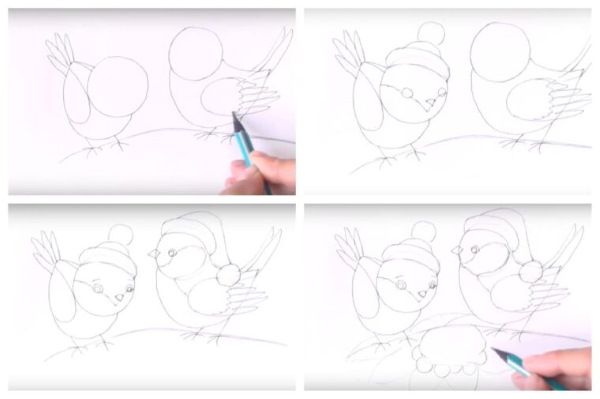
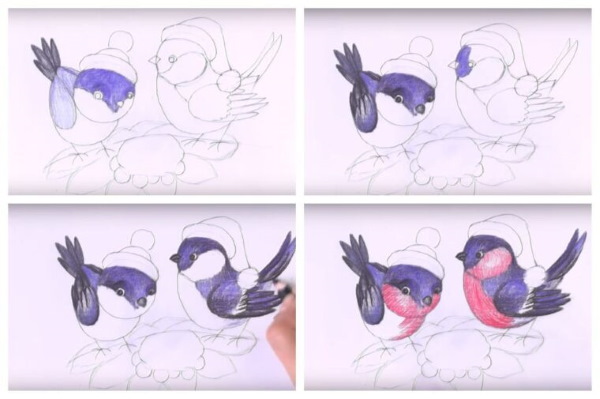
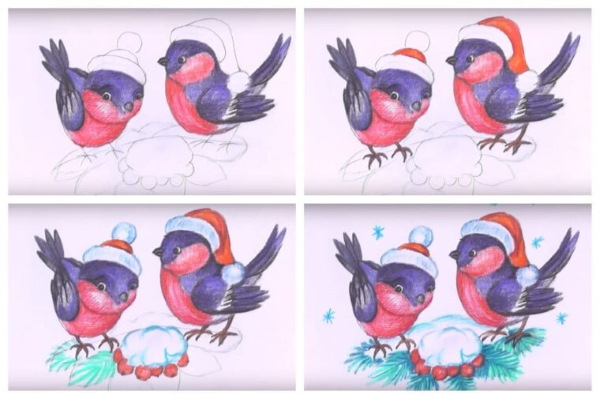
- The outline of the body, wing, tail, paws and eye with beak should be outlined with a black pencil. The bird's chest should be colored red, and all other parts - several shades of gray. Draw the wing, tail and beak of the bullfinch with black straight lines. Also outline the branch with a black pencil, and fill it inside with brown.
The parrot is drawn with colored pencils using a monochrome technique:
- You need to depict the beak and the line of the head, lowered slightly below the nose.
- Now you need to finish drawing the round eye and the lower base of the beak.
- After this, the bird's body is depicted. The chest and back are drawn with 2 curved lines that start from the beak and head of the parrot. The line of the back should be a little longer.
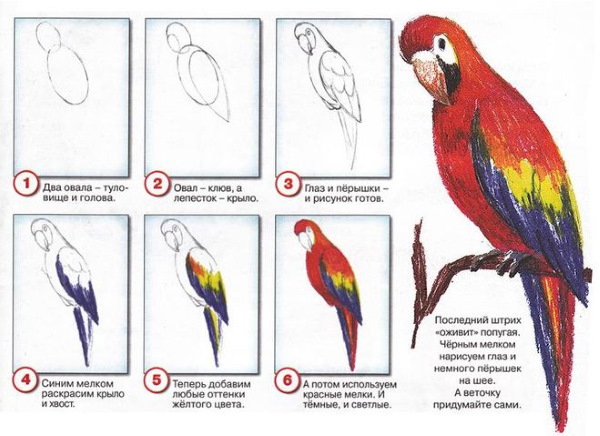
- The wing is drawn from several lines, after which the paws, claws and tail are added.
- The parrot is colored with several shades of green pencil to give the illustration a monochrome look.
Insects
You can create a picture of a grasshopper using a simple pencil in the following way:
- On the canvas you need to capture a circle and a figure resembling an orange slice.
- Now you need to add eyes and horns to the grasshopper's head.
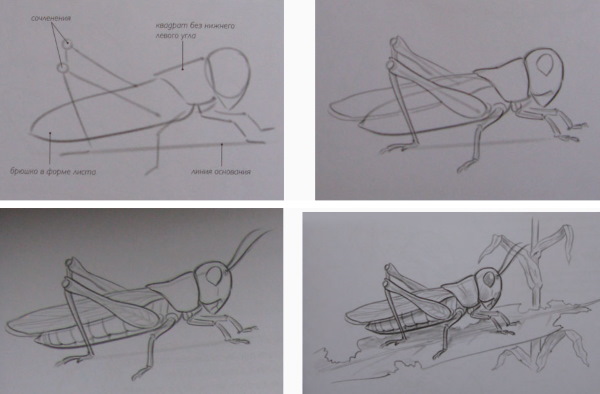
- The next step is to add the half-bent hind legs and draw the body of the insect.
- After this, the front legs are added.
- The last step is to erase the edging lines with an eraser.
Illustration of a wasp using colored pencils:
- To create the base of the body, you need to fix 3 ovals of different sizes on paper, then add antennae, eyes and a sting.
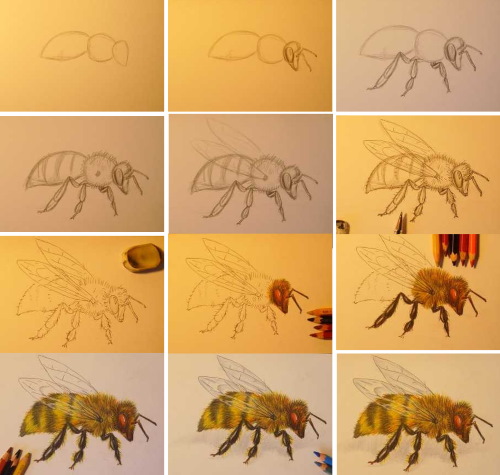
- Now you can finish drawing the paws and wings.
- Next, the outline of the insect is outlined with a black pencil. The wasp is painted in orange and black tones, while the wings are filled with a light gray shade.
Butterfly with colored pencils using the grisaille technique:
- The first step is to draw an oval body and antennae.
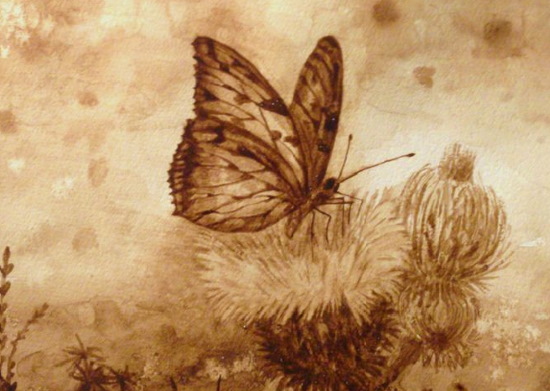
- Next, you need to capture the left wing with wide lines, dividing it in the middle with a horizontal line. Using the same technique, you should add the right wing.
- The butterfly is painted in a single red color scheme to correctly convey the transition from light to shadow.
Sea creatures
Fish in pencil:
- First, an oblong figure is drawn, resembling a seed.
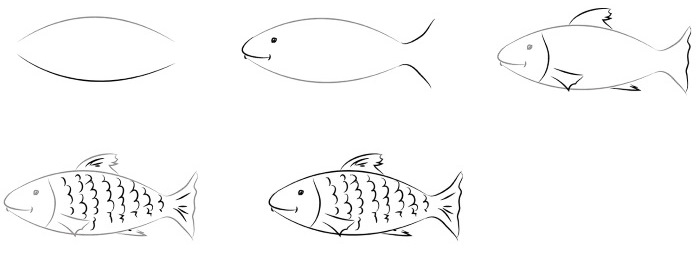
- Now you need to narrow the right part of the oval a little, draw the eyes and mouth of the fish.
- Next, the fins are added, which are drawn with straight vertical lines. The side fin is drawn in a similar way.
- After this, you should erase the edging lines with an eraser.
You can draw a sturgeon using colored pencils:
- First, you need to capture the body of the fish on paper in the form of an elongated curved triangle. A straight line is drawn in the middle. The head and tail also resemble a triangular figure, only slightly smaller than the body.
- The next step is to add fins, diamond-shaped scales. It is also necessary to slightly bend the head line to create the effect of a sharp nose and draw a fish eye.
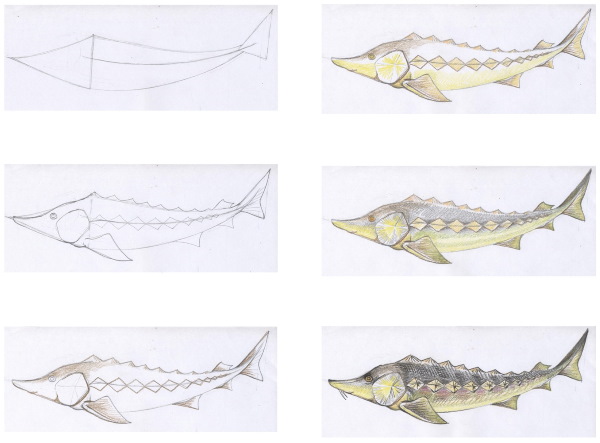
- Using a brown pencil, color the head, fins, and outline the scales.
- The sturgeon's belly, the ends of the fins, the lower part of the head, and also the cheek are filled with yellow.
- Orange, green and grey shades should be added to the fins and back of the fish.
- The final step is to outline the details with a black pencil.
Drawing of a dolphin with colored pencils in monochrome:
- The first thing you need to do is draw the outline of the body, resembling a drop of water at an angle.
- After this, you need to capture the head, neck, eye, nose and smile on canvas.
- Now the fins and belly are drawn.
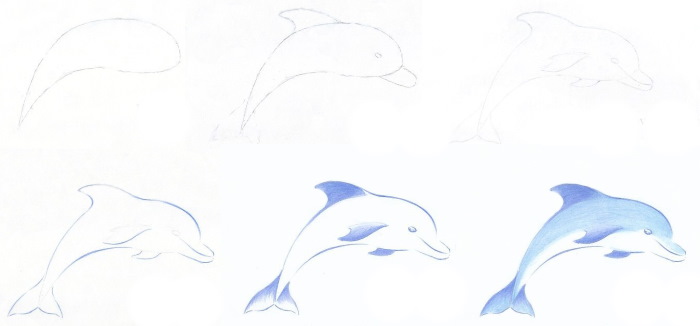
- Next, you need to draw out the back of the body and the fin located on the back.
- Then the tail is added. The entire dolphin is colored with several shades of blue pencil to obtain a monochrome image.
Cartoon characters in sketchbook
To draw Snow White in a notebook, you will need to follow these steps:
- First, you should outline the shape of the head with light shading. After that, you need to draw the lips, nose, eyes, arms and legs.
- Now you need to capture the hair with the headband, the neck and the dress.
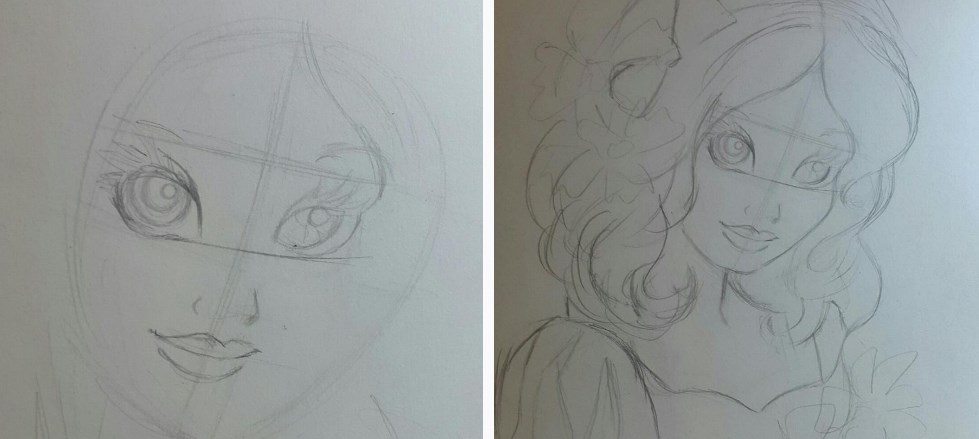

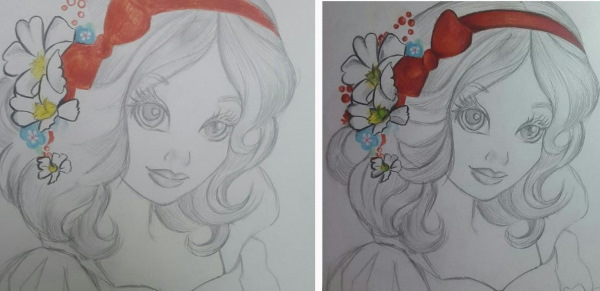
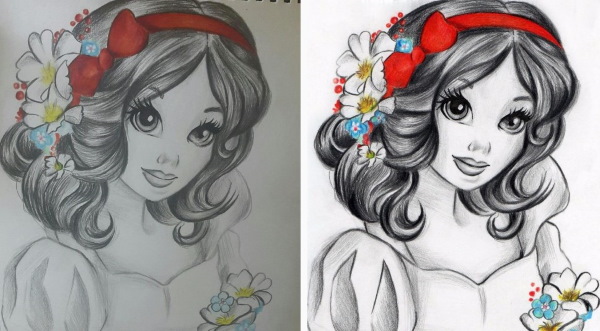
- The details of the hero are carefully drawn and extra lines are erased with an eraser.
- Next, you need to shade Snow White's hair.
- Next, outline the details on the dress and headband with a simple pencil.
Gnome Quiet in a sketchbook with colored pencils:
- At the initial stage, the eyes, mouth, nose and beard are drawn.
- Then the outline of the face, body, arms, legs, shoes and hat are added.
- The beard should be painted white and grey. The blue shade should be applied to the hat, and yellow to the sweater.
- The trousers are painted with several tones of red pencil to create small shadows.
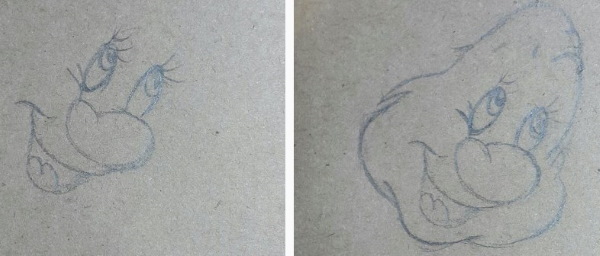
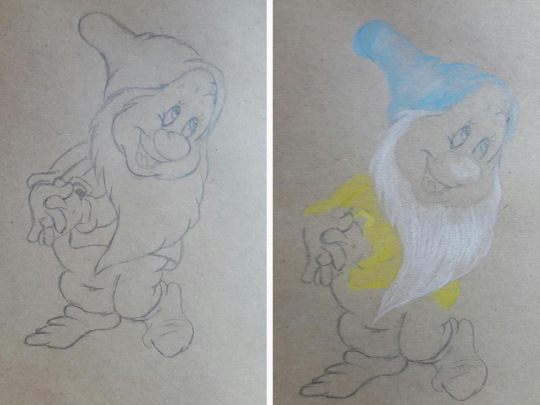
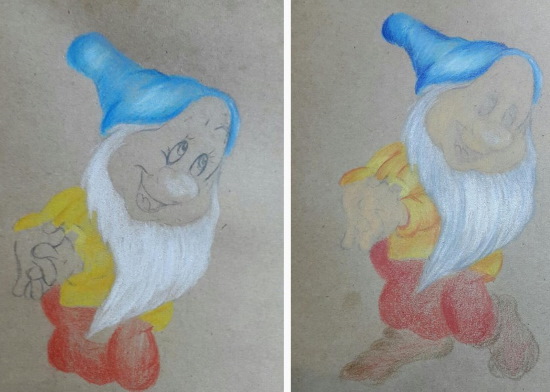
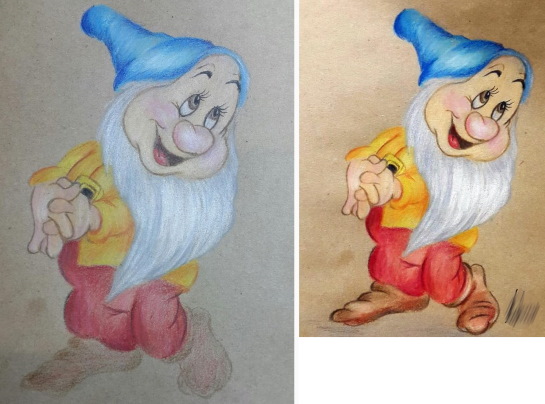
- Orange is added to the clothes, ochre to the hands and face. The shoes are painted a brown shade.
- The face needs to be painted in pink and white tones. The tongue is colored with a dark red pencil, and the oval of the face is outlined in black. The hat is highlighted in a dark blue shade.
- Before finishing the work, it is necessary to add a shadow.
Monochrome drawing technique of Ray from the cartoon "The Princess and the Frog":
- First you need to outline the mouth and draw the eyes.
- Now you need to draw the teeth and the oval of the head.
- Next, the upper part of the body and paws are drawn.
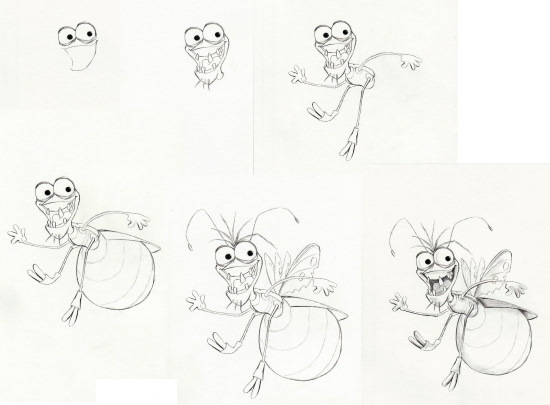
- At this stage, you should finish drawing the body and apply semi-bent lines to it.
- Then you need to draw the bangs, horns and wings of the firefly.
- After this, you need to use orange pencils of several tones to convey the play of light and shadow.
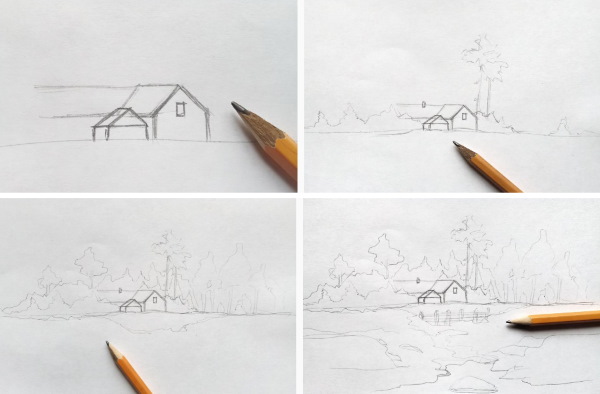
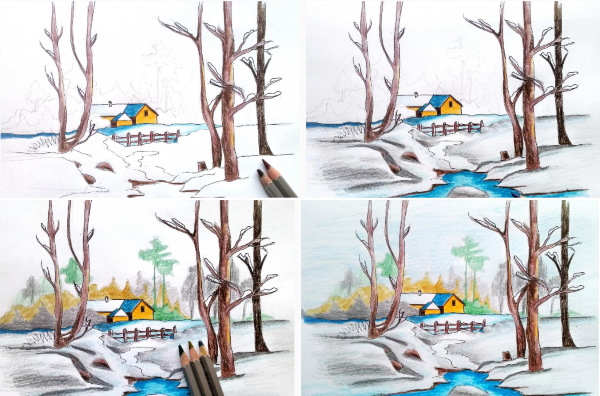
Pencil paintings are easy to do and do not take much time to implement. Such drawings develop logical thinking in children. The easiest way is to find good ideas for illustrations and copy existing images.
Author: Ekaterina Pisarenko
Video about drawing with pencils
Pencil Drawing Ideas:
Need some pencil drawing ideas