To decorate New Year's cards, gifts and crafts, you can make a bullfinch with your own hands. Crafts made from threads or plasticine are quite simple, even a child can make it. The advantage of this applique is the availability of materials.
Materials for making crafts
A bullfinch, which you can make with your own hands at school during a lesson, is often cut out of colored paper or cardboard. To make the craft pleasant to the touch, you can use velvet colored paper or cardboard.
You can create a bullfinch from threads and wool yarn. It is recommended to use thick yarn, as it looks neater and is used less than thin yarn.
The bullfinch can be laid out with your own hands and from beads of the corresponding colors. To hold them on the cardboard, they need to be glued. In addition, in the work, you can combine cardboard and paper in the craft. Sewn pieces of felt are another type of material from which you can make this beautiful bird.
The softness and plasticity of plasticine allow you to mold a bullfinch of any size from it. You can mold both a three-dimensional bird and a flat craft from it by rolling out lumps of plasticine according to a template.
Paper is a material from which you can make a bullfinch using several techniques. For example, using quilling or origami.
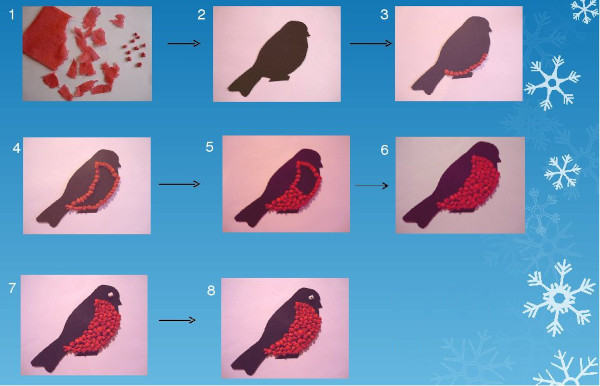
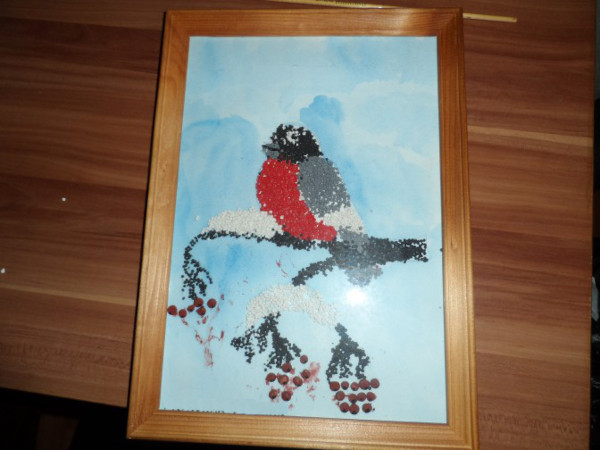
A winter bird can also be created from cereals, using products of corresponding colors. For example, the black color in the plumage can be laid out from seeds, and the red color from rowan berries. If you are not satisfied with the color of the product, you can paint it with gouache.
Threadfinch
A bullfinch, which you can make yourself for a New Year tree, will look beautiful from floss and yarn.
To work you need to prepare:
- threads of gray, black or red colors;
- scissors;
- seed for the beak;
- 2 beads for the eye or 2 eyes for toys;
- glue
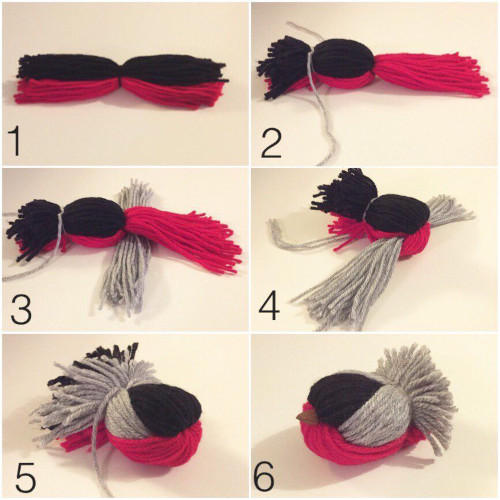
The work is done according to the following instructions:
- Cut the threads into pieces about 40 cm long. The number of pieces depends on the thickness of the yarn. If it is thick enough, you can cut fewer pieces. For a bird made of thin yarn, you need to cut more pieces.
- Place black threads on top of the red threads. Find the center of the folded sections and tie them tightly with a black thread.
- Bend all the black yarn from one side to the other side. Place it on top and tie it with gray thread to the red yarn. Leave the ends of the gray thread free, do not hide them.
- Take the grey yarn and place it under the free part of the red yarn.
- Bend the red yarn at the bottom, bending it around the gray one. Tie it with the previously left ends of the gray thread, forming the bullfinch's tail.
- Bring the ends of the grey threads from the bottom up and back to the tail. Trim them so that they are symmetrical. Tie everything with grey thread.
- Pull and align all threads.
- Glue the eyes and the seed-beak. To hang it on the tree, attach a thread to the craft.
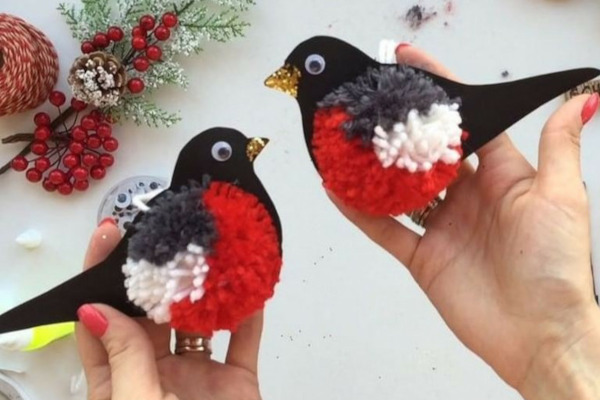
From pompoms
In this master class on creating a bird from pom-poms, you will need the following materials:
- PVA glue;
- white and black cardboard;
- scissors;
- red thread;
- colored paper in black and red;
- ribbon
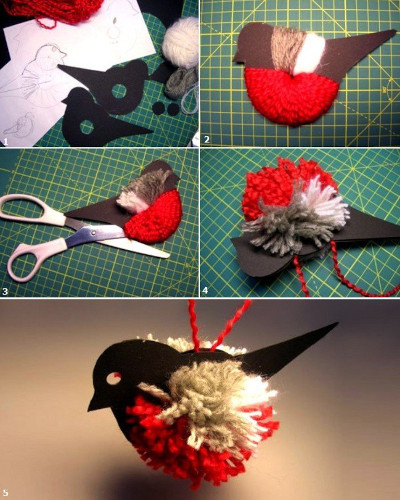
You can make a bullfinch from such materials in accordance with the following steps:
- Cut out 2 circles of about 10 cm in diameter from cardboard. In the center of the circle, cut out another one of 2 cm in diameter. Connect them and wrap with red thread.
- Additionally, cut a 25 cm long thread.
- Cut the wound threads.
- Thread the thread between the circles and tighten. A pompom should form.
- On a sheet of black cardboard folded in half, draw the silhouette of a bullfinch.
- Take red paper, draw and cut out the bullfinch's chest.
- Glue the chest onto the black silhouette.
- Glue on the eye. Draw wings on black paper.
- Insert the bullfinch's body into the pompom.
- Glue the wings to the pompom and insert the ribbon.
Paper applique
A bullfinch, which can be made with your own hands with children of different ages, will look beautiful from paper. For younger children, you can cut out applique templates in advance, school-age children can cut them out together with the teacher.
Before starting work, you need to prepare:
- black cardboard;
- white and black paper;
- red napkin;
- scissors, glue;
- black marker;
- cotton swab;
- white gouache
The master class is carried out according to these instructions:
- Cut out a tree from paper on which you can place the bullfinch.
- Glue it onto the black cardboard - the background of the applique.
- Cut out a black wing from black paper and glue it on.
- Cut the red napkin into pieces. Make lumps out of them.
- Glue them to the chest.
- Make an eye out of white paper and draw a pupil on it.
- Draw several branches on the tree with a marker.
- Add lumps from the red napkin. They can be used as rowan berries.
- Use a cotton swab and gouache to draw snow.
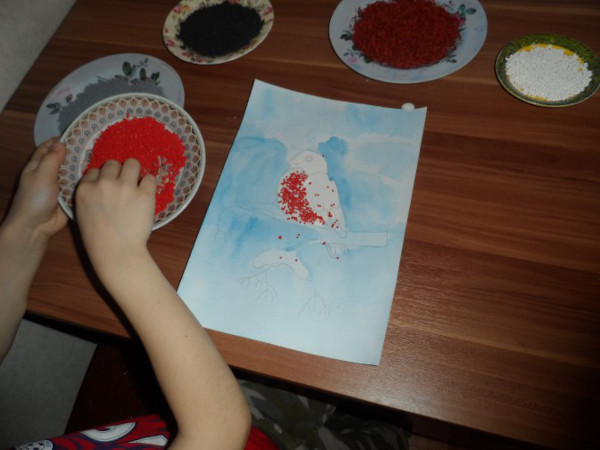
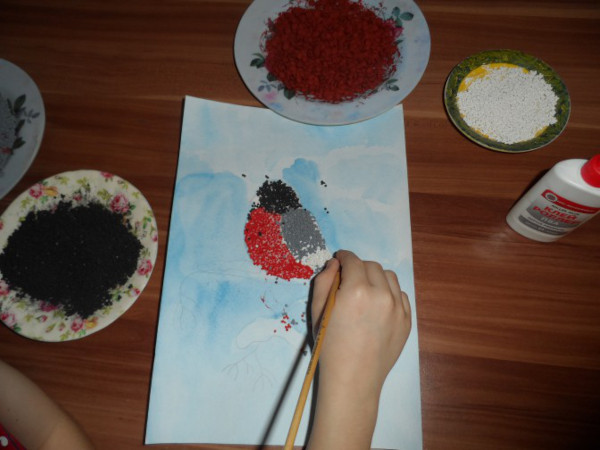
From cereals or beads
Cereals or beads are a material that many children will like. They often play with cereals, so you can make a beautiful applique from them.
In addition to cereals, you will need the following for the applique:
- sheet of cardboard;
- cereals, which can be replaced with beads of the colors corresponding to the bullfinch's color;
- paints;
- tassels;
- glue
A bullfinch, which can be made with your own hands from various materials, is created in accordance with the following instructions:
- Draw a silhouette of a bird on cardboard; you can add branches on which the bullfinch will sit.

- Paint the grains to match the bird's plumage. After that, dry the grains.
- Place the dried grains on cardboard according to color.
- Coat the cardboard with glue beforehand.

- Dry the work.
You can also replace the cereal with beads. It is better to choose Czech or Japanese beads, as they look neater and smoother than the others. By embroidering according to the following master class, you can embroider a bullfinch brooch from beads.
First you need to prepare:
- felt;
- rhinestones;
- beads of colors that match the plumage of a bullfinch;
- embroidery needle;
- threads for beads;
- fishing line;
- clay for the beak;
- cardboard;
- clasp;
- pen or pencil
- Place 3 rhinestones on the drawn wing, leaving a small gap. Glue to felt, stitch with fishing line. Sew the rhinestones with black beads.
- Glue a rhinestone to represent the eye. Prepare a beak from clay, glue it and sew it on. If you don’t have clay, you can embroider the beak from a floss thread folded twice.
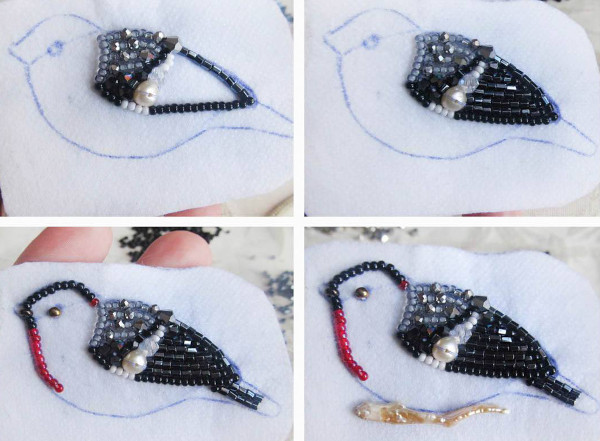
- Embroider the head: black on top, white in the middle, and garnet at the bottom. You can sew feathers on the wing with light gray beads.
- The tail can be embroidered from 5 rows of black beads.
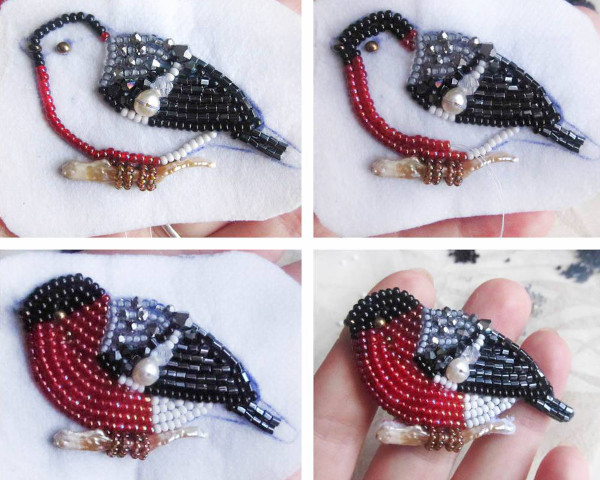
- Cut the felt as close to the outline as possible. Cut out a template from leather. Attach a lock to it and glue everything onto cardboard.
- Sew black beads along the outline.
Made of felt
Paper and cardboard in the bullfinch applique can be replaced with felt.
In addition, you will need the following materials:
- white and blue cardboard;
- red and gray felt;
- velvet black paper;
- corrugated brown paper;
- simple pencil;
- glue;
- beads for eyes;
- dried branches and fruits
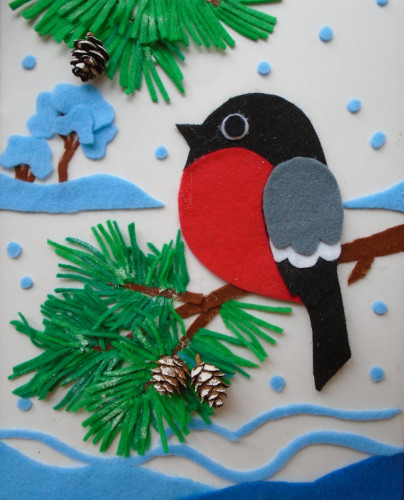
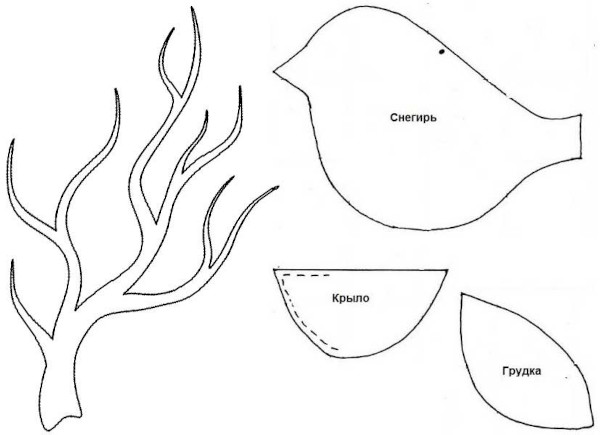
- You should start creating a felt bird by drawing a sketch. On white cardboard you can draw all the parts of the bullfinch: wings, body.
- Using the drawn template, cut out black bodies, black wings and red breasts.
- Glue the red template to the black body.
- Glue a grey stencil onto the black wing.
- Glue the wings and body.
- Glue circles made in white paper with a hole punch onto the head in place of the eyes.
- Glue beads or peppercorns onto the white circle.
- Roll up the corrugated paper and make several branches out of it.
- Glue paper branches to the sides of the blue cardboard, which is the base of the craft.
- Glue bullfinches onto the branches.
- To make the applique look more natural, you can glue rowan berries onto the applique. To prevent them from spoiling, you can cover everything with varnish.
Bullfinch made of plasticine
Plasticine is one of the most popular materials for children's creativity.
For a plasticine bullfinch you will need:
- grey and white plasticine;
- red plasticine;
- black plasticine;
- a knife for working with this material;
- modeling board
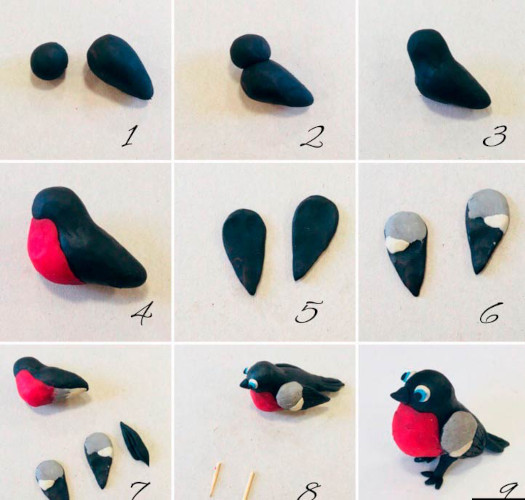
- Knead the prepared flowers into plasticine and roll into circles.
- The base is a ball of red plasticine, which will make up the bird’s body.
- To make it more realistic, stretch it out on one side.
- Roll out wings from grey plasticine.
- Add black plasticine to their tips.
- Glue white stripes of plasticine onto the wings.
- Attach the wings to the bird's body.
- Make a bullfinch's head out of black plasticine.
- Make a beak out of grey plasticine, making it in the shape of a small cone.
- Make eyes from white and black plasticine.
- Make a tail from the remaining black plasticine.
From this material you can mold not only a three-dimensional, but also a flat bullfinch. To do this, you can print out a bird template, glue it to cardboard and carefully roll out plasticine of the required colors along the outline of the drawing.
Bullfinch in quilling technique
Quilling is an interesting and unusual technique of working with colored and white paper. This technique is used to make cards, appliques and crafts. You can also make a bullfinch this way.
To do this you need:
- Set of 5mm wide quilling paper strips;
- Paper stick;
- Glue;
- Scissors;
- White sheet of paper
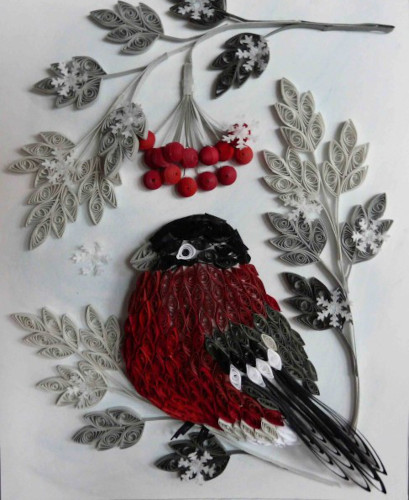
The work is carried out as follows:
- Using a stick, you need to roll up rolls from strips that are the right width for the bullfinch.
- You should start rolling with black strips of paper.
- Remove the roll from the stick and let it straighten out.
- To prevent it from unwinding, glue the end of the strip to the roll. Give the resulting roll the shape of a triangle, forming the bird's beak.
- For the head, roll 2 black rolls. Glue the end of the roll. Make it look like a crescent moon.
- Roll the 3rd roll into a drop shape and glue it as well.
- From 1 strip, make a curl at each end. Fix the curls with glue.
- Make another roll in the shape of a round drop.
- Roll a black oval roll.
- The last black roll should be made in the shape of a leaf.
- Form a head from black curls and glue it to the paper.
- Make another black curl - the body of the bullfinch. Glue it and add 2 rolls in the form of a crescent to it.
- Roll a wing out of black paper.
- Form 2 double-sided curls from a black strip of paper.
- Form a wing from black and white rolls in the shape of leaves. Glue them together.
- Roll up the bullfinch's chest from red paper strips. Make sure that the curls fit into the overall picture of the applique.
- Twist the bird's tail from white strips.
- Glue 2 black rolls to the white stripes in the tail.
- To make the drawing more realistic, you can add a tree branch made of green curls.
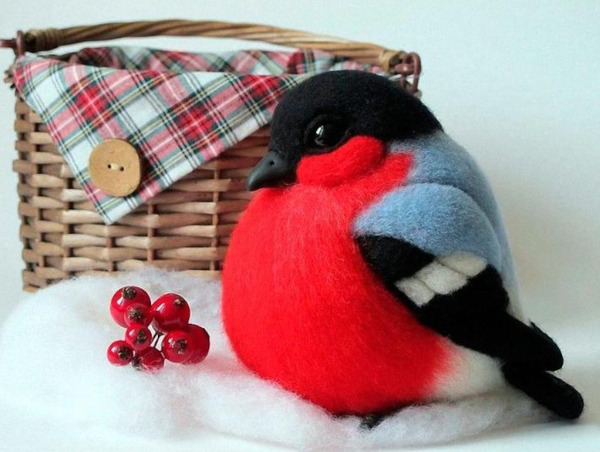
Bullfinch made of wool
Wool allows you to create a bullfinch, which can be hung on the tree as a New Year's decoration. For work, you need special wool for felting the corresponding colors, a thick board or any other support for work, a felting needle.
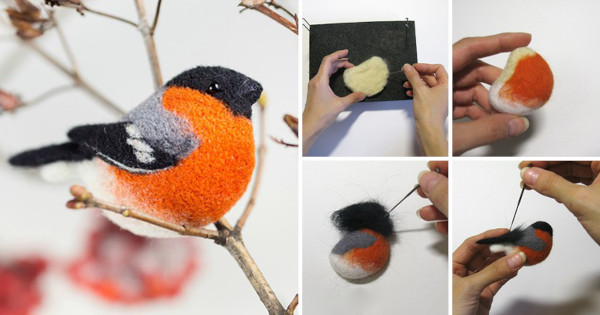
- Felt the bullfinch's body from wool. To make the wool take the shape of the bird's body, it is necessary to pierce the tuft of wool with a needle many times. Over time, it should harden.
- Use your hands to shape the ball of wool to match the bullfinch's body.
- Felt the wings from smaller bunches, add red color for the bullfinch's chest. To felt the part to the body, you need to carefully attach the part to the body and pierce the joint with the same felting needle until it becomes tight.
- Add eyes and a beak in the same way.
- The pupils can be made from beads.
- To hang the bullfinch on the Christmas tree, you can sew a ribbon onto it.
Using felting wool, you can make a flat wool painting.
To do this you will need:
- white, blue, black, gray, brown, red, lilac, green wool for felting;
- photo frame;
- scissors;
- interlining
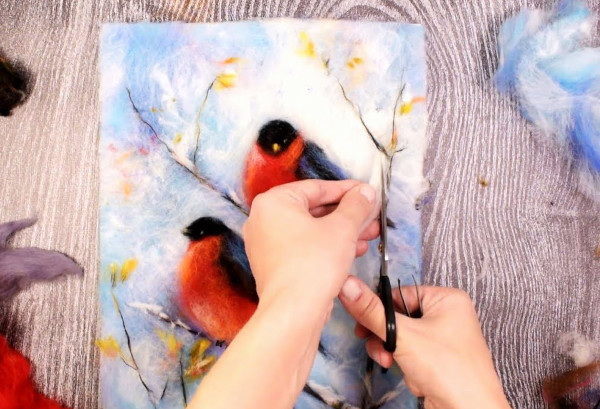
- On a fabric base (non-woven fabric), lay out thin strands of white and lilac wool.
- To even out the background, lay out white wool in thin strands.
- Forming pine branches, roll two bunches of brown wool into stripes. Place them on the picture.
- Lay out green wool to form a spruce branch.
- Add fir cones made from brown and grey wool to the green wool.
- Add black wool to the green tufts.
- Cut a tuft of red wool into a crescent shape, making it look like the body of a bullfinch.
- Place a grey strand on top of the bun.
- Make a bird's tail from a black strand.
- To form the wing, pull out the black and dark gray tufts of wool.
- Give the black tuft the shape of a wing and add grey fur on top.
- For the head, roll a ball of black wool.
- Place the head on the body, connect it to the body with small pieces of black wool.
- Make the eye from a small piece of white wool.
Thus, you can make a bullfinch with your own hands from almost any material. Depending on the age of the student, you can choose a more complex or simple master class. In addition, preschoolers are recommended to make a bullfinch together with adults.
Video about the craft Bullfinch
DIY felt bullfinches: