Experienced craftswomen are confident that this is not difficult knitting mittens with knitting needlesHowever, beginner knitters do not want to get involved with making this product because it is difficult to shape the thumb.
The thumb of the mitten can be knitted with knitting needles in various ways and patterns. A description of some is below in the article.
Methods of knitting the thumb
There are different ways to knit the thumb of a mitten with knitting needles.
Description of knitting features:
| Way | Peculiarities |
| 1 | 7 elements for the finger need to be decorated with contrasting yarn, then you need to return to the beginning of the material and continue creating the product. Then you need to unravel the contrasting yarn, picking up the loops from the bottom and top. If necessary, you can add 2-4 elements. The process of creating a finger is carried out on 16 loops. |
| 2 | The elements for the finger can be transferred to a pin, and the same number of dropped loops can be cast on the needle, continuing knitting. Afterwards, you can return to the finger and add 4 elements. The finger should be designed on 20 loops. |
| 3 | Moving from the cuff, it is permissible to add loops through the stitch into the center of the finger. |
| 4 | You can save 5 elements on a finger, and at the edges of them it is permissible to add loops through a line. In the absence of an ornament, elements are allowed to be added to each line. |
Thumb tying
It is possible to knit the thumb of a mitten with knitting needles in several ways using different numbers of knitting needles. This stage is considered one of the main moments in the design of the product.
On 2 needles
When the knitted elastic reaches the optimal height, you need to start shaping the main product to the base of the thumb. The height from the base to the elastic can vary within 3.5 cm.
Step-by-step process of registration:
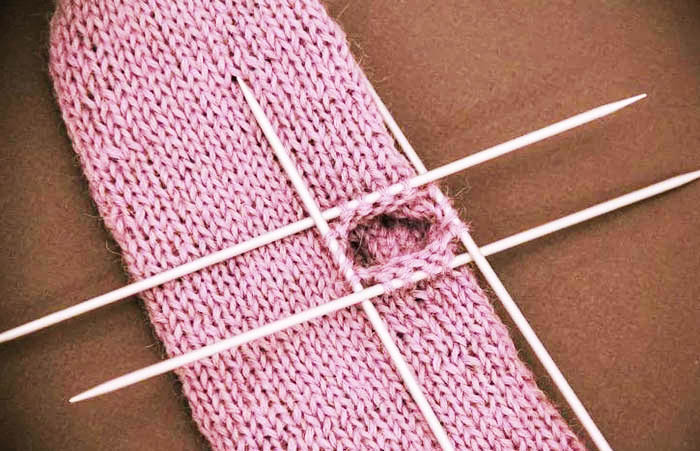
- On the 1st knitting needle, knit the loops completely. On the 2nd tool, form 5 loops, throwing them onto the 1st needle. Then form 6 loops that remain on the 2nd knitting needle, as well as 6 elements on the 3rd tool.
- Combine the 12 elements obtained on the 2nd tool to make it convenient to work. Start knitting the product in height only on the 2nd knitting needle. The length of the product should match the size of the thumb approximately to the center of the nail plate.
- To close the loops, initially close 1 element at the beginning and end of rows 1 and 2. Then close the remaining elements. As a result, you can achieve a neat toe near the finger of the mitten.
- Sew the knitted finger piece from the inside out, then turn it right side out and continue to design the main piece of the piece.
- When stretching the loops in the area where the finger meets the main fabric, holes may appear. To prevent this problem, pull the loops out of the gaps.
- Place the loops evenly on 4 knitting needles so that there are 8-9 elements on each tool. As a result, 34 loops should be created.
On 4 needles
The thumb of the mitten can be knitted on 4 knitting needles. This option is appropriate if the product is single-color or thick melange yarn was used. After making the elastic, it is necessary to add the same number of elements so that the width of the knitted item matches the width of the palm.
For example, initially there were 44 loops, then you need to add 2 elements on each tool. As a result, you should get 52 elements (there should be 13 loops on each knitting needle).
Step-by-step description of the work:
- To design a finger, prepare 2 pins. On the 1st tool, design 8 elements and move them to the pin. After that, the knitting process should be done in a circle.
- Knit the elements on the 2nd and 3rd tools. On the 4th needle, make 5 loops. Transfer the remaining 8 unknitted elements to a pin.
- Afterwards, you can begin to design the main fabric in a circle, evenly distributing the loops on 4 tools so that there are 9 elements on each needle.
- To prevent the formation of holes in the area where the fabric meets the finger, form a crossed element from the drawstring by knitting it with the next element.
- Afterwards, knit the product to the top, closing the loops using any convenient method.
- Transfer the pin elements evenly to 4 tools. To avoid holes in the mitten where the finger joins the main fabric, make crossed loops from the broaches. In this case, create 4 elements from the broaches.
- When distributing the loops, there should be 5 elements on each tool. Continue shaping the part on 4 knitting needles approximately to the middle of the fingernail.
- To decrease the loops on the finger, at the beginning of the 1st and 3rd tools, and also at the end of the 2nd and 4th knitting needle, knit 2 elements together. Perform a similar decrease in the following rows. Close the last 2 elements that remain.
On 5 needles
Knitting the thumb of a mitten with 5 knitting needles is acceptable if you need to create a relief pattern or design on the product on each side.
Once the cuff and several rows near the base of the thumb are formed, you can begin creating this part itself. There should be 40 loops in total (each tool should have 10 elements).
Step by step instructions for creating the left thumb:
- To make a finger hole, knit the elements on 3 knitting needles. On the 4th tool, make only 1 loop.
- On the tool dial 8 crossed elements.
- Transfer 8 elements on the 4th tool to the pin, and knit the remaining 1 element.
- As a result, a hole for the finger will be created between the elements located on the pin and the 2nd tool. On the 2nd knitting needle there should be 10 elements, including 8 crossed ones.
- Create face loops with circular knitting to the top of the product. Close the top of the fabric using any convenient method.
- To knit a finger, remove the loops from the pin, distributing them evenly between the 2 tools. There should be 4 elements on each needle.
- From the opposite edge, make 8 crossed elements, placing 4 pieces on 2 tools.
- To prevent holes from appearing in the product from the sides, knit elements with crossed yarn overs from the broaches. As a result, additional elements should be created, which should be evenly distributed on the tools. The total number is 20 loops, 5 elements on each needle.
- After each row, decrease by 2 elements twice, so that 18 loops remain. From now on, knitting should be circular.
- Thanks to the auxiliary elements from the stretchers, there will be no holes in the canvas.
- The height of the finger should reach the center of the nail plate, then you can start decreasing to create the top. In this case, at the beginning of the 1st and at the end of the 2nd tool, knit 2 elements together. Then turn the canvas over and continue working according to a similar pattern.
When shaping the right finger, the hole for this part must be made on the 3rd knitting game. Otherwise, all the actions will be identical, as for the left mitten.
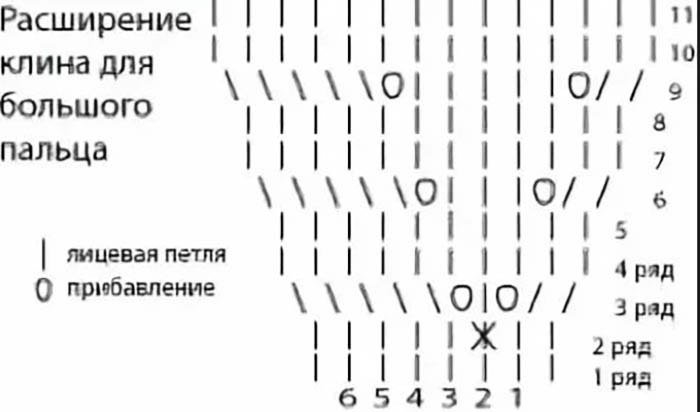
With the help of a small wedge
The design of a small wedge is required if thin or not thick yarn is used to create the thumb. This detail is also called a raglan thumb.
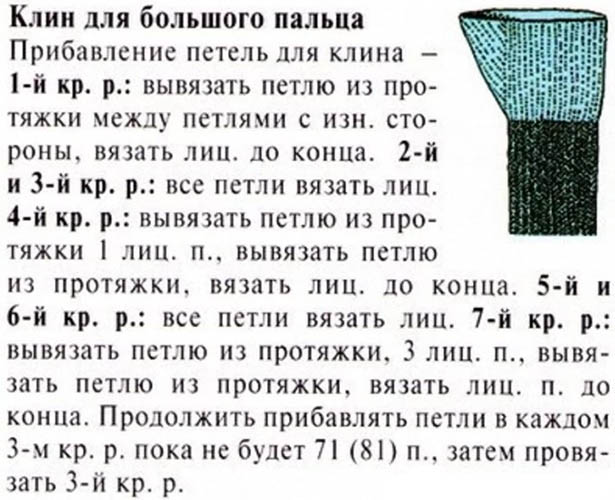
When shaping a finger on 5 knitting needles, it is necessary to create a small wedge to increase the width of the product in the area where the finger will be located. Due to this, the item will fit well to the hand, without restricting the movement of the thumb.
Step by step description:
- On the tool perform a set of 41 loops. 1 element allows you to close the row into a ring. Design the cuff of the product and create 3 rows of the desired ornament.
- To make a wedge, design the elements on the 1st and 2nd tools on the right product. On the 3rd knitting needle, perform a crossed yarn over and 1 front element, then 1 crossed yarn over. Additionally, knit the remaining loops. Then knit the elements on the 4th tool.
- Make 2 circles and make an increase on the 3rd needle in the form of a crossed yarn over, 3 knits and a crossed yarn over. Then make 2 rings according to the given pattern.
- Increase again on the 3rd tool by knitting a crossed yarn over, 5 knits and 1 crossed yarn over. Then make 2 rings without increasing.
- On the 3rd knitting needle, make the final increase in the form of a crossed yarn over, 7 knit elements and 1 crossed yarn over. Again, make 2 circles so that 9 elements belong to the wedge.
- 9 elements are thrown onto 1-2 pins. On the 3rd tool, restore 7 elements in the form of crossed throws.
- Knit 2 rows. Then start decreasing the collected elements to smoothly move to the original width of the product. Decrease through the line by 2 elements.
- In this case, at the beginning of the 3rd needle, form 2 elements together, after 7 front and 2 loops together, continuing to work according to the given pattern. In the future, create a row without decreasing.
- Decrease again by knitting 2 elements together, then 5 knit stitches and 2 loops together. Decrease again through the next row.
- Continue decreasing until there is 1 element left from the wedge. After that, you can begin to shape the product in height.
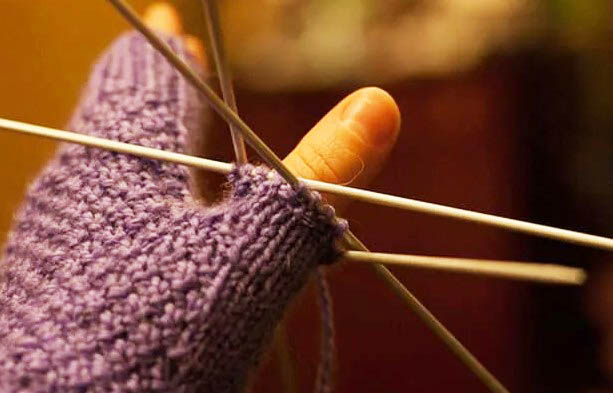
- To create a finger, transfer the elements on the pin to 2 tools. From the other end, pick up the elements on 2 other needles.
- To avoid holes in the fabric where the thumb will join the main piece, knit 2 elements from the gaps. As a result, there should be 5 elements on the tools.
- When knitting the finger, the height should reach the center of the nail. Then decrease by 2 elements, knitting together from each end.
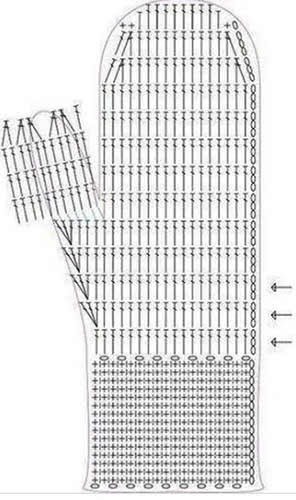
With the help of a large wedge
It is permissible to knit the thumb of the mitten with knitting needles using a large wedge. This method promotes a high-quality fit, because the parts of the product will be anatomically positioned. The method is appropriate when using fluffy and thick thread material. Often the wedge needs to be designed on the palm, so a pattern in this area is not required.
Step by step description:
- After finishing the cuff design, make a few lines. Then move on to creating the wedge.
- To do this, each tool must have 11 elements. For the wedge, 14 loops are required, which then need to be transferred to knitting needles to form the finger. In this regard, for the main fabric, it will be necessary to restore 14 elements, which can be added 1 piece per 14 lines.
- The wedge is created in the center of the palm of the product. To do this, knit the elements of the 1st tool without changes. Increases will have to be created on the 2nd needle for the right product. In this regard, on the 2nd tool, make 3 elements, then knit 2 front loops from 4. Make the remaining parts on the 2nd needle front. On the 3rd and 4th tools, design the loops without changes.
- Design a new row in the same way. To do this, design the front elements on the 1st, 3rd and 4th tools without changes. On the 2nd needle, make the first 3 loops front, out of 4 - knit 2 front elements. The remaining loops should be front.
- Increase in 14 rows to obtain 14 additional elements.
- Transfer the elements for the wedge to the pins. Then, using circular knitting, design the main fabric, equally placing the elements on 4 tools so that there are 11 loops on each needle.
- To create a finger, evenly transfer the loops from the pin to 4 knitting needles. From the gaps in the area where the finger joins the main fabric, make crossed elements. As a result, there should be 5 loops on each tool.
- Knit the finger on 4 needles to the center of the nail plate. Then close the elements of this part using the same decrease.
With saving of the drawing
This method allows you to save the ornament on the thumb. To do this, it is enough to use 2 knitting needles instead of 4, if the number of loops is minimal.
Step by step instructions:
- After finishing the cuff design, create the same number of auxiliary loops for a high-quality fit of the palm. Knit the finger in height. To do this, make 10 elements on 1 tool.
- Turn the fabric and decorate the created loops with purl elements. Knit to the center of the nail plate of the thumb.
- Then decrease by 1 element at the beginning of the front and back sides. You can decrease up to 4 elements.
- Perform the restoration of 10 loops and an increase, making 2 crossed yarn overs at the beginning and end of the line. Similarly, knit through the line. Then make the finger to the optimal length.
- Having formed the finger, continue knitting the product in a circle. To do this, on the 1st tool, knit 10 elements that were required for the finger, then knit the remaining 3 parts.
- In the future, knit in a circle on 4 needles. Then fold the finger in half and stitch on each side.
There are many different ways to shape a thumb with knitting needles. When knitting mittens, you need to strictly follow the instructions and pattern to get a beautiful product. To create a finger, you can use 2, 4 or 5 knitting needles. Everyone will find the option that suits them best.
Video about knitting