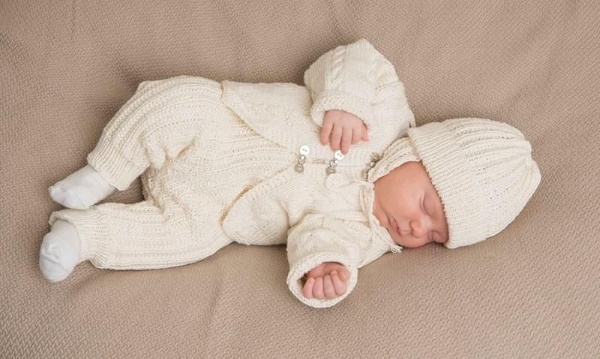
Knitted suits will become essential clothing for newborns, born in the cold season, and will also come in handy on cool summer evenings. The expectant mother can independently and lovingly create a comfortable, original and high-quality thing of any model and color.
Features of knitting a newborn costume and what you will need
DIY newborn costumes are made taking into account some features:
- The product is knitted or crocheted. The first option produces a smoother fabric, while the second option involves openwork or patterned weaving.
- Before sewing the overalls, all the parts must be steamed, it is recommended to start the assembly from the shoulder cuts. Then move on to the sides, sleeves and pants.
- Miniature costumes can be one-piece or consist of several items: pants, a blouse, a beret or a hat, and booties.
- Beginner needlewomen are better off choosing a simple style without complex designs.
- The baby grows quickly, so it is advisable to make a larger suit.
- Knitted items should be dried horizontally to avoid deformation.
- Clothes for the smallest children differ depending on gender only in color and the placement of the fastener.
The following materials will be required for the work:
- yarn:
| Name | Peculiarities |
| Natural | |
| Wool | Very warm, the best option is merino threads. |
| Cotton | Suitable for off-season or summer items, wrinkle-resistant, hypoallergenic and wear-resistant. |
| Flax | Hypoallergenic, shrinkage resistant, suitable for summer wear. |
| Silk | Soft, warms well, does not wrinkle or roll. |
| Artificial | |
| Acrylic | Elastic, soft, hypoallergenic. |
| Viscose | It resembles cotton, but the thread is less durable and more hygroscopic. |
| Microfiber | It warms well, breathes, does not tolerate high temperatures well, and loses its useful properties after wearing. |
| Plush | Soft fluffy polyester, lightweight, slightly breathable. |
- knitting needles (ring or hosiery) and a hook. They are selected depending on the thickness of the thread;
- fittings in the form of fasteners, hooks, buttons;
- decorative elements (thermal applications or ribbons);
- centimeter;
- scissors;
- ruler.
Choosing a model of overalls for newborns
Costumes knitted for newborns must meet certain parameters:
- The model should be knitted with the seams facing outward to prevent irritation and chafing on delicate baby skin;
- for work, yarn is selected depending on the season: for summer - cotton or linen, and for winter - natural wool fibers;
- To make it easier to dress and undress the child, it is advisable to make many fasteners. They are placed along the front of the suit, so as not to pull the thing over the head or in the lower half between the legs, so you do not have to put the child's legs through;
- The fasteners should be placed on the front panel. This is due to the fact that the baby spends a lot of time lying down, and hard objects will cause discomfort;
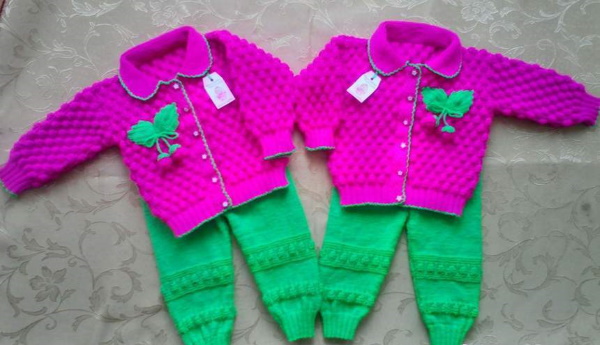
- for girls, pastel shades (pink, coral or lilac) are suitable, and for boys, green, blue or purple tones. Universal colors are gray, white or beige;
- The yarn should be delicate, hypoallergenic and soft to prevent skin irritation;
- the model should be loose and not restrict the baby’s movements;
- It is not recommended to decorate the product with a large number of bows or ruffles;
- for the summer version of the product, it is better to use thin openwork inserts or take knitting needles 1-2 sizes larger, so that the item turns out airy. For winter, you need to choose a dense weave or jacquard patterns;
- Summer models are sleeveless and have cropped pants, while warm overalls include closed rompers or booties, as well as a hood;
- the lower half of the product does not need to be narrowed, but space needs to be left for the diaper;
- It is advisable to choose practical and easy-to-use models so that they do not irritate the child and his mother when dressing.
Openwork jumpsuit
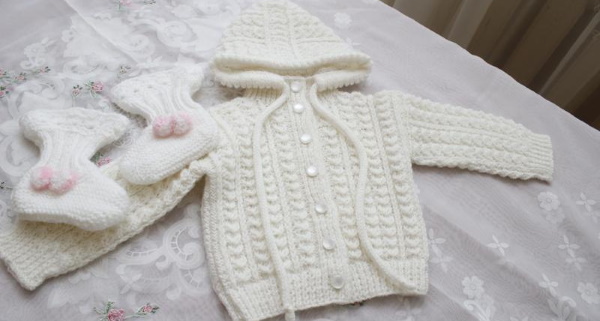
Newborn suits in the form of a transformer can be knitted with an openwork pattern.
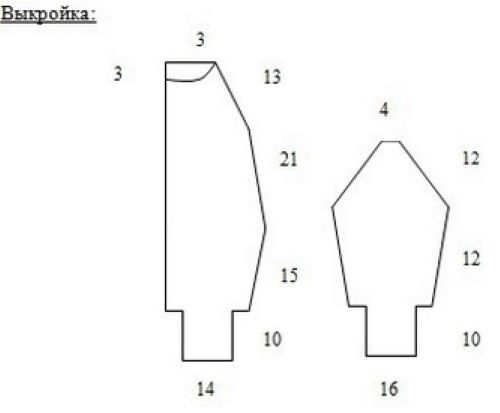
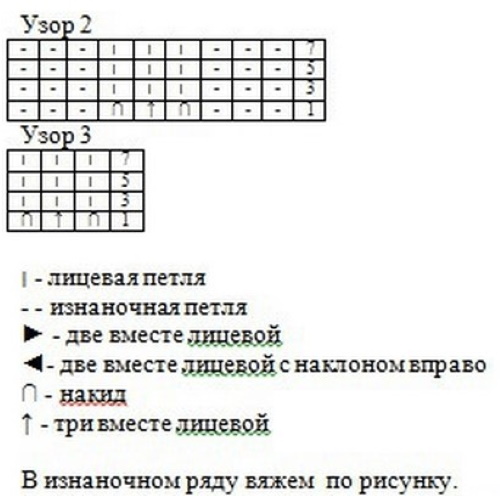
Pattern and designs included:

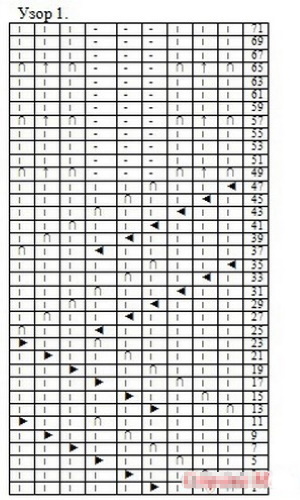
The product requires 200 g of acrylic or semi-woolen threads, 5 buttons and ring knitting needles No. 2.5. Knitting density: a 10x10 sample consists of 31 sts and 42 rows. The model is knitted with a 3x3 elastic band, fantasy motif No. 1, as well as patterns No. 2 and 3.
First, make the back half. For the trouser leg, cast on 44 sts and knit 10 cm with a rib pattern.
Next, you should follow this scheme:
| How many loops | Peculiarities |
| 1 | Edge |
| 3 | Purl p. |
| 9 | Pattern #2 |
| 9 | Motive No. 1 |
| 9 | |
| 3 | Purl p. |
| 1 | Edge |
The order of registration is as follows:
- After 4 rows from the right edge add 15x1 st. You will get 59 sts. Knit the added links with the purl fabric.
- After walking 15 cm, put the work aside.
- Design the left leg in the same way as the right part, only in mirror image.
- Next, connect both connected halves, adding 1 st between them (= 119 sts). Then knit the 9 central cells with motif No. 2.
- At the same time, on both sides, decrease 5 rows in each. 18x1 st. 83 sts will remain.
- After passing 21 cm from the step, knit the loops using pattern No. 2, and continue knitting the snares, which were decorated with ornament No. 1, according to the same pattern, but from rows 49 to 71. In row 1, decrease 12 sts evenly (= 71 sts). After this, after 2 rows, remove the arches for the armhole: 23x1 = 25 sts.
- At a height of 12 cm from the edge of the armhole, set aside the remaining 25 sts.
- The front panel is woven in the same way as the back. At a distance of 3 cm from the step point, reduce the central 7 sts, after which the parts are knitted separately.
- Having passed 21 cm from the step, perform 5 decreases on each part, the armhole is created as on the back panel.
- After 10 cm from the edge of the armhole, make reductions for the neck: 1x5 sts, 1x2 sts and 1x1 st. After knitting another 3 cm, there will be 1 st on each half.
- For the sleeve, string 53 sts and knit with a 10 cm elastic band. Then knit the front cells according to pattern No. 3, and purl sts without changes. After 2 rows, add 7x1 st (= 67 sts), attaching the links to the pattern. At a distance of 12 cm from the beginning of the motif, in each 2 rows, close 25x1 st (= 17 sts), also involving them in the pattern. Put the remaining arches aside.
- Making a hood. Sew the armhole edges, distribute the remaining cells on circular knitting needles, then additionally string 20 sts along the edge of the neck onto the tool and knit with an elastic band (= 101 sts). You should adhere to the following pattern: 9 sts first with pattern No. 1, then No. 2 and again No. 1. After going 17 cm, finish the work.
- Make open seams - step, side, sleeves, then sew the hood, fold it in half.
- For the fastener along the edge of the front and hood, cast on 279 sts and knit 3 cm with an elastic band, leaving openings for buttons.
- Sew on the fittings and edges of the fastener.
- Finally, steam the product.
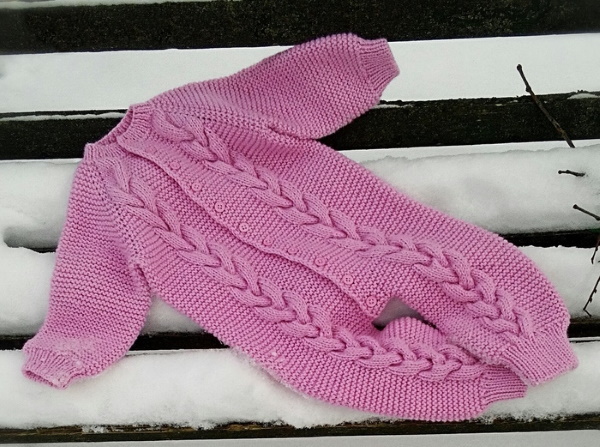
With braids
Costumes for newborns are knitted with the addition of lush braids.
For a product for ages 1/6/12/18 months, you will need acrylic yarn (100 g - 330 m) in the amount of 300/300/350/400 g, as well as knitting needles No. 3.5 and 4.5.

Knitting density: 10 cm consists of 16 sts in 2 threads in garter stitch. In a cord of 12 sts – 5 cm.
Registration procedure:
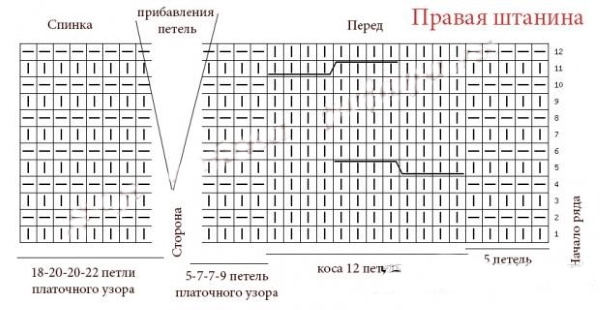
- For the right leg, make a set of 36/40/40/44 sts with knitting needles No. 3.5, connect them into a ring line and knit with an elastic band (2x2) 10 tiers.
- Next, switch to thicker needles and make additions for the braid: 5 knit sts (1 knit st, knit the cell twice) – 8 times, 5/7/7/9 knit sts, place marker, 18/20/20/22 knit sts. You will get 40/44/44/48 sts.
- Continue working according to the pattern from level 2. Then knit rows 1-12 according to the pattern.
- At the same time, to expand the piece, add 1 st on both sides of the marker at 6/5.5/4.5/4 cm – 1/2/4/4 times. There will be 42/48/52/56 sts.
- After passing 16/20/23/26 cm, add edge arches at the beginning and end of the tier = 44/50/54/58 sts.
- Weave straight and back lines according to the pattern for another 2 cm. Put the work aside.
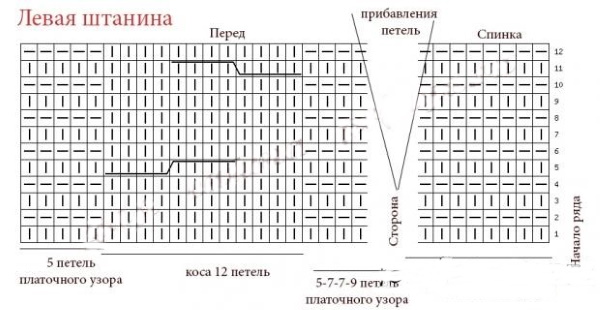
- Design the left leg symmetrically to the right piece.
- Next, you need to create the back and front panels. The edge snares are knitted together 2 sts, you will get 1 additional link in the center of the shelf and back. The beginning of the level will be in the middle of the front piece.
- Transfer the edge arch located in the center of the shelf to the right half and additionally string 5/5/6/6 sts to create a strip. You will get 11/11/12/12 sts after the cord. Add 1 st more to the right part of the front panel (which means 6/6/7/7 new links for the strip). As a result, 97/109/119/127 sts will be formed.
- Continue knitting all loops together in turning rows.
- Make 6/7/8/8 buttonholes on the left or right shelf (depending on who it is for: a girl or a boy). To do this, reduce 2 sts in the right place and create 2 new arches in their place. Make the 1st hole 2 cm from the joint, the rest 5 cm from the previous opening.
- It is not necessary to lift the back of a 1-month-old baby.
At a distance of 8/12/17/18 cm, divide the fabric as in the lifting diagram using 4 markers using the following method:
| Marking No. | After how many loops |
| 1 | 23/25/27/28 |
| 2 | 12/14/16/18 |
| 3 | 37/31/33/35 |
| 4 | 23/25/27/28 |
The knitting is done according to the pattern.
Next:
- Weave shortened tiers from the beginning to the 3rd marker, turn and work to the 2nd mark, turn again and work to the 4th mark, then shape the turned row to the 1st mark. At the end, turn the work over and weave to the end of the tier.
- After going through 15/19/25/27 sts, divide the product into the right side (29/32/35/37 sts), the back (39/45/49/53 sts) and the left half of the front (29/32/35/37 sts).
- Knit the parts separately to a height of 12/13/14/14 cm, while on the back panel do 1 row more.
- At the same time, on the shelves in the last row, make reductions above the braid links (1 front st, 2 together front sts) – 4 times. On each rod there will be 25/28/31/33 sts left.
- Using a needle, complete 12/12/13/14 sts on both sides of the back with the adjacent shelf to form the shoulder.
- Leave the remainder (41/53/59/63 sts) for the hood.
- For the sleeves, pick up 36/40/44/44 sts along the armhole edge and knit with garter stitch in a circle to a height of 14/15/18/21 sts.
- Next, transfer the work to rods No. 3.5 and decorate with a 3.5 cm elastic band. Knit the second sleeve in the same way.
- For the hood, add 1 st in the middle of the back and you will have 42/54/60/64 sts.
- Place marker in center = 27/27/30/32 sts on each edge.
- Continue working with garter stitch, adding 1 st on both sides of the marking at a height of 2 cm.

- Then repeat the additions every 3.5 cm until the distance is 21/23/25/27 cm.
- Divide the links into 2 segments, then close them by sewing the edge of the hood.
- Connect the slit on the trousers.
Delicate suit for newborns for discharge
Suits for newborns up to 3 months are suitable for discharge. To make a set consisting of a sweater and pants, you will need 400 g of multi-colored yarn, as well as knitting needles No. 3 and 4. For the summer version, it is recommended to take cotton or linen, and for the winter - acrylic or natural wool threads.
The blouse includes 2 weaving methods:
- Elastic band - alternating 1 front st and 1 back st.
- Face jersey.
Knitting density: in a 10x10 cm sample, 28 rows are knitted on 20 cells.
Step-by-step design:
- For the back, cast on 60 sts using knitting needles #3, then knit with a 2 cm rib pattern.
- Then transfer the work to thicker knitting needles and knit to the end with the front panel (about 30 cm). At the same time, after 3 cm, change the shade of the threads. At the end, close all the cells in 1 step.
- For the shelf, string 30 sts on thin rods and weave an elastic band the same height as on the back. Further knitting will be done with the front surface on knitting needles No. 4. Having passed 27 cm, begin to shape the neck. To do this, from the 1st side, close 2x3 sts, 2x2 sts, and 2x1 st. Having reached a distance of 30 cm from the bottom, close all the links. During weaving, alternate colors in the same way as on the back half.
- Make the second shelf in mirror image.
- To create a sleeve, cast on 36 sts on knitting rods #3 and knit 2 cm with a rib. Then transfer the work to a thicker tool and knit with the front jersey to the end - 17 cm. It is necessary to alternate threads of different colors, and to expand the part, make increases on both sides by 1 st every 6 rows. At the end, reduce all the loops at once.
- Before you start making the hood, you need to sew the shoulder sections, then cast on 48 sts along the edge of the neck on the section of the shelf and half of the back. Make the detail with the front jersey, alternating shades. Every 6 rows, add 1 st from the right edge. Knit 22 cm and start making the other side. It is made in the same way as the previous one. After making the 2nd part, connect both halves of the hood with a loop-to-loop seam.
- Next, assemble and steam all the parts. Then you need to sew the side cuts, stitch the sleeves and sew them to the main product. Along the edge of the sweater and hood, weave an elastic band on knitting needles No. 3, 2 cm wide. Finally, sew in a zipper.
- To make the pants, thread 50 sts onto knitting needles No. 3 and knit 2 cm with an elastic band. Then transfer the work to rods No. 4 and knit with the front surface, alternating shades.
- To widen the leg, add 1 st in each 5 rows on both sides. Knit 20 cm in this way, then reduce the links for the inseam on both edges: 1x 3 sts, 2x2 sts, 2x1 st. Then knit another 15 cm and finish the work in one go. Knit the second part in the same way.
- Steam the blanks, sew the side cuts, turn the top of the pants slightly inside out and sew, pull the elastic through the resulting drawstring.
Costume decoration options
Knitted suits are made not only for practical purposes, but also for photo shoots.
In this case, clothing is presented in the form of:
- any fairy-tale character (gnome, fairy, Cinderella);
- berries or fruits. For example, a strawberry, an orange or an apple;
- costumes from cartoons (Mickey Mouse, Luntik, Smeshariki, superhero);
- various little animals. It could be a bunny, a bear cub, a fox or a kitten.
You should choose the decor for the newborn's jumpsuit carefully. At this age, the baby lies down a lot, so the elements should not cause discomfort. It is not advisable to sew on elements such as pendants, cords, beads, small plastic parts and buttons, because the child pulls everything into his mouth.
Clothing decoration options:
- embroidery will highlight the beauty of the item and add brightness to it. At the same time, it will not come off and will not cause inconvenience;
- beads or seed beads are used only during the formation of the canvas. Here it is recommended to add small elements;
- lace is sewn on both ready-made and hand-made using a crochet hook. Hand-made lace is stronger and looks harmonious;
- appliques woven from plain yarn or silk threads;
- knitted cords, braids, relief patterns.
All decorative elements should be firmly sewn and placed in places inaccessible to the child. Handmade items for newborns are always appreciated because thanks to them, the baby will look stylish and fashionable.
Knitted suits will create coziness and comfort for the child and will be relevant at any time. Self-made clothes provide an opportunity for self-expression and give a reason for pride.
Video about making costumes for newborns
Beautiful suit for a newborn, knitted: