The forest space is filled with branches, snags and tree crowns, so It's quite difficult to draw such a landscapeWith basic knowledge and drawing techniques, you can try to create an image with a pencil, but there are other nuances when working with paints.
It is not forbidden to use improvised elements in the work to create a crown or small leaves, but artists do not resort to such tricks, completing the painting exclusively with a pencil, brush or palette knife.
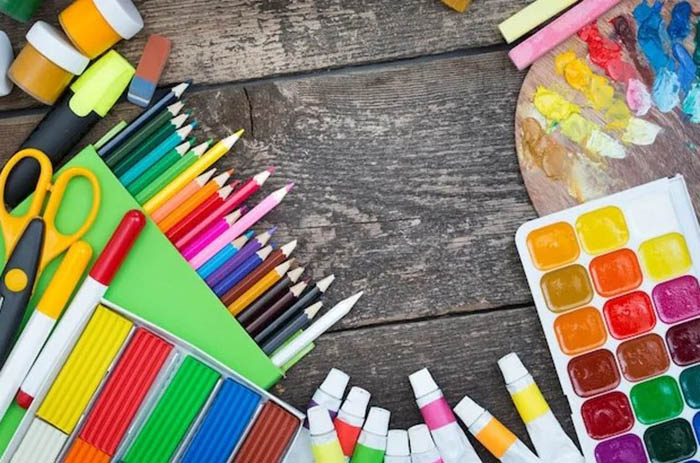
What you need for drawing
You can draw a forest (forest landscape) using pencil technique using:
- pencils;
- graphite pencils (plain and colored);
- charcoal pencil;
- pastel pencils (matte);
- A4 paper.
The paper can be office grade, which has a standard density, as well as matte coated, which has increased strength. However, it is worth remembering that such sheets do not like an eraser; a blade will be needed to erase a pencil. The paper density is 200 g/m2.
For the master class on painting a forest with gouache and paints you will need:
- torchon paper for gouache;
- French paper smooth for paints with a density of up to 300 g / m2;
- fine-grained paper with neutral pH acidity is suitable for liquid paints;
- acrylic paints with translucent texture;
- gouache paints (poster or art paints, acrylic paints are not suitable);
- sable or squirrel brushes for gouache;
- For other paints, any flat, round, retouching or flute brushes are suitable.
From a wide range of paints, you can choose both oil and tempera. They are ideal for painting forests. The latter can be acrylic-based. These are not always suitable for covering dark areas. Casein-oil and PVA paints dry well, and wax-oil-based ones will dry as long as oil paints.
Master classes
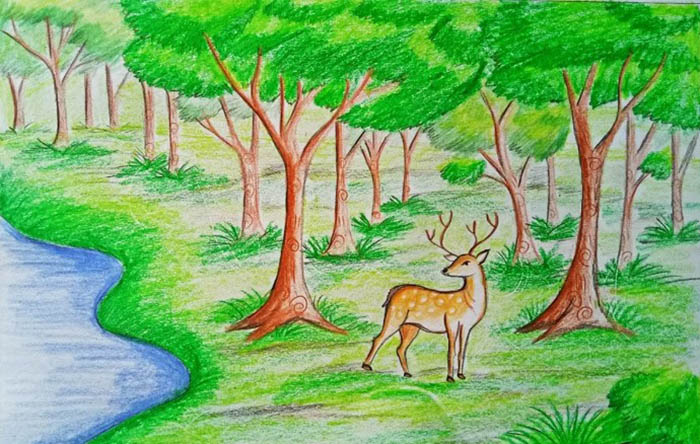
Drawing a forest and nature is probably one of the main desires of children who have ever attended a school art lesson or an art gallery. Everyone has different skills, but a forest in a landscape should be drawn using pencil or paint.
It is not recommended to give children watercolors or simple stationery pencils for drawing. From early childhood, it is worth accustoming the child to the correct use of tools and the ability to use them, distinguishing types of paper, paint composition and features of working with brushes.
To create a forest landscape it is important to remember basic rules that apply to pencil technique and working with any paints:
- Trunks and branches do not have ideal proportions either in nature or in drawing.
- The unevenness and curves of the trees in the mass are subject to linear and aerial perspectives.
- Large trunks will always be in the foreground.
- Tall trees in the foreground may extend beyond the edges of the sheet.
- Even the tallest trees will appear smaller in the distance than those that are close by.
- Individual snags and branches need to be generalized. The tree crown needs to be highlighted only in the mass.
- Nature is dynamic, there are no identical trees or sizes.
- The tree is based on a cylinder. Understanding geometric shapes at the elementary school level is a big plus when working with landscapes.
It is not worth working with light and shadow in these master classes, since the shapes of leaves and tree crowns in mass are quite difficult for a child to project. Therefore, it will be better if the young artist learns to draw with shades of paints and pencils of different types before he is able to feel the stratification of the overall picture into geometric layers before applying the first brush stroke.
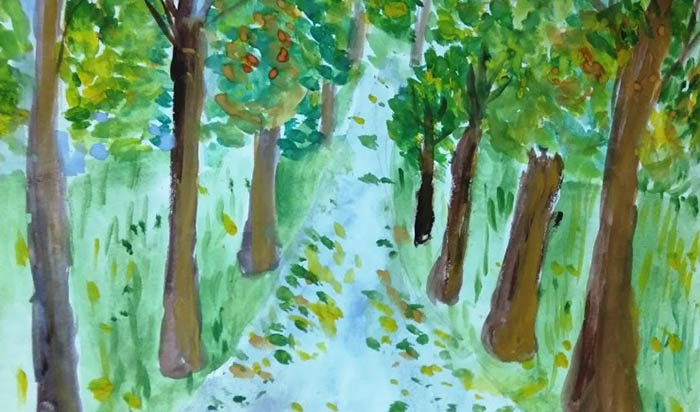
In pencil technique
To work in pencil technique, you will need 2H, HB and 2B pencils. You can take 4B or 6B to draw the trees in detail. It is better to choose a vinyl eraser, which does not scratch the paper. It should be, in turn, cold-pressed with a density of 90 lb. Watercolor paper will also do.
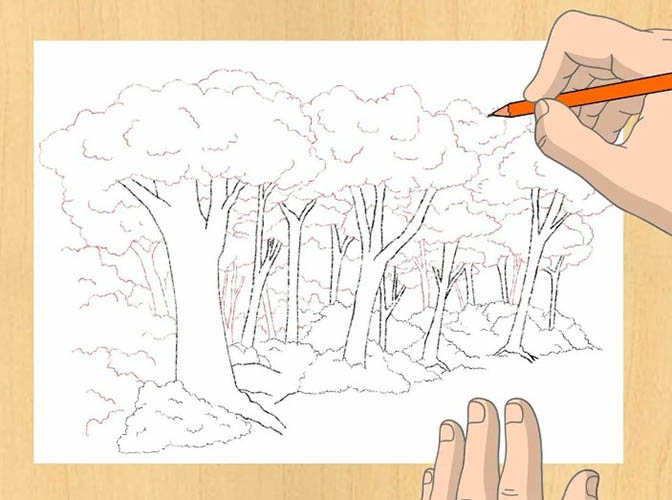
To plan and create a composition, you need to follow these steps:
- It is necessary to determine the center of the drawing. This can be the middle of the sheet in linear perspective or slightly above the middle (2/3 of the sheet).
- The foreground (up to the horizon line) will consist of 7-8 trees.
- The background is made up of trees that form a forest.
- Geometric perspectives are interesting in that small details in the distance are not drawn, but form a single spot.
- Use a pencil to outline the ovals that will serve as the base for each tree.
- Beyond the horizon line, you need to draw horizontal lines that go into the distance.
- Along the diagonal lines there will be a forest that will close the vanishing lines at the center point of the sheet.
- The distant trees in the forest will always look lighter, so you can use a pencil to slightly darken the areas near the outline.
- There is no need to draw, but you can add strokes as darkening. To do this, you need to shade the side sections of the forest with a pencil, and highlight the center with light outlines.
- The nearby trees should form a dense forest. To do this, it is necessary to create depth and saturation.
- From the previously drawn ovals, lines should be drawn upwards by hand. These will be the areas of the forest that are closest to the observer.
- The forest nearby needs to be darkened, you can shade the trees and mark the boundaries of each tree with a charcoal pencil.
- The forest in the central part of the drawing is already visible in full size, the crowns without outlines give the feeling of complete coverage of the space.
- You can use a graphite pencil to mark the lines of trees that are visible (one shows up from behind the other), and use a charcoal pencil to highlight the bases. The further away the forest, the less pressure you apply on the pencil.
- The shadows and highlights are brighter in the forest area that is closer. The contrast is noticeable here.
- On one side the forest is darkened, so these areas need to be painted over with strokes.
- From the largest focal tree, you need to draw the edges of the nearest trees on one side, where the sun does not reach.
- The crown of the forest is formed by all the trees, so intuitively the part will be darker. The one that is closest will be the most retouched with a simple pencil.
- The forest, as we know, also has textures that fill the drawing with life. For this, you can add light sketches of the outlines of the leaves. In a heap, they look like wavy lines of varying lightness.
- Taking the pencil at an angle (closer to the horizontal surface), you need to try to draw lines with the side flat part of the lead. This will allow you to get a sloppy thick layer that will look like a layer of earth.
- Without pressing down on the thin pencil lead, you can make several circular movements in the foliage area. In volume, the forest will look tangled and dense.
Drawing a forest is not difficult at all, and a child can work on individual areas with his fingers. For example, shade the background of the drawing to blur the clarity of the pencil line. This will allow you to darken or lighten distant areas, smoothly moving from one area to another. If the landscape is illuminated by the sun, you can add shadows using a thick graphite pencil.
By combining strokes and curls, you can add grass, greenery and other vegetation to the drawing. When finished, you can draw branches growing downwards. With a charcoal pencil, you will get thin and clear lines.
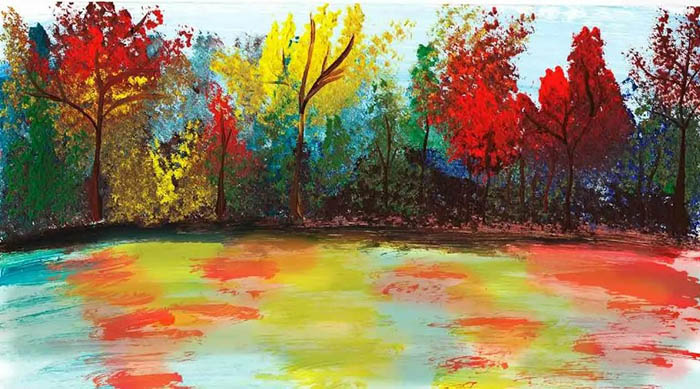
Forest landscape in gouache
To work with paints, poster or artistic gouache, a regular brush and a thick sheet of paper are suitable. Since gouache does not have high fluidity and requires less water than watercolor, 100 ml of liquid in a glass is enough.
You will also need a rag to blot the brush:
- On the sheet you need to create a background on which the forest will be located.
- You need to take red gouache and shade it in the upper part of the sheet, without reaching the horizon line.
- You can apply blue on top of the resulting pink, mixing them to create a sunset effect.
- Gouache is good because light colors cover dark and bright ones. To create a lighter background tone, you can wet the brush in water and pick up a little white. It should be shaded, mixing with red and blue colors.
- The resulting light haze imitates the sunset background.
- On the horizon line, the red color becomes more intense. Therefore, it is necessary to outline a semicircle to reflect the outlines of the sun rays. They become more saturated.
- Using red gouache, apply strokes in the center of the sheet, creating a smooth gradient from light pink to dark red.
- Periodically, you need to pick up some white color with a brush to dilute the dense red shades.
- Next, apply yellow below the red and slightly above it, going down to the horizon line.
- The resulting orange color should be drawn in a gradient to yellow, gradually leaving only one shade closer to the bottom edge of the paper.
- Once the background is drawn, you can start drawing the forest.
- To do this, you need to draw a "smile" with black gouache. From the right and left edges of the sheet, draw hills that go down to the center of the sheet and connect slightly above the bottom edge. Such a black depression will imitate the horizon.
- In the middle of the hollow, you need to draw a circle with white gouache. It will be translucent, slightly tinted with a yellowish color.
- After wetting the brush in water, you need to shade and smear the edges of the circle, connecting the color with the neighboring yellow. You will get a fuzzy round spot.
- Next, on the left, you need to draw a vertical stripe with black gouache. This will be the beginning of the forest. On the vertical line, you need to make horizontal strokes, scribbling, showing the width of the forest tree. From the top to the bottom, the strokes will slightly widen.
- The same spruce trees need to be drawn next to the first one. The same can be done on the other side of the sheet.
- In the middle of the hollow, you need to draw the same fir trees, but smaller. Above them, put black check marks, imitating birds.
You can paint a dense forest with gouache against the backdrop of sunrise. Then the fir trees should be painted against the backdrop of a bright orange sun with red spots.
In this master class, we get a linear perspective, where a forest is depicted, going into the distance. The hollow on the black background is not a ravine or an elevation in the plane. It will be easier for a child to draw perspective using geometric shapes.
With paints
From the rich assortment of paints, acrylic ones are suitable for children, which are the easiest to paint a forest with. A master class on painting a forest with a palette knife and oil paints will also be described.
Stages of drawing:
- Acrylic paints dry quickly, which is very convenient when applying several layers. To create a forest composition, you first need to make a background.
- To create a winter forest in the distance, cool shades of blue, purple and lilac are suitable.
- On the horizon line, you need to mark the beginning of the forest. To do this, take a blue paint with a brush and slightly moisten it with water.
- You get a rich blue stripe. From there, you need to make strokes upwards using a brush without paint.
- From the horizon line, you also need to draw lines of gray color. You need to take a little black paint with a brush and shade it on the wet paper.
- Using small purple strokes, you need to draw circles and dots chaotically. This will give the forest depth, and since it is located far away, it will turn out voluminous and dense.
- You can use a lilac shade to make the edge of the forest top by brushing it over the leaf and blending the clear lines.
- Below the horizon line there is snow. But in some places it is not illuminated by the sun, and sometimes it looks bluish. To create this effect, you can take a damp brush with blue color, slightly moisten the brush and wipe it on a napkin or rag.
- With almost washed-out blue color you need to mark out areas, draw chaotic figures. You will get snow in snowdrifts, which has a shade.
- Winter skies tend to show fuzzy, blurry cloud remnants, haze, and hints of inclement weather. To create this effect, you'll need yellow, gray, and blue tones.
- You need to draw clouds in blue.
- Use a gray shade of paint to outline the contours of the clouds so that they appear blurry.
- Using a yellow shade, you need to draw stripes and spots under the clouds. This is the sun trying to break through the clouds.
- The clear yellow color should be mixed with gray using a clean, damp brush. This will erase the edges and make the clouds look blurry, as if the wind is unevenly moving them to the sides.
It will be much easier to paint a forest with tempera paints. But watercolors are ideal for this technique. It will be easier for a child to mix the borders of colors, getting smooth transitions and gradients. It will be more difficult to work with acrylic, but an interesting result will be a picture painted with oil paints.
| Palette | Oil paints can only be used if you have a large tube of white paint. Only white paints are used to create shades. |
| Tools | Brushes #8 and #6 are great for beginners. The hog bristle with a round tip will work for most strokes. The palette knife is not for oil, but for the stroke technique. A nylon brush can replace it, and a flat brush will save you when working with thin lines. |
| Spatulas | Spatulas, like palette knives, can be used to combine a palette of colors and create new shades. |
| Palette | You can use a plate or glass. Be sure to treat it with linseed oil so that the paints do not soak into the surface. |
| Flushing | You can wash your brushes in tin or metal cans. |
| Cleaning | Turpentine and white spirit can be poured into any container to wash brushes. They can also be used as paint thinners. |
| Rags | Only natural fabric can absorb paint residue and wipe it off brushes. Synthetics and wool are not suitable. |
Work done in oil will require calcination so that the paints do not darken over time. The product will also have to be varnished, but it is best to get by with a cheap composition - turpentine mixed with painting varnish. This product is ideal for small works and children's creativity.
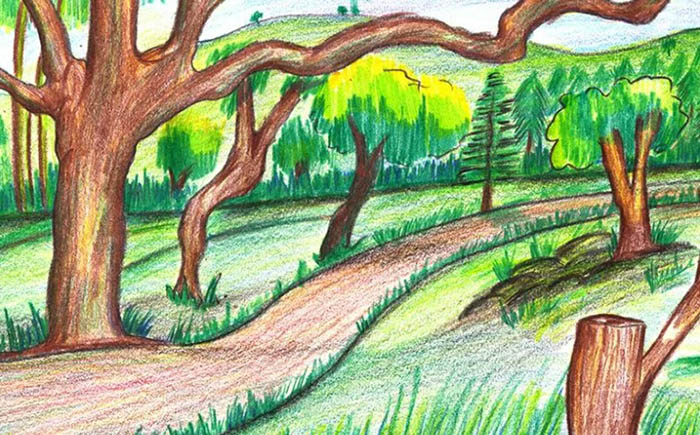
It is worth noting that landscapes painted in oil convey color much better, and even a child can put maximum knowledge into a simple drawing.
Stages of drawing:
- Of the oil paints you will need “chrome yellow”, “yellow ochre”, “azure”, “crimson”, white, “grass”, “cadmium red”, “burnt umber”, “pink-lilac”, “raw sienna”, and ultramarine shades.
- On the canvas you need to make a sketch with a pencil, and then use the desired oil color in the right areas.
- Using a flat brush #1 or #3, start with the background – randomly cover the lower part of the canvas with yellow shades, which will serve as the ground in the forest.
- The middle of the canvas needs to be darkened with a brownish-red color, slightly tinged with pink.
- Leave the top part white, randomly apply a blue shade of oil closer to the edge of the canvas on top and on the sides.
- Using a pencil, leave the canvas unpainted where the nearest tree trunks are marked.
- The edges of the forest, which was imitated with brown in the middle of the canvas, need to be treated with ultramarine.
- To shade or blur the paint, you need to wet the brush in turpentine and wipe it with a rag.
- The tree trunks need to be treated with lilac shades.
- The crowns in the background are always green, but some areas need to be lightened. It is better to use several shades at once on the brush, without mixing them.
- Using a darker green color, you need to chaotically draw the crown in the distance, rising above the forest.
- You need to connect the borders with dots and strokes and smear them where there is the beginning of the forest and red-brown paint. This can be done with red and green colors. They need to be picked up with a brush and not mixed with each other.
- Use umbra and sienna to make strokes in the places where the nearest trees are marked. They will be darkened on one side. On the other side, draw vertical lines to create a contrast of shadows.
- Use white to create a beige shade and draw small thin branches.
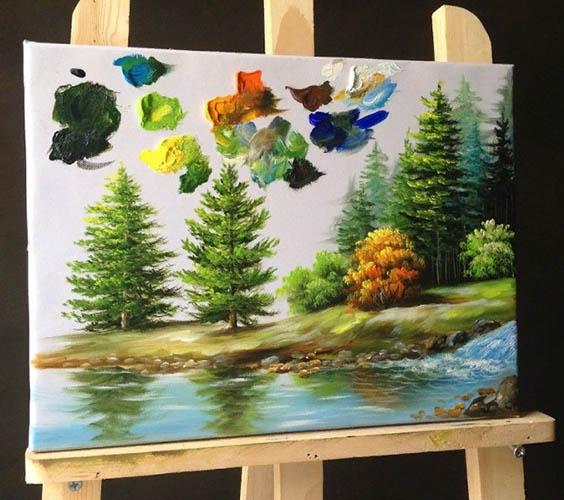
It is much easier to draw a forest in oil than with acrylic paints or pencil. The child will learn to work with strokes and dots. It is easy and convenient, especially when the paint does not dry quickly, can be mixed and applied in long strokes. If desired, the child will be able to add accents, shadows and other details to the drawing on another day, since oil paints dry for about a month.
After drying, the painting should be varnished to preserve all the bright (especially grassy shades) colors in their original form. The varnish can be diluted with turpentine to obtain a solution for application to a small painting. This will be more advantageous for those who are not yet familiar with paints and oil painting.
A forest drawn in pencil is a great introduction to painting. Landscapes created with colored pencils are also beautiful. Some paintings can be drawn with watercolor pencils and then turned into watercolor paintings.
Those who want and are ready to get acquainted with tempera and acrylic already know the basics of mixing colors. But children with an excellent sense of color will easily master the technique of painting with oil. These are the most successful ways to paint a forest in the distance and close by using several colors and 2-3 brushes.
Video about drawing
Master class: forest with acrylic or gouache: