Beautiful New Year snowflakes will become a festive decoration of the room and will help to create a festive atmosphere on New Year's Eve. Both adults and children like to cut out simple original paper applications.
This is a great activity that can unite all household members in an interesting and exciting work. And the cutting patterns will help make the process quick and interesting, and will allow you to create a lot of masterpieces with your own hands.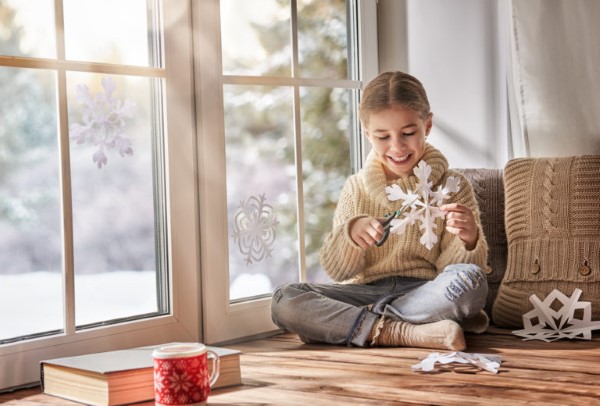
How to cut snowflakes out of paper
You can make a snowflake from regular white or colored paper, napkins or fabric. In addition to the material, you will need scissors, a pencil, and you can also choose beautiful snowflake patterns for yourself. Cut out an even square from paper or material. Fold it diagonally, and bend the resulting triangle again, and then make the craft as shown in the picture.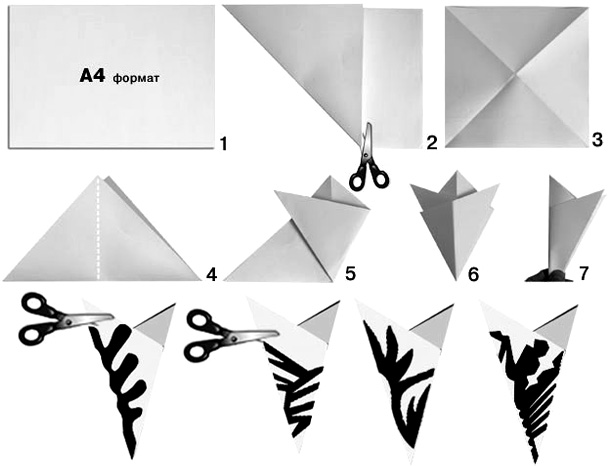
The step-by-step process looks like this:
- First we make circles. To do this, place a cup or mug upside down on a sheet of paper folded in four, trace the outline, then cut it out. If the snowflakes are large, the sheet should be folded in half or not folded at all, and use a round saucer for the stencil.
- Fold the resulting circles in half 3 times. Then we apply the drawing and start cutting. You need small and sharp scissors, for small snowflakes it is better to use manicure scissors. You can do without a drawing, just cut it out approximately according to the suggested patterns, in any case it will turn out great. The more complex the drawing on both sides of the workpiece, the more beautiful and delicate the snowflakes will be.
- All that remains is to unfold the snowflakes and admire the result. And then make more snowflakes and decorate the tree with them, stick them on the windows, give them to friends. You will notice that when following approximately the same cutting patterns, the result will vary each time. In this way, you can create many unique, original snowflakes for New Year's decoration. They can also be made from colored paper, candy wrappers or multi-colored foil.
By making snowflakes using a simple pattern, the resulting triangle can serve as the basis for thousands of variations of different snowflakes. You can come up with patterns yourself or use patterns offered on websites and in magazines.
The drawings are transferred to the base using a pencil, and then the snowflake is cut out.
Snowflake in kirigami technique
The kirigami technique is somewhat different from the traditional technique of making snowflakes. It is done with scissors on paper and looks creative, interesting, and original.
Making such a snowflake is not difficult even for children. First, on an album sheet using a conveyor, you need to build an angle of 60 degrees. Next, apply a square of paper to this blank, folded diagonally, and fold as in the pictures.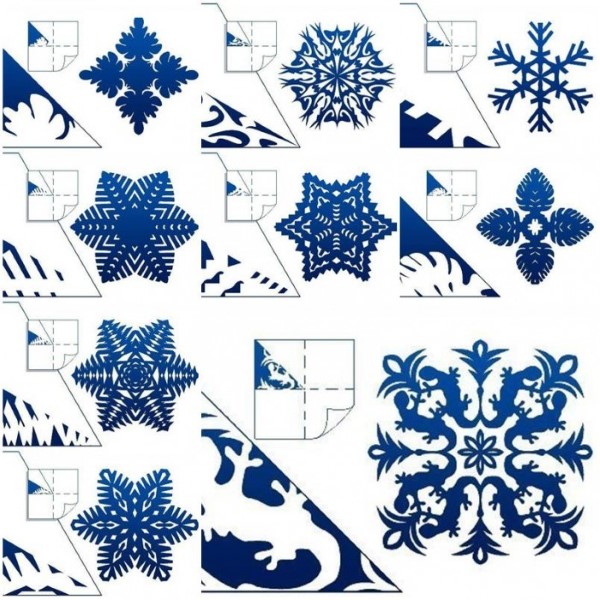
Using a pencil, draw cut lines on the workpiece, which can then be erased with an eraser. You can also use a printed template for this purpose, which is applied to the blank and cut out along the contour. The blank can be folded in half one more time, and the snowflake can be cut out not with a stationery knife, but with simple manicure scissors.
New Year's paper snowflakes using the kirigami technique are decorated with various rhinestones, glitter, pompoms, or colored with felt-tip pens and pencils.
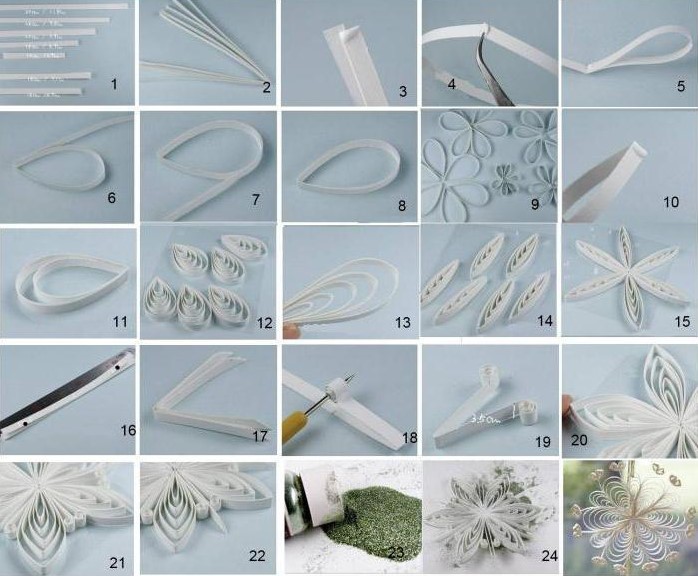
Snowflake in quilling technique
The technique is quite simple and well-known. Quilling strips are tightly wound on a toothpick, then removed, slightly loosened and the tip fixed with glue. The resulting circle is given the desired shape. When all the parts are ready, the snowflake is glued and the craft is ready.
In addition to these simple methods, snowflakes can be made using a more complex origami technique or made three-dimensional.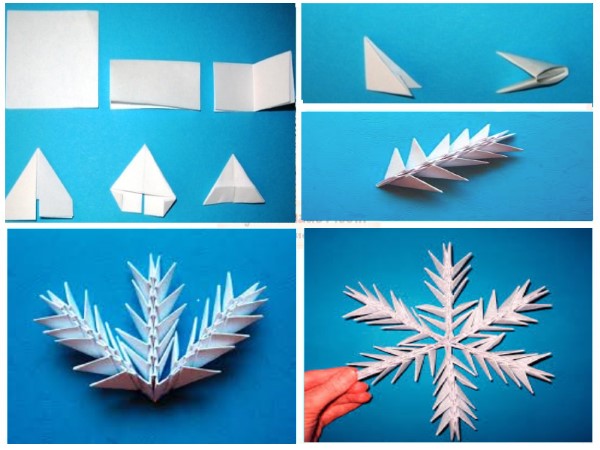
Making snowflakes from paper and glue with children
Many teachers and educators love making paper snowflakes with their students. It is a very peaceful activity that can be done even at home, and the finished snowflakes can be hung from the ceiling with a fishing line. As a result, the rooms and windows are transformed beyond recognition, and you find yourself in a winter wonderland.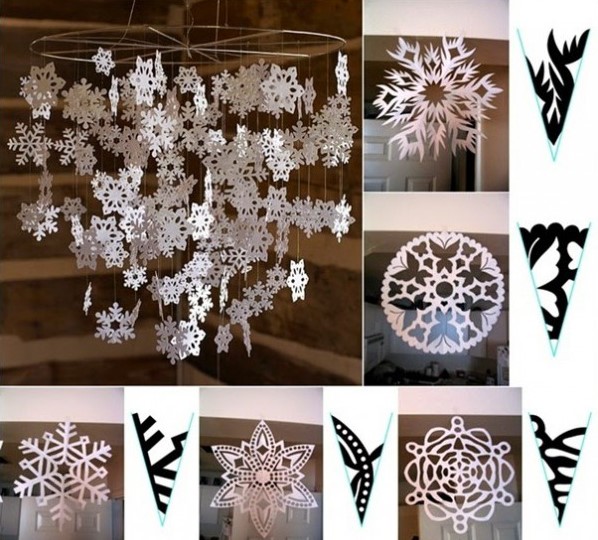
While the kids are busy making snowflakes, you can read them the book "Bentley the Snowflake" by Jacqueline Briggs Martin, which tells the story of the first person to take amazing photographs of snowflakes. It's a fascinating story, and the accompanying pictures will help make your snowflakes more beautiful and lifelike.
Necessary tools
You will need glue, one small bottle per person, about 30-60 ml per person, it all depends on the number and size of snowflakes that you and the children plan to make. You will also need a lot of wax paper, one sheet is enough for two medium-sized snowflakes. You can also buy glitter or glitter glue if you want to decorate the snowflake.
The process of making snowflakes
Lay a sheet of wax paper on the table. This is your workspace. Use a pencil to draw your future snowflake. You can use a compass to make the edges more even. And don’t be afraid to use an eraser if you get something wrong.
Interesting fact about snow crystals! They are made up of water molecules converted into ice, they have the shape of a hexagonal lattice, which explains their sixfold symmetry.
Thus, the most beautiful and neat snowflakes have exactly six faces., but three-sided ones also look beautiful. Experiment, make a volumetric snowflake by joining several identical snowflakes with glue. If you do everything correctly, you will get a beautiful spherical snowflake.
Once you've finished gluing your snowflake, add some glitter with glue. Don't skimp! Cover every inch of the snowflake with glue. Once the glue dries, it will sparkle and shine. For an extra sparkle, sprinkle glitter on the snowflake before the glue dries.
Set the snowflake aside until the glue dries. This may take quite a while, but you're not in a hurry, are you? Keep making more and more snowflakes!
Note! Look at photos of real snowflakes, patterns for cutting out the most unusual and beautiful ones from paper, to get ideas for creating your own snowflakes. Try making snowflakes of different sizes, make different patterns.
Once the glue is completely dry, you can finally take the snowflake in your hands. If you see that you have not used enough glue, return it to its original place and add as much glue as needed. However, you will have to wait for it to dry again. When everything is ready, take the snowflake and use a transparent fishing line to attach it to the ceiling.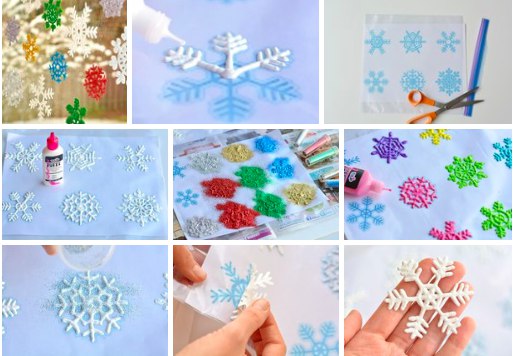
Done! It's a real snowstorm here! Make some hot chocolate and enjoy the charm of winter!