The slip stitch is also called a hook, a loop of attachment, a half loop, a half column, a half column without a throw, as well as a slip stitch, a blind loop or a blind loop. The above techniques must be crochet in the same technique. These elements differ only in name, which can be indicated in different diagrams with an explanation, but otherwise they are the same.
What are crochet slip stitches?
The connecting column (both experienced craftsmen and beginners can crochet) is a special element used to connect 2 lines of a knitting ornament. This type of column helps to move from one shade to another, disguise the transition on the back of the fabric, and also add volume to the pattern.
This technique is often used to create openwork patterns and designs in which yarn of different tones is intertwined. This helps to create a beautiful and smooth connection of lines without sharp color transitions. The technique is suitable for decorating things, blankets, children's toys and other products.
The connecting post helps to create a flexible and strong connection between two parts, which is held in place and does not require regular adjustment.
Recommendations for using the column:
- To create a spectacular transition, it is recommended to join thread material of different shades with a connecting column. For example, to make an iridescent scarf, it is acceptable to join blue yarn with a bluer material. Thanks to this, you can achieve a smooth transition from one shade to another.
- For work, it is necessary to select a knitting tool whose size will match the size of the thread material. In order to properly distribute the load on the hand, as well as to avoid possible fatigue, the knitting tool must have a straight, unbent grip.
- Thread material made of artificial, synthetic or natural fibers is suitable for crocheting. It is comfortable to work with synthetic yarn, because such material is easy to pick up with a tool, and it is docile and will not delaminate. For example, it is acceptable to use polyamide, polyester or acrylic. However, you should not use yarn that is intended for embroidery or sewing.
- You can experiment with different types of connecting posts. The standard type can be used for many products. However, some projects require shorter or longer elements or a combination of both in one canvas. To achieve the best result, it is recommended to try different methods.
- The density of knitting should always be under control. The use of connecting columns helps to reduce or increase the number of columns in the fabric, relative to the correctness of the weaving of the element with other parts. In order for the fabric to be uniform, it is necessary to control the density of knitting.
- With the correct formation of the connecting column, it is necessary to knit the fabric in your own technique. In this case, you should not replace a suitable and convenient knitting method with a more complex one just to insert this element into the ornament.
- The element is suitable for creating spectacular ornaments to decorate the product. For example, the connecting column can be included in different ornaments and combined with regular columns to create an unusual pattern on the canvas.
How the column looks on the diagrams
The slip stitch is easy to crochet, especially if you have a diagram with a detailed description at hand. However, this element may look different on each diagram.
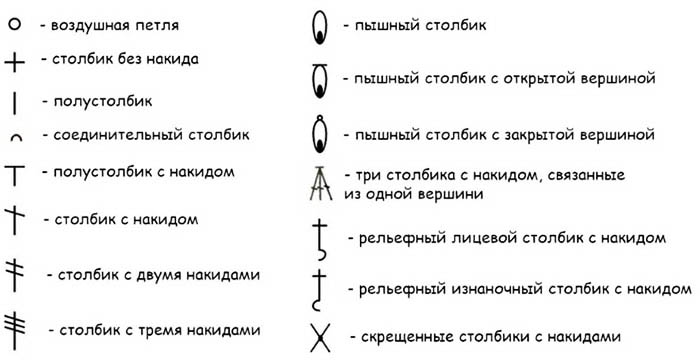
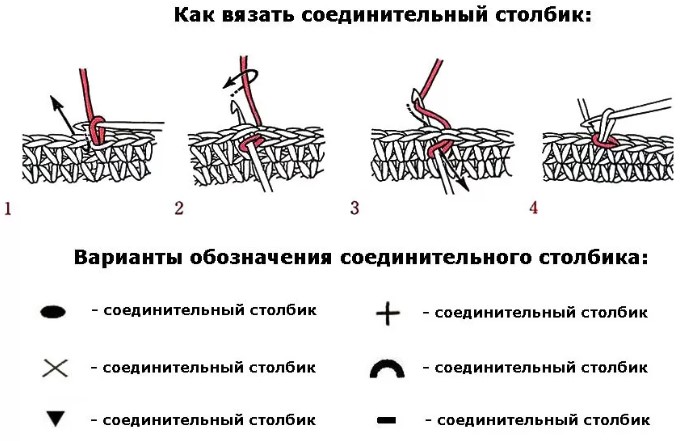
Common designation options:
- 2 crossed lines;
- in the form of a cross;
- in the form of a dash;
- arc;
- black oval;
- black inverted triangle.
Sometimes this element is not indicated in the diagram, especially when decorating the canvas from the middle (for example, a napkin, motifs). In this case, you need to remember that the connecting column must be present in the required place.
In some diagrams with descriptions, instead of designations, there are abbreviations in the form of CC or connect. st. (connecting column), as well as PSBN (half-column without throwing). The word "zamknut" may be written, which also means a connecting column. In this case, the diagram will not indicate that a connecting element needs to be created, it will say "kloknut".
Where are these loops used?
Knitting fabric with a crochet hook is not possible without creating connecting columns, because this element is universal and multifunctional.
It is needed for:
- knitting an ornament to join two parts together;
- processing and fixing the edges of a knitted product;
- rounding of edges;
- creating decreases along the edges;
- creating a chain in which the back side will be used to transfer the knitting from one section to another (for example, when making Irish lace);
- joining stitches in a circular technique or when decorating a fabric with reverse and straight stitches;
- sewing parts together into one piece.
As the name suggests, connecting elements are needed to join the stitches, so this type of column is often called a connecting loop. The half-column and half-column without a throw should be designed in the center of the product and used to join the chain of air stitches with the main stitch.
Examples of using this technique:
- Combining shades. By combining different tones, you can give your knitted item an unusual and beautiful look. The connecting column helps to unite the color rings together so that the transitions are beautiful.
- Grid design. Often, a connecting column is used when designing openwork fabrics in the form of a grid. This element helps to unite the chain in the event that a hole needs to be made in the product.
- Connecting parts. The connecting post is suitable for fastening or sewing created parts into a single whole, for example, when knitting children's toys.
- Joining the edges. Suitable for joining the edges of the fabric. For example, when knitting a blanket, when you need to join several square figures into one whole.
Knitting technique and examples of connecting motifs
The connecting post can be crocheted in a circle to connect the beginning and end of the line. In rare cases, this technique is used to design the entire canvas so that the knitting is very dense.
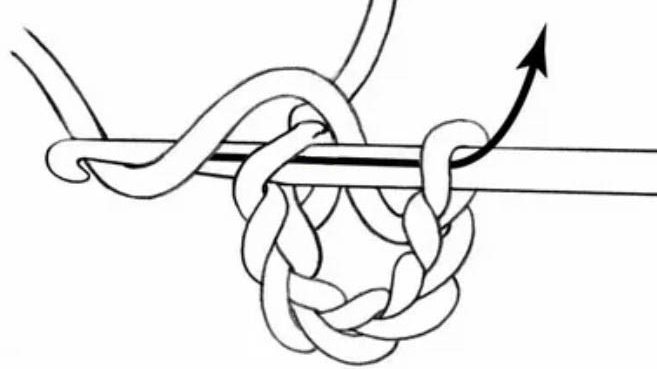
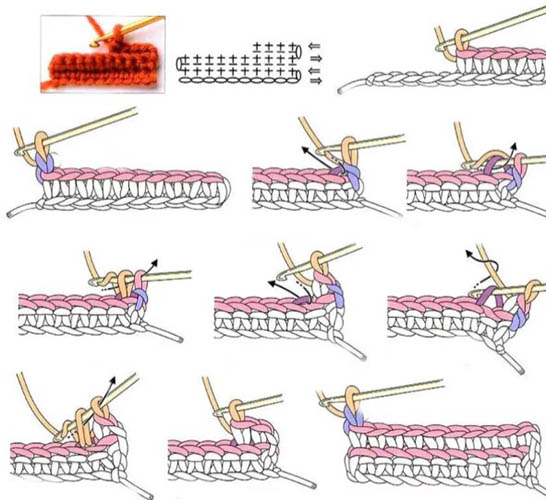
Knitting technique:
- To start knitting, create a chain of air elements. Additionally, knit 1 air stitch to start the design of the first line.
- Skip the 1st loop because an air element was created that replaces 1 column.
- Insert the knitting tool into the next element, picking up the working yarn.
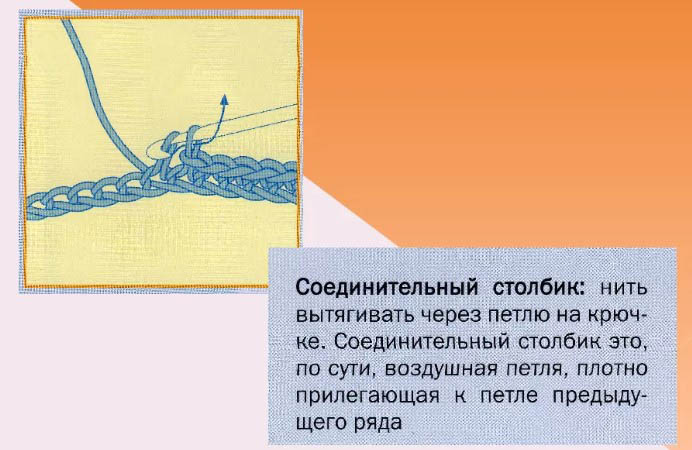
- Pull the captured material through the stitch into which the tool was inserted. There should be 2 loops left on the hook.
- Pull the resulting element through the stitch that was already on the knitting tool.
- Knit all the following connecting columns in the same way. However, insert the tool into the next stitch.
- To start knitting a new line, unfold the product and make 1 air element. After that, you can start creating a new row.
Often, connecting posts are not used to design the entire canvas, because it is considered a long and inconvenient process. In this case, the knitted clothes will be heavy.
The connecting element serves to join together different parts of the canvas. This is often required when creating individual motifs.
Several examples of their connection stand out:
| Way | Features of knitting |
| 1 | Arches of air loops are suitable for connecting openwork hexagonal or round motifs. In this case, one motif must be knitted completely, and the next one must be joined with the first one during tying, making connecting columns in certain areas. The third and subsequent motifs must be simultaneously joined with two or more elements that are located next to each other. |
| 2 | If the elements are connected with short air chains of 3 loops, which are knitted into one base, it is permissible to give the knitted product airiness and lightness. In this case, one motif must be knitted completely, and the next one must be connected during the piping, alternating columns with picots. Air elements of the second motif must be passed through the picots of the first and fixed with connecting columns. |
| 3 | Using connecting columns, it is possible to make the binding of parts more dense. In this case, one motif must be knitted completely, and the next one must be joined using columns with a throw. In this case, the knitting tool should be passed through the edge half-loops of the element placed next to it. |
| 4 | Connecting posts without throwing over are suitable for sewing elements with a smooth contour. For these purposes, it is necessary to combine the connected edge loops to create an elastic and invisible seam. In this case, the knitting tool must be threaded into the corresponding half-loops, using additional thread material. |
| 5 | To tightly join hexagonal or square motifs, these parts must be combined so that their front parts look at each other. Additionally, their borders must be knitted with thread material, passing the knitting tool through the edge half-loops. During the work, it is necessary to control the tension of the yarn to prevent deformation. In this case, the motifs will not shift relative to each other. |
The connecting post can be crocheted into a ring.
To do this you need:
- Cast on 1 stitch onto your knitting tool.
- Insert the hook into the required loop and grab the working yarn.
- Pull the thread material through 2 elements to connect the chain of air loops into a circle.
If the knitting tool initially had more than 1 element, and the pattern indicates the word "close", then the last step requires passing the working thread material through all the loops that are located on the hook.
The pattern may also say "knit a half loop" or "close with a half loop." All steps for joining the stitches are considered the same sequence of actions.
When joining rows in the circular technique, you need to know which loop to insert the knitting tool into to make the joining. This will depend on the length of the row you need to join.
Step by step description:
- If the stitch was knitted with yarn over columns, insert the tool into 3 air loops, because yarn over columns consist of 3 air elements.
- Knit to the end of the line and insert the tool into the 3rd lifting chain element.
- Grab the working yarn and pull it through 2 loops to join the circular stitch.
This type of knitting design is suitable for creating light hats for the summer season, openwork napkins and other items that need to be designed using the circular technique.
To strengthen the edge of the canvas, it is often necessary to tie it with a fastening tight loop, which is sometimes called a tight element. Regarding the technique of execution, this element is a connecting column or a half-column without a throw.
The method of designing this element depends on the number of thread material in the columns of the previous line that needs to be captured. If you need to capture 2 yarns at once, the knitted fabric will acquire a dense reinforced edging. In this case, the edge will be even and will almost not curl.
When capturing only one yarn in the loop, a strip of the remaining thread material will remain. In this regard, when capturing the bottom yarn in the column, the strip will be located on the back of the fabric. This technique is suitable for decorating knitted clothing.
Knitting elastic bands with crochet stitches
The slip stitch (you can crochet not only toys, home goods, but also clothing items) is suitable for creating an elastic band that will retain its original shape even after stretching. Using a crochet hook in crocheting helps to create rigid fabrics, so the elastic will also be tight.
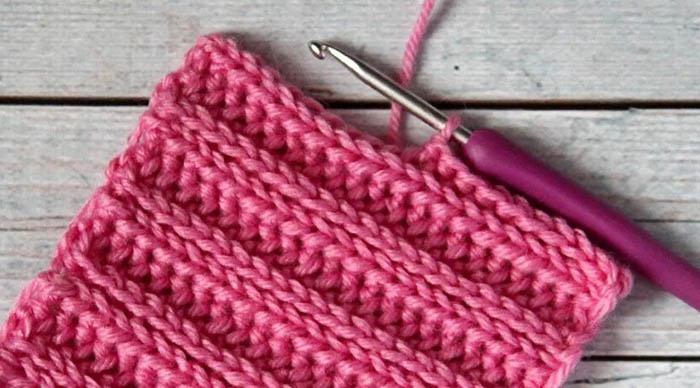
In this case, the longer the length of the part, the stiffer the elastic will be. Any fabric can be started with creating an elastic band or tacking stitches in the work. The latter must be designed in columns without throwing, so the elastic columns will have to be fixed to these elements.
Step-by-step description of creating a crochet elastic band:
- Cast on a chain of air stitches that should match the width of the elastic. For example, cast on 10 elements and add 1 air stitch of lifting, which is needed in each row.
- From the knitting tool into the 2nd loop behind the back wall, knit connecting columns. At the end of the line, 10 connecting elements should be formed.
- Turn each row in the same direction, clockwise. Be sure to make a lifting loop at the end of each row.
- Knit 10 connecting columns for the back half-loop and repeat as many times as necessary until the desired length is reached.
- To increase the speed of work, pull the working yarn through 2 elements on the knitting tool at once. Due to this, knitting will not take much time, and the loops will be the same size.
- The last 10th element should be slightly pulled into the product. In this regard, it is recommended to recount the loops or check every few lines.
- When looking at the edge of the product from the side, all the thread material should be directed in one direction.
If you do not have much experience in crocheting, it is recommended to count the number of loops in each line. This eliminates errors in work and prevents unnecessary narrowing of the elastic.
The slip stitch, unlike other crocheted elements, is characterized by a small height, and therefore is rarely used when creating large items.
However, this element is required to close a row in a circular technique, tie the fabric on the edges, make a decrease, create Irish lace or connect individual motifs. The design of this element is not difficult, so both experienced and novice knitters can cope with it.
Video about knitting