Such a plastic mass as cold porcelain, can replace plasticine and polymer clay. At home, it can be prepared using basic ingredients. Recipes differ in the ingredients that are present in the compositions for different purposes.
Soft clay is suitable for modeling flowers, people, prototypes of buildings and houses. This is a great way to create your own doll collection, get your child interested in modeling and learn the features of modern art.
Composition and features of use
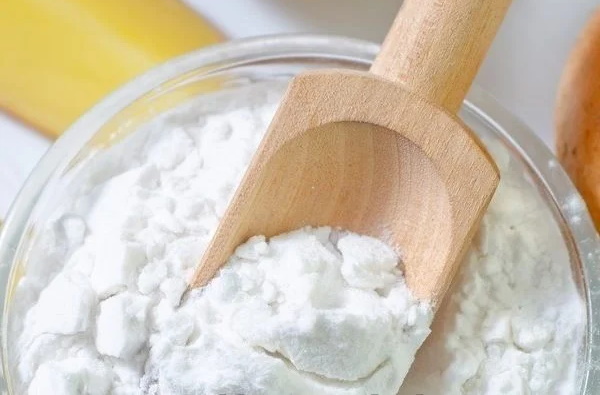
Cold porcelain contains corn starch and PVA glue. Its consistency is similar to porcelain mass, which is why it got its name. Unlike the original, the cold type of clay does not require baking at high temperatures.
Moreover, it hardens in the air, which makes it ideal for beginners. Unlike plasticine, which hardens in the air, cold porcelain retains its plasticity throughout the entire time after drying.
Advantages of using cold porcelain:
- Easy to prepare – it can be easily made from available ingredients at home.
- Low cost price – unlike polymer clay, this material justifies the price of all components.
- Uniform and smooth texture – due to its properties, the plastic mass can be molded to create figures of any complexity, does not crumble or break.
- Shrinkage during drying is minimal, which helps to adjust proportions and calculate the initial weight and volume of all ingredients. This also affects the economy with high material consumption.
Cold porcelain (the recipe can be used at home to create various crafts, changing the composition and including new ingredients) first appeared in the late 19th century in Argentina. It was used to create various household resources that covered up flaws in the walls of the house and floors. Children sculpted interesting figures from the remains, after which they gave them away or sold them.
The floral details were made by stretching the material. It acquired a wavy shape, which allowed the children to create compositions of flowers and plants.
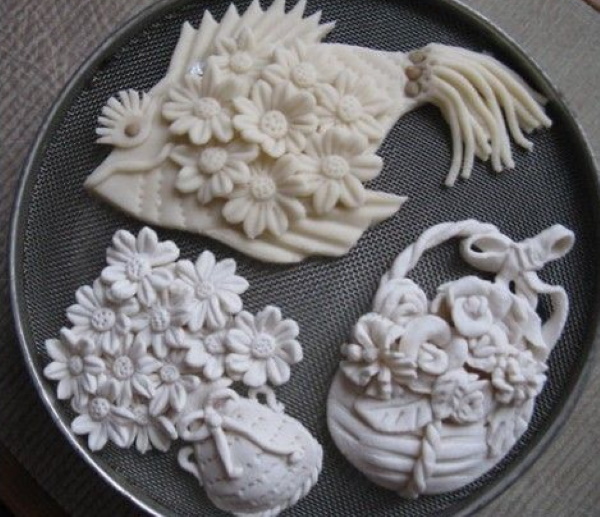
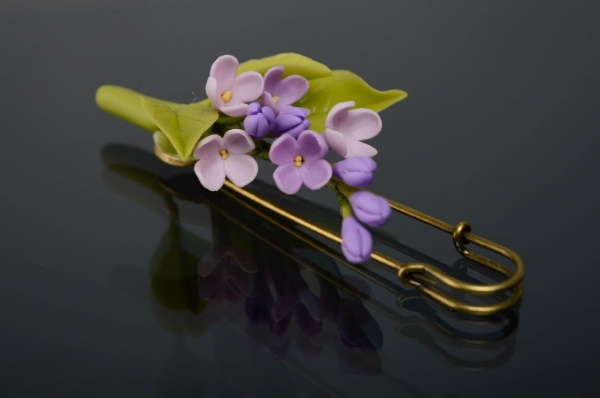
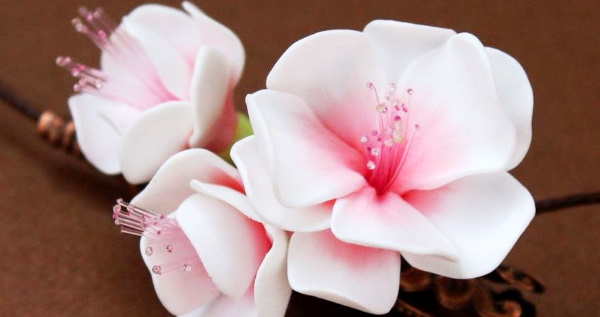
Due to the versatility of the composition, cold porcelain can be used to create three-dimensional figures, flowers, details, souvenirs and even accessories for interior decoration elements. Each finished model can be painted, and they can be used to make jewelry, boxes, hairpins and even dishes.
Recipes for making cold porcelain
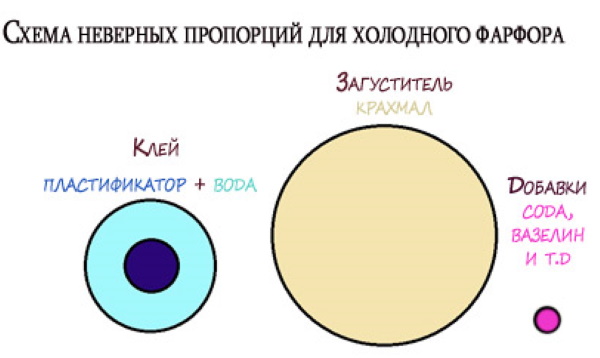
Different manufacturers call the material differently, however, the basic composition always includes oil, glycerin, glue and starch. Different preparation technologies allow you to get a "marshmallow" white consistency, durable clay or ordinary (Cold porcelain) for universal artistic modeling.
Basic recipe without cooking
To prepare the classic recipe you will need:
- PVA glue – 2 tsp;
- starch – 2 tbsp;
- Vaseline – 1 tbsp;
- soda ½ tsp.
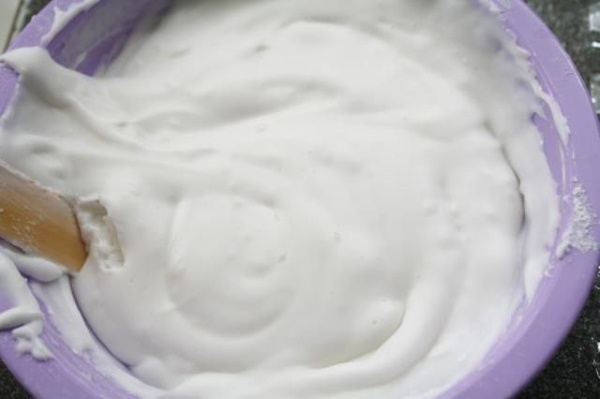
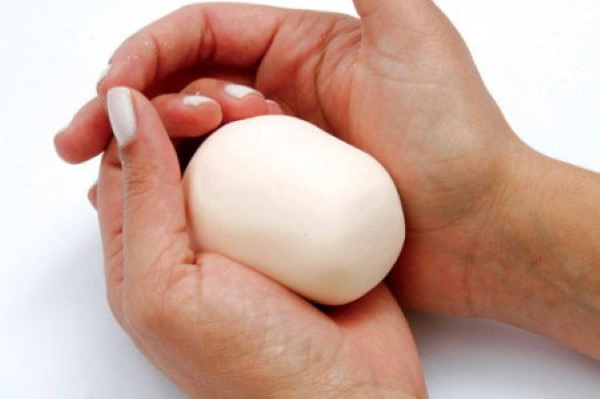
All ingredients should be mixed until smooth to form a plastic mass. As a rule, dry ingredients should be mixed first, then Vaseline (slightly warmed) and glue should be added to the mixture. The main thing is to knead the resulting mass well with your fingers so that lumps do not form due to the connection with the glue. If the mixture is too sticky, the entire surface should be coated with Vaseline.
On potato starch
To prepare clay based on potato starch you will need:
- PVA glue – 200 ml;
- potato starch – 200 g;
- glycerin – 100 g;
- baby cream – 100 ml.
The ingredients need to be mixed and left for 20 minutes so that the mass "comes up". The components are mutually soluble, so no effort is needed to mix them. The resulting product cannot be stored in the refrigerator or kept for more than 2 hours at room temperature. It should be worked with immediately after it is ready.
On rice starch
Despite the fact that potato starch can be simply replaced with rice starch, you need to take into account the characteristics of the cereal.
To prepare clay based on a denser and heavier type of starch, you will need:
- rice starch – 100 g;
- corn flour – 100 g;
- PVA glue for wood – ¾ of a 200 g glass;
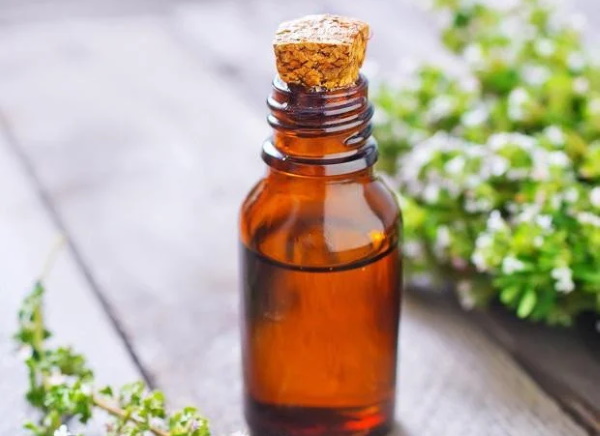
- eucalyptus oil – 5 drops;
- nutmeg extract (for preserving) – ½ tsp;
- Vaseline – ½ tsp;
- baby cream – 1 tsp;
- water – ¼ of a 200 g glass.
First, you need to prepare the components:
- Corn flour should be mixed with water until a homogeneous mass is formed.
- PVA glue should be mixed slowly with oils. It is best to do this in a water bath.
- After 9-10 minutes, remove the mixture from the heat and form a ball.
- The texture will be sticky, so you need to roll out the mass on a board greased with Vaseline.
The resulting mixture should be elastic. If it is difficult to form thin petals, then the glue was not warm enough and did not set. This mass can be thrown away. A harder consistency of the mixture is not so bad - it can be soaked in water for 3 days, and then used again.
Based on vinyl adhesive
The peculiarity of vinyl glue is the presence of modified starch in its composition. Such ready-made glue can be purchased in a hardware store - for wallpaper. They are made together with corn starch. When using it, cold porcelain becomes glossy snow-white.
The ingredients you will need are:
- wallpaper (vinyl) glue – 1 part;
- baking soda – 1 part;
- water – 1 part;
- glycerin – 1/3 part;
- cream – 1/3 part.
Cooking process:
- First, you need to add baking soda and water into 1 container.
- Then you need to add glue to the water.
- All ingredients should dissolve in a water bath.
- Then you need to add cream and glycerin to them.
Cold porcelain (the recipe at home requires thorough mixing of the finished mass) should be homogeneous. The only downside of this recipe is that vinyl glue is too expensive. But it can also be made at home.
To do this, you need to prepare the paste:
- To 1 part cornstarch you need to add the same amount of water.
- The starch suspension should be at room temperature. Since the mixture does not dissolve in water, a cloudy sediment should form.
- It is necessary to pour boiling water into this suspension in the amount of 1 part.
- The consistency should be like thick glue. It becomes transparent in color.
- The finished glue must be cooled, stirring occasionally.
- As the vinyl glue cools, it should be strained through cheesecloth or a sieve.
The output is a blank for further use. You can add cream, PVA glue and glycerin to it to get cold porcelain.
Corn
Various cold porcelain recipes are prepared on the basis of corn starch. The only downside is that you cannot get a crystal white mass. But for artistic modeling, a cloudy yellowish shade is sometimes required.

For example, for sculpting plants for painting or white-flowered plantings:
- corn starch – 200 g;
- baby cream – 1 tbsp;
- food glycerin – 1 tbsp;
- PVA stationery glue – 200 ml.
The principle of combining starch with glue should be the basis. The construction analogue of the mass is not always suitable for creating a plastic mass. Thanks to corn starch and simple office glue, you can get an ideal version of porcelain that will take any shape. At the same time, it remains plastic and elastic.
Cooking process:
- You need to lubricate your hands with baby cream in advance.
- In a Teflon bowl, dissolve the cream and glycerin.
- Starch should be added to the resulting mixture.
- The curd consistency should become completely homogeneous.
- As a lump forms, you need to continue kneading the dough with your hands.
- When the mass acquires the properties of plasticine, it is considered ready for use.
If the dough is too hard, you can add water. To get a colored product, you can add dyes at this stage.
With formaldehyde
The solution "formalin" is sold in pharmacies freely and without a prescription. Formaldehyde in its pure form is not used. The product of chemical origin is toxic, and when working with it, you must take precautions - wear gloves and a medical mask. You should also avoid contact with skin and mucous membranes.
The embalming solution must be carefully introduced into the recipe:
- starch – 600 g;
- vinyl glue – 600 g;
- cold water – 150 ml;
- baby cream – 1 tbsp;
- vegetable oil – 1 tbsp;
- stearic acid – 1 tbsp;
- formalin – 1 tbsp. l.
If desired, you can add food coloring or rice starch in the amount of 1-2 tbsp., as well as sodium benzoate to give it shine and protect it from cracks.
Cooking process:
- First you need to mix starch with baby cream, then immediately add oil and glue.
- Next, you need to pour in water and stir the mixture until it reaches a uniform consistency.
- At the end, formalin and stearic acid should be added.
- The dough turns out dense and elastic.
It should be cooled to room temperature before you start working with it. Until it hardens, it is best not to touch the figures and decorative elements without gloves.
Cold method
Without the boiling process, cold porcelain can be prepared using the following recipe:
- dry chalk – 200 g;
- rice starch – 200 g;
- vinyl based glue – 400 ml;
- Vaseline liquid – 6 tbsp;
- formalin – 6 drops.
First, mix the starch with chalk. The dry mixture will be crumbly and uniform. Next, pour glue and Vaseline into the container. The mixture should be thoroughly kneaded before adding formalin. This ingredient can be omitted or replaced with essential oil.
If the dough is too "stiff", you can add cold water. In this case, the dough does not require heat treatment. If you need to color the mass in a different color, it is recommended to use only dry dyes.
Soda Porcellan
Cold porcelain is a cold porcelain made using the cold languishing method. It contains soda, which gives any such dough a plastic effect, like mastic for confectionery decorations. There is no glue in this recipe, so it will be more difficult to work with the products.
Cold porcelain (a recipe that can be used at home to make eco-friendly jewelry) can be made from the following ingredients.
Scroll:
- corn starch – 100 g;
- soda – 100 g;
- cold water – 100 ml.
Mix all ingredients in an enamel bowl and place the container on low heat. When the mixture starts to bubble, stir the ingredients. As the water evaporates, the dough will thicken. Wait until the optimal consistency is reached, then cool the resulting dough.
Drying of finished products
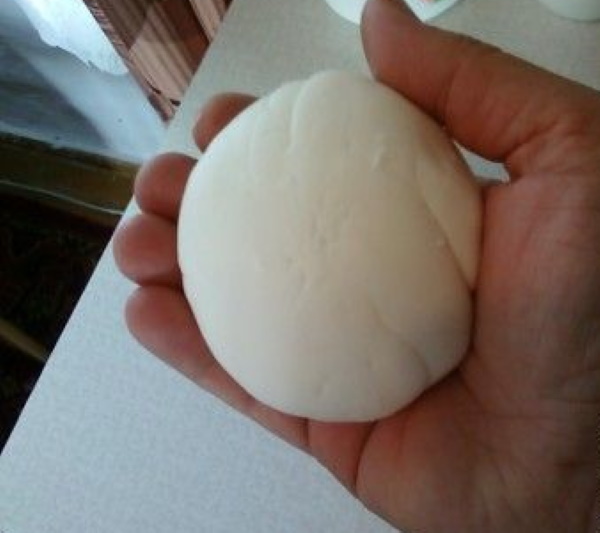
Cold mass is like a plate that dries in the air. This quality is possessed by porcelain made at home. Due to its consistency and texture, it remains plastic and elastic, but dries completely in the air. Like clay, it takes any form, which makes it indispensable for working with artistic decorations.
Natural air flow is usually used for drying, but if you need to speed up this process, you can use an oven:
- The finished products should be placed on a baking sheet in the oven.
- Drying occurs at medium temperatures – from 180 to 200 degrees.
- After baking, you need to leave the craft in the oven for 12 hours so that the temperature difference does not affect the integrity of the product.
- As a rule, porcelain crafts dry in the air for 2-7 days.
Fresh dough should not be left in the air – it can be wrapped in a plastic bag, like mastic, to preserve its properties. A vacuum helps prevent spoilage. In addition, the products become harder after 2-3 hours, even if you work with them by hand. Unlike plasticine, cold porcelain cannot be kneaded again after drying.
Painting
The plastic mass can be painted in 2 ways:
- At the preparation stage, you can add food coloring or candurin. The mass acquires the desired shade required for work.
- After finishing the molding, when the porcelain is completely dry, it can be painted with paints. This option is suitable for those who want to create a composition in different colors, and it takes a lot of time to prepare each shade separately.
Cold porcelain can be painted with dry tempera or gel or dry food coloring. At home, finished crafts are painted with tempera paints, acrylic, gouache or watercolor. Pastel is the most difficult to work with, but it can be used to create unusual shades and streaks.
If the recipe contains a synthetic ingredient, you can safely use pastel paints in the form of a dry mixture - it is sprinkled on top of wet porcelain until it dries.
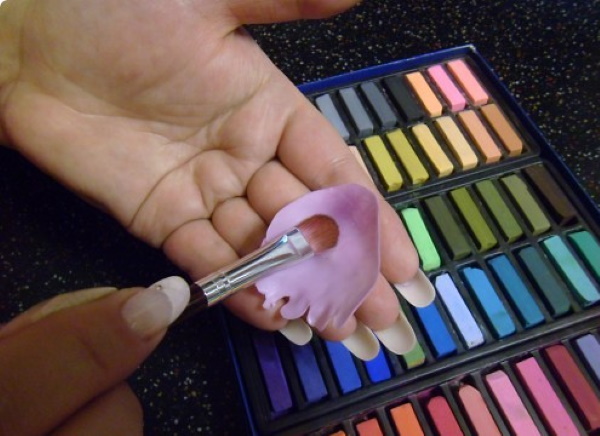
More complex coloring options can be attributed to the process of using gouache. After drying, it can crumble, and to fix the result, you need to hold the product over hot steam for a few minutes. The porcelain surface becomes slightly soft, and the composition absorbs the pigment. To fix the finished version, you can use hairspray.
Tips for working with the material
Beginning craftsmen should learn several features of working with cold porcelain:
- The finished product may shrink by 25-30% after drying.
- Formaldehyde in the dough remains toxic - it helps the dough stay intact and not spread. It should be added to a warm or cold mass.
- When cooking the material, use Teflon or glass containers.
- Aluminum containers cannot be used - the composition may corrode the walls.
- The finished mass should be left to stand for 24 hours. Therefore, to preserve its properties, the dough should be wrapped in a tight package, creating a vacuum.
- The finished mass should be stored only at room temperature in an airtight bag.
- If condensation forms in the bag due to heat, it can be removed with a new bag 24 hours after wrapping.
- To avoid cracks, the dough must be kneaded well.
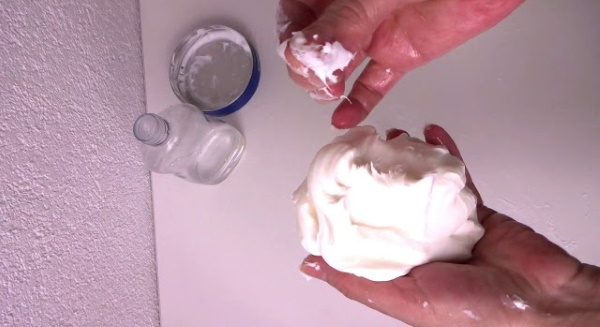
- Before wrapping in a hermetically sealed package, the mass should be lubricated with cream or Vaseline. This will help prevent the development of fungus.
- To prevent the dough from sticking to your hands, you need to grease your hands with cream or any type of vegetable oil before starting to work with cold porcelain.
- Plastic and salt dough are not suitable for working with flowers, but porcelain is the ideal material for this.
- To make flowers or foliage the right shade and look realistic, hold the dry dye over steam after application. The inclusions will look like real streaks of green pigment on the foliage.
- Bright colors will make the craft brighter and less realistic.
- To work with acrylic paints, you need to choose cooler and deeper tones.

Such simple secrets allow you to create amazing crafts that are difficult to distinguish from real products.
Craft making options for beginners
The simplest crafts that can be made from cold porcelain are:
- Crafts in which the figures are made up of elongated layers and oval parts.
- Flowers made using a soft stand and a plastic ball.
- Petals – to create a composition. They can be made from rolled out dough.
- Small flowers or buds are folded using petal-shaped blanks.
The most beautiful crafts can be made in just an hour, and the child will get great pleasure from creating realistic figures.
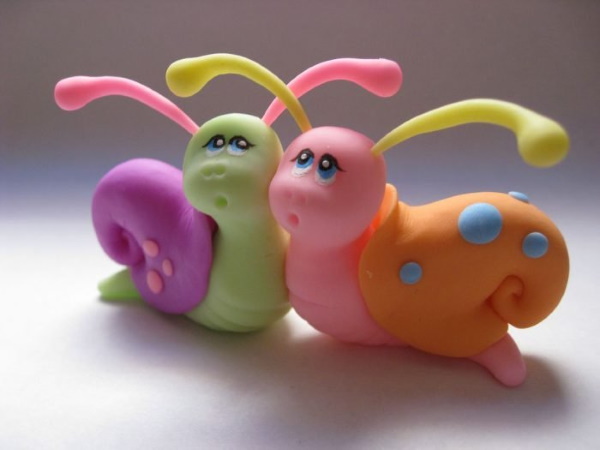
A simple version of modeling a snail is 2 parts of the body that are connected to each other. The whiskers and spots on the shell can be molded in the same way as from plasticine.
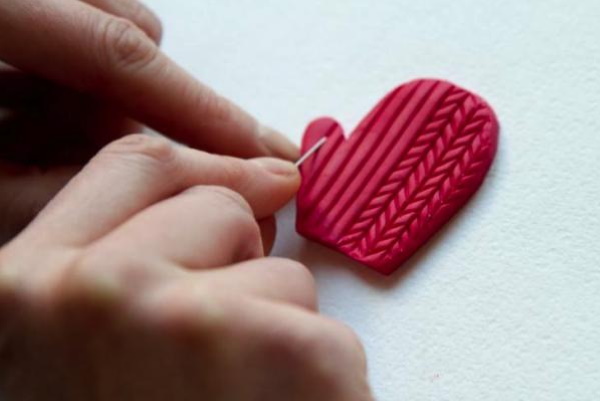
Mittens and socks, as attributes of the New Year's celebration, are easily made using simple layers of dough. It is enough to give them a shape and decorate them with relief.
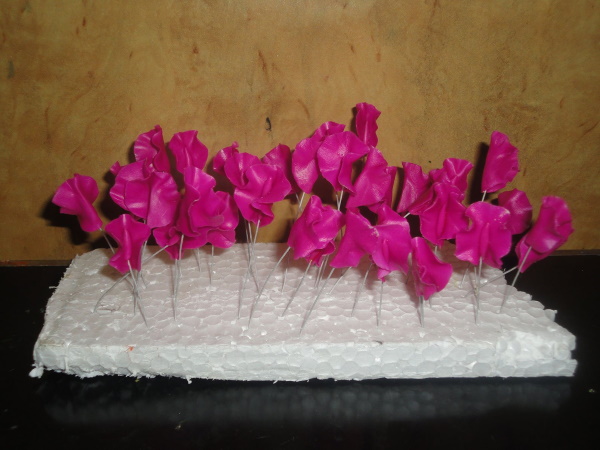
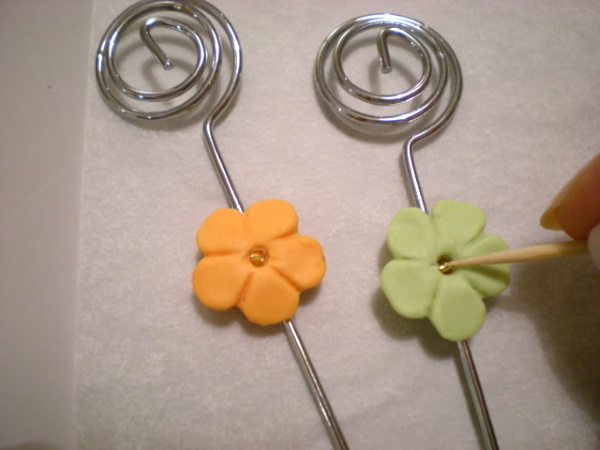
Flowers can be made from ready-made petals. You need to put the petals on a wire rod, wrapping them around the center.
And for drying you can use a foam stand.
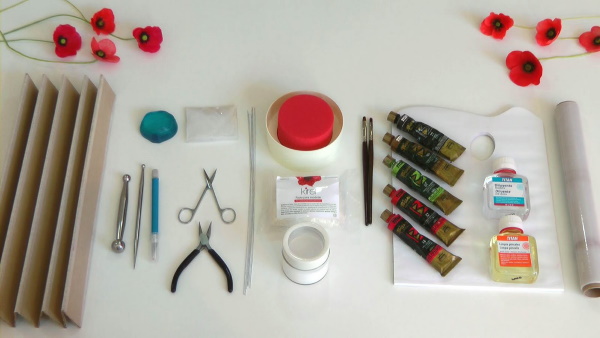
To work you will need a minimum of tools that can be found at home or made from improvised means.
That's all.
New Year's Santa Claus
Cold porcelain (you can see the recipe for making it at home in the section above) should be prepared in advance using one of the recipes. When the dough is ready, you need to let it "rest". To make a craft with Santa Claus, you will need about 300 g of ready porcelain.
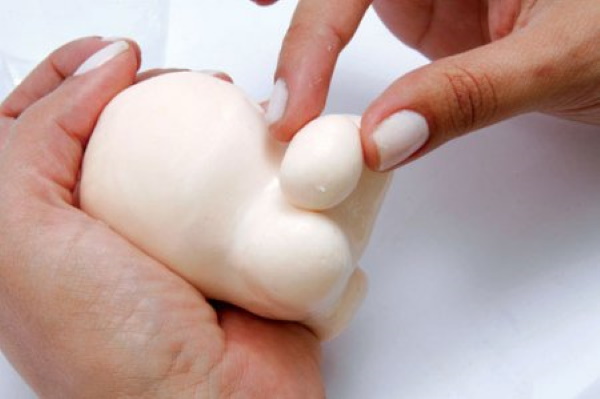
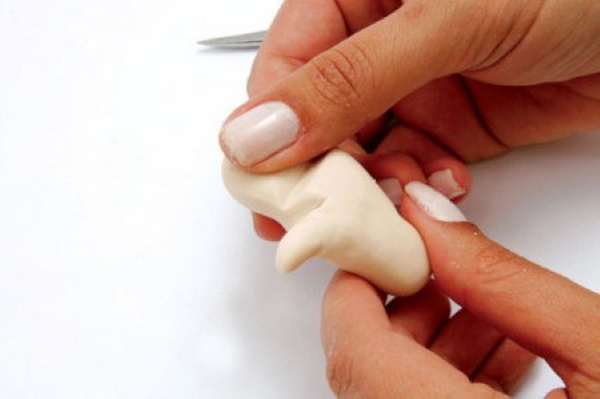
A third of the finished dough should be set aside to form the head. Use your hands to knead the dough and shape it. Use your fingers to press indentations to form the eyes and chin.

Next you need to make cheeks and roll a nose out of the dough separately.
Using a plastic spatula, you need to lift the material and secure it to the head.
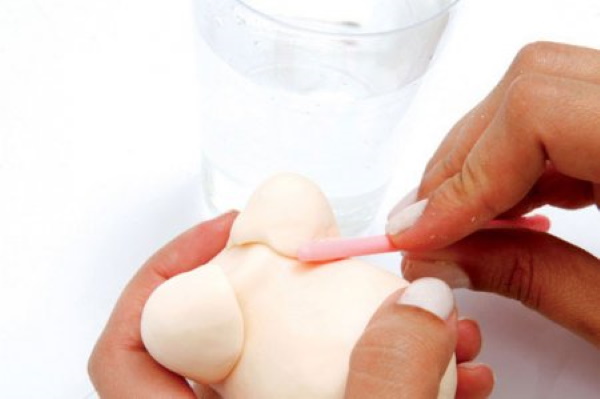
All parts need to be soaked in cold water so that the mass sticks together, as when working with clay.
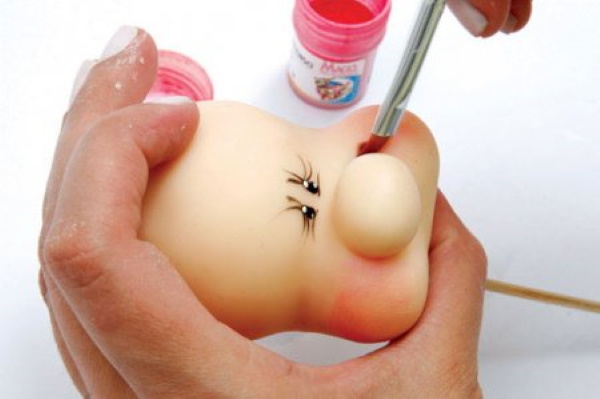
At this stage, you can make initial sketches – paint the cheeks, eyes and mouth area.
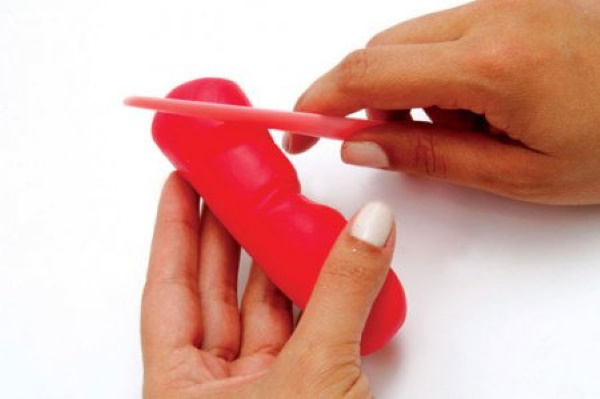
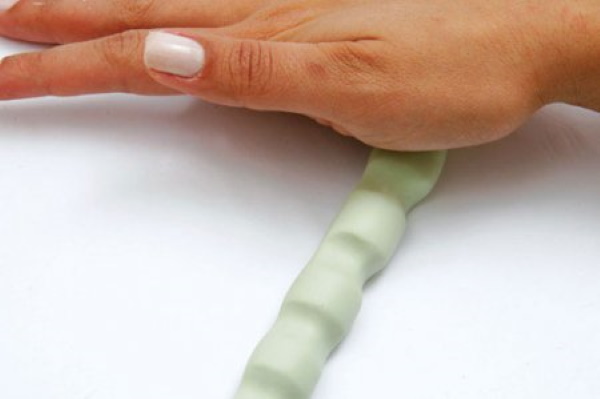
The arms need to be rolled out of red dough in the shape of a sausage, and the future elbow bends need to be marked with a knife.
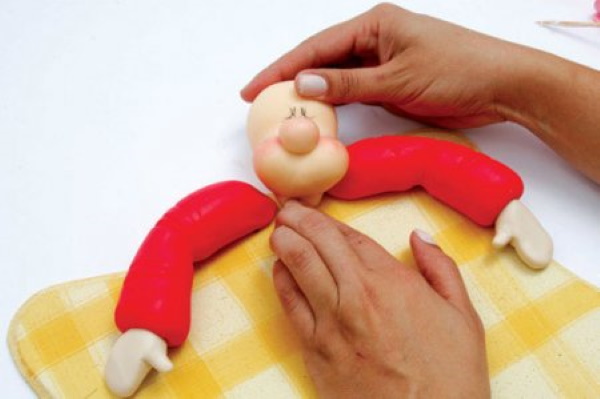
The hands and head of the future Santa must be placed on the stand one after the other.
The stand can be made from MDF sheet or plywood. A layer of porcelain dough will also do. The base can be painted to your taste.
Using molding, you can create mitten-like hands.
The cuffs are made using the same principle as the arms - the dough layer needs to be rolled out and formed into a semicircle.
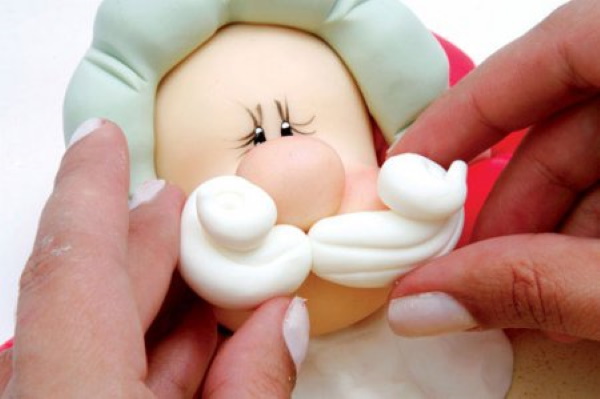
The mustache and beard should be made from long sausages, rolled like a candy wrapper, in different directions at each corner.
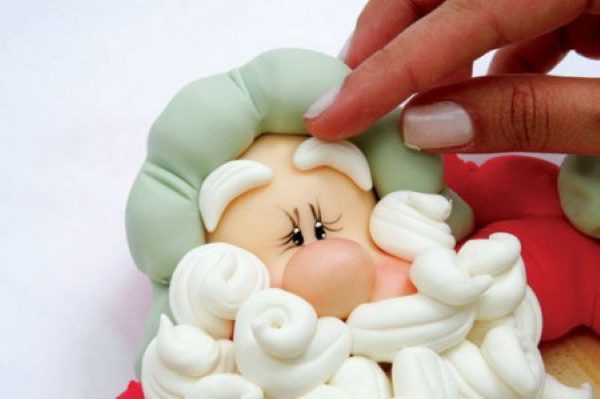
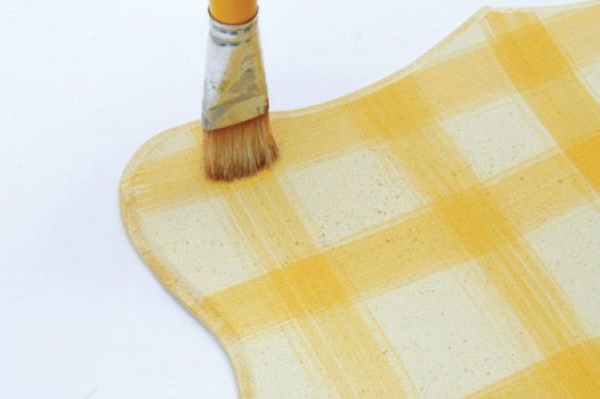
The whole composition can be decorated with splashes of white paint, which gives a shining effect. Using paint, you can apply patterns with a plastic brush.
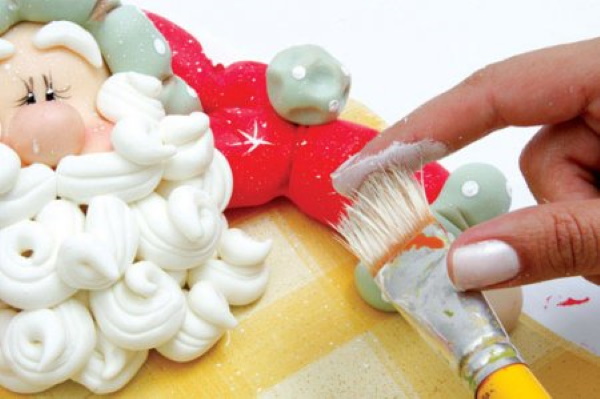
Acrylic or oil paints are best. The latter, it is worth remembering, dries for about 2-3 weeks.
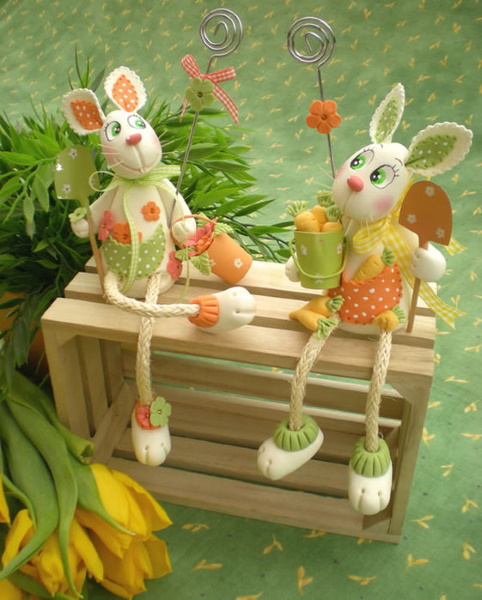
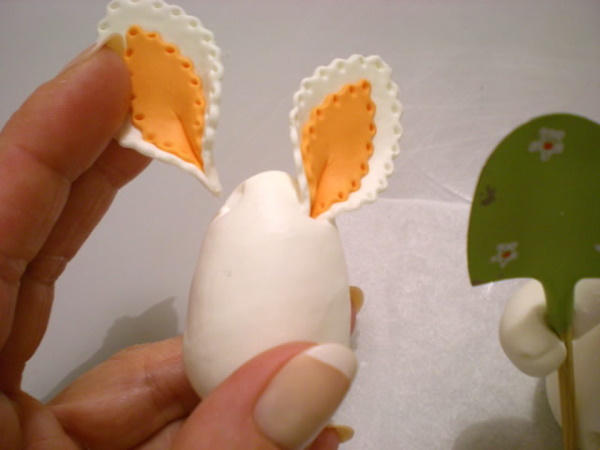
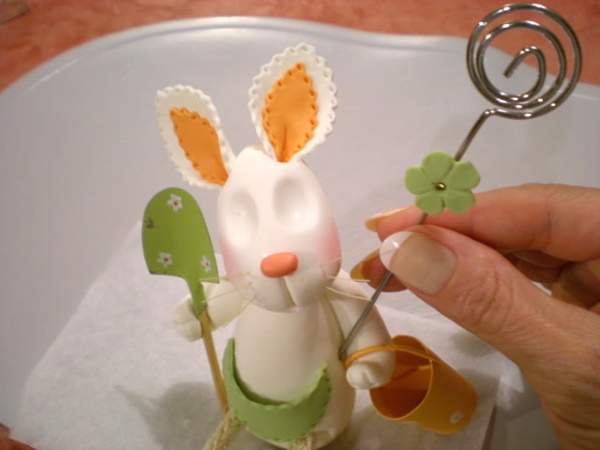
Modeling a hare
To make 2 hares, you can prepare colored dough in advance, which will be used according to the color scheme.
You can change the palette during the cooking process.
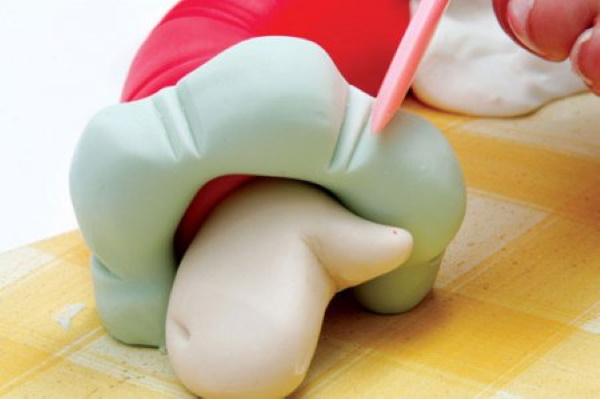
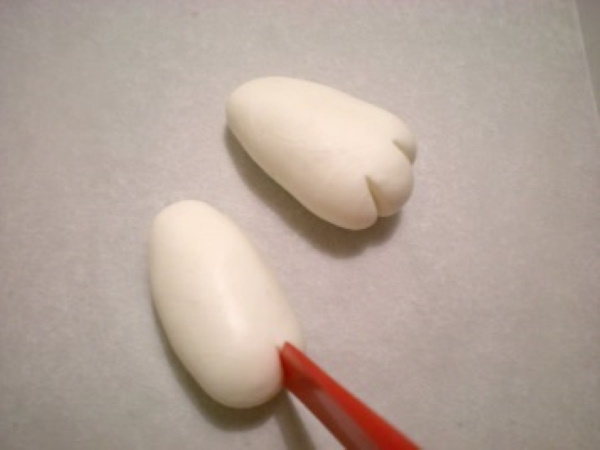
First, you need to prepare miniature bundles that will later become legs.
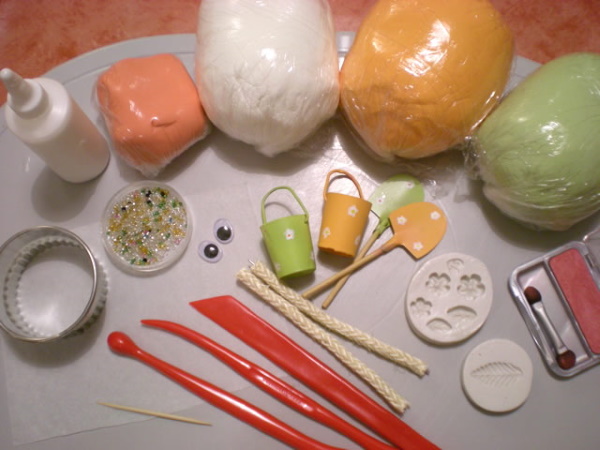
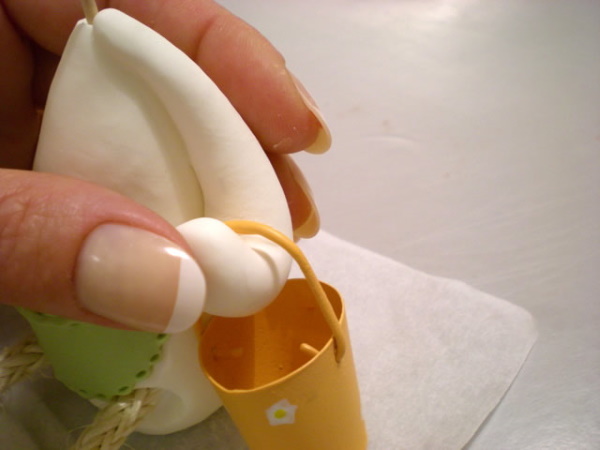
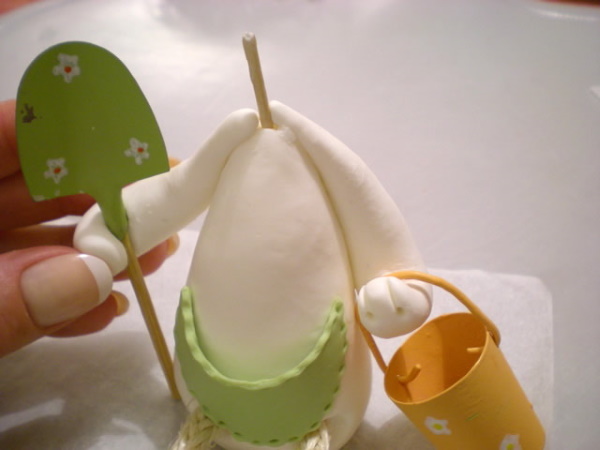
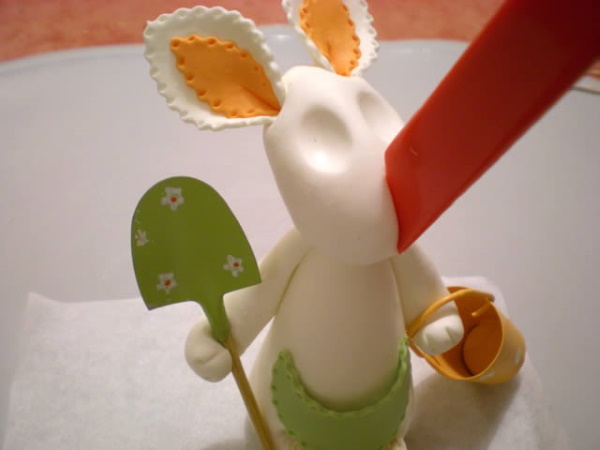
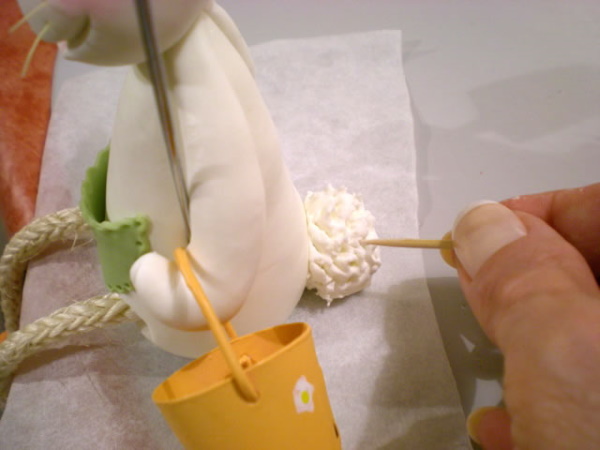
You can buy decorative buckets and shovels at a children's store. You can also make them yourself. First, you need to make the paws.
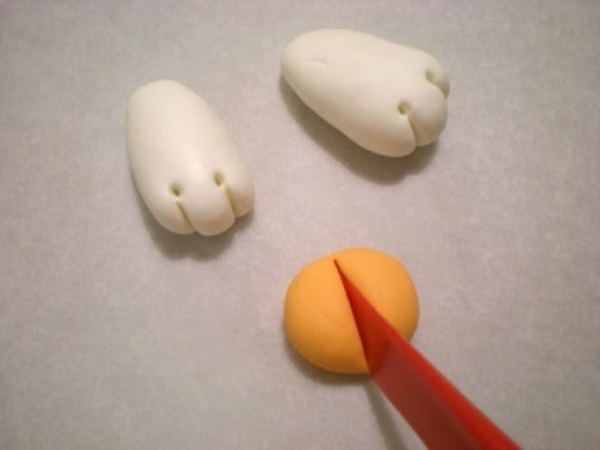
Using a knife, cut the dough – these will be the fingers. The orange balls will be the future cuffs of the socks.
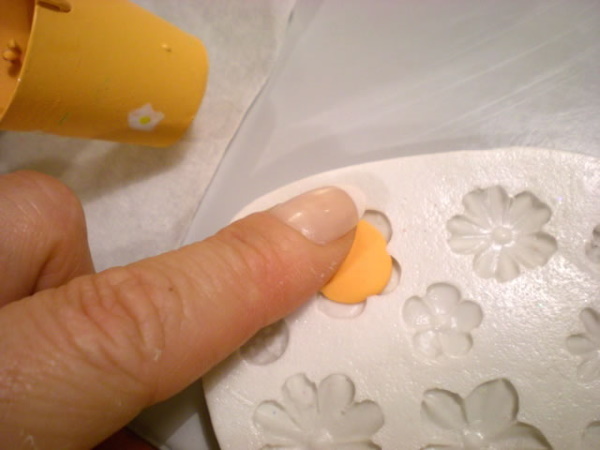
Using a cookie cutter (used in cooking to create different cookie shapes), you can make leaves.
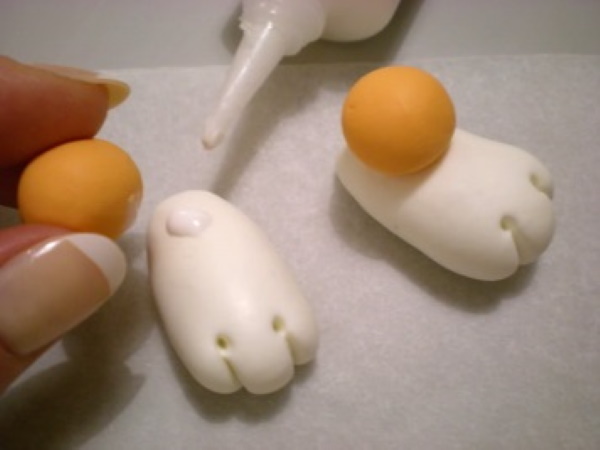

And to decorate with patterns you need to use a small plastic ball.
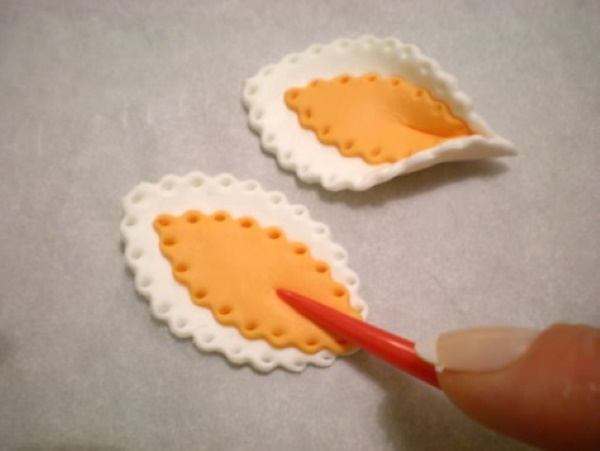
They should sell deep into the point.
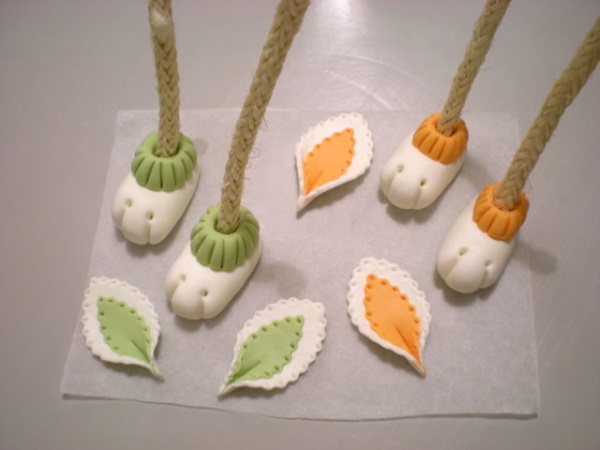
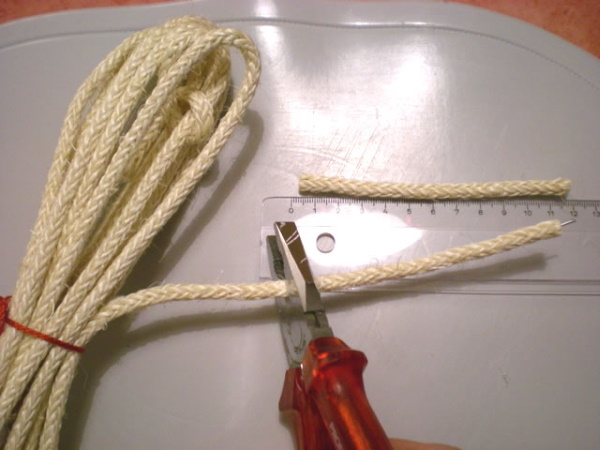
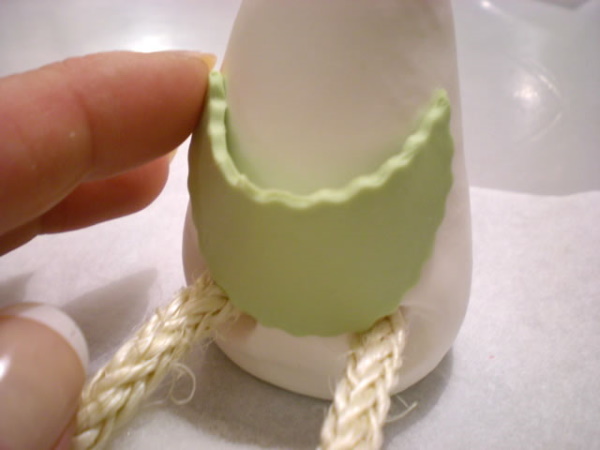
Next, you need to seat the ropes in the center of the dough in the shape of paws. Next, you need to make an apron - using the same cutter, you can cut out relief borders.
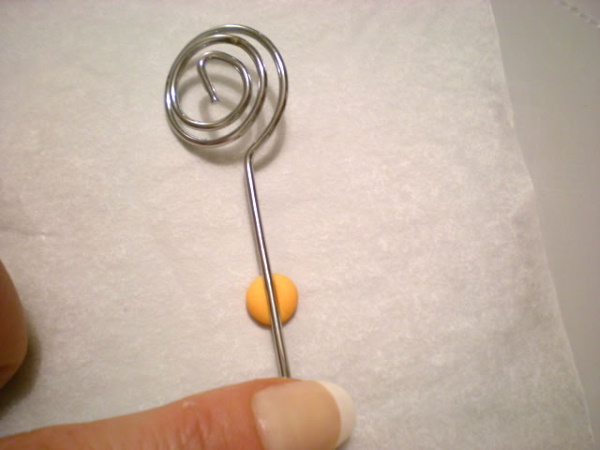
The thick metal wire needs to be rolled into a "croissant", after which flowers are attached to it. In the middle, you can decorate them with regular beads.
The buckets and spatula need to be hung on pre-made arms from an oblong piece of dough.
The previously made ears need to be placed into the head part by pressing the dough into the ball.
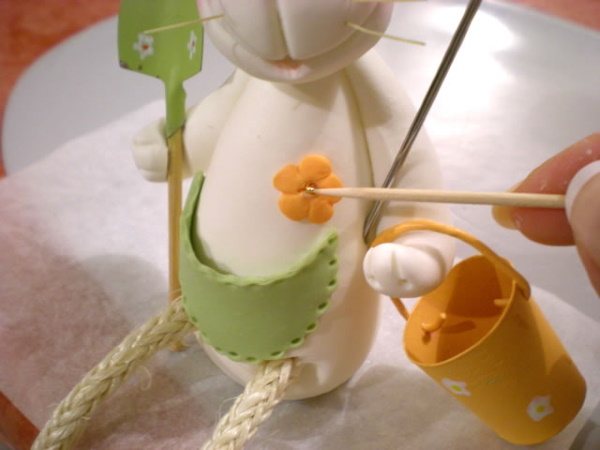
Use a knife to mark the hare's face and teeth.
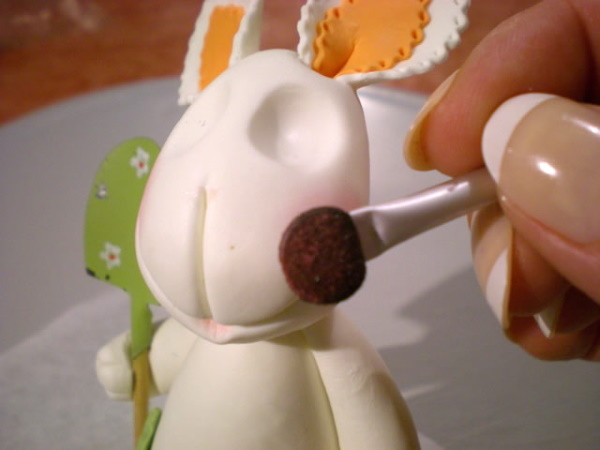
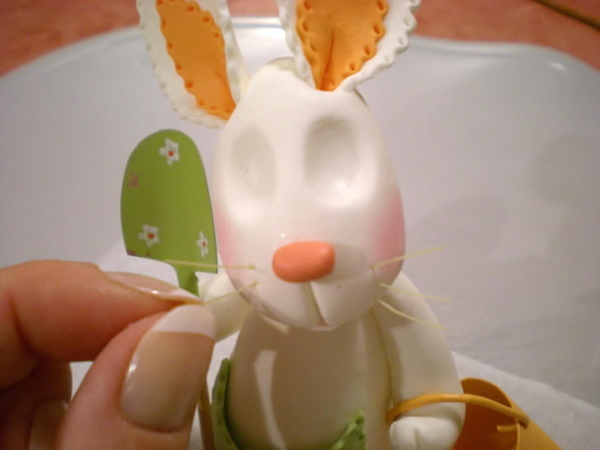
Using simple dry paints, you need to give the face a blush, make the eyes and place the rest of the accessories.
Separately, you need to make a tail - the ball needs to be pierced with a toothpick so that the mass from the inside comes out, creating a voluminous effect.
Floral decoration can be made using molds. After wetting the back of the flower, you can sit it on the body and press it with a toothpick.
The end result is interesting crafts. Such figures do not need to be dried in the oven or kept over a steam bath for the paints to soften and soak in.
Cold porcelain always produces amazing compositions. With the help of plastic accessories, you can make relief flowers, and with the help of children's accessories - unusual toys and simply beautiful figurines. At home, you can make a recipe for suitable cold porcelain, taking into account the features of painting and drying.
Video about making cold porcelain
Recipe for making cold porcelain: