A helicopter is an air vehicle that is widely used in many areas of human activity, including military purposes. The key advantage of such equipment over other types of transport is their ability to take off and land vertically.
This topic will be useful for beginning artists interested in aviation or those wishing to acquire drawing skills.
Necessary materials and tools
Different creative projects may require different combinations of materials and tools. Their choice depends on the style, technique and purpose of drawing.
| Tools and materials | Brief description |
| Paper | Thick sheets of white paper (from 90 to 300 g) are suitable for graphics, for watercolors it is necessary to choose paper with good absorption and a density of 140 to 500 g. Pastel requires moderately primed paper. For mixed media, grainy paper of medium density is suitable - it is recommended for use with charcoal, sanguine, sauce. There are universal types of paper that are suitable for various techniques. Among the most popular brands are: · Faber-Castell. The manufacturer offers a wide range of drawing paper of different formats, densities, colors, with different coatings and textures. · "Sonnet" is a Russian manufacturer. It has various types of paper for graphic works, watercolors, pastels and mixed media. There are also blocks for sketches. |
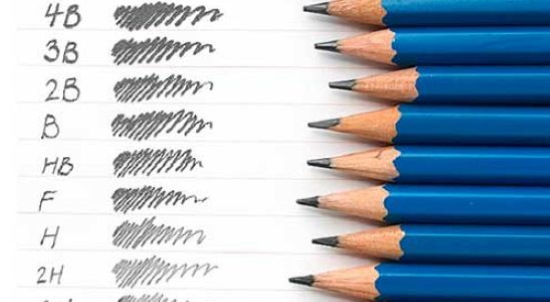
| Pencils | The hardness of the lead is indicated by a special designation on the body of the pencil: from H (hard) increasing to 9H, which indicates the maximum degree of lead hardness, to B (soft), where the number indicates the level of softness.
A soft pencil allows you to create wide lines and apply maximum pressure on the paper to create a rich stroke, while a hard pencil provides finer lines and minimal pressure on the paper. There are the following types of pencils: · Lead is a highly pressed lead placed in a wooden shell. The lines made with such a tool are rich and bold. It is a rich sepia. · Sanguine has many shades, but the main one is the red range. It is used for sketches and drafts and as an independent tool. · Professional colored pencils belong to the category of artistic pencils and are used to create complex works. · Pastels come in soft and hard varieties. They are easy to blend due to the wax they contain. · Watercolor colored pencils have a water-soluble lead. |
| Erasers | These are products for erasing graphite or coal from the surface of paper. They come in soft and hard varieties.
· Soft ones are made of vinyl or rubber. They are designed to remove traces of dry graphite pencil. · Hard ones are usually made of plastic. They remove traces of graphite, as well as retouching and ink. |
| Klyachki | These are tools that are used to lighten the drawing. When lightly touched, the kneaded eraser softens and it seems that it leaves a greasy mark on the paper. In fact, the kneaded eraser absorbs graphite, thereby lightening the sharpness of the tone. Small ones are convenient for working out small details, large ones are more universal. |
| Stencils | These are templates through which a drawing can be transferred to paper. To use a stencil, it is placed on a sheet of paper, then paint or ink is applied to the sheet from the back through the holes. This leaves a drawing on the sheet that is identical to the drawing on the stencil. |
| Rulers, compasses | Rulers are a simple tool for drawing straight lines. Rulers come in a variety of shapes and sizes, from short ones used for small drawings to long ones used by architects and engineers.
A compass is an instrument used to draw perfect circles and arcs. |
| Sharpeners | This is a tool that will allow you to adjust the length of the pencil lead and get a neat and even tip shape. |
Master classes
Military helicopters are complex machines that consist of various components:
- housings;
- engines;
- screws;
- control systems;
- navigation.
They are often equipped with missiles, guns and other weapons to carry out combat missions.
Master classes describe one of the methods of drawing a military helicopter in pencil. Using a harmonious combination of perspective, shadow and correct distribution of light, you can achieve a natural visual effect of the drawing.
Mi-24
The Mi-24 is a large and heavy helicopter. It can carry not only people, but also various cargo, such as weapons or military equipment. It has 2 powerful engines that allow it to fly quickly and maneuver even in difficult conditions.
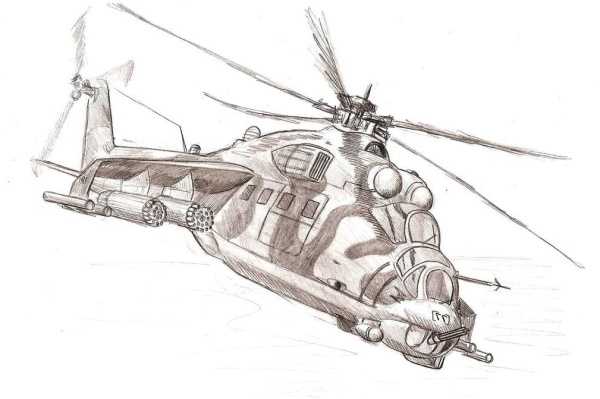
Inside the Mi-24 is a pilot's cabin, where the person who controls the helicopter sits. Next to the pilot is the gunner's seat, who helps him in combat. The Mi-24 is used by the military in many countries around the world.
The helicopter in the picture can be created using the following step-by-step instructions:
- Start by creating an oval shape for the body of the helicopter, on which all other elements will then be placed. The oval should be large enough to accommodate the entire structure of the helicopter.
- Inside the oval, add a small circle that will represent the cockpit. Place it approximately in the center of the oval. This will become the basis of the drawing.
- Add an elongated nose shape, just below the cockpit. It should be triangular in shape with rounded corners.
- Mark the engine air intakes here. They are located in front of the cockpit and are needed to cool and supply air to the engines.
- Create an H-shaped tail boom where the center line connects the cockpit and the nose of the helicopter.
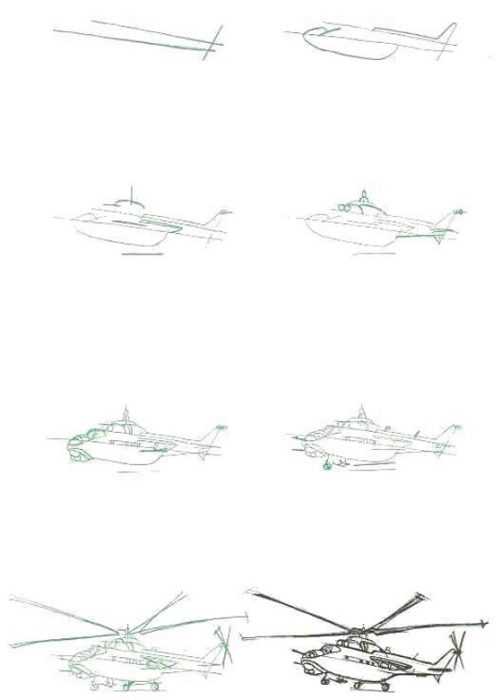
- Add triangular horizontal stabilizers to the ends of the center line, which provide stability to the helicopter during flight.
- On the top of the helicopter body, draw a small rectangle - this is the superstructure for attaching the rotor blades. The blades will rotate around this superstructure.
- Draw 2 circles in the nose section to represent the engine turbines. The diameter of these circles should match the size of the helicopter nose section.
- Inside the rectangle for the superstructure, draw a vertical line that will represent the axis of rotation of the blades.
- Add 3 landing gear supports under the helicopter body. They should be located symmetrically and at a slight angle relative to the helicopter body.
- Draw the rectangular cockpit windshields located under the cockpit circle. They should have a rounded top and clear, straight bottom edges.
- Add side windows. They are rectangular in shape and are located symmetrically on both sides of the fuselage.
- Draw the cabin doors located at the rear of the helicopter. They can be slightly rounded and slightly offset towards the tail.
- Draw missiles and machine guns on the helicopter's external mounts.
- Add additional details such as antennas, lights and other elements typical for the Mi-24 helicopter.
- Draw the main rotor blades above the cockpit and on the tail. They should have enough detail and the correct proportions.
- Remove all unnecessary contour lines.
- Apply military paint to the helicopter. Use different shades of green, brown and gray to create a realistic camouflage effect.
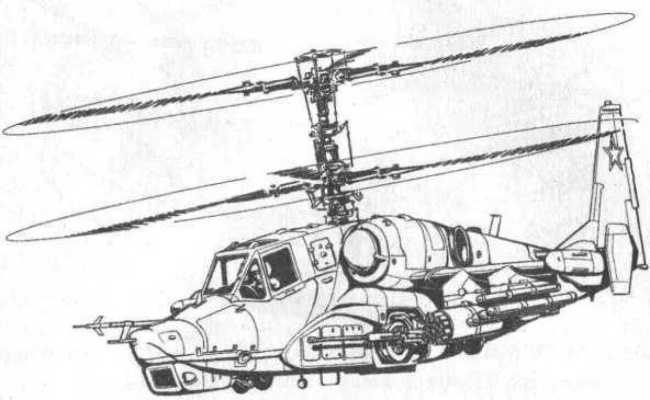
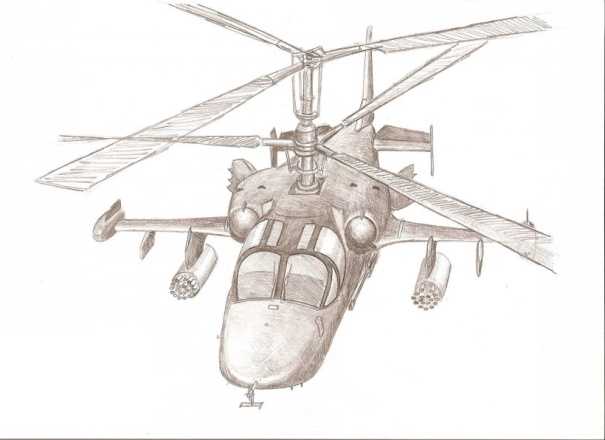
Ka-52
The Ka-52 helicopter is a powerful combat vehicle created by Russian engineers. This equipment has 2 powerful engines and two large propellers. The cabin is protected by armored glass so that the crew can carry out their work safely.
The Ka-52 can not only fly fast, but also make sharp turns, rise high into the sky and even hover in the air.
The helicopter in the picture is depicted based on the step-by-step master class:
- Start by sketching the general outline of the helicopter. Use simple geometric shapes such as rectangles and triangles to indicate the main parts of the helicopter, including the cockpit, tail section, and the tail section.
- Draw the nose section where the cockpit is. This will be the small part at the top of the drawing, usually in the shape of a triangle.
- The tail section has a trapezoid shape. It should be located at the bottom of the helicopter. draw the tail unit - 2 vertical keels located on the sides of the tail boom.
- Draw the superstructure on which the rotor blades are attached. It is a round structure at the top of the helicopter.
- In the center of the superstructure circle, draw a supporting shaft around which the blades will rotate. It should be vertical and pass through the center of the circle.
- Add 2 turbines, which are located at the ends of the helicopter wings. They should be in the form of cones or cylinders.
- Draw the landing gear under the helicopter. It consists of 3 main legs and 1 nose leg. The legs should be thick and strong.
- Draw frontal windows on the front of the cockpit, and side windows on the sides. The frontal windows should be large so that the pilots can see well forward, and the side windows should be small and located slightly below the frontal windows.
- On the side of the cockpit add the cabin doors. They should be small and square.
- Draw missiles and machine guns on the wings and fuselage of the helicopter. The missiles are small cylinders with cones at the end, and the machine guns are rectangular structures with narrow slits.
- On the superstructure, draw 2 blades located one above the other. They should be curved and wide at the base.
- Remove all unnecessary contour lines.
- Add volume to the drawing by shading the helicopter.
Chinook for little artists
The Boeing CH-47 Chinook helicopter is one of the most widely used models. Its high payload and versatility make it ideal for transport operations. The Chinook has multiple engines.
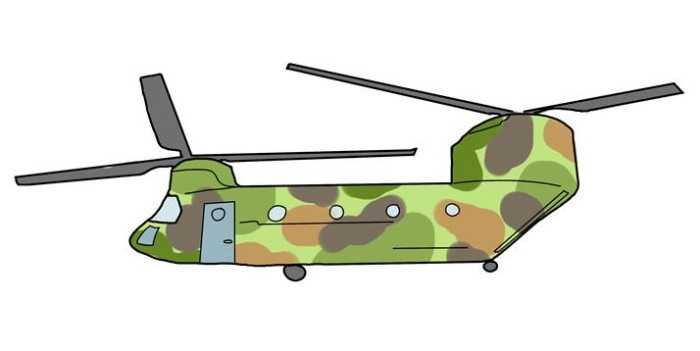
It also has large blades that allow the helicopter to hover in the air. Inside the Chinook there are special compartments where you can carry cargo or people.
The helicopter in the picture, which can be created using this step-by-step master class, can be depicted by a novice artist:
- Determine the basis of the future drawing - an oval for the body and a circle in the front part for the pilot's cabin. Use a pencil and draw these lines on a sheet of paper. The oval and circle will serve as a frame for the entire helicopter.
- Draw a wedge-shaped outline with sharp edges in the nose. The line should flow smoothly from the rounded shape of the cabin to the pointed front part. Draw the details of the nose, such as vents and other elements.
- Draw the tail section, which consists of 2 curved lines connected together. The outline should be symmetrical relative to the vertical axis of the helicopter. At the end of the tail, draw a small pointed protrusion.
- Above the pilot's cabin, draw a small oval superstructure for attaching the blade. On the tail of the helicopter, another larger round superstructure for attaching the tail blade. Draw the connecting elements between the superstructures and the body.
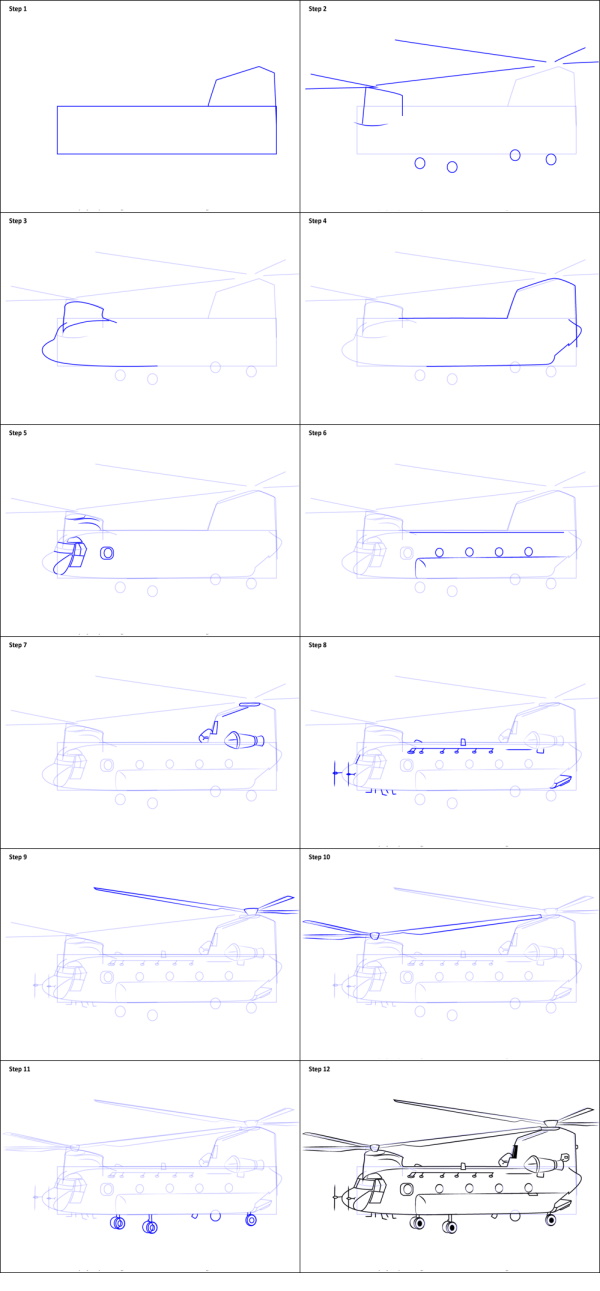
- Draw the helicopter chassis under the body. They should look massive and stable. Draw thin auxiliary lines.
- Add windshields for the cockpit using thin straight lines. They can be quite large.
- Draw the cabin doors on the side. They should be rectangular and located symmetrically relative to the central axis of the helicopter. Indicate the door hinges and handles.
- Draw the main pair of blades above the cockpit and the tail blades on the tail. Consider the angle of inclination and the width of the blades.
- Proceed to remove excess lines.
- To color the drawing, use army shades, which usually consist of a combination of dark green, brown and gray colors.
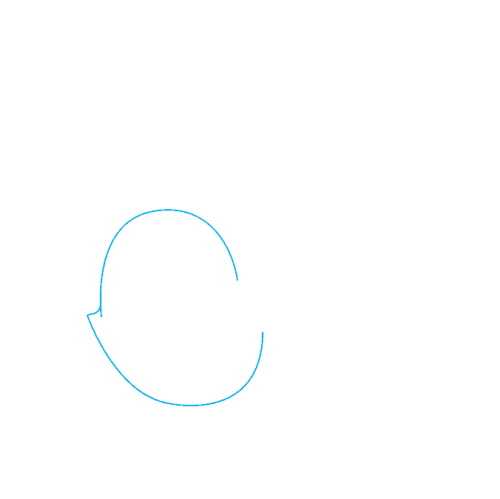
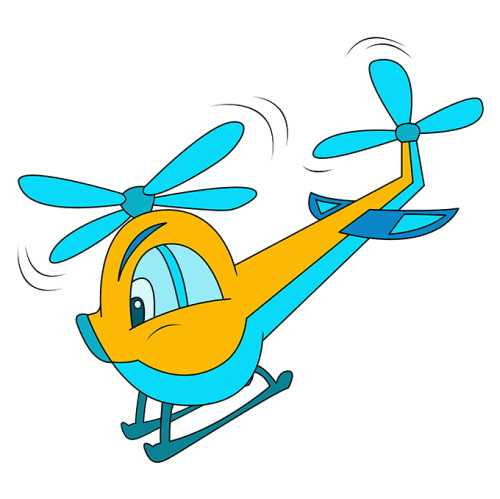
In cartoon style
The helicopter in the picture can be depicted with eyes and a smile using a step-by-step master class:
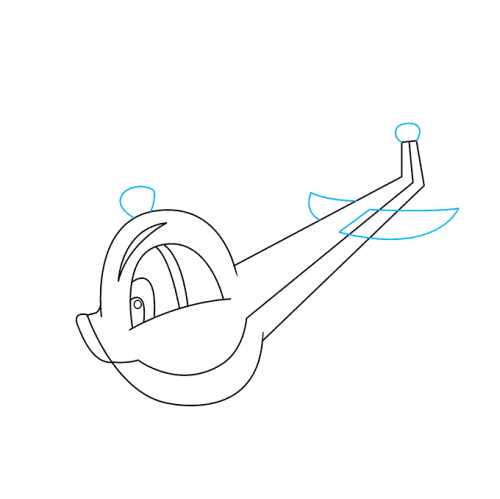
- Draw a simple oval or circle as the base of the helicopter. This outline will serve as a basis for subsequent details.
 |  |
 |  |
- Add a rectangular or triangular nose piece to the oval.
- Give the nose the desired shape by adding smaller details such as curved lines that emphasize the shape of the nose.
- Place a small oval or round tail section at the rear of the main body of the helicopter.
- Create curved line details to create the illusion of a tail.
- Draw 2 turbines using vertical and horizontal lines. They should be connected to the main shape of the helicopter. This can be done using short curved lines.
- Mark the landing gear by drawing straight lines from the base of the helicopter to the ground.
- Use thin curved lines to define the cockpit windows. They are proportional and not too thin to provide visual impact.
- Add rockets or machine guns using dots or simple outlines.
 |  |
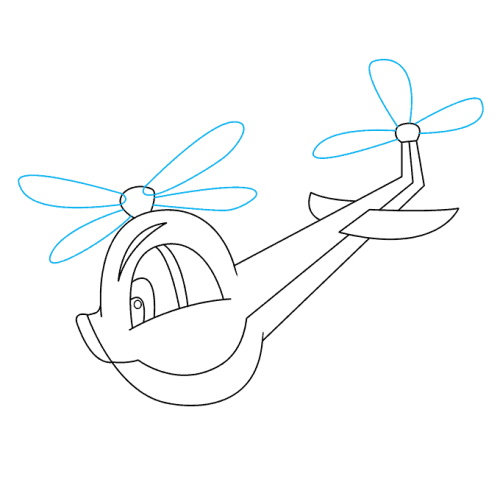 | 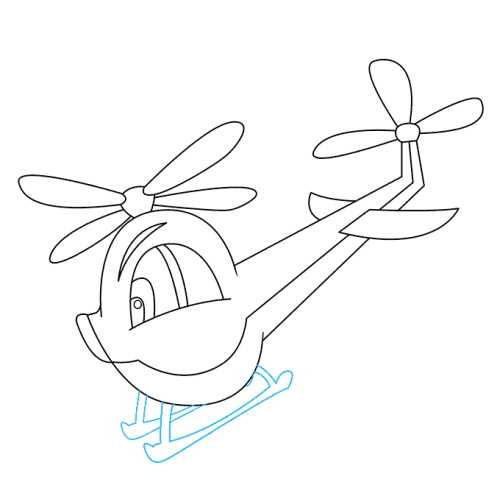 |
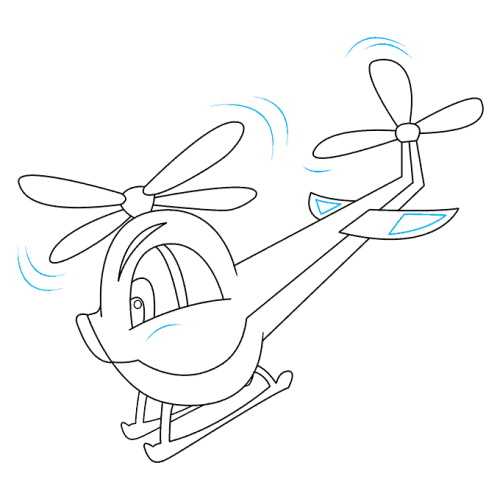 |  |
- Draw 2 eyes using circles or ovals with thin lines to represent eyelashes or eyebrows.
- Create a smile with a curved line on the nose of the helicopter. For a cartoon style, exaggerated shapes and sizes can be used.
- Detail the blades using curved lines and short strokes. In cartoon style, they can be larger and brighter than in the real world.
- Remove unnecessary contour lines.
- Colour using shades of brown and green.
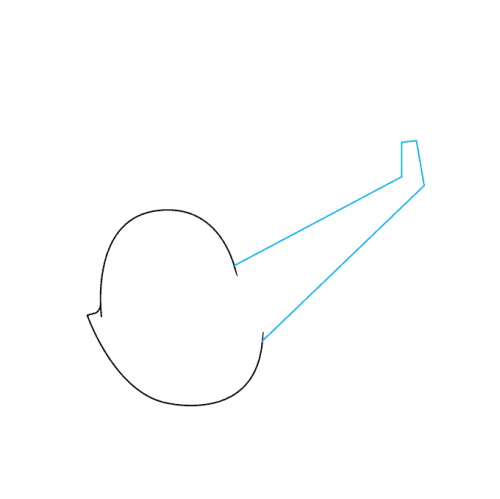
Silhouette (front view)
The helicopter can be depicted as a simple silhouette with characteristic outlines and proportions, following the steps from the master class:
- Start by creating a simple sketch. Draw the general outline of the future helicopter, which will determine its shape and proportions.

- Draw the superstructure for the blades, which is located at the end of the rotor shaft. This part of the helicopter gives it a characteristic appearance.
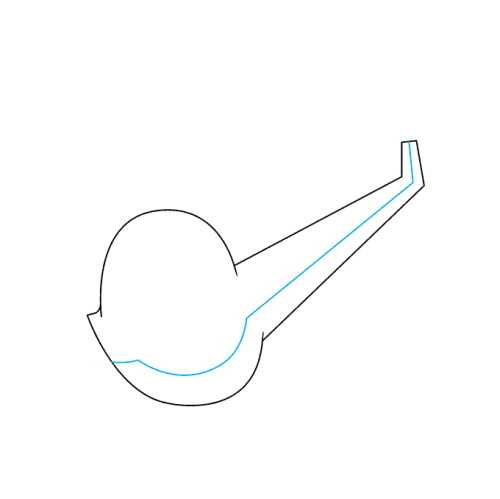
- Draw a line to represent the blade carrier shaft. It should pass through the center of the blade superstructure and widen evenly toward the bottom of the helicopter.
- Draw the chassis, which is used to support the machine on the ground. It consists of 3 or 4 supports located under the fuselage.
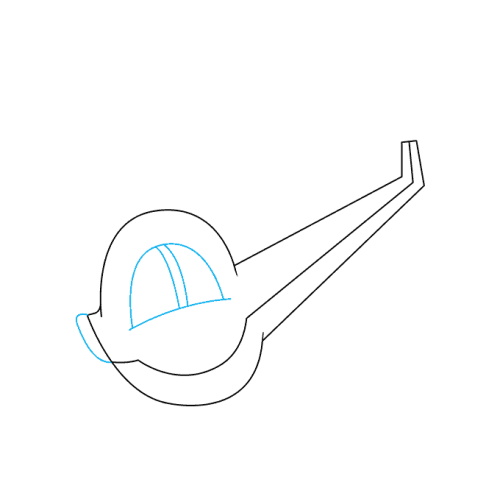
- Add rockets that can be attached to the sides of the helicopter or its body.
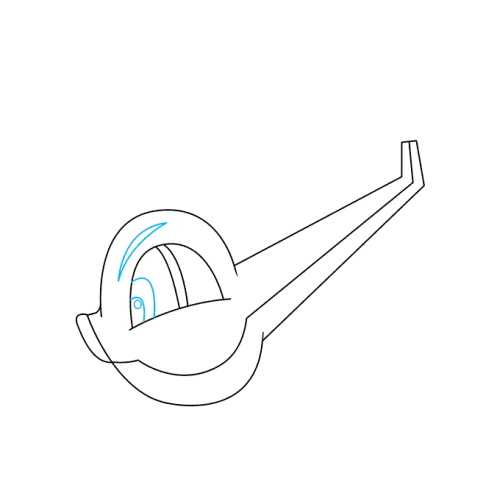
- Using a few lines, draw the main blades of the helicopter rotor. They should be angled relative to the main shaft and pointed forward.
- Remove all unnecessary lines that are not part of the main outline of the helicopter. Clear the drawing of unnecessary details.
- Use black to paint the interior areas of the helicopter, including the blades, superstructure and landing gear.
Tips for Beginners
General recommendations for creating an image of a military helicopter that will help you draw it correctly and accurately.
| Stages | Comments and recommendations |
| Models for drawing | This can be a photo from the Internet or an image from a magazine, encyclopedia or other reliable source. It is important to examine in detail all the design features of the helicopter. Pay attention to the shape of the fuselage, the number and shape of the propellers. Note details such as the chassis, cockpit doors, tail boom. It is important to highlight the weapons. |
| Start with the general outline of the helicopter | Draw the shape of the fuselage and propellers. Draw the basic shape of the body, blades, tail section and wheels. Use simple geometric shapes to create the basis of the drawing. Maintain proportions relative to each other. Use a ruler or auxiliary means to create straight lines. |
| Work out the main details | These are the chassis, armament, cockpit glazing, and others. Mark the main elements of the helicopter — this will be useful for further development of the drawing. Detail the image of the propellers. The blades should look voluminous. Pay special attention to their length and shape. |
| Learn how light and shadow work | Add these effects to the drawing. Gradually form shadows and light areas. Using different painting materials, you can create an interesting effect of volume and light. |
| Finish the details | Add accent elements such as camouflage, markings and other details. Erase unnecessary lines and make final adjustments. Assess the overall effect and make sure the drawing matches the original concept. |
Military helicopters are unique technical devices that are an integral part of the modern air force. If you take into account the features of this equipment when drawing, you can create a more realistic and accurate image.
Video about drawing
Helicopter - drawing: