Knitted yarn became popular immediately after its appearance on the market. Unlike regular yarn, it is much easier and faster to work with. Using standard crochet patterns, you can create even the most complex product in just one day. This material is also convenient for handicrafts, so it is suitable for beginners.
Types of knitting yarn
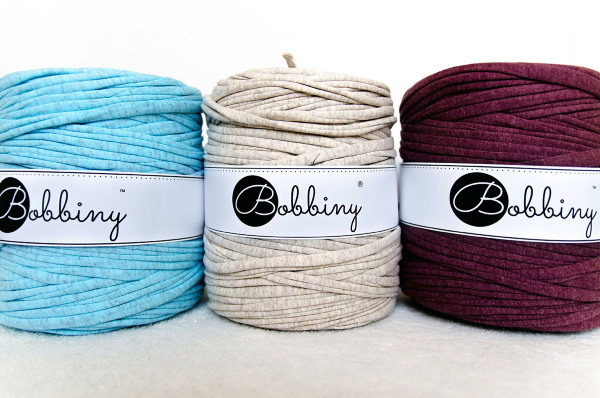
Knitting with knitted yarn using a crochet hook is a simple task that even a person without skills can learn. But to simplify the work, you need to learn how to choose the right yarn. It differs in types, which you can see in the table below.
| Name | Description | Advantages | Flaws |
| Handmade (made by hand) | The basis is any knitted product, which is cut into equal strips and then twisted into balls. | Waste-free production, you can make a beautiful thing from an old, worn-out one. | It takes time to make yarn. Since the work is done by hand, there will be some unevenness and defects. It is also not possible to make a long skein of yarn, there will definitely be knots. |
| Primary | The threads are cut from full-fledged canvases, therefore they are the most beautiful, long and dense. | No defects, threads are even, without burrs and defects. There is a wide choice of color and texture. | They differ mainly in price |
| Secondary | The threads are cut from pieces of knitted fabrics that remain in production. | Various compositions and low prices | Often there are defective products, threads break or snap. |
Knitted yarn in each considered variant is threads cut from the corresponding material. They differ from each other in quality, composition and ease of work.
Pros and cons
Advantages:
- large thread sizes. The work is done faster, and the product acquires an unusual texture;
- many ways of knitting;
- it is possible to work with your hands without using any tools;
- a large selection of offers on the market, different price categories;
- many manufacturers;
- easy care for finished products – machine washable, most types of yarn do not fade in the sun.
Flaws:
- It is difficult to work out small decorative elements, so it is better not to use them;
- to give shape, the product must be starched or soaked in syrup;
- quickly absorbs odors that are difficult to get rid of;
- finished products shrink significantly after the first wash;
- Many types of yarn shed heavily and cannot be machine washed with other items.
Color scheme
The color variety of knitted yarn on the market is endless. The entire existing palette is used, so there are no problems with the choice.
There are several fashionable colors in the 2020 season:
- bright scarlet;
- blue (classic);
- orange (orange);
- coral;
- pink;
- bright yellow (saffron).
Classic colours are also always in fashion: black, white and grey.
What to knit from knitted yarn with a crochet hook
Knitting with knitted yarn crochet gives a wide scope for the implementation of creative ideas. This is the simplest material for needlework, but at the same time it is universal.
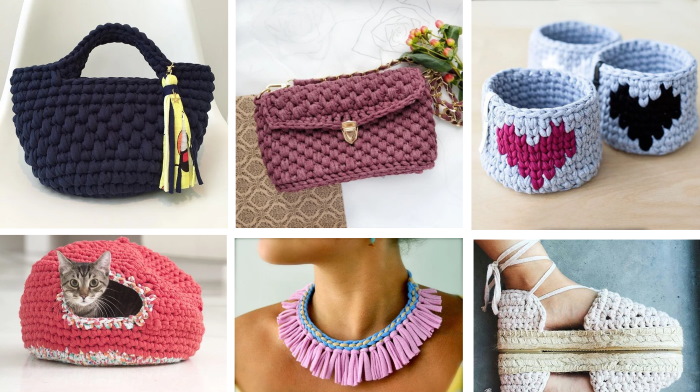
You can create any products, but the most popular are:
- bags. They dry quickly, are easy to wash and do not fade in the sun. The use of large and small threads allows you to create both simple everyday items and miniature ones intended for going out;
- backpacks. Unlike bags, they are more difficult to work with. But the result is a durable and reliable product of any design;
- decorations. Even without any skills, but following detailed instructions, you can make a set in 1-2 hours, including a bracelet, necklace and earrings;
- boxes and baskets. They are used in the interior for things. It is important to choose the right yarn for them, it should be strong and durable. You also need to tighten the loops well so that the basket holds its shape;
- poufs. The basis is already prepared forms, for example, car tires. Then they are wrapped in a yarn cover, and can be used in any interior.
Clothes made from knitted yarn look beautiful. But they are not popular because they stretch quickly, losing their original appearance. The exceptions are outer capes.
How to calculate yarn consumption
Knitting from knitted yarn with a crochet hook should begin with the acquisition of the necessary materials. And in advance it is worth calculating their quantity. It is recommended to take into account with a reserve, since there may be defects in the tapes. And also beginners often make mistakes, as a result of which there is a loss of material.
The yarn count is based on the desired product. Approximate data are considered on the sites where materials are sold. You can also check the information with the seller or use ready-made tables.
When calculating the consumption, the following features are taken into account:
- the thicker the thread, the less consumption;
- simple patterns cost less than complex, patterned ones;
- the tighter the thread is twisted, the greater the consumption;
- the thicker the hook, the less consumption. But then the strength of the finished product decreases.
Choosing a hook and other knitting accessories
Knitted yarn is used both with a crochet hook and with knitting needles. The first option is more popular, since it is faster to work with. Knitting needles are usually used to knit individual decorative elements if small details need to be worked out.

The thicker the hook, the looser and more delicate the surface of the product will be. Small specimens (No. 8-10 and less) are selected for dense items, such as a basket or rug. Large knitting is mainly used to create clothing items.
Master class for beginners: the simplest crochet basket from knitted yarn
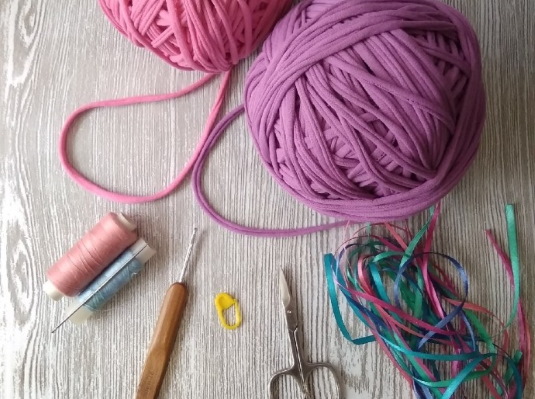
To work you will need:
- yarn;
- hook;
- decorative ornaments (can be made by yourself);
- form (for beginners only).
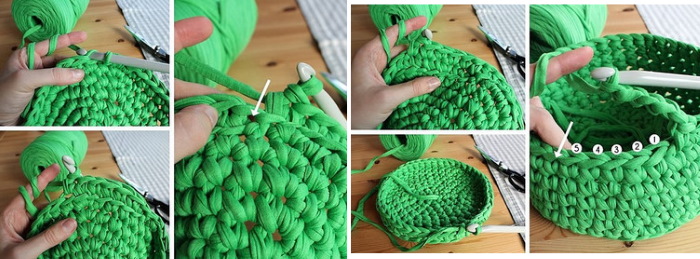
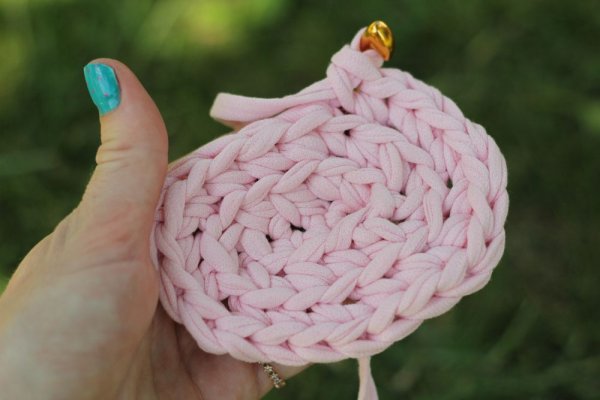
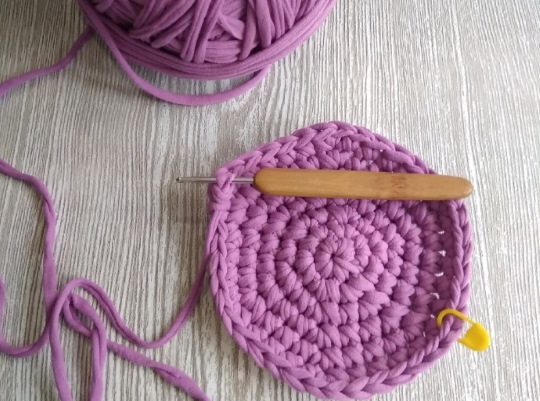
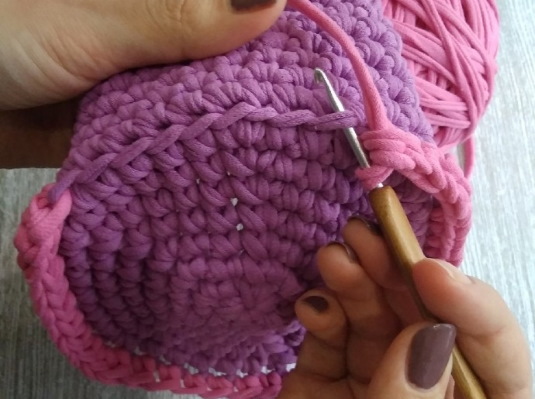
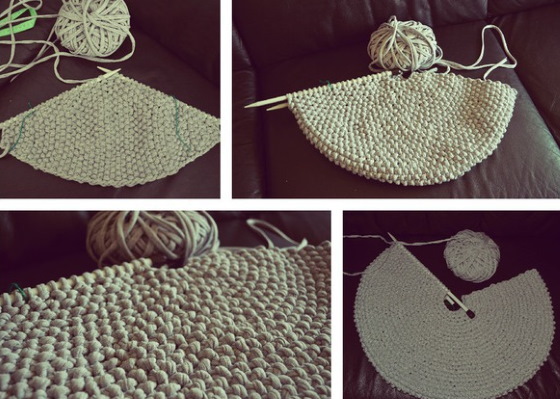
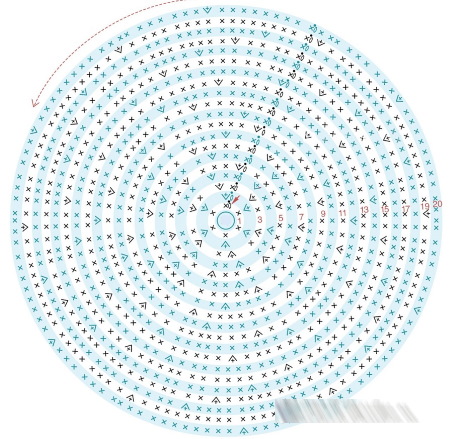
Bottom
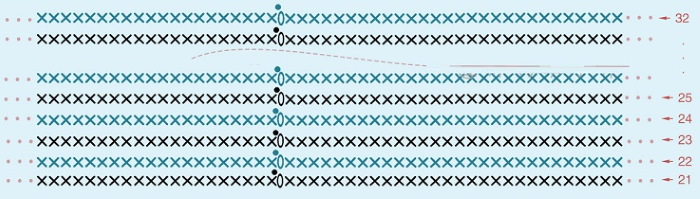
Instructions:
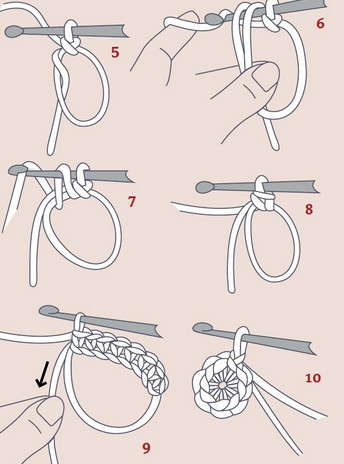
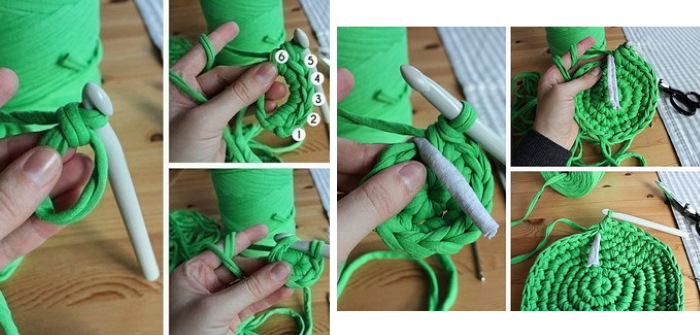
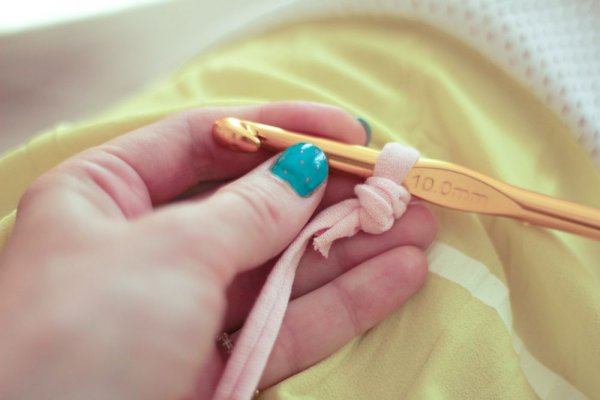
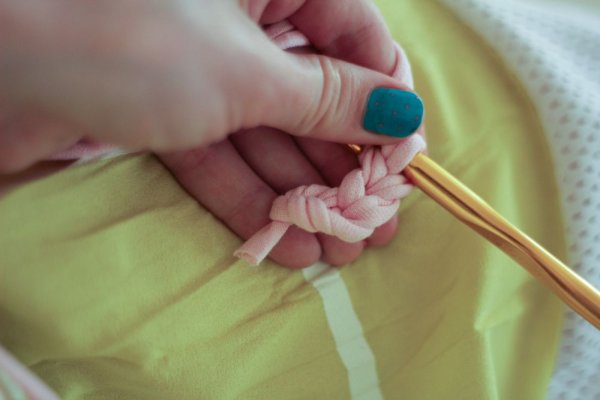
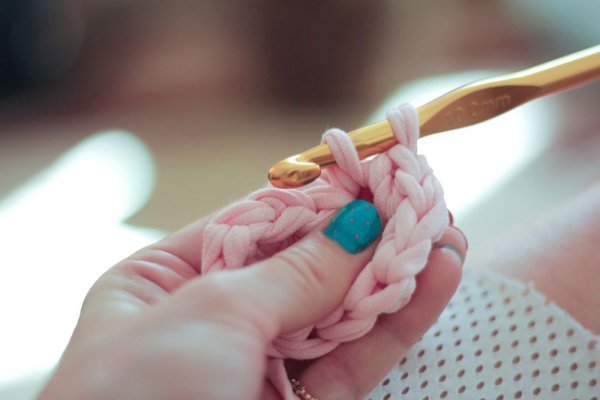
- Make an amigurumi ring. The thread is placed above the fingers, wrapped three times, then a single crochet stitch is pulled out.
- An air loop is knitted.
- In the ring, knit 6 single crochet stitches.
Tip: do not tighten the first braids, otherwise the middle of the bottom will stick out downwards.
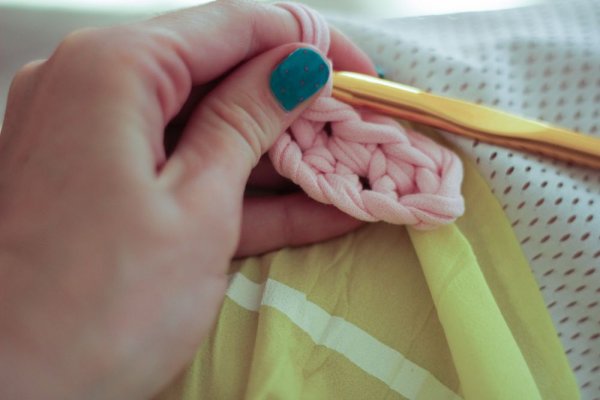
- The first row is knitted. The posts should not be pulled tightly, otherwise the knitting will become more difficult.
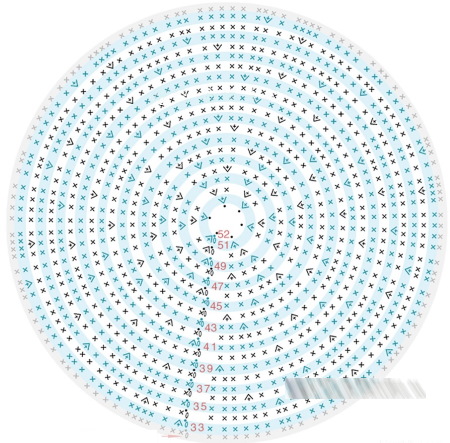
- Subsequent rows are knitted until the product reaches the desired diameter.
- The wider the row, the stronger the tension of the posts should be.
- The bottom of the basket is completed with a row of ticks, slightly raised upwards – this is how the blank for the walls is made.
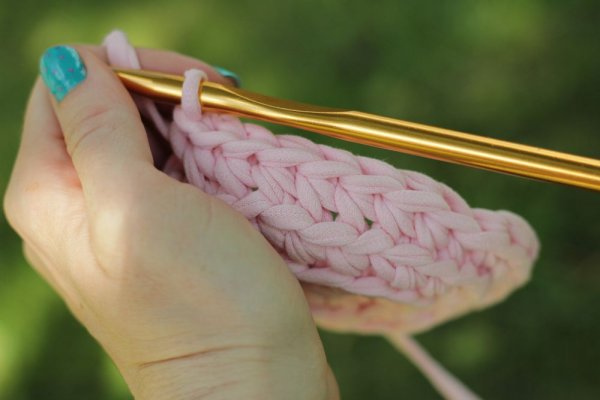
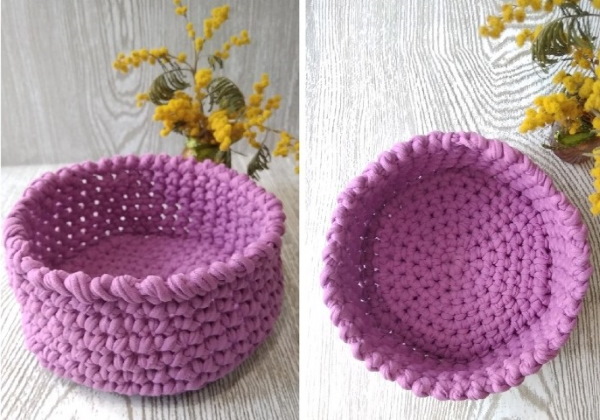
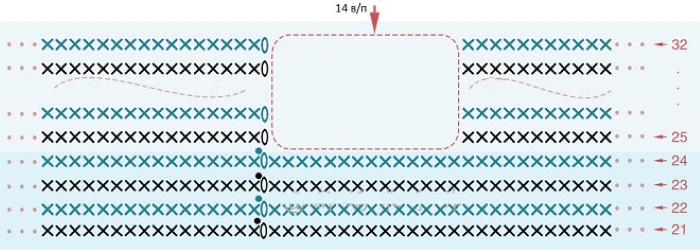
Walls
Instructions:
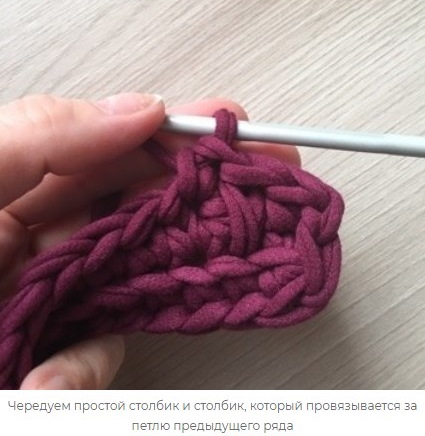
- On the finished row of check marks on the bottom, a second row of the same is knitted, but for the back loop, to align the walls.
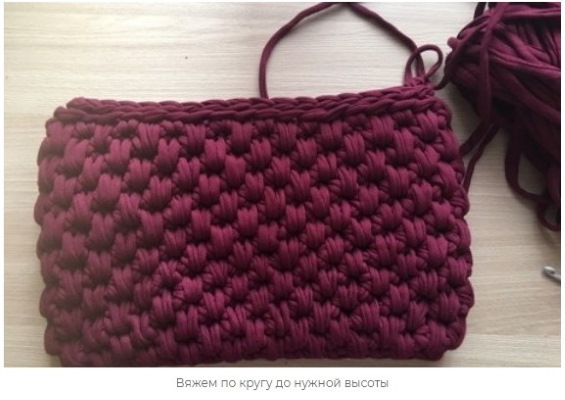
- Rows are knitted until the product reaches the desired height.
- The work is completed with a decorative row of vertical loops. For this, you can take yarn of a different color, but so that the base and decor are in harmony with each other.
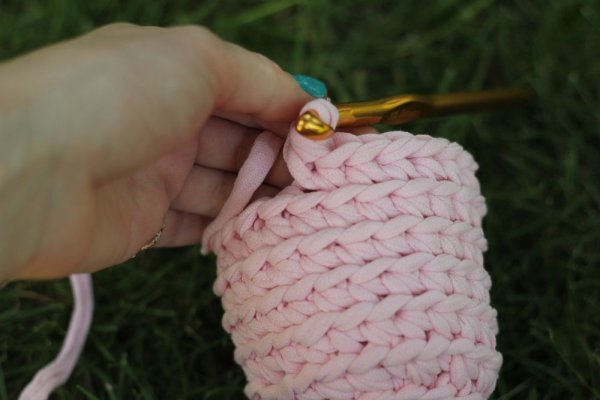
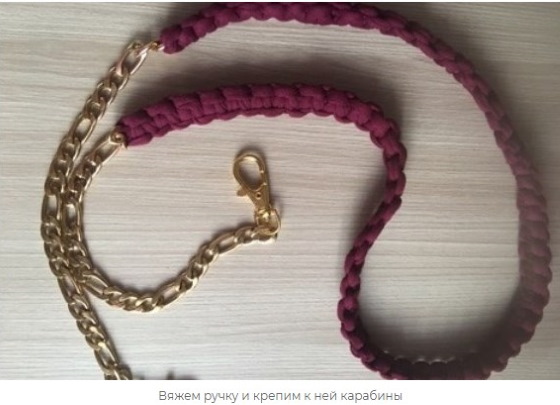
Handles
Instead of handles, you can make owl ears. Then decorate the basket with owl eyes and a beak. Then this element will be both beautiful and functional.
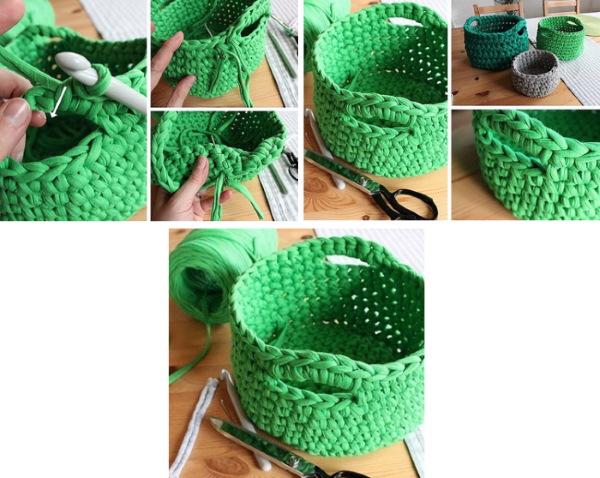
To create handles-ears on the sides, several short and dense rows protruding upwards are knitted parallel to each other. You can use the macrame technique for this. It is convenient to hold the basket by such ears, they are reliable and strong.
Lid
The lid is made in the same way as the bottom. But it is important to increase the number of rows so that it completely covers the top of the basket.
Giving rigidity to the finished product
First, prepare the syrup: 4 tablespoons of sugar per 1 cup of water. Boil over the fire for several minutes until the liquid reaches a uniform consistency. Then soak the finished knitted product with the resulting syrup, and then give it the desired shape. When the basket dries, it will become much harder and stronger than it was.
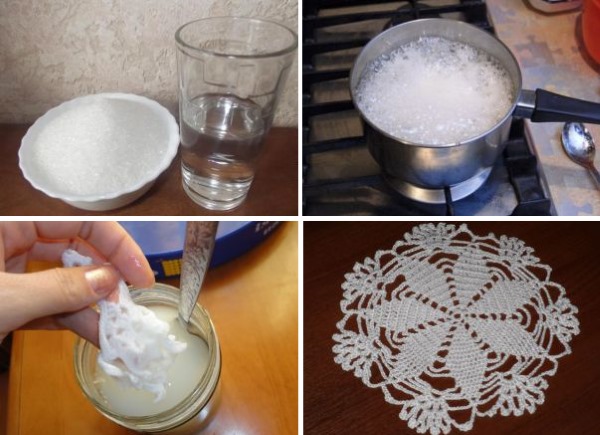
Note: this method is suitable for adding rigidity not only to a basket made of knitted yarn, but also to all other knitted items.The method is not durable; if the basket is washed, the procedure will need to be repeated.
Decorating a basket
Together with the ear handles, the basket should be decorated in the shape of a cute owl head. For this, the eyes and beak are knitted separately. Then they are sewn to the front of the product. You can also make a small tuft in the center of the lid. It is done using the macrame technique in the same way as the ears were made.
Knitting with knitted yarn crochet: ideas, patterns, step-by-step description
It is not difficult to learn how to crochet from knitted yarn. The problem is that for many products you need to adjust yourself, to be able to navigate.
For example, the instructions may indicate one number of loops, but in reality the things go in waves. This means that the number of loops is more than required. Therefore, you need to start with the simplest things to get the hang of it and the ability to adjust.
Glass
Jersey cups are great options for storing pencils or small items. These items can also wrap around glasses to keep liquid warm longer. Sometimes they are made to decorate old flower pots.
Instructions:
- A chain of 5 loops is cast on.
- The chain is tied in a circle with single crochet stitches.
- After 2-3 rows, double stitches are made to form and raise the circle.
- On the 5th row, knit single crochet stitches again, but upwards. These will be the walls.
- When the product reaches the desired height, the end of the thread is hidden inside. Then the upper part is sewn with regular threads in the same tone.

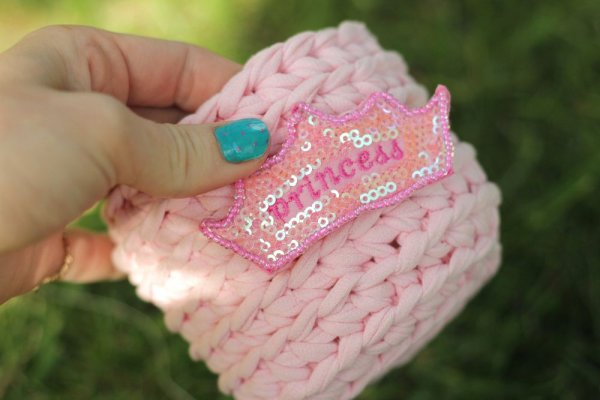
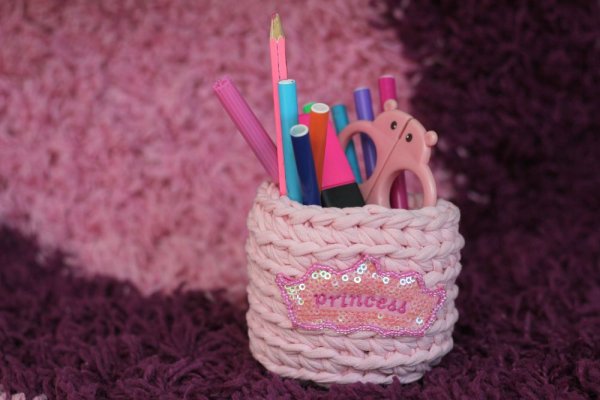
For decoration, it is better to buy ready-made appliques that match the color. They are sewn on with regular threads in the same tone, or bright ones to accentuate the attention.
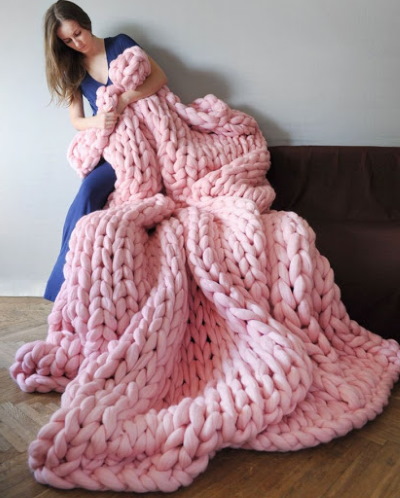
Cozy thick blanket
To knit a blanket, you will need 2 or more skeins of thick multi-colored yarn and a #10 hook (or more, depending on the thickness of the thread).Important: the length can always be adjusted during knitting, but the width cannot be increased., so you need to think about the dimensions of the product before you start working on it.
 Then follow the instructions:
- Making an amigurumi ring.
- In the ring, knit 11 double crochets.
The following rows are performed in the standard manner.
- The number of loops will constantly increase, their exact number depends on the thickness of the thread.
- When the product reaches the desired size, an openwork edge is made.
To do this, make 3 air loops, passing a regular one inside.
Continue this until the edge is completely processed.
- At the end, the product is secured with a connecting loop.
For a blanket, it is better to choose thick yarn, since the finished product will then be much softer.
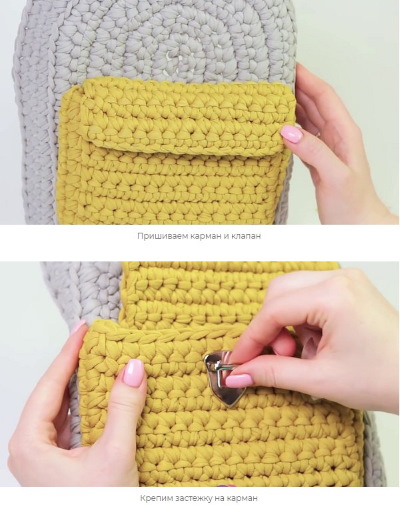
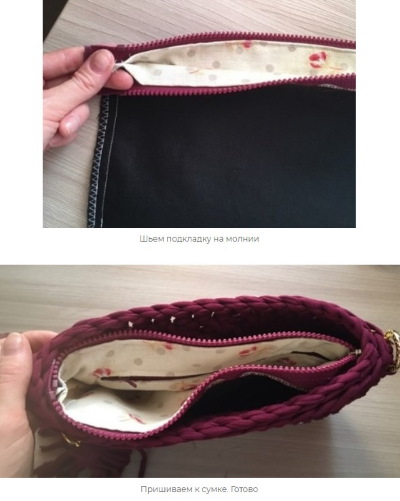
Bag
For work you will need: 2-3 skeins of yarn (preferably of the same color) and hook No. 6.
Instructions:
- Using a crochet hook, cast on a row of 18 air loops.
- The chain is tied with half-columns without a crochet.
- 3 loops are made along the edge.
- The pattern is created: 1 column is knitted in the standard way, and the second is passed through the loop.
- Several rows are knitted using the given pattern until the product reaches the desired size.
- The handles are crocheted with double crochets to make them stronger.
A fastener is sewn onto the finished product. You can use a zipper, buttons or magnetic fasteners. Knitted flowers or patterns with large loops are great as decorations. More experienced needlewomen can use several colors when knitting, then additional decoration will not be required.
Important: when single crochet stitches are used in the knitting process and there is no pattern at all, the final row is much easier to complete. There is no need to choose the right moment so as not to disturb the integrity of the patterns.
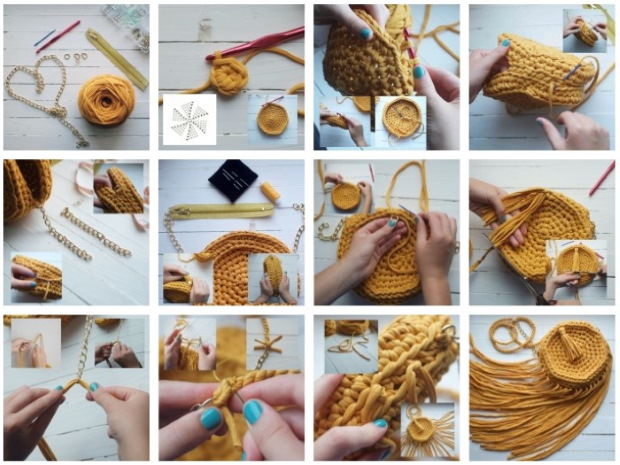
Backpack
Knitting from knitted yarn with a crochet hook provides a wide range of options for choosing a product that you can create with your own hands. A beautiful and strong backpack looks unusual and stylish, and is also suitable for most looks, excluding classics and evening dresses.

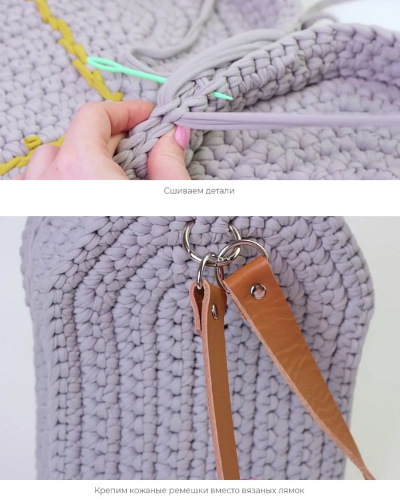
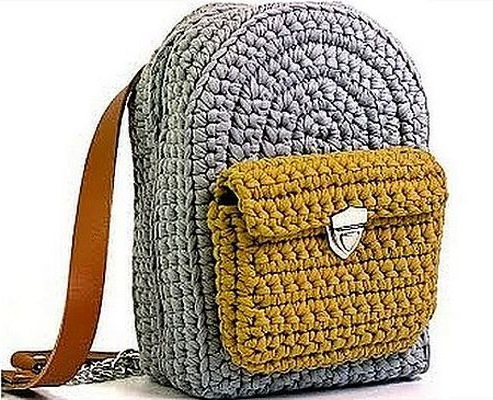
Instructions:
- Using a light thread, cast on 8 air loops, the last of which is for lifting.
- From the 2nd loop, single crochets are knitted. The row ends with a chain stitch.
- The process is repeated with each chain stitch, except for the one for lifting.
- When the bottom of the backpack is finished, air loops are made around the perimeter.
- The walls of the backpack rise from the air loops. The back one should be larger than the front and side ones, since it will serve as a closing element.
- A ribbon or any beautiful cord is passed through the top part to the lid, and a retainer is installed on it.
- The straps are knitted separately using any loops. Then they are sewn to the base.
The difficulty is that the straps cannot be adjusted in length later, so they need to be measured accurately. Backpacks can be decorated with any decorative elements, but they must be in harmony with the color and shape of the main product.
Clutch
Clutches are knitted using the same pattern as bags. However, they should be smaller in size, and usually only one handle is made for them. It is better to use a zipper as a fastener, so as not to disturb the laconicism of the forms.

Advice: clutches should be elegant and discreet, so it is better not to decorate such items at all. When knitting, you can use a maximum of 2 colors that are not very different from each other.
Easter basket
The Easter basket is not much different in technique from knitting a regular basket. Its key feature is the correctly selected decor.
The following are used as decoration:
- lace. They emphasize the festive atmosphere better than others;
- straw decorations;
- miniature silk eggs of various colors;
- bows made from natural materials (it is better not to use synthetic ribbons, they look out of place);
- real flowers. This type of decoration is used immediately before presenting the basket or holidays. Only buds are used, so the flowers will quickly fade.


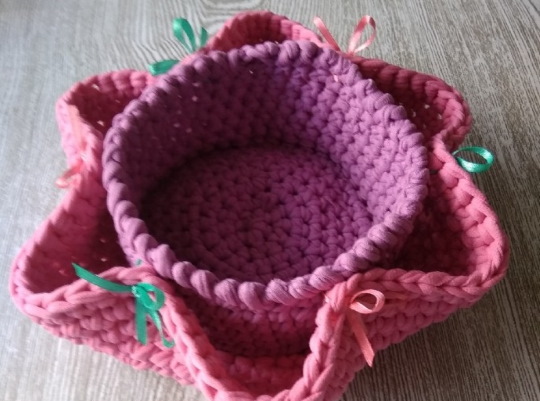
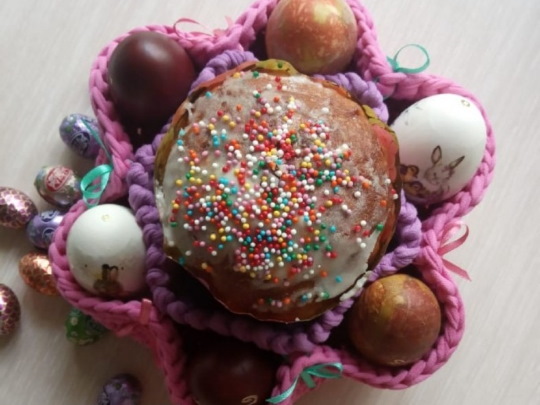
Easter baskets, unlike regular ones, should be shorter in height. You can also play with shapes, make round, oval or square products.
Cradle
The base of the cradle is made in the same way as the basket, but not round, but slightly elongated. It is more difficult to work with, you need to ensure sufficient strength. Therefore, it is better to use medium threads (not large ones), otherwise the product will be beautiful, but will not withstand the loads.
The upper part is tied along the selected surface of the base. Usually it takes up 1/3 of the entire product. As a decoration, it is better to choose long laces and sew them on overlapping. Then they will flow in waves along the perimeter, adding tenderness to the product.
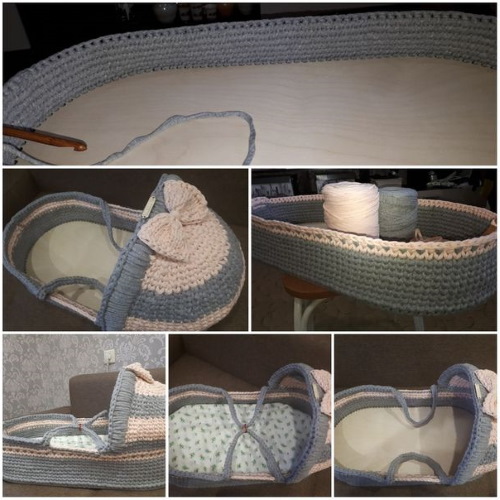
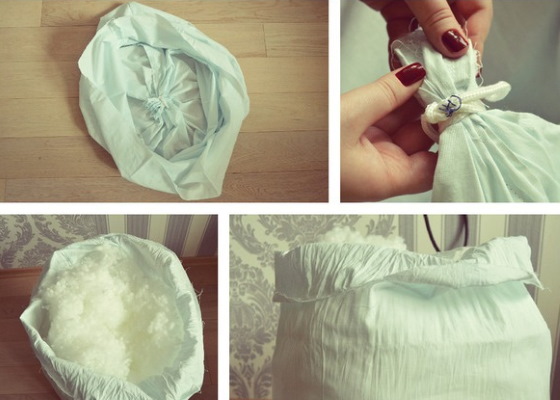
The cradle itself is made of soft fabric, but this is not enough for a baby. It is necessary to make bed linen under it from soft and breathable materials. If you make a pillow, it should be very thin, since children in the first 1-3 months should sleep mainly on flat surfaces.
Advice: during knitting, after 2-3 rows, you need to move the threads upward and tighten them. Then the finished product will be much stronger.
Slippers
Work with slippers begins with cutting out the insole. It is used by needlewomen to orient themselves regarding the shape and size.

First of all, the sole is knitted:
- The required number of air loops is collected. Calculated based on the foot size, divided by 2. For example, if size 38, there should be 19 loops.
- From the second loop, knit single crochets.
- The next row is a half double crochet. Almost the entire width of the product is knitted with it, after which single crochets and air loops are made again.
Next, from the side of the sock, knit the toe and top with single crochet stitches. Continue until the foot is comfortable. The final row is done with half-columns.
The top of the slippers can be decorated with knitted decorative elements, buttons, and beads.
Pouf
The pouf is made in the same way as the blanket, but it is better to choose thin threads for it. If the base is already there, then the dimensions are adjusted to it. The lower part can be left untied, and the finished cover can be put on top.
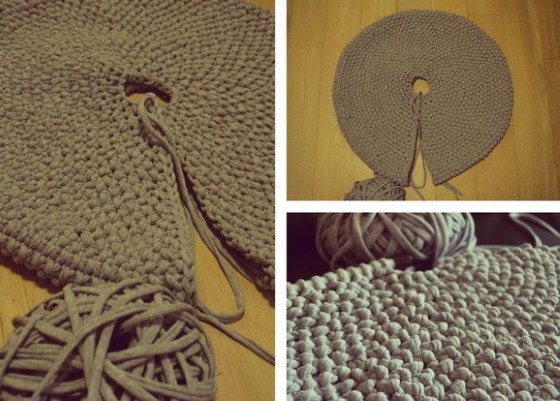
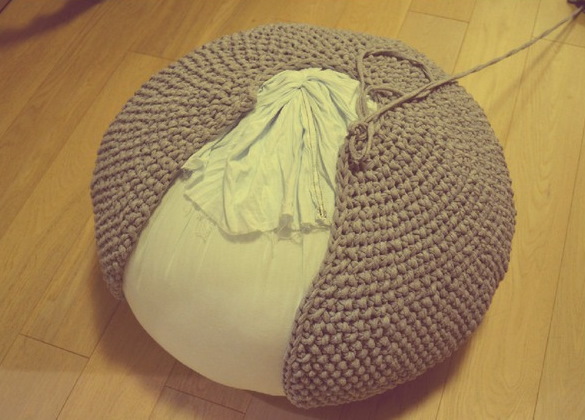
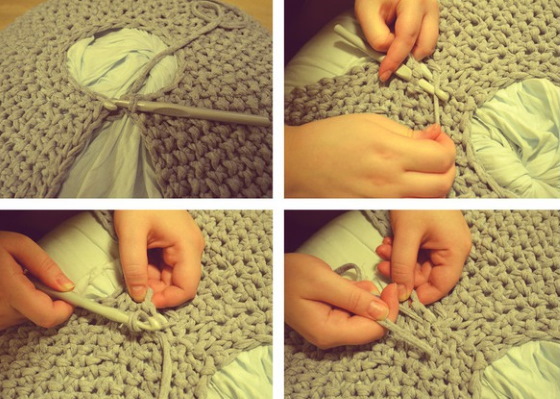
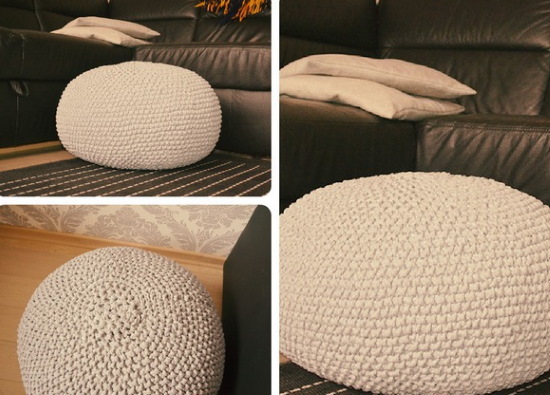
If there is no base, then the pouf is knitted in the same way as the basket, only larger in size. Instead of a lid, the knitting is again wrapped with turning columns. Then, with regular single crochets, rows are knitted until a small hole remains. Filling is collected in it.
It is better to use synthetic filler, since it can be replaced inexpensively when it wears out, and it is easier to care for.After the product is filled, the hole is knitted, securing it with a connecting loop. Additionally, the side walls of the pouf can be decorated with handmade or ready-made knitted decorations.
House for a cat
Cat houses are made according to the patterns of knitting a cradle. Since you don’t need to carry it with you, you can use thick yarn. Then the product will be soft, and the pet will be comfortable and warm in it.
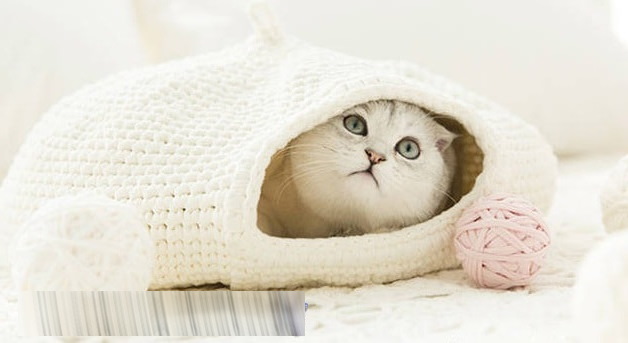
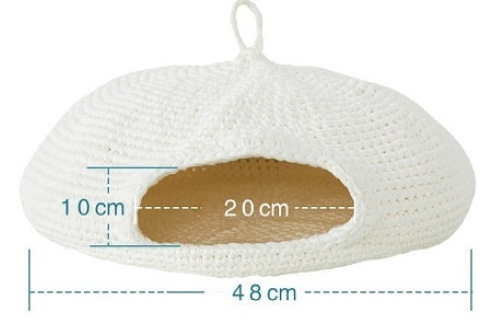
It is better to decorate the cat house in the appropriate style. You can sew knitted ears to the top, make a nose and eyes from large buttons. It is also possible to use ready-made appliques with thematic images. In handicraft stores, you can find large decorations that are perfect for the decor in question.
New Year's wreath
It is better for beginners to make New Year's wreaths with a base. To do this, cut out a shape from thick cardboard. Subsequently, it is sewn with knitted yarn loops. You can use regular double crochets, but they will be wrapped around a thick base.
After tying, add colors. Choose threads of a different shade, preferably red. They go through 1-2 rows on each side of the wreath. You can make an internal and external frame with the addition of loops. Then the shape of the wreath will be wavy.
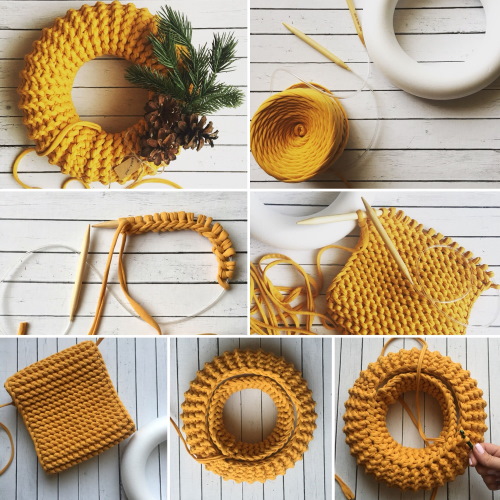
Next, use regular New Year's decorations:
- Christmas tree decorations;
- tinsel;
- artificial spruce branches;
- cones;
- cotton wool for snow.
If you have a short battery-powered LED strip, you can also use it in the decor. It wraps around the wreath, and the battery box is hidden at the back.
Spiral shell
To work you will need:
- yarn 5mm or less;
- scissors;
- lighter (solder the ends);
- hooks No. 3 and No. 6.
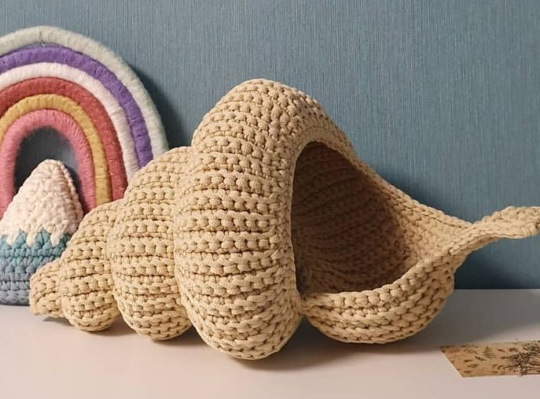
Instructions:
- A ring is created from a loop, 6 loops are collected into it.
- On top, 6 loops are again collected to twist the product and make it voluminous.
- In subsequent rows, loops are added to the wall (1-2 pcs., depending on the width of the yarn).
- After 3-4 rows, the knitting direction turns to the side, the wall that has been made serves as the basis.
- The procedure is repeated until the product reaches the desired size.
Tip: To keep the row tight and prevent it from falling apart, use plastic pins. They attach to each loop and hold it in place until it is needed for work again.
- Having reached the required size, the mouth is made. Both sides are tied with connecting columns with regular loops without a crochet. They continue until the 4-5 row, after which the resulting ribbons are connected to each other.
Spiral shells are used not only for interior decoration. Their internal cavity is suitable for storing small items: keys or jewelry.
How to Make Knitted Yarn Yourself
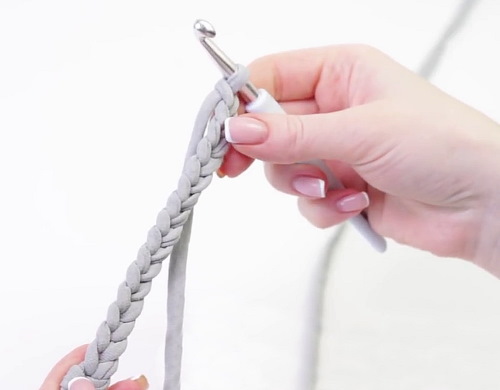
Knitted yarn is made from old T-shirts - instructions:
- The bottom part of the product is cut off.
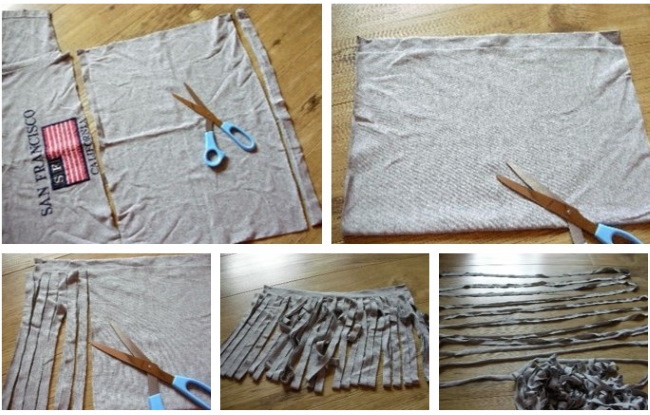
- A ribbon 1-2 cm wide is cut in a circle in spiral turns.
- The tape is pulled out so that it curls slightly inward.
- The ribbons are tied together and wound into a ball.
You need to try to make the ribbons as long as possible so that they have fewer knots. Then the products you create will be much more beautiful and durable. Knitting from knitted yarn is an interesting and exciting process. You can use any tools for this: knitting needles, hooks, or even your own hands.
Video about knitting from jersey
Knitting with knitted yarn using a crochet hook - the main mistakes: