They call it Gzhel traditional Russian painting, which in ancient times was one of the most popular types of folk crafts.
Today, this type of fine art is studied as a separate course not only in specialized art schools, but also during general development classes with children of younger and middle age. To learn how to create Gzhel painting, it is important not only to understand the main stages of the work process, but also to know the history of its origin.
History of the emergence of Gzhel patterns and ornaments
Gzhel (painting for children can be created with regular paints on any surface) is the name of one of the regions of the Moscow region. Initially, this area was territorially home to several villages and settlements, the residents of which were masters of pottery. That is why the first Gzhel paintings were applied to clay mined in the specified area. The first mentions of this type of fine art date back to the 14th century (approximately 1328).
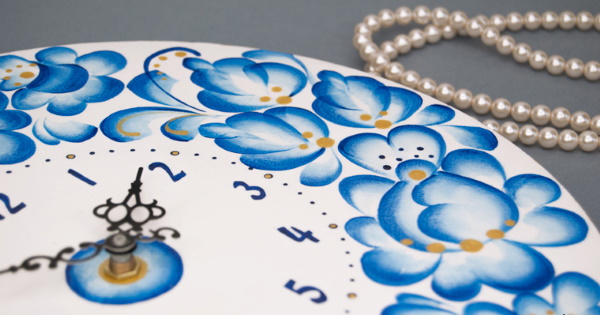
Its distinctive feature is the limited use of colors (1 shade on a snow-white background). The development of folk crafts was greatly influenced by consumer demand, since the Gzhel people fed their families with the money they earned from selling painted dishes. Gzhel painting reached the peak of its development and popularity in the 18th century, when it began to decorate not only dishes and decorative items for living spaces, but also toys, figurines and memorable souvenirs. During this period, painting began to be applied mainly to porcelain and earthenware.
At the beginning of the 20th century, there is restraint in the development of the Gzhel craft. This is due to the suppression of factory production due to the nationalization of enterprises by the Soviet government. Active restoration of this type of art began to gain popularity again only at the end of the 20th century.
Colour range of Gzhel painting
Gzhel painting was originally done exclusively with blue paint (shades are allowed). It is this feature of this type of art that makes it difficult for beginners to perform even today. Not every artist can create a beautiful drawing using a limited number of colors.
The main colours used by the masters in Gzhel painting are:
- snow white color (always used as a background shade, since it does not shade the contrasting paint with which the main pattern is created);
- all shades of blue, the most popular of which are deep blue and pale blue;
- cobalt color (dark shade);
- white paint color (used in mirror painting, when the pattern is created on a blue background - the opposite of classical Gzhel painting);
- gold (a modern innovation by artists who seek to use a noble shade of gold to place accents on an image they have created themselves);
- platinum (used rarely, also to focus the viewer's attention on specific details of the ornament).
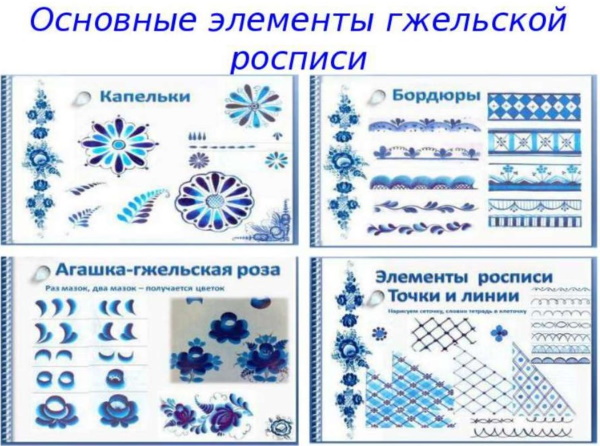
Motives and elements
Gzhel (painting for children will be easier to master if they already have basic skills in fine art), with its clearly expressed motifs and characteristic ornamental elements, is used today in decorating residential or commercial premises, toys and even clothing.
The most characteristic features of this type of painting are:
- all elements of the ornament, regardless of the overall complexity of the image, are drawn by hand (occasionally using templates);
- strict execution of painting on a plain blue or white background;
- the ornament is drawn exclusively in blue or white (in rare cases, the use of gold or platinum shades is acceptable);
- the presence of clear and sharp color transitions in the drawing of the Gzhel ornament;
- if the use of several shades of blue is implied within the framework of one ornament, their sequence should be maintained as much as possible, despite the sharpness of the transitions;
- all elements of Gzhel painting applied to one object must represent a complete composition, maintained in one theme (for example, if a mug is painted with Gzhel flowers, then each element of its decor must visually resemble plant buds or their stems).
Classic elements of Gzhel:
- plants (trees, herbs, flowers);
- animals;
- birds;
- ornament (Gzhel patterns have lines);
- multi-component images with a plot.
What do you need to create patterns on paper?
In working with children, in the vast majority of cases, traditional tools for creating Gzhel painting (cobalt oxide, spatulas, reagents, etc.) are not used for safety reasons. Young artists learn to draw patterns in this style on paper.
For a comfortable work process, the child must be provided with:
- thick sheets of paper or white cardboard. Thin pages will deform under the influence of water and paint, which will significantly worsen the appearance of the entire work;
- blue and white paints. It is not recommended to give the child more colors in order to form a clearer idea of Gzhel painting. Gouache, oil paints or rich watercolors are suitable for work;
- brushes (it is recommended to provide the child with 2-3 types of brushes that differ in thickness);
- palette (the young artist will need it when mixing colors to obtain the required shade of blue);
- container with water;
- a piece of fabric made from natural materials (you can not only wipe your hands with it, if necessary, but also correct an image recently applied to the work surface);
- stencils (especially relevant if the painting is taught to a young child who does not have fine art skills).
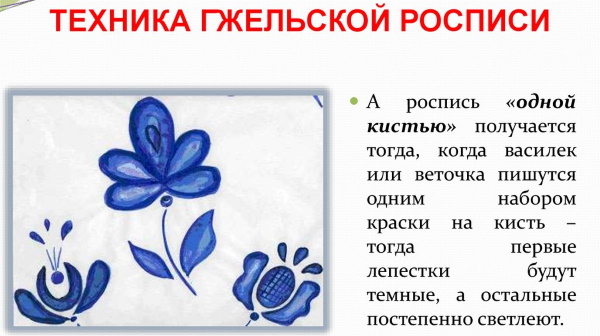
Painting technique
Gzhel (painting for children should be created in accordance with the generally accepted algorithm) implies the stages of its creation by successively applying strokes of paint to the working surface so that the intensity of the color gradually changes from lighter to darker (or vice versa). The movements of the brush should be made from the middle part of the sheet of paper used to its edges.
When explaining the technique of creating Gzhel patterns to young artists, it is recommended to draw their attention to:
- saturation and width of lines drawn with a brush;
- the arrangement of the brush bristles on the working surface;
- amount of color on the brush.
The Gzhel painting technique traditionally looks like this:
- Mix thick drops of blue and white on a palette, then, as if pulling out the paint with a brush, shade the halftones of the pattern.
- Create a contour using classic brush strokes, which involve drawing lines by moving the brush with paint in a direction perpendicular to the position of the bristle part of the working tool.
- Detail the image with “wave” strokes, which involve alternating strong and weak pressure on the brush, followed by turning it 180 degrees at the edge of the working plane.
- If necessary, fill in the gaps with clear dots, which should be drawn by lightly touching the surface of the paper sheet with the brush.
Master class on drawing simple Gzhel patterns for children
In order for a child to be able to independently invent Gzhel patterns, he should master the methods of creating the simplest types of ornament.
Chintz
To create such a pattern, a child will need a brush with long, thin bristles.
It is recommended to draw calico like this:
- After placing a small amount of paint on the palette, use a brush slightly moistened with water to pick up some pigment on the tip.
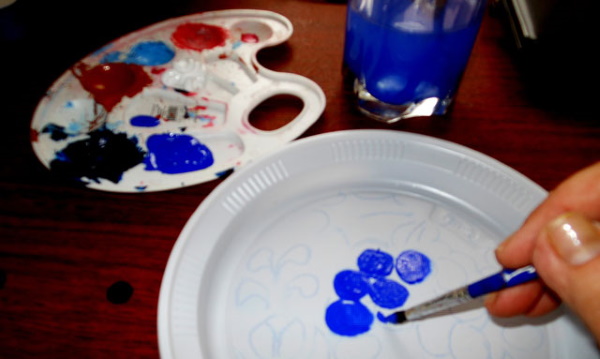
- Using precise light touches of the working plane, draw several dots on the working plane, placing them in a horizontal or vertical row, at a distance of 2-3 cm from each other.
- Wash off any remaining paint, then use the same method to apply a contrasting shade of pigment to the tip of the brush.
- Lightly touching the surface of the sheet, draw semicircles near the marked points, connecting them together at the extreme points.
- Clean the brush from any remaining paint, and then refill it with pigment of the same shade as the semicircles drawn earlier.
- At a distance of 0.5 – 1 cm from the junction of the semicircles, place the required number of dots, created by lightly touching the paper with a brush. The density of these dots should be approximately half that of the main ones drawn in point 2.
- Fill the work surface with the selected pattern or, if desired, combine 2-3 types of ornaments, while ensuring that they do not intersect with each other and are all consistent with the same theme.
Chinese smear
Chinese brushstroke is considered a more complex technique of Gzhel ornament.
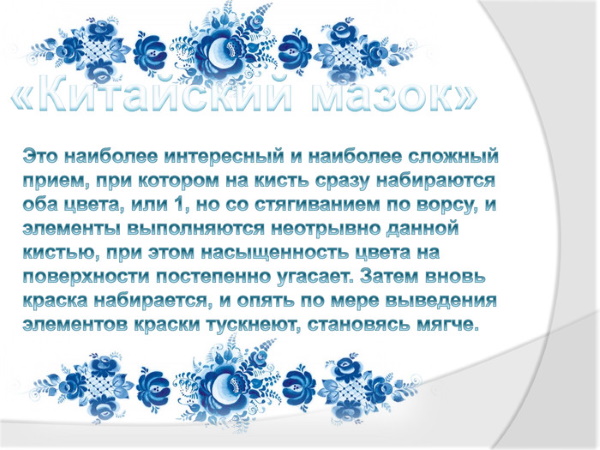
It is recommended to create patterns with its help as follows:
- Place a small amount of paint in 2 shades on the palette, then apply each color to a brush with thin, long bristles.
- Next, having determined the most convenient point for further drawing of the pattern, put the brush on the working surface and do not lift it until the paint completely disappears. This will create a smooth loss of saturation of the shade, which will look as natural as possible when drying.
- When there is no paint left on the brush, you need to repeat steps 1 and 2, thus finishing the Gzhel ornament to the end.
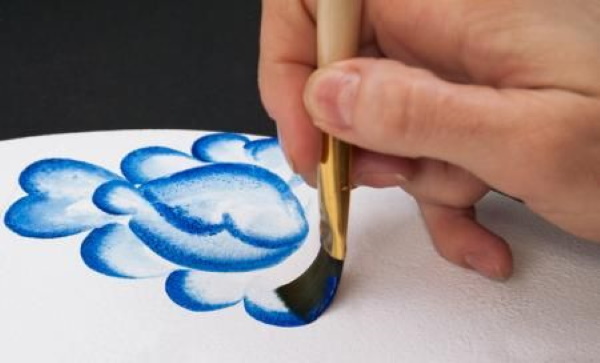
Smear with shadow
The brushstroke with shadow is considered a type of Chinese brushstroke. It involves a wide range of shades of basic colors applied to the working surface with circular turns of a thick brush.
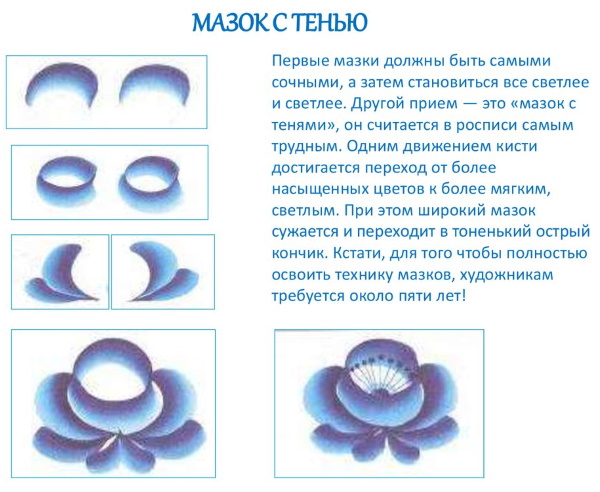
The algorithm for creating an ornament in this way looks like this:
- Take a brush, size No. 8 (brush No. 10 is also suitable for this technique), the end of which should be rectangular.
- Load the end of the brush with paint so that the layer of color at the edge of the bristles is denser than in the middle.
- Place the bristle part of the brush on the working surface, then, without lifting the working tool from the surface of the sheet of paper, depict the necessary element of the painting.
For ease of drawing with strokes and shadows, the brush should be held with 3 fingers - thumb, index and middle. Otherwise, the pressure on the working tool will be distributed incorrectly, which will negatively affect the appearance of the final image.
How to draw sketches in Gzhel technique?
Gzhel (painting for children can be created not only on paper, but also on plastic or wooden polished surfaces) allows the artist to decorate various household items not only with standard ornaments, but also with multi-component compositions with a traceable plot line.
Flowers
There are several ways to paint flowers using Gzhel painting (usually used in decorating dishes):
| Final image variant | Algorithm for its creation |
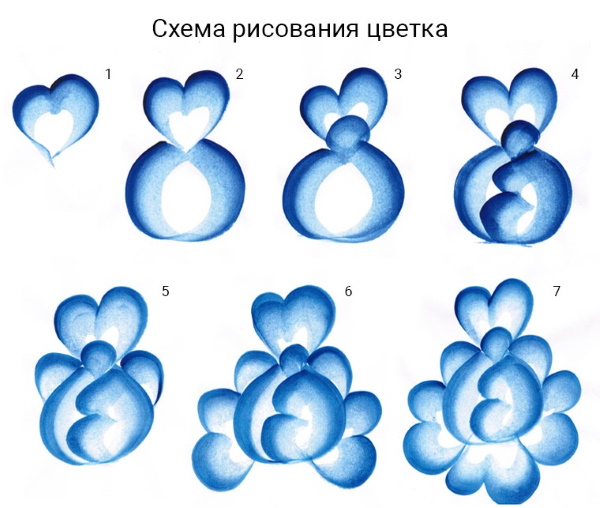 | 1. Using the shadow stroke technique, draw a small heart in the upper part of the working plane so that its upper borders are wider than the lower ones. 2. From the corner of the heart, mirror 2 semicircles to the right and left, exactly repeating the force of each other's bend. The extreme points of the semicircles must be connected at the bottom and top. 3. In the area where the heart connects to the semicircles, draw a small circle inside the figure. 4. Fill the space between the semicircles with slightly curved lines, connecting them together. 5. To the right and left of the outline of the main figure, in the area where the heart and the semicircles connect, draw another semicircle. 6. Make the bud more voluminous by drawing additional petals around the outline of the lower figure from the outside. |
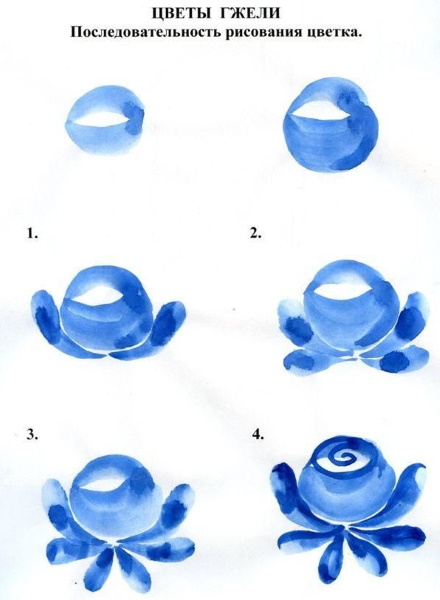 | 1. In the center of the sheet of paper you are using, draw 2 semicircles (one with a downward bend, the other with an upward bend) so that their extreme points are located close to each other.
2. Using additional lines drawn below the lower semicircle, add volume to the outline of the flower bud. 3. Draw 2 smoothly curved lines under the bud, the extreme points of which should be drawn above the middle of the side edges of the bud. 4. From the point of exit of the lines shown in point 3, draw 2 more semicircles, directing them downwards. 5. Using 2 straight lines, fill the distance between the lines created in step 4. 6. At the top of the bud, draw a spiral that imitates closed petals. |
Plants
Children will also find it interesting to create paintings with images of plants in Gzhel, which are most often used in decorating kitchen utensils or wardrobe items.
| Final image variant | Algorithm for its creation |
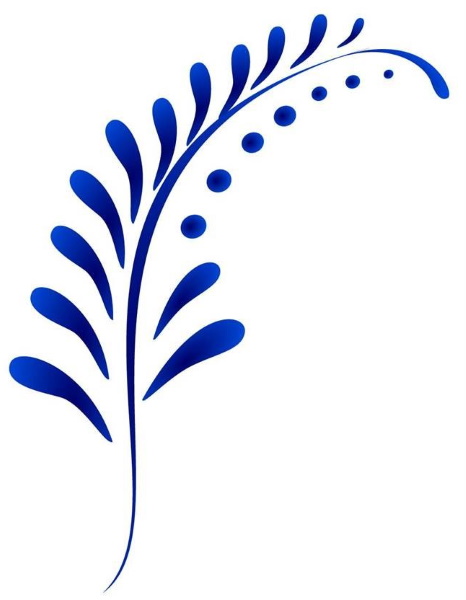 | 1. From the top center of the working plane, draw a smoothly curved line, directing it to the lower left corner. 2. Along the entire length of the line on the left side, draw smoothly curved strokes, placing them at a distance of 1-2 cm from each other. 3. Along the entire length of the line on the right side, draw 2 smoothly curved strokes (at the bottom), and fill the remaining space with dots, the intensity of which should be arranged in descending order (large and dense at the bottom edge of the sheet, small, barely noticeable at the top). |
 | 1. In the center of the working plane, draw 2 curved lines in a spiral, drawn from one point located at the bottom edge of the sheet of paper.
2. From the sides of the spirals, draw 2-3 more curves that repeat the bends of the main lines. 3. At the line in the lower part of the working plane, on the left, draw rich, wide strokes. 4. Fill the space in the places where the spirals diverge in opposite directions by drawing 3 lines of different sizes in these areas, coming out from one point. 5. From the starting point of the main features, draw a curve, at the end of which draw the leaf using a wavy line. 6. Draw 4 dots on the side of one of the spirals located on the right side of the sheet of paper at a distance of no more than 1 cm from each other (provided that the image is created on a sheet of A4 format or smaller). |
Animals
Images of animals created in the Gzhel painting style are most often used to decorate interior items or clothing.
| Final image variant | Algorithm for its creation |
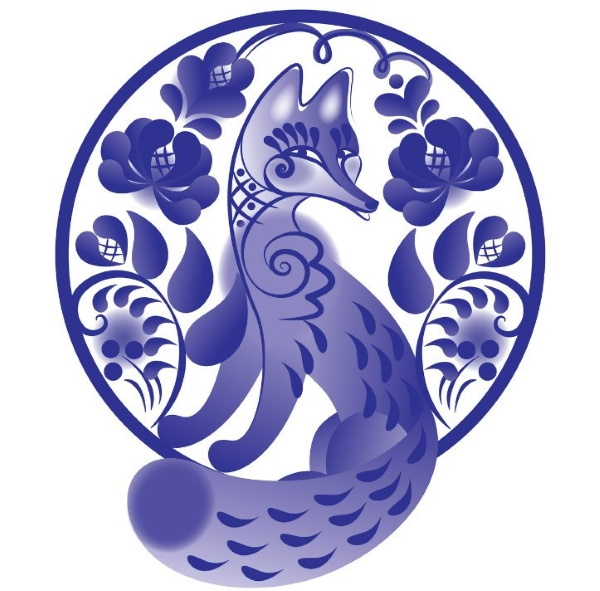 | 1. Draw an even circle in the center of the working plane. 2. Inside the circle, using the algorithms given above, depict the contours of plants and flowers, leaving the middle part of the figure white. 3. From the bottom edge of the circle, draw a curved line upward, directing it to the upper left corner. 4. Continue the line with a semicircle curved upwards, pointing it towards the upper right corner. 5. Sharpen the connection, then continue the outline, drawing, without lifting the brush from the sheet of paper, the fox's muzzle and its ears using a semicircle and 2 triangles. 6. Draw a smoothly curved line down to the base of the circle. 7. Add detail to the image by more clearly drawing the animal’s paws, as well as its eyes, nose and mouth. 8. Draw an oval (the fox’s tail) along the lower border of the main figure so that the left part of the tail is approximately twice as wide as the left. |
Birds
Gzhel painting with images of birds is most often used to decorate dishes, kitchen utensils (for example, cutting boards) or wardrobe items.
| Final image variant | Algorithm for its creation |
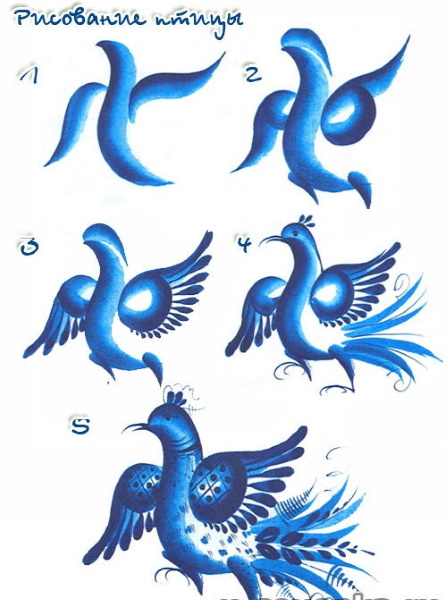 | 1. In the center of the working plane, draw a slightly curved wide line, placing it vertically (the body of the bird). 2. To the right and left of the main figure, closer to its upper edge, draw curves, one of which should be directed upwards and the other downwards (bird’s wings). 3. From the middle of the side curves, draw semicircles, the extreme points of which should be located on the main line. 4. Make the upper part of the main vertical wider by drawing a small semicircle (the bird’s head) close to it. 5. Along the entire length of the side curves, around the semicircles, depict diagonals, the outer edge of which should be thicker than the edge located close to the body of the Gzhel bird (the bird's plumage). 6. Draw ovals at the bottom of the body, pointed at the edges (the bird’s legs). 7. From the area between the right wing and the bird’s leg, draw smoothly curved lines directed randomly, placing them close to each other (the bird’s tail). 8. Detail the image of the bird by drawing the eyes, beak and crest on its head. 9. Using various techniques, fill in the interior of the drawn object, thus indicating the plumage and color of the bird. |
Plot pictures
It is recommended to begin creating plot pictures in the style of Gzhel ornament only after the application of basic fine art skills by the young artist has been brought to perfection.
| Final image variant | Algorithm for its creation |
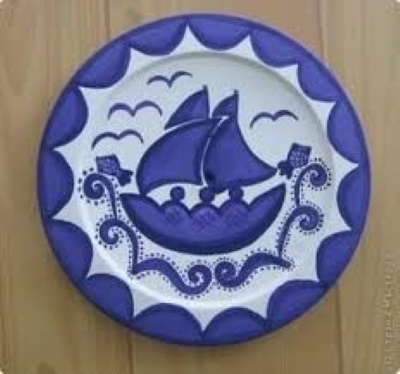 | 1. Step back 1-2 cm from the lower border of the working plane. 2. At the specified distance, draw several chaotically curved lines connected to each other and forming a semicircle with a downward bend (waves). 3. Along the entire length of the depicted waves, draw many small dots on both sides, giving volume to the image. 4. Above the curves, stepping back 3-4 cm, draw a semicircle curved downwards (the bottom of the ship). 5. Connect the top points of the semicircle with a wavy line (the top of the ship). 6. Draw 3 small circles close to the top edge of the ship. 7. Above the circles, use smoothly curved lines in opposite directions to depict sails. 8. To the right and left of the drawn ship, depict a fish using simple geometric figures and straight lines. 9. Fill the space above the ship with closely spaced semicircles, grouped in twos (birds). |
How to make a stencil for Gzhel painting?
You can create stencils for painting any surface in Gzhel style in different ways, depending on the main object.
For example, a bird should be made like this:
- Transfer a small amount of paint to the palette, then stir the color using a special spatula.
- Dip a flat brush (it is recommended to use a figure eight) into the pigment so that the paint layer on one side of the bristles is denser than on the other.
- Having distributed the paint over the pad of one of the fingers of the leading hand, make a stroke in the shape of a semicircle on the working surface.
- Using short strokes, draw the wings and the outline of the body.
- Finish drawing the tail with wavy lines.
- Re-outline the wings, darkening their outline.
- Refine the image.
- Having refreshed the already dried lines, apply the stencil to the required object, then remove the paper and finish the ornament on the white surface.
Gzhel will be interesting for children only if they are familiar with the history of the creation of this painting. Realizing the versatility of this type of creativity, young artists will quickly master the basic algorithms for creating the simplest ornaments, which will allow them to begin to independently develop patterns, as well as create complex plot pictures.
Video about Gzhel painting for children
Gzhel painting for children - drawing of a rose: