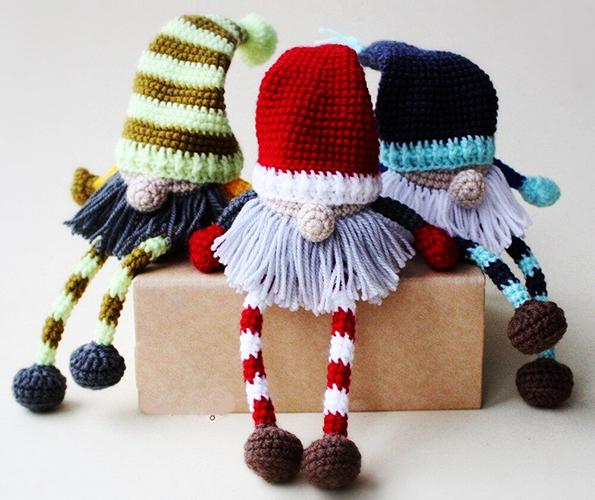
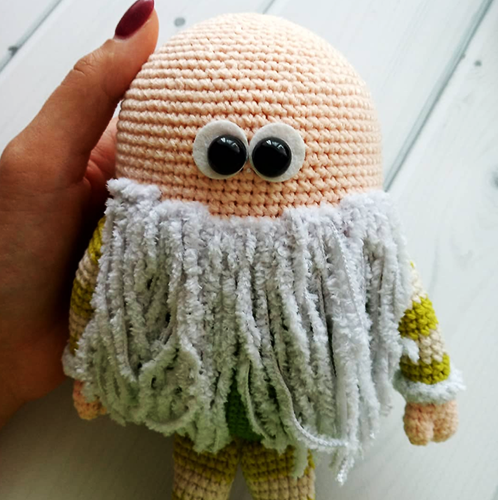
You can knit a gnome in honor of Christmas, as it is one of the symbols of the New Year holidays. Such a craft can be used to decorate a garden (gnomes on private plots, according to superstition, are placed to scare away uninvited guests). Children will not refuse such a gift either.
Thanks to step-by-step master classes with descriptions of schemes knitting themed crochet crafts You can make not only a cheap, but also a unique toy.
Materials and tools for knitting
A crochet gnome (the diagram and description of the craft are presented step by step for ease of knitting, any changes or errors in the process of work can cause an unsuccessful result) can be created in 1-2 days. For work you will need a hook, yarn and elements for decorating the toy.
It is better to choose a hook of medium length - 12-14 cm. For ease of use, the handle of the tool should have a flat part so that it does not slip out of your hands.
The following hooks are suitable for making toys:
- Steel. They do not electrify the yarn, last a long time and do not bend.
- Combined (steel hook, wooden or plastic handle). These tools have the same advantages as steel ones, and they are also more comfortable to hold, since the handle material prevents the hook from slipping between the fingers while working.
- Plastic. They are suitable for knitting large toys, as they are produced with a large diameter working hook. Thin tools can break during work.
It is better to use acrylic yarn for making toys: it does not fluff up and does not lose its appearance over time.
Conventional symbols in diagrams
The following symbols are used in the descriptions of the patterns for crocheting gnomes:
- R – row;
- P – loop;
- VP - air loop;
- PP – half loop;
- SS - slip stitch;
- KA — amigurumi ring;
- SC - single crochet;
- ССН — double crochet;
- PR - addition;
- UB – decrease;
- CCM — displacement column.
Master class on knitting a Christmas gnome
The master class covers making toys from Alize Cotton and Alize Softy threads.
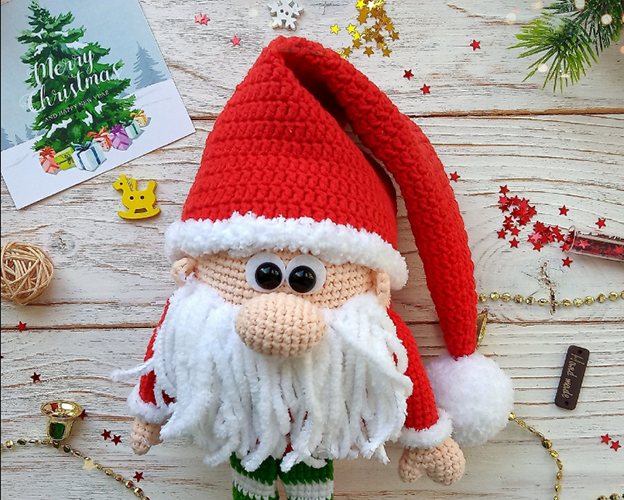
For work, use hook No. 2.25. You will also need needles: tapestry and for markers.
The crochet gnome, the diagram and description of which are discussed further in the article, is knitted from the following materials:
- semi-cotton yarn (acrylic content 45%) peach, red, white, green;
- micropolyester threads (100%) white;
- buttons or half beads for eyes or 2 felt circles 1.5 cm in diameter;
- filler: synthetic padding, cotton wool or other material at your discretion.
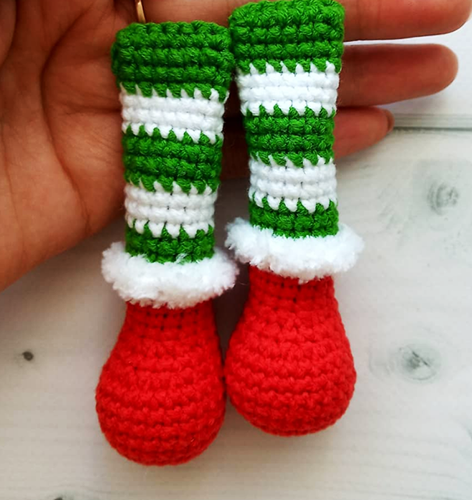
Knitting gnome legs
You will need to knit 2 identical pieces.
They start working with red threads.
- First, knit a KA from 4-5 VP.
- 1 R: knit 6 sc into the ring.
- 2 R: knit the product with SC. In each P make 1 PR, after which there are 12 P in the row.
- 3 R: knit the first P with SC, knit every second P with 1 PR to get 18 P in a row.
- 4 R: after every 2 R make 1 PR to get 24 R.
- 5-9 R: knit sc without changes.
- 10 R: knit 6 sc, then 6 ub and again 6 sc. As a result, 18 sts should remain.
- 11 R: knit all sc.
- 12 R: knit 6 sc, then 3 UB and again 6 sc. There should be 15 sts left in the row.
- 13-16 R: 15 sts are knitted with SC without changes.
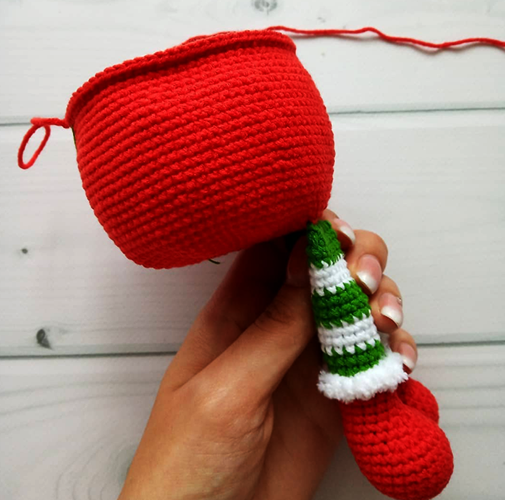
- The finished boot is stuffed with filler, and the red thread is replaced with a green one.
- 17 R: perform 15 sc behind the back PP.
- 18-19 R: knit 15 sc behind the front PP.
- Replace the green thread with a white one.
- 20-22 R: knit 15 sc in each row.
- Replace the yarn with green.
- 23-25 R: make 15 sc in each row.
- Replace the yarn with white thread.
- 26-28 R: make 15 sc.
- Replace the yarn with green.
- 29-30 R: make 15 sc.
- 31 R: knit 13 sc, knit the last 2 sts together. There should be 14 sts left.
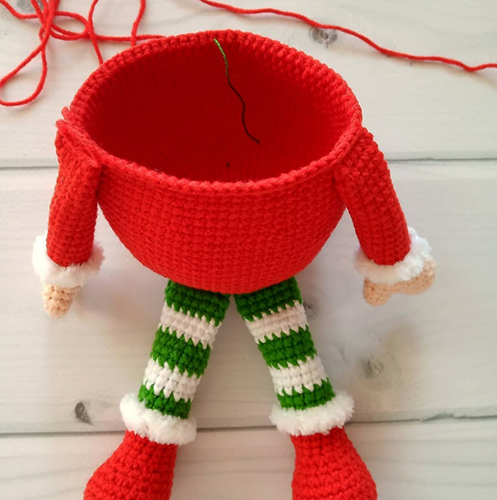
When the gnome's legs are tied, they are stuffed with filler up to 23-24 R. Then they need to be placed next to each other, making sure that the toes of the boots are turned forward equally.
At this stage, you can adjust the position of the filler.
- For symmetrical arrangement: Fold the top of each knitted leg in half, connect the front and back loops by knitting 6 sc through both walls.
- If the toes of the boots are not symmetrical, you should perform 1-2 SC to correct the position of the toe and only then perform 6 SC through both walls of the boot folded in half.
The cut threads of each toy element should be hidden inside the legs. For decoration, in the PP of the 17th row, knit all the SC with fluffy yarn to make a border.
Hand knitting
The crochet gnome (the pattern and description of knitting in the master class can be used as a template for making toys of a different theme, for example, a garden gnome, a Christmas tree toy, a gift craft) is knitted strictly according to the instructions so that it turns out proportional.
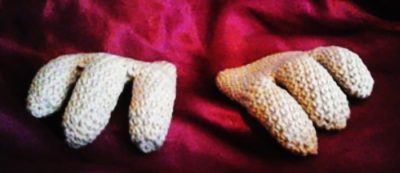
The next step to creating a toy is making the hands, which also happens in 2 stages. You will need to knit 2 identical elements.
Start working with peach-colored threads. First, you need to make a thumb. To do this, knit a KA, into which 2 R of 6 SC are knitted.
Next, knit the palm:
- Perform a KA of 4-5 VP.
- 1 R: in the KA knit 6 SC.
- 2 R: through each P make 1 PR. At the end of the row you should have 12 P.
- 3-5 R: knit 12 sc without changes.
- 6 R: without cutting the threads, you need to tie 6 sc along the palm and tie the thumb: do 6 sc along the finger and the same number along the palm. There should be 18 sts in the row.
- 7 R: knit 2 sc, then knit 2 sts together (UB), 4 sc, 1 UB, 4 sc again, 1 UB and 2 sc. There should be 15 sts left in the row.
- 8 R: 3 times perform the rapport 3 sc, 1 ub. 12 sts should remain in the work.
- 9 R: knit 12 sc without changes.
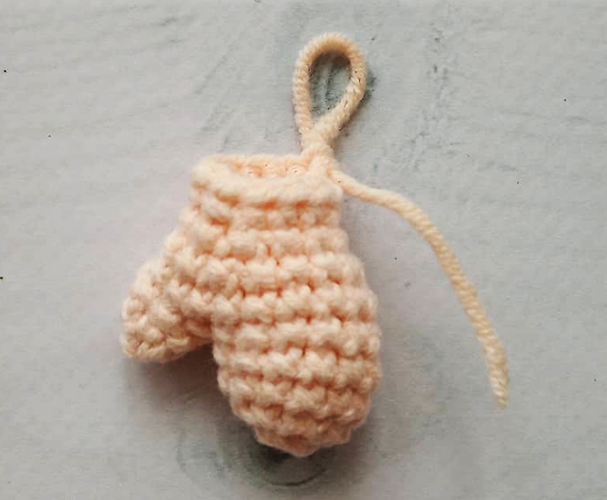
The finished palm is stuffed with filler. The thread on the thumb is hidden inside the product. The peach yarn is replaced with red.
Knitting stages:
- 10 R: 12 sc are knitted behind the back PP.
- 11-24 R: without changes, perform 12 sc.
- At the end, 3 CCMs are done so that the fingers are positioned symmetrically.
- The gnome's hand is filled up to 15 R.
- The top part of the knitting is folded in half, 5 sc are knitted for both walls, fastening the front and back parts of the knitted fabric.
- The thread is cut and hidden inside the finished piece.
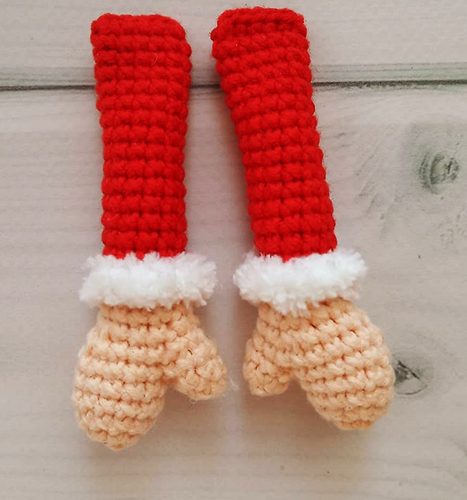
For decoration, in the PP of the 10th row, knit all the SC with fluffy yarn to make a border.
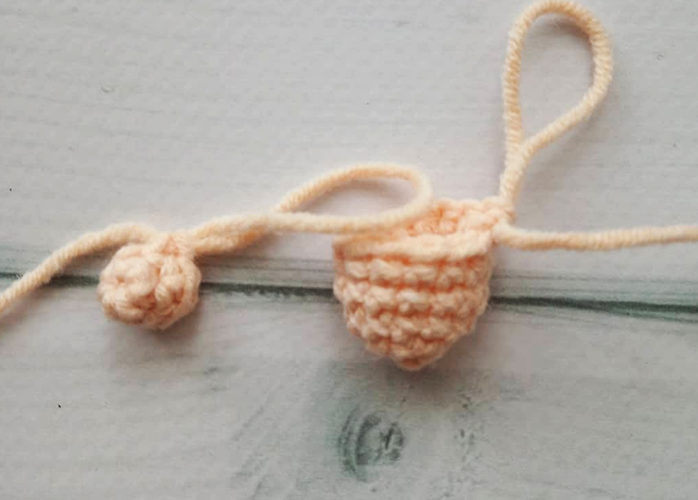
Knitting the nose
The element is made with peach yarn.
They begin work by creating a CA:
- 1 R: in KA make 6 sc.
- 2 R: knit 2 P into each P. You should get 6 PR or 12 P.
- 3 R: knit a pattern of 3 sc and 1 dc three times to make 15 sts.
- 4: similar to the previous row, knit the rapport 3 times, only from 4 sc and 1 dc, to get 18 sts.
- 5 R: knit sc without changes.
- 6 R: knit a pattern of 5 sc and 1 dc three times to make 21 sts.
- 7 R: knit sc without changes.
- 8 R: knit a pattern of 5 sc and 1 dec 3 times to make 18 sts.
- 9 R: perform 18 sc.
- 10 R: make a rapport of 4 sc and 1 dec 3 times to get 15 sts.
- 11 R: perform the pattern of 3 sc and 1 dec three times. There should be 12 sts left.
- The connected element is filled with filler.
- 12 Rows: sc 2 sts together, decreasing. You should end up with 6 sts.
- The thread is passed through all the loops with a hook, tightened and brought out between the 5th and 6th rows, cut off, leaving a 15 cm long end to sew the nose to the gnome's face.
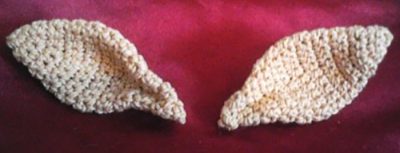
Ears
You need to knit 2 identical elements with peach yarn:
- It is necessary to perform the CA.
- Knit 6 sc into the ring without connecting 1 and 6 sts.
- Perform 1 VP for lifting.
- The fabric is turned over and sc is knitted in the opposite direction.
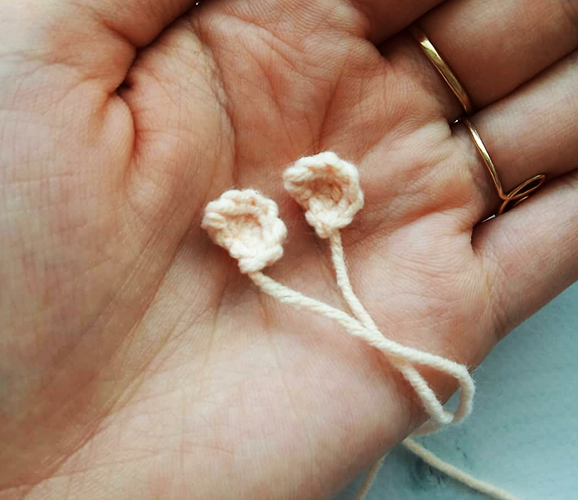
At the end, the thread is cut, leaving the necessary tail to sew the ear to the toy.
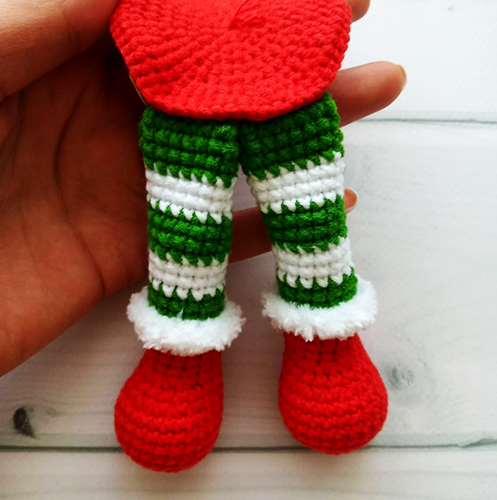
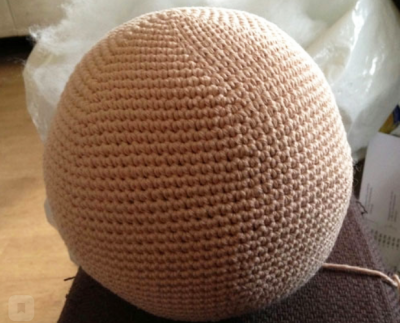
Body and head
The base of the gnome's body is knitted with red yarn:
- 1 R: in the row knit 8 sc.
- 2 R: in each P knit 2 sc so that there are 16 P in total in the row.
- 3 R: after every 1 sc make 1 CR. At the end of the row you should have 24 P.
- 4 R: with an interval of 2 P, make a PR (8 times in a row). As a result, you should get 32 P.
- 5 R: every 3 R make 1 CR to make a total of 40 R in a row.
- 6 R: knit in the same way as the previous rows with an increase every 4 P. There should be 48 P in a row.
- 7 R: make a total of 8 PR in a row every 5 P, for a total of 56 P.
- 8 R: at this stage, the gnome's legs are knitted. Make a rapport of 6 sc and 1 pr only 3 times. Next, knit 6 sc, capturing the loops from the fabric of the toy's body and the first leg. Then make 1 pr on the main fabric and repeat knitting the second leg, knitting 6 sc. Again, make 1 pr on the main fabric and 3 times a rapport of 6 sc and 1 pr, as at the beginning of the row. As a result, 64 sts should be in the work.
- 9 R: make 8 PR in a row with an interval of 7 P to get 72 P.
- 10-14 R: knit 72 sc without changes.
- 15 R: make 8 PR in a row with an interval of 8 P to get 80 P.
- 16-24 R: knit without changes 80 sc in each row.
- 25 R: Every 8 sts make 1 UB, knitting 2 sts together. There should be 72 sts left in the row.
- 26-31 R: knit without changes for 72 sts.
- 32 R: at this stage, the gnome's arms are knitted. First, make 2 SC, tie on a marker thread. Next, make 20 SC on the main fabric. Then knit together 5 P of the body and the first arm. Next, knit 22 SC on the main fabric and knit the second arm, making 5 P. Knit 20 SC to the end of the row.
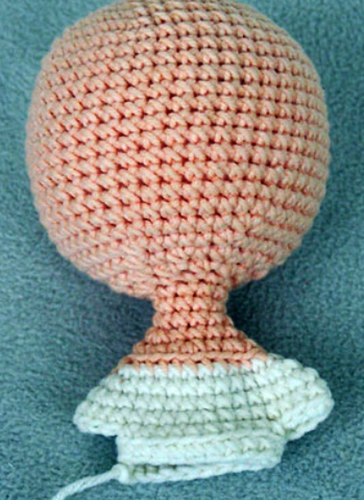
- 33-45 R: replace the yarn with peach thread for knitting the head. Knit 72 sc in a row without changes.
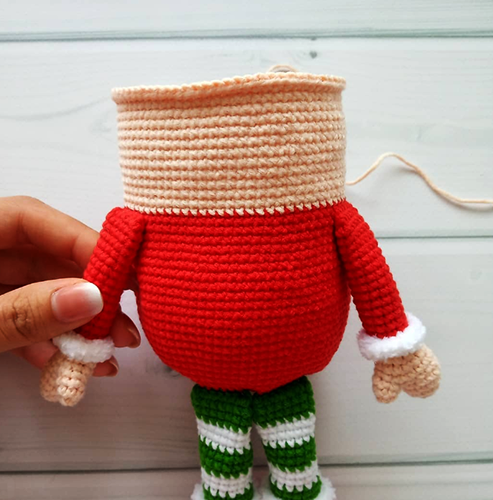
- At this stage, you can attach the eyes, if they are buttons or felt circles. Sew them between rows 40 and 41.
- 46 R: make a rapport of 7 SC and 1 UB 8 times. There should be 64 P left in the row.
- 47 R: knit 64 sc without changes.
- The gnome's body is stuffed with filler. Then, as the head loops are reduced, stuffing is added inside the toy.
- 48 R: knit 3 sc and 1 UB, then do the rapport of 6 sc and 1 UB 7 times and at the end of the row knit 3 sc. There should be 56 sts left in the work.
- 49 R: knit 56 sc without changes.
- 50 R: perform a rapport of 5 sc and 1 ub 8 times. There should be 48 sts left.
- 51 R: knit 48 sc without changes.
- 52 R: make 2 sc and 1 UB, then knit 7 times a rapport of 4 sc and 1 UB, at the end of the row make 2 sc. 40 sts remain in the work.
- 53 R: knit 40 P without changes.
- 54 R: perform a rapport of 3 sc and 1 ub 8 times, so that 32 sts remain.
- 55 R: knit 32 sts without changes.
- 56 R: perform 1 sc and 1 ub, then 7 times repeat 2 sc and 1 ub, finish the row with 1 sc. There should be 24 sts left.
- 57 R: knit 24 sc without changes.
- 58: knit 8 times the pattern of 1 sc and 1 dec, so that 16 sts remain.
- 59 R: perform 16 sc.
- 60 Rows: Knit every 2 sts together to make 8 sts in a row.
When the work is finished, the hole is pulled together with the working thread, fixed and its end is hidden inside the toy.
Beard and face
The gnome's beard is knitted with fluffy white yarn.
First, you need to use markers to mark the line of its attachment:
- Blue: from the red part of the toy’s body, move upward 4 R, place markers at arm level.
- Pink: from the red part of the knitting, move up 3 rows and from the blue markers to the center, 4 sc.
- White: from the red part of the knitting, move up 2 rows and from the pink markers to the center, 4 sc.
There should be 6 sc between the 2 central white markers. Next, wrap the yarn around the cardboard or bank card, as in the photo:
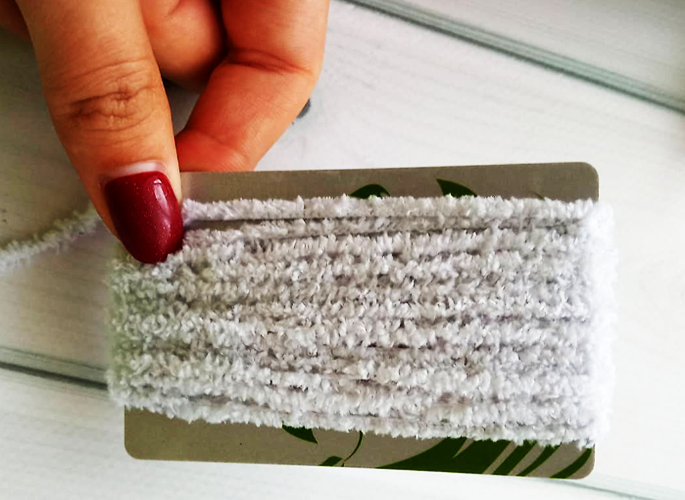
On one side the threads are cut (so they are the same length).
Next, secure each of them with knots:
- The thread is folded in half.
- The thread is crocheted under the sc in the place marked with markers.
- The loop is pulled out and both ends of the thread are pulled through it.
- The thread is pulled tight, thereby fixing it.
To add thickness to the beard, you can make a second row in the same way, securing the threads 1 row below the markers.
Next, the nose and ears are sewn on. Their placement on the toy's face should be chosen intuitively. After that, the eyebrows are embroidered with fluffy yarn.
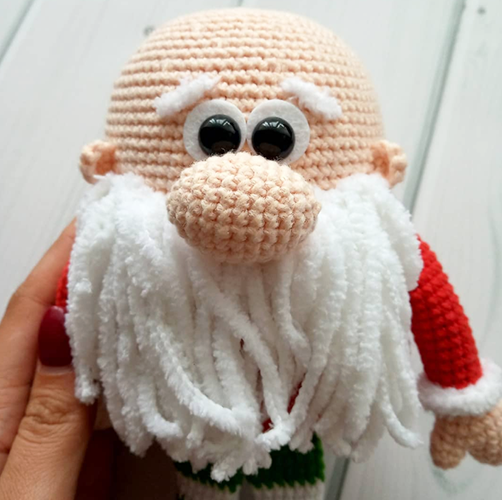
It is better to make them not much higher than the eyes, so that they are not hidden under the cap later.
Cap
The toy's hat is knitted with red yarn, starting from the bottom.
At the beginning of each row, make 3 sc for lifting and finish with 1 ss:
- Cast on 64 VP and close them into a circle using SS.
- 1 R: in each air loop knit 1 SC (64 P in total) and 1 SS.
- 2-6 R: perform 64 DC.
- 7 R: perform the rapport of 1 UB and 30 CCH twice. There should be 62 P. left.
- 8 R: knit 14 dc, make 1 ub, then make 29 dc, 1 ub and 15 dc. 60 sts remain in the work.
- 9 R: perform the rapport of 1 UB and 28 CCH twice. There should be 58 P. left.
- 10th Row: knit 13 DC, 1 UB, then 27 DC, 1 UB and 14 DC. There should be 56 sts in the row.
- 11 R: perform the rapport of 1 UB and 26 CCH twice. There should be 54 P. left.
- 12 Rows: knit 12 dc, make 1 ub, then make 25 dc, 1 ub and 13 dc. 52 sts remain in the work.
- 13 R: make a rapport of 1 UB and 24 CCH 2 times. 50 P. remain.
- 14 R: make 11 DC, 1 UB, 23 DC, 1 UB again and 12 DC. There are 48 sts left in the row.
- 15 R: knit the pattern of 1 UB and 22 CCH twice, so that 46 P remain.
- 16th Row: knit 10 DC, 1 UB, then 21 DC, 1 UB and 11 DC. There should be 44 sts in the row.
- 17 R: 2 times the rapport of 1 UB and 20 CCH. You should get 42 P.
- 18th Row: knit 9 DC, 1 UB, 19 DC and 1 UB, at the end 10 DC. 40 sts remain.
- 19 R: the rapport of 1 UB and 18 CCH is worked twice to make 38 P.
- 20 Rows: make 8 dc, 1 ub, 17 dc, 1 ub and 9 dc. There are 36 sts left in the work.
- 21 R: knit 2 times 1 UB and 16 CCH. You get a total of 34 P.
- 22 R: knit 7 dc, make 1 ub, again 15 dc, 1 ub and 8 dc. There are 32 sts left in the row.
- 23 R: 2 times make 1 UB and 14 CCH to get 30 P.
- Row 24: Work 6 dc, 1 dc, 1 dc, 1 dc and 7 dc. You should have 28 sts.
- 25 R: repeat 2 times from 1 UB and 12 CCH, so that 26 P. remain.
- 26 R: knit 5 DC, 1 UB, then 11 DC, 1 UB and 6 DC. There should be 24 P in the row.
- 27 R: make a rapport of 1 UB and 10 CCH twice. 22 P remain in the row.
- 28 Rows: knit 4 DC, make 1 UB, then make 9 DC, 1 UB and 5 DC. 20 sts remain in the work.
- 29 R: 2 times knit 1 UB and 8 CCH, so that 18 P remain.
- 30 R: make 3 dc, then 1 ub, 7 dc, 1 ub and 4 dc. Only 16 sts remain.
- 31 R: the rapport of 1 UB and 6 CCH is performed twice, 14 P remain.
- Row 32: Work 2 dc, make 1 dc, 5 dc, 1 dc and 3 dc to make 12 sts in a row.
- 33 R: knit 1 UB and 4 CCH 2 times.
- 34 R: the last row is made from 1 DC, 1 UB, 3 DC, 1 UB and 2 DC. There should be 8 P left, which are pulled together with the working thread. It is cut off, leaving a reserve for further sewing on the pompom.
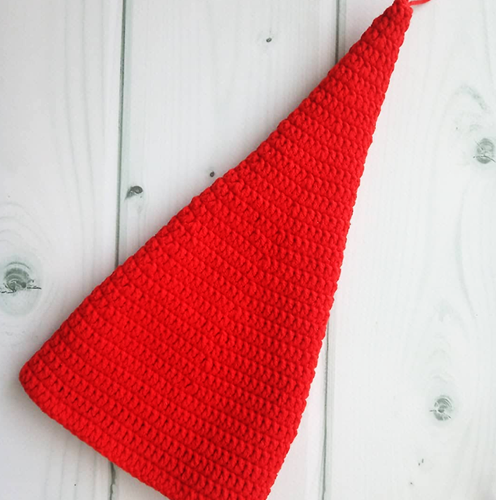
For decoration, the bottom edge of the cap is tied with fluffy yarn.
Pompon
The pompom is knitted with fluffy white threads.
Start knitting with KA:
- 1 R: make 6 sc in KA.
- 2 R: make a PR into each loop to make 12 P in a row.
- 3 R: knit the pattern 6 times with 1 SC and 1 PR. You should get a total of 18 P.
- 4 R: knit the pattern 6 times from 2 sc and 1 dc. The work results in 24 sts.
- 5 R: knit the pattern of 3 sc and 1 dc 6 times to make 30 sts.
- 6-9 R: perform 30 sc without changes.
- 10-12 R: knit in reverse order, like 4-2 R. Instead of increasing, decrease the loops. When 12 R is knitted (there should be 12 P left in total), the pompom must be stuffed with filler.
- 13 R: perform 6 UB so that there are 6 P left in total.
- The hole is pulled together with a working thread, which is cut and hidden inside.
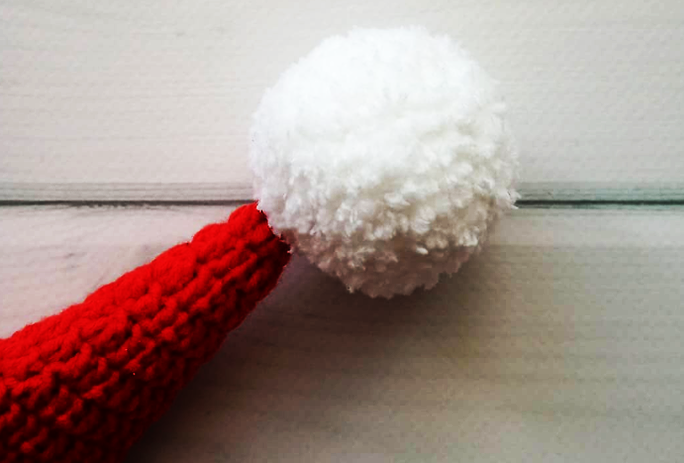
The finished pompom is sewn onto the cap.
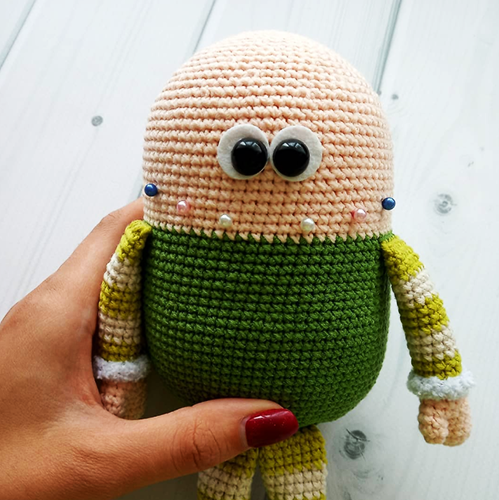
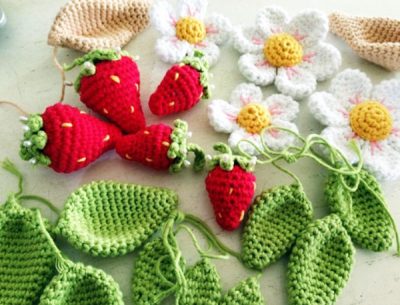
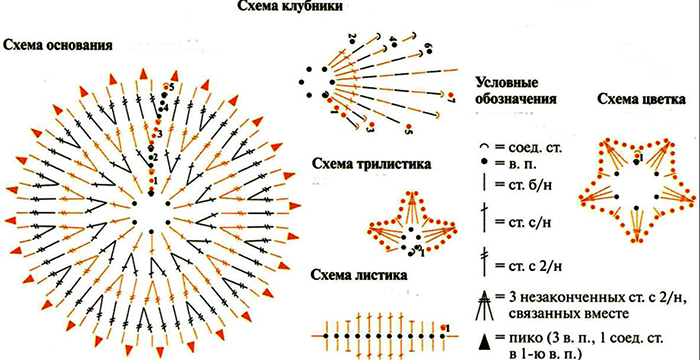
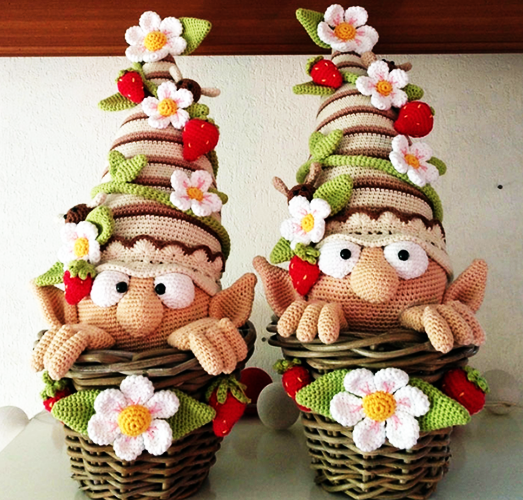
Strawberry Gnome
A crochet gnome (the diagram and description are given in the article as an example, they can be changed at your discretion) can be an element of decor in the garden or even at home on the windowsill.
| Head
| They start working with the KA, into which they first dial 6 P:
At the end, the head is stuffed with filler. |
| Body
| Knitting continues from the head, in a circle:
|
| Nose and cap | These elements can be made in the same way as the Christmas gnome, just choose the appropriate color of thread. |
| Ears
| Start knitting with KA. Make 2 identical elements.
You can leave the ears as is or decrease the loops so that they taper on both sides. |
| Cord for cap
| You can knit a lace using this pattern:
|
| Hands and fingers
| Instructions for knitting the outer fingers (4 elements in total):
For the middle fingers (2 elements), knit another 6 rows with 8 sc. Next, form the gnome's hand:
Rows 4 and 5 in 2 elements are knitted in mirror image to create a left and right hand. |
| Decor
| You can choose any decorative elements. For the "strawberry" gnome, knit strawberries, which can be replaced with cherries, flowers, stars and other elements.
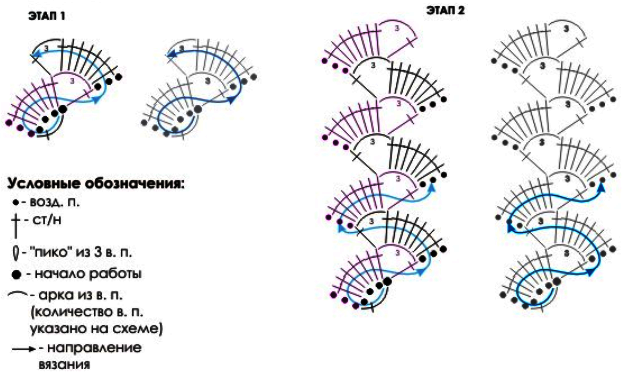
The leaves are knitted in the same way as the ears, using green yarn. The strawberry is knitted according to the pattern:
|
You can use a ready-made basket for the toy made of bamboo or branches, or you can knit it.
When all the elements of the craft are ready, they need to be assembled into a complete composition.
If the process is slow due to lack of experience, it is better not to rush, but carefully follow the Step-by-Step instructions and diagrams with descriptions, even if the making of the toy takes more than a week. To crochet a gnome, you need perseverance and patience.
Author: Alexandra Zivkovich
Video about crocheting a gnome
Master class on crocheting a Scandinavian gnome: