After long active games, it is good to occupy the child with a creative process that will contribute to his development. One of the ways is to create geometric drawings on the cells. To do this, you should prepare a sheet of paper in a cell and drawing tools.
Drawing tools
To draw, a child needs to have:
- paper of any type;
- fountain pen;
- several markers;
- pencils;
- a sample appropriate to the child's age.
If you have a printer at home, you can create graphic paper with cells of the required width. Also, in addition to squares, you can use triangles, hexagons, rectangles, circles. However, it is better to start with squares: this way it will be easier for the child to master this technique of creating drawings. Once he has learned to draw well in squares, you can move on to other shapes.
If you have a printer, you can choose not only any cell size, but also the color of the lines. If you don't have a printer, regular paper from a school notebook will come to the rescue. It will allow you to create interesting drawings and simple patterns based on the cyclical repetition of the same fragments. For example, you can easily create a chessboard pattern. All you need to do is paint every 2nd cell black.
Geometric patterns on cells to create large figures will require combining several squares. And, conversely, squares can be reduced by deliberately dividing them into components, which, in turn, can have any shape: triangular, octagonal. In this case, the pictures will become more interesting.
Triangles and hexagons are also great for creating interesting images and patterns. Children who are good at drawing different shapes can use emoticons from social networks as a template. Animals are a good idea. They may be difficult to draw at first, but soon children will get the hang of it and will be able to implement the most daring ideas on paper.
Graphic dictations can also be carried out. This creative work is especially popular in kindergartens. Educators give children a task - to create a picture without having a sample. The essence comes down to the fact that the child must follow simple instructions - color the squares: top, bottom, right or left.
The best way to draw by cells is to use ready-made schemes. This process is very similar to solving Japanese crosswords. It is enough to number the horizontal and vertical rows, so that it will be easier to determine which cells in which row should be painted and what color.
Basic methods of drawing by cells
Geometrical drawings on cells can be done in one of the following ways:
| Way | Description |
| Copying from a finished sample | The essence of copying is that the child must copy a ready-made picture made by cells. This type of exercise helps develop attention and perseverance |
| Finishing the painting I started | You can show your child not a finished picture, but only half of it. He should draw the rest himself. Such activities are good for developing spatial imagination. |
| Graphic dictation | Its essence is that the child must listen to what he is told and act according to what he heard. This technology is applicable for preparing a child's hand for the upcoming writing at school. Also, graphic dictation helps younger students learn to count. |
In graphic dictation, an adult dictates a sequence of actions to a child, each of which must be characterized by a number and direction. The number shows the length of the line and can be any.
For example, the number "1" indicates that the line should be the length of 1 cell; 2 indicates that the line should be 2 cells long. When a child performs a dictation, the numbers should not be too big so that he can easily count the number of cells. There are 4 directions of lines - up, down, left or right.
This method of drawing helps the child:
- navigate in space;
- better perceive information by ear;
- develop attention.
The one who dictates the sequence of actions should not pronounce other words. It is also unacceptable to repeat the same actions twice. It is necessary to ensure that the work is carried out in a room where the child will not be distracted by extraneous sounds. If the child makes a mistake somewhere, he should put the pencil down and wait until everything is dictated, then it will be possible to determine where exactly the mistake was made.
Master classes
Regardless of the child's age, parents and educators should remember that the young artist needs rest. The recommended time for classes for the youngest children is a quarter of an hour, and for preschoolers and first-graders - half an hour. If the child cannot cope, help him with this.
Black cat
Among the simple drawings that can be quickly created by cells is the image of a black cat on a square sheet of paper 10 cells wide and high. There should be 100 cells in total. The drawing process takes place in vertical rows.
They are numbered from left to right, with the cells in these rows counted from top to bottom:
| Row | Description |
| 1st | The entire row remains empty. |
| 2nd | The bottom 3 cells are painted black - 8th, 9th and 10th |
| 3rd | Only the bottom cell, the 10th, is painted black. |
| 4th | The 2nd, 3rd, 4th and 5th cells must be black, as well as the 4 lowest cells - 7th, 8th, 9th and 10th |
| 5th | The 3rd and 5th cells must be black, as well as the 4 bottom cells - 7th, 8th, 9th and 10th. In addition, the 4th cell must be yellow, and the 6th cell must be red. |
| 6th | The 3rd, 4th and 5th cells are painted black, as well as the 4 lower ones - the 7th, 8th, 9th and 10th. The 6th cell must be red. |
| 7th | Everything is painted the same way as in the 5th row. |
| 8th | Everything is painted the same way as in the 4th row. |
| 9th | These rows remain white. |
| 10th |
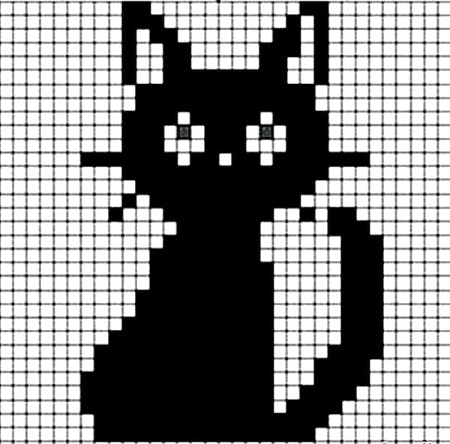
As a result of following the described steps, you get a cute black cat with yellow eyes and a red bow.
Elephant
Geometric dictation by cells can help a child draw a small elephant. To do this, you need to put a dot at one of the intersections of the lines in the upper left corner of the paper sheet. It will be the beginning of the picture. From the starting point, you need to draw lines, the length and direction of which will be determined by the cells.
You need to move the pencil or pen in the following sequence:
- To the right by 4 cells.
- Down 1 cell.
- 5 cells to the right.
- 8 cells down.
- 3 cells to the left.
- 3 cells up.
- 1 cell to the left.
- 3 cells down.
- 3 cells to the left.
- 4 cells up.
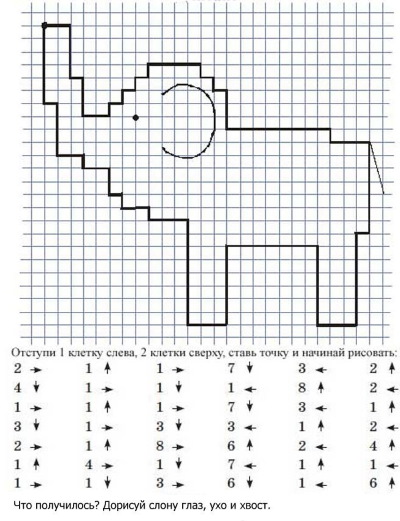
- 1 cell to the left.
- 2 cells down.
- 1 cell to the left.
- 1 cell down.
- 1 cell to the left.
- 2 cells up.
- 1 cell to the right.
- 6 cells up.
After completing this short and simple dictation correctly, you will be able to admire the resulting cute elephant.
Dog
Just as the elephant is drawn in the example above, a small dog can be depicted.
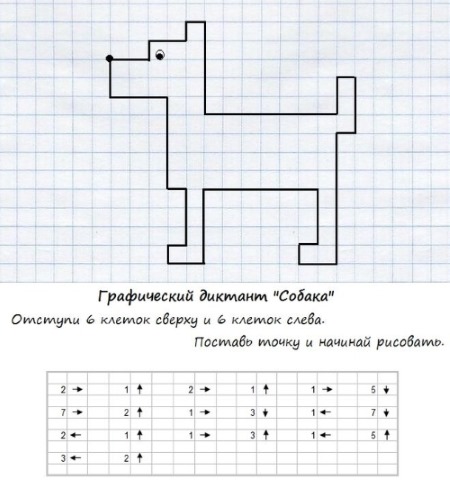
The stages of drawing are as follows:
- Draw a point at the intersection of the lines on the left side of the sheet, approximately halfway between its top and bottom edges.
- Having placed a point, which will be the starting point, begin drawing lines along the cells: 1 to the right, 3 up, 2 to the right, 1 up, 1 to the right, 3 down, 6 to the right, 1 up, 1 to the right, 1 up, 1 to the right, 2 down, 1 to the left, 4 down, 1 to the left, 2 down, 3 to the left, 1 up, 1 to the right, 1 up, 2 to the left, 1 down, 1 to the left, 1 down, 2 to the left, 1 up, 1 to the right, 2 up, 1 to the left, 1 up, 3 to the left, 1 up.
- Draw an eye for the resulting dog. It will be a dot located 2 cells to the right and 1 cell above the initial one.
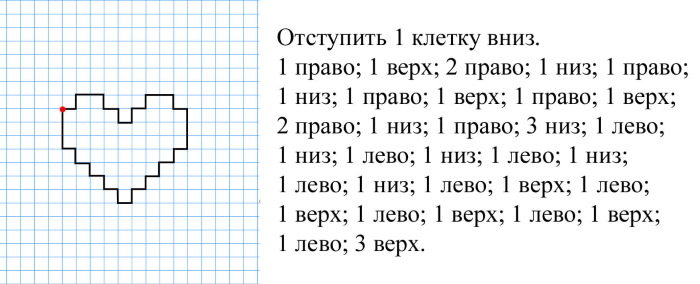
Snake
You can try drawing a snake with your child. To do this, first put a dot, and then draw lines from it along the cells. At the final stage of such drawing, it remains to add some elements that will give the reptile a little realism.
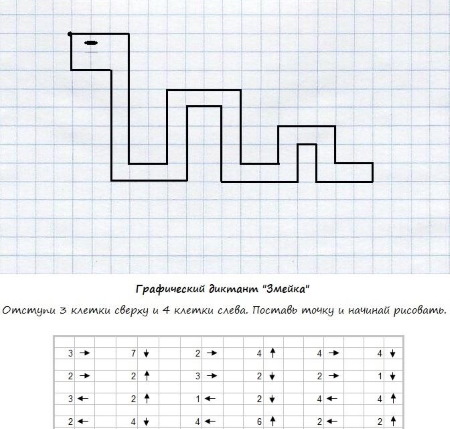
The stages of work are as follows:
- Place the starting point approximately in the upper left corner of the paper sheet. The main thing is that there are at least 3 more cells above this point.
- Proceed to draw lines in the specified directions for a certain number of cells: 2 up, 2 to the right, 8 down, 2 to the right, 4 up, 3 to the right, 4 down, 1 to the right, 3 up, 3 to the right, 3 down, 2 to the right, 1 down, 3 to the left, 3 up, 1 to the left, 3 down, 3 to the left, 4 up, 1 to the left, 4 down, 4 to the left, 7 up, 1 to the left. The last line drawn, if done correctly, will end at the point where it all began.
- Add an eye to the snake, which can be represented by a simple dot. It should be located on the head. You need to step back 1 cell to the right and 1 cell up from the starting point. Then it turns out that the snake's eye is located in the center of the head.
Blue smiley cup
Geometric grid patterns can be complex.
For example, a blue cup with eyes and a mouth could be created as follows:
- Start from a point located at the very bottom of the paper sheet, approximately halfway between its right and left edges.
- Having established the starting point, draw lines in the following order: 5 to the right, 1 up, 1 to the right, 1 up, 1 to the right, 1 up, 1 to the right, 6 up, 5 to the left, 1 up, 1 to the left, 1 up, 1 to the right, 1 up, 1 to the left, 1 down, 1 to the left, 1 down, 1 to the right, 1 down, 1 to the right, 1 down, 1 to the left, 2 down, 1 to the right, 1 down, 1 to the right, 1 down, 1 to the right, 1 down, 1 to the right, 1 down, 1 to the right, 1 down.
- Add color to the cup and decorate it with eyes and a smile.
- Paint all the outer cells of the drawing black.
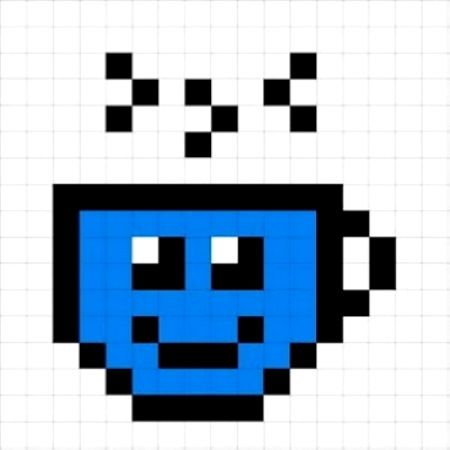
- Inside the image, approximately in the middle, draw 2 eyes, each of which is represented by a square consisting of 4 cells. 3 cells of this square should be black, and 1 - white. This will imitate the pupils.
- Place the mouth at the bottom of the cup. To depict it, you need to paint 3 cells in a horizontal row black, and then paint 2 more cells black, which are located slightly higher on both sides of this horizontal row. Make the remaining cells, enclosed in the outline of the cup, blue.
- Add a small stroke that will make the smiling cup more beautiful. Paint a few cells above the cup black. This will be the steam coming from the drink contained in the cup. It is best to step back 1 cell up from the top edge of the cup and paint 3 cells on the left and right black.
The Golden Key
To depict a key on paper, you need to mark a point in the center of the sheet in the box on the left.
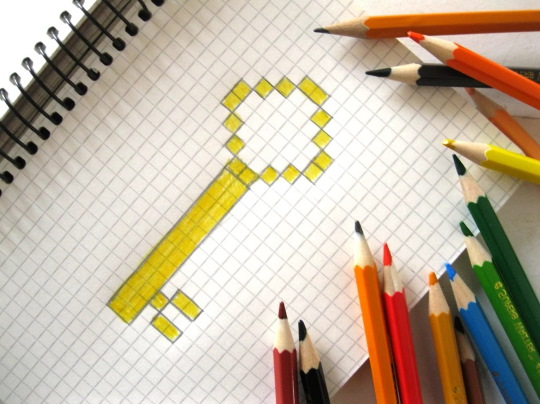
Then, draw lines from this point in the following sequence:
- 8 cells to the right.
- 2 cells up.
- 3 cells to the right.
- 5 cells down.
- 3 cells to the left.
- 2 cells up.
- 4 cells to the left.
- 3 cells down.
- 1 cell to the left.
- 1 cell up.
- 1 cell to the left.
- 1 cell down.
- 1 cell to the left.
- 3 cells up.
- 1 cell to the left.
- 1 cell up.
Bunny
A beautiful hare can be drawn on a piece of squared paper, following the following sequence:
- Count 5 cells to the right and 3 from the top, put a dot.

- From the designated point, draw 1 cell to the right, 3 down, 2 right, 2 down, 1 left, 2 down, 3 right, 3 down, 1 left, 1 up, 1 left, 2 down, 1 right, 2 down, 2 right, 1 down, 6 left, 1 up, 1 left, 1 up, 1 right, 12 up.
- Add details to the drawing.
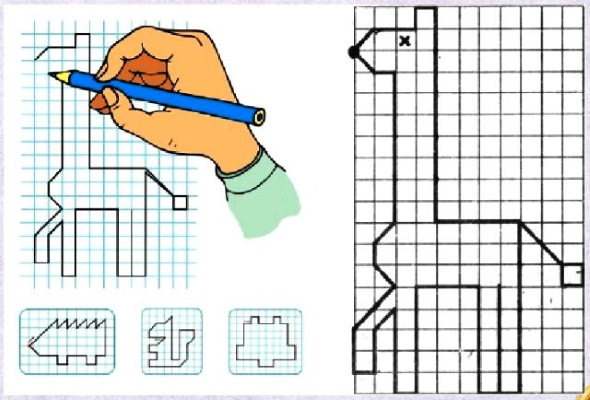
Finishing the second half of the picture
Geometric drawings on cells can be based on mirror drawing of the second half of the picture. Such an activity helps to develop the child's imagination and fantasy. For work you will need paper in a cell.
First, parents should draw multi-colored squares on the left side of the sheet. The child should look at the colored cells, remember them and make exactly the same drawing on the other half of the sheet of paper. Ideally, the young artist should observe both the color of the squares and their correct location, while for a complete drawing everything should be mirrored.
A black and white version can be used, which will give the child the opportunity to color the finished picture as they wish.
Own drawing
It is not necessary to take ready-made examples, you can come up with your own drawing, the main distinctive feature of which will be uniqueness. To do this, you should make a small sketch, and then turn it into a picture by cells.
The stages of work are as follows:
- Start drawing with contour lines, which can be done with a simple pencil.
- Start highlighting small but important details. It is necessary to note what color this or that detail of the drawing will have. It is worth thinking about which particular element of the drawing should stand out so that the image turns out bright and beautiful.
- All contour lines should be "translated" into cells. Each such line can be represented by a series of black cells - their horizontal, vertical or diagonal row.
- To give the drawing color. This work comes down to coloring certain cells enclosed between the rows that play the role of contours.
3D images
Creating 3D images by cells is a great way to spend your free time pleasantly and usefully, implementing creative skills. This method of drawing will be difficult for preschoolers, but is well suited for older children and adults. By drawing lines between cells and inside cells, you can create fancy figures of varying complexity.
Such an activity:
- promotes the development of logic and creative thinking;
- improves coordination of movements;
- increases concentration.
Geometrical ornament on cells
Geometric ornament usually consists of simple figures – squares, rectangles, circles, triangles. It is better for children to make their patterns with the help of adults. When creating any pattern, it is important to consider that it should have its own rhythm – a series of repetitions of certain elements.
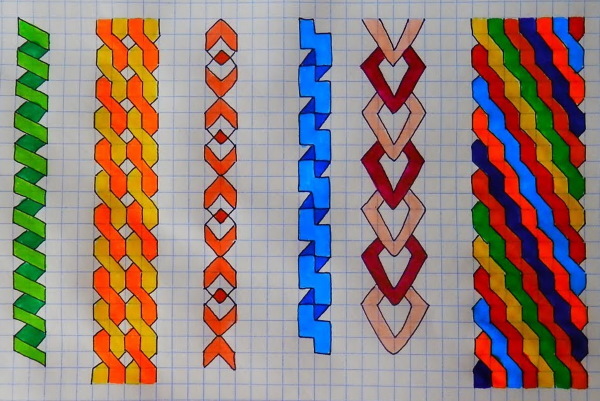
For example, it could be a triangle, which can be:
- repeat horizontally and vertically without gaps;
- line up in a column;
- alternate with a shift of 1-2 cells;
- alternate with a number of other figures.
Interesting geometric patterns can be created by combining different types of mirroring, where rows, columns or parts of combinations of shapes are reflected vertically or horizontally.
Drawing by cells is a great idea when you need to keep your child busy. It is easy to create small drawings, which will be interesting for the child. He will not only have a good time, but also benefit from it. Such a simple but interesting activity successfully combines art, geometry and mathematics, development of thinking and imagination.
Video about creating drawings
Geometric drawings by cells:
Ksyusha, hello, this is Sonya and Lisa, our house is Tolbukhina 2-A, our region is Lugansk, Ukraine. Come to Tolbukhina 2-A.
Ksyusha vazmi saboy sketch book at Tulukhinu 2-A. Lugansk region. Lisa and Sonya