Foil balloon in the form of fairy tale characters, numbers and letters Suitable as a children's toy. At the same time, such a product is not very expensive. The main advantage of foil structures is their repeated inflation, without losing their original properties. Below you can find out how to properly deflate a foil product with your own hands.
Features of foil balloons and working with them
Foil and latex are two completely different materials, therefore they will be differ from each other in appearance, design and the peculiarities of interaction with them:
- The foil structure has no pores, so the balloons will not deflate. At the same time, they do not need to be treated with high float.
- The balloons have a valve that firmly holds the air inside.
- Foil products will not stretch. If a change in temperature is expected, it is recommended to inflate them incompletely, leaving a small space for the air to expand.

It is much easier to deflate a foil balloon with your own hands than latex products. The main task of an aerodesigner is to carefully tie a fragile foil structure without deformation. With full awareness and strict compliance with the instructions, foil products will last more than 7 days. Sometimes the storage period can reach 30 days.
How to properly inflate a foil balloon
When inflating foil balloons yourself, it is not recommended to use alkali, vinegar or other chemicals to obtain gas. Under their influence, the seam of the product may come apart, and the material will deform, dissolve, and lose its brightness and shape. In this regard, it is recommended to inflate the structure using helium or air.
However, helium inflation is an expensive option, but the most effective, since the gas is lighter than air and allows foil structures to fly. It is advisable to entrust this process to more experienced aerodesigners, but it is acceptable to do it yourself, using an adapter with a helium cylinder.
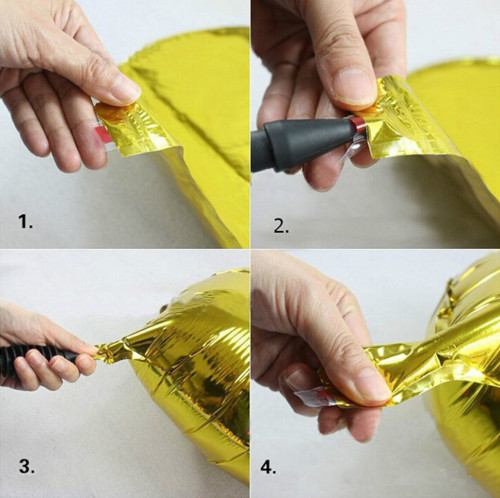
Step-by-step instructions for inflation:
- Fix the adapter on the cylinder and insert the other end into the ball.
- Straighten the figure so that helium penetrates evenly and freely into the structure.
- It is recommended to initially inflate the product with air using a tube so that the valve can open smoothly. Otherwise, it may become deformed due to the sudden flow of gas.
- Inflate the structure until it takes the appropriate shape.
- Close the valve and tie a ponytail.
Despite the fact that foil products are very strong, they can be blown too much. As a result, the material will tear or the seam will come apart.
If the party is held outdoors during a hot period of time, it is advisable not to inflate the products too much. Under the influence of heat, the gas will begin to expand, and the structure will take the required shape.
Inflating balloons with helium is not quite suitable for a small celebration, since the cylinder is quite expensive and it is not worth buying it for several items. However, it can be rented from a company that provides such services.
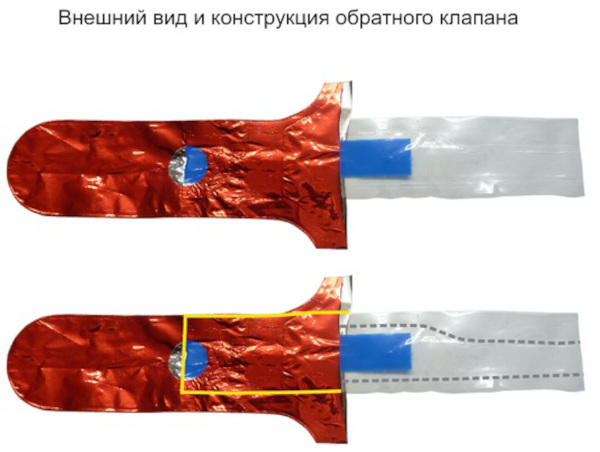
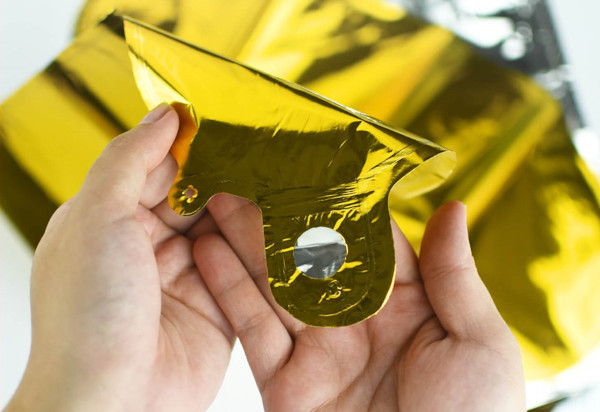
Foil Balloon Check Valve
It is possible to deflate a foil balloon with your own hands using a check valve consisting of 2 transparent polyethylene strips that are soldered together along the entire length of the edges. On one of the strips, part of the length is stronger due to a sealed polyethylene piece of a bluish tint.
The beginning of the valve, shown by the yellowish line, should be sealed into the neck of the structure. The welded line of polyethylene strips is shown as a greyish dotted line.
The valve is a tube that is more rigid inside the neck and softer inside the product cylinder. The rigid part is reinforced with a bluish strip and is intended for contact with the reducer nozzles or adapters. The softer part of the valve tube, presented in the form of petals, is required to close the gas inside the product.
When helium is pumped into the product, the tube begins to open, allowing the gas to freely penetrate the structure. When the decoration is inflated, the soft part of the valve tube will begin to contract under the pressure of the gas hidden inside the product. As a result, the closed petals will not allow the gas to escape from the product.
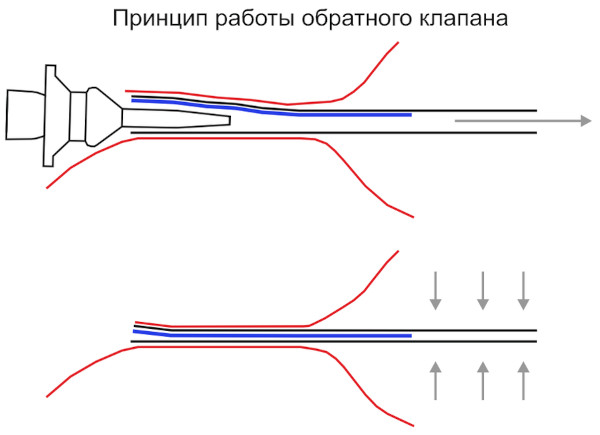
In order for the gas to be reliably locked inside the foil product, the petals must be very long. For example, if the gas pressure inside the structure begins to drop as the temperature drops, the force compressing the valve petals will begin to increase, with possible gas leakage from the product.
When helium leaves the structure, it begins to reduce the pressure inside the product, and as a result, the check valve begins to open more. A lot of gas must escape to quickly leave the balloon.
Easy tying of an inflated foil balloon
The check valve fixed in the neck of the structure holds the gas very reliably. In this regard, the tape is fixed to the inflated product so that it does not fly away. However, if the tape is tied slightly above the inlet, the strength of the check valve will be compromised and the product will begin to deflate within a short period of time. The tape must be fixed below the entrance hole.
If the air temperature starts to decrease, the pressure inside the foil structure can drop significantly. As a result, the check valve will start to leak gas. At the same time, the protruding neck of the ball does not look very impressive. To securely close the structure and hide the neck of the product, it is recommended to use a professional tying method.
Professional balloon tying
It will be quite difficult to deflate a foil balloon with your own hands if you tie it using a professional method that involves double fixing the ends of the ribbon.
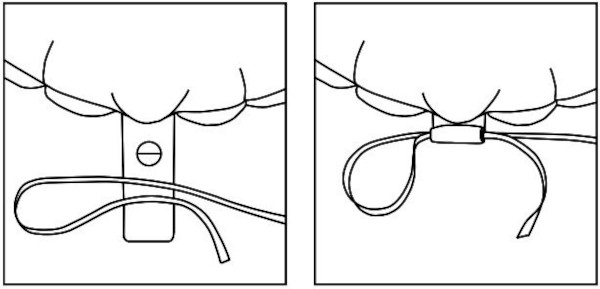
Instructions for tying foil jewelry:
- Fold one end of the ribbon into a loop.
- Roll the neck of the product into a strong roll around the loop.
- Fold the roller into a V shape, holding it in place with one hand.
- With your other free hand, pass the free edge through the loop and pull it tight to form the first knot.
- Using both hands, tie the ends of the ribbon together to form a second knot that will prevent the first from coming undone.
Sealing inflated foil balloons
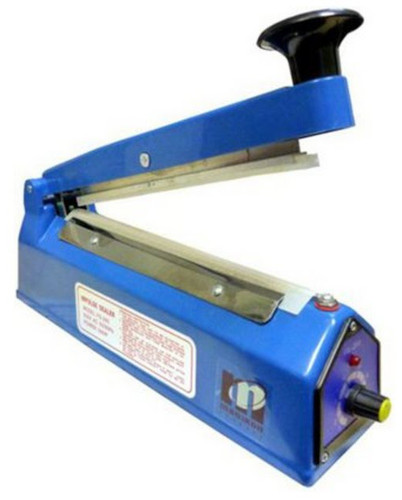
A foil balloon must be sealed so that it does not deflate after inflating. For this, you can use a special sealer. However, if you do not have one, you can seal the structure yourself using a regular iron, which must be heated to a high temperature.
You cannot solder the structure directly, as the material may melt, tear, or create unsightly folds. It is recommended to make a gasket between the hot metal and the foil, a thin napkin will do. The product should be soldered in several places, leaving a small distance between them.
When sealing an inflated foil balloon There are several things to consider:
- Before sealing, make sure there are no folds or air in the neck;
- the product must be sealed twice, maintaining a distance of 1 cm between the solders;
- The protruding part of the structure through which inflation occurs must be applied to the sealer;
- It is necessary to test what temperature mode to set and how long to keep the hot tool for different products (the time will be different depending on the material).
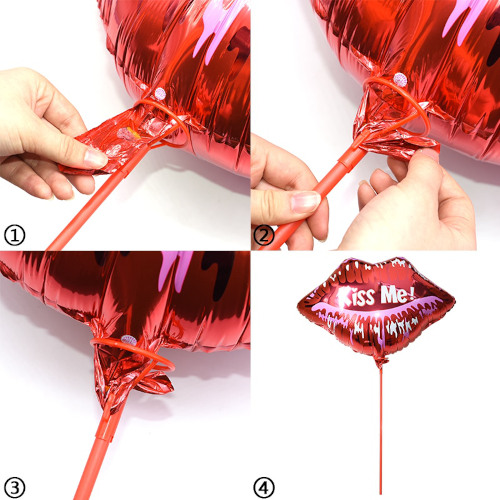
How to attach a ball to a stick
A thin plastic stick acts as a handle for the foil product. It can also be used instead of a cocktail straw to inflate the structure.
Correct attachment of the ball to the stick:
- Inflate the structure in any way.
- Insert the stick into the product.
- Tie the tail tightly at the highest point, near the base of the ball, using tape.
If the structure is not sealed, it will not deflate for several weeks. Then the balloon can be inflated again.
For tying, it is advisable to use a thick ribbon, the width of which will be within 1.5 cm. The tail should be wrapped with tape in several layers so that the winding is dense and strong. As a result, the gas will not escape from the structure.
How to deflate a foil balloon
Small structures are often filled with air. Larger ones use helium, as well as an internal valve so that they can be reused. However, for these purposes they need to be properly deflated.
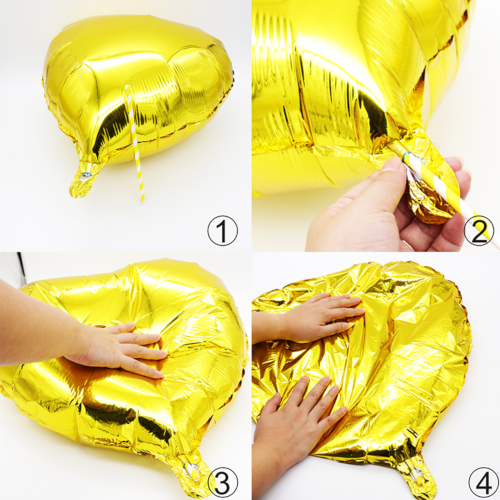
You can deflate a foil balloon with your own hands using a cocktail tube, following these steps:
- Carefully insert the tube into the valve structure.
- Slowly push the tool into the product. The valve with the walls must not be deformed, otherwise the product cannot be used again.
- Release the gas from the balloon by lightly pressing on the structure.
- If the helium does not escape, it is permissible to use a vacuum cleaner to remove the remaining gas.
After deflating, the product should be flat, resembling a sheet of paper.
Storing foil balloons
After deflating, the foil balloon must be stored correctly. To do this, it must not be folded, otherwise there will be tears or cracks at the folds. The products should be separated from each other using soft paper sheets, since when the temperature rises, they can stick together. As a result, deformation will occur.
It is recommended to store foil structures horizontally in an unfolded state. In this case, the air temperature should not be very high.
Re-inflating foil balloons
Foil balloons can be re-inflated using air and a straw. However, this design will not float to the ceiling.
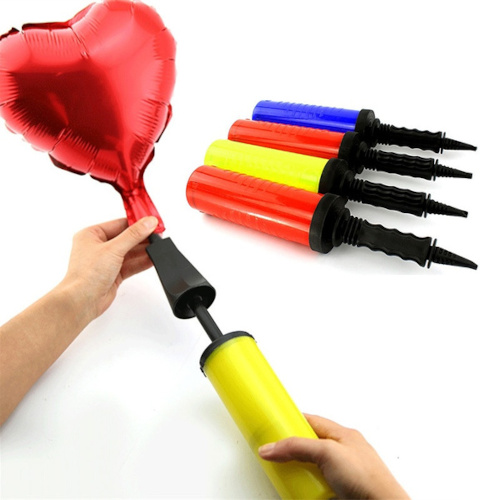
There are 2 ways to inflate foil products:
| Option | Peculiarities |
| Using a ballpoint pen or a cocktail straw | The rod must be removed from the handle, since only the main part is needed. The tool should be inserted into the valve and the product should be slowly inflated. If you blow too hard, the valve will be deformed. If the air does not penetrate well, the handle can be moved a little further into the structure. |
| By pump | The product should not be blown to the limit, so there should be folds on the sides. After inflation, the valve should be clamped and closed. If desired, helium can be used instead of air. |
If you inflate a foil balloon correctly, it will retain its shape for several weeks. When all the air has gone down, you don’t have to throw the product away, as it can be re-inflated, giving the balloon a second life so that it can decorate a festive occasion. However, to do this, you should deflate it correctly with your own hands and store it without losing its properties.
Video about foil balloons
How to properly inflate foil balloons: