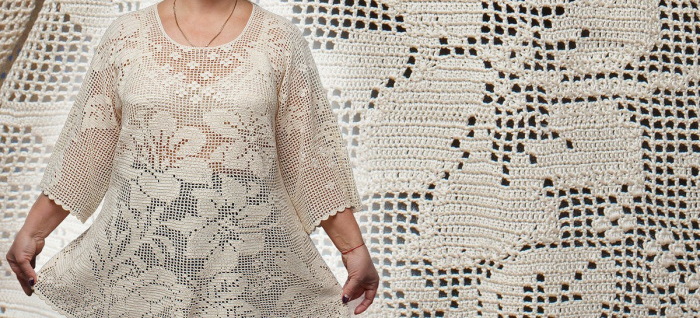
Knitting filet lace with a crochet hook is in great demand among fans and true connoisseurs of openwork products. Knitted items are considered unique and look quite impressive. Further in the article you can see various patterns and models for beginners.
Necessary tools and materials
The quality and thickness of the threads for creating fillet pattern items will depend on the functional purpose of the item. If you need to knit a warm jacket, sweater, potholder, thick bedspread or carpet, it is recommended to use medium-thickness yarn made of wool, semi-wool or mixed thread material.
To decorate a thin fabric with a crochet hook, it is permissible to use yarn from:
- viscose;
- cotton material;
- silks.
For knitting summer items such as a T-shirt, dress, blouse, iris or garus are mainly used, for curtains, tablecloths and napkins - crochet. For work, you can use any shade of thread. At the same time, this technique makes it possible to combine various shades with flowers, as well as knit individual parts with yarn of different colors.
The pattern for knitting filet lace requires selecting a hook relative to the thickness of the yarn. Mostly, a tool of 0.2, 0.5, 0.8 and 1 mm in size is used. For work, you can use a plastic, aluminum, metal or combined hook.
Features of the tool material:
| Hook material | Characteristic |
| Aluminum | An aluminum hook is inexpensive, lightweight, and will not statically charge the threads. However, it can bend. |
| Combined | The combination tool is convenient, not too expensive, but is not always practical. |
| Plastic | It is a budget option, and at the same time, such a tool is quite light and comfortable to hold in your hand. However, it can electrify threads and is mostly large in size. |
| Steel | This hook has a long service life and is comfortable to hold in your hand. However, the tool is very expensive. |
To choose a tool, it is recommended to pay attention to the yarn label. If there is no label, the hook should be selected based on the structure of the threads.
In this case, you need to place the yarn in the sinuses of the tool and pull:
- if the thread completely covers the hook, the item will be dense;
- if the yarn is completely located in the hollow and leaves a little space, the item will be loose;
- If the thread completely covers the notch, the product will be perfect.
The hook can be selected depending on the footage.
If the thread pile is thin, you need to take a thin tool:
- 0.6-1.75 mm – you need thin cotton yarn;
- 2-3.5 mm – medium thickness threads are required;
- 4-5 mm – the yarn should be double twisted and of medium thickness;
- 5-6 mm – fluffy yarn is required;
- 7-8 mm – thick woolen threads are needed;
- more than 9 mm – twisted thick yarn will do.
Schemes with description of works for beginners
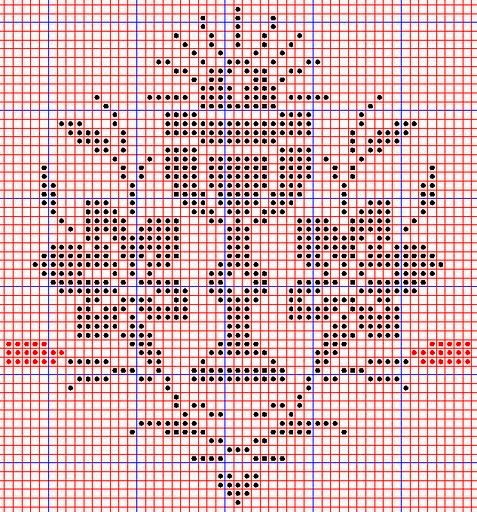
Fillet crochet lace (the patterns are quite simple and do not require the preparation of a large number of tools) is considered a relatively simple knitting technique, which is based on knitting a grid formed by double crochets and alternating empty grid cells with filled ones.
As a result, it is possible to create a variety of designs with which you can decorate any product:
- kerchief, scarf;
- sweater, blouse, dress;
- a pillowcase intended for a sofa cushion;
- bedspread, cape, napkin;
- bed linen, stitching for a towel;
- curtains, tablecloth.
It is possible to create the simplest fillet designs using geometric shapes. However, it is also possible to create more complex designs using curls, plant motifs and entire paintings.
It is permissible to crochet fabrics created using the fillet technique in various shapes such as:
- square;
- circle;
- polygon;
- oval;
- rectangle;
- rhombus;
- hearts;
- trapezoids.
The air loop with the double crochet are considered the main elements of the fillet technique.
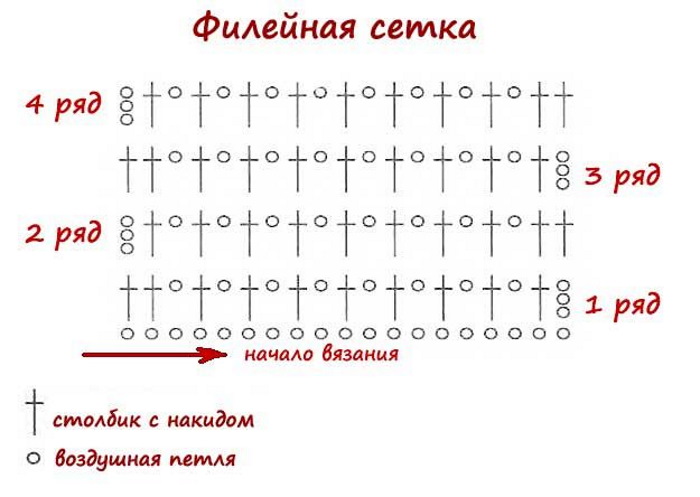
Fillet mesh
The mesh is the base of the fillet technique, from which any classic fabric will begin, such as socks with a lace pattern, a T-shirt, a tablecloth or a napkin. All loops will be airy.
Method of registration:
- To create a chain, knit an even number of loops.
- To lift, make 3 elements.
- From the rise in the opposite direction, knit into a new hole, make a yarn over column and an element, continuing to work to the end of the chain.
- In the new row, make 3 lifting elements. Above each hole in the bottom row, make a similar one: above the yarn over column - a similar column, above the air element - a similar number of corresponding holes.
Traditional grid
Crochet filet lace (diagrams and description works will help novice needlewomen to create any product) can have a rare placement of partitions made from columns with a yarn.
At the same time, this knitting technique is traditional, with the help of which it is permissible to give the fabric a free lace texture. This method of filet mesh is allowed to be used to decorate a tablecloth, dress or top.
Method of registration:
- Create a chain of the required number of air elements.
- Make 3 lifting air holes and 2 arch elements in the new chain.
- Continue alternating 1 yarn over and 2 holes until the end of the chain.
- In a new row, make a similar one over each chain, and make 1 double crochet over the double crochet.
When completed, the product will look like numerous cells placed one above the other.
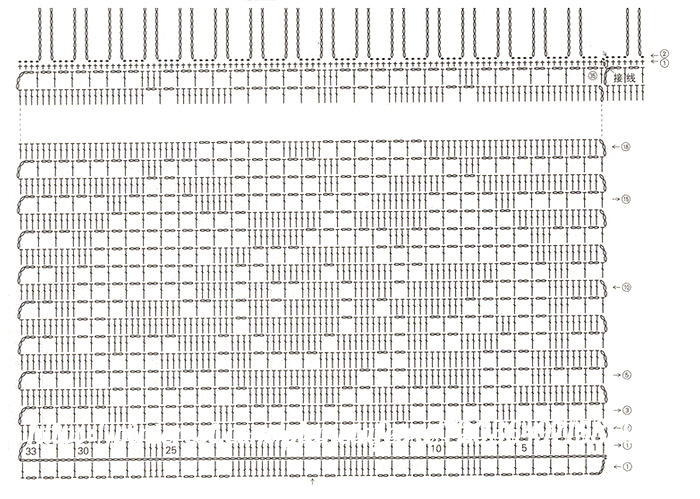
Figured mesh
Crochet filet lace (the patterns will tell you how to knit the figured pattern correctly) allows you to create a figured mesh, the cell of which will have inclined arches. Despite the fact that this knitting technique is more complicated than the traditional one, the thing will look beautiful.
Step by step description:
- Create a chain of air holes.
- Make 3 lifting elements, 3 holes again and a yarn over post. Repeat the indicated sequence to the end of the chain.
- In the new row, create 3 air elements of lifting and 5 air holes between the column with a yarn in the previous row.
The number of elements in the initial chain for a certain fabric may be different than indicated in the diagram. To solve the problem, it is recommended to initially make a sample from the selected thread material, calculating the loops. As a result, the number of elements in the chain should be divisible by 3. In this case, there should be one initial hole for 1 double crochet.
Tablecloth
It is possible to crochet a large festive tablecloth using the fillet technique, which can be used to cover a table. In this case, all the loops will be airy.
Step by step description:
- Create a chain of 8 elements, closing it into a ring with a connecting column.
- In the 1st row, make 4 lifting holes and 4 unfinished columns with 2 yarns, knitted together with the 4th lifting element, into a formed ring. Knit 6 elements. From the beginning to the end, make a sequence of 5 unfinished columns with 2 yarns, which are knitted together, close in a circle and 6 holes. There should be 4 cells, 6 in total. Finish the row with a connecting column.
- In the 2nd row there should be 5 elements and a yarn over column threaded through 1 lifting hole. Skip 7 yarn over columns into the arch of 6 elements of the previous row. Perform the sequence: thread 2 yarn over columns into the following columns with 2 yarn overs of the previous row, there should be an arch of 2 elements between the yarn over column, skip 7 double crochets into the next arch of 6 holes of the previous row. There should be 4 cells, there should be 6 in total. Finish the row with a connecting column.
- In the 3rd row, make 4 elements, skip 4 columns with 4 yarns into the arch of 2 holes of the previous row. Knit 2 elements, pass a column with 2 yarns into the 4th yarn column of the previous row. Make 3 elements and pass a yarn column into the 2nd yarn column of the previous chain. Make 2 holes.
- Repeat the sequence of 4 cells: 5 columns with 2 yarns pass into the next arch of 2 elements of the previous chain, 2 elements, a column with 2 yarns pass into the 4 yarn column of the previous chain, 3 elements, a yarn column pass into the 2 yarn column of the previous row and 2 elements. There should be 6 cells in total. Finish the row with a connecting column.
- Make the remaining 35 rows in the same way. Finish each chain with a connecting column.
Angel toy
To crochet an angel using the fillet technique, it is recommended to use cotton yarn and a hook No. 0.9. Additionally, you will need synthetic padding with a shape and a satin ribbon. As a result, the toy will be 11 cm high.
The product consists of a head, body and skirt. Each part of the toy should be knitted in turn with air elements. At the end of the work, the product is decorated.
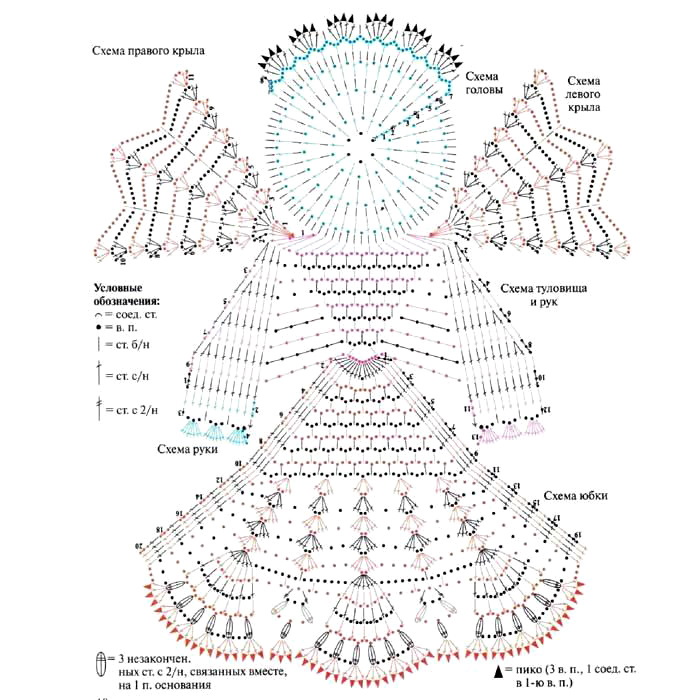
Knitting pattern for the head:
- Use a crochet hook to create a chain of 5 elements, closing it into a ring with a connecting column.
- 1 row consists of 1 hole, 7 threaded through the ring without yarn over columns and a connecting column.
- In the 2nd row, 1 element and 11 without yarn over columns skip into the without yarn over column of the previous chain. At the end, a connecting column.
- In the 3rd row, knit 1 element and 15 without yarn over columns, knitting them into the without yarn over column of the previous chain. In total, there should be 16 without yarn over columns. Finish the chain with a connecting column.
- Continue knitting the head according to the given pattern up to row 12, without cutting the yarn. Fill the blank with padding polyester, tightening the remaining loops.
Knitting pattern for the body:
- Cast on 8 elements, joining them into a ring using a connecting column.
- In the 1st row there is 1 element and 8 without yarn over columns, threaded into the ring. Finish the chain with a connecting column.
- In the 2nd row, knit 3 holes and insert a yarn over column into 1 lifting element of the previous row. Insert 2 yarn over columns into the next yarn over column of the previous row. In total, there should be 18 yarn over columns. Finish the row with a connecting column.
- Do the same manipulations for row 6.
Knitting pattern for a skirt:
- To make a chain, make 8 elements, closing them into a ring with a connecting column.
- Join new yarn and continue working, skipping the wings in row 1, joining the front and back of the bodice with a slip stitch.
- Continue the sequence to row 9. Cut the thread.
Assembling the toy:
- Sew a satin ribbon to the 9th row from the wrong side and a loop of several air elements to the crown.
- Starch the angel and fix it on the form.
Decorative bag
Crochet filet lace (work patterns will allow you to knit any model) is suitable for creating a decorative bag, the size of which will be 11x15 cm. For knitting, it is advisable to use cotton threads and a hook No. 0.9. Make the loops airy.
Detailed instructions:
- Using a hook, make a chain of 67 elements.
- In the 1st row, thread 1 yarn over column into the 7th hole. Knit 1 element and pass the yarn over column into the 2nd hole. Repeat this sequence to get 29 cells. There should be 31 cells in total. Finish the row with a yarn over column.
- In the 2nd row make 4 elements. From the beginning to the end repeat the sequence of 1 yarn over column, knitted into the yarn over column of the previous row, and 1 element. You should get 29 cells, 31 in total. Finish the row with a yarn over column.
- Up to and including row 13, knit according to the pattern with straight and reverse loops.
- In row 14, make a yarn over column in the round, 3 elements, and also skip 187 yarn over columns into the yarn over column and the hole of the previous row. Finish the row with a slip stitch.
- In row 15, divide all the double crochets into 4 segments so that the front and back parts have 63 double crochets each, and the sides have 31 double crochets each.
- Rows 16-36 are knitted in the round according to the pattern. Each row is finished with a slip stitch.
Once knitting is complete, you can begin assembling the product. The bag should be carefully starched and fixed on the form, leaving it in this form until it dries completely.
Secrets for Beginners
Despite the fact that filet knitting seems simple on the surface, there are some secrets that will allow you to easily create an imitation of a lace product.
Tips for Beginners:
- During the knitting process, the edges of the product may be uneven due to deformation of the columns or uneven length of the outer elements. To solve the problem, it is recommended to knit the edges of the product with single crochets.
- If there are 3 chain stitches at the base of the cell, it is recommended to knit 3 connecting columns along the chain to the new cell at the beginning of the line. At the end of the row, you do not need to knit one cell. The new row should be started from the penultimate hole.
- If the first cell in the pattern is empty, 2 air loops must be additionally knitted by inserting the tool into the third element. If the cell is initially filled, the double crochet must be performed in the 5th hole. For correct and easy mastering of the pattern, you must always look at the previous row: if in the lower area of the arch, there will always be a full cell at the top and vice versa.
- If the edge of the fabric is scalloped, you need to start working from the first through row, and it is recommended to immediately use additional yarn, which will be needed immediately or later to design the scallops. The main work must be done in the opposite direction. If the edge of the fabric is even, the row must be made up of air elements, knitting from one thread and in one direction.
- If the work's ornament allows dividing the product into meaningful parts, they can be created separately, connecting them in the process of knitting or sewing. The main thing is that the joining area does not spoil the pattern, because the place of connection will be visible on a certain part of the ornament.
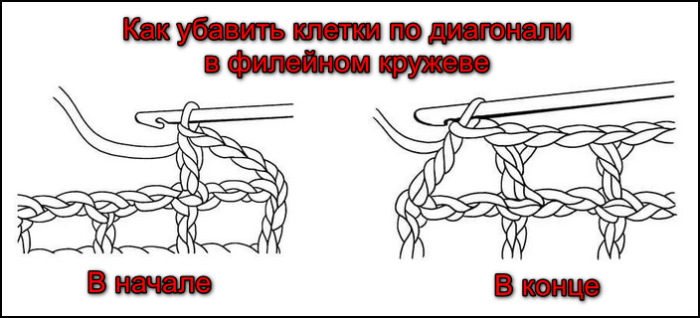
- With the help of filet knitting it is possible to create any model of clothing. For example, parts of a summer T-shirt will not have a rectangular shape. In this case it is advisable to perform decreases so that the thing looks normal on a person. Decreases are carried out by canceling the whole cell.
- In order for the item to hold its shape, it is permissible to knit the fabric in single crochets in a circle. In this case, 1 single crochet should be knitted in each opening of the base, 5 columns should be made on the sides for every second row of the fillet mesh. In the corners, 3 columns should be knitted in one element of the base.
- To increase the size of the product, it is necessary to make an increase along the edges. Increases can be made in one or several cells, depending on the requirements for the shape of the canvas.
Crocheting filet lace is a versatile technique used to decorate various items, as well as clothing. Using this technique with simple patterns and descriptions, beginners and experienced craftsmen can create unusual clothing models for adults and children, as well as wedding dresses.
Video on how to knit filet lace
Simple ribbon lace.